2016.5 VAUXHALL ZAFIRA TOURER wheel
[x] Cancel search: wheelPage 225 of 307

Vehicle care223Vehicle careGeneral Information...................224
Accessories and vehicle modifications .......................... 224
Vehicle storage ........................224
End-of-life vehicle recovery .....224
Vehicle checks ........................... 225
Performing work ......................225
Bonnet ..................................... 225
Engine oil ................................. 226
Engine coolant ......................... 227
Power steering fluid .................228
Washer fluid ............................ 229
Brakes ..................................... 229
Brake fluid ............................... 229
Vehicle battery ......................... 229
Diesel fuel system bleeding .....231
Wiper blade replacement ........231
Bulb replacement .......................232
Halogen headlights ..................232
Adaptive forward lighting .........234
Fog lights ................................. 235
Tail lights ................................. 236
Side turn signal lights ..............238
Number plate light ...................239Interior lights ............................ 239
Instrument panel illumination ...240
Electrical system ........................240
Fuses ....................................... 240
Engine compartment fuse box . 241
Instrument panel fuse box .......243
Load compartment fuse box ....244
Vehicle tools .............................. 246
Tools ........................................ 246
Wheels and tyres .......................247
Winter tyres ............................. 247
Tyre designations ....................247
Tyre pressure .......................... 247
Tyre pressure monitoring system .................................... 248
Tread depth ............................. 251
Changing tyre and wheel size . 252
Wheel covers ........................... 252
Tyre chains .............................. 253
Tyre repair kit .......................... 253
Wheel changing .......................256
Spare wheel ............................ 258
Jump starting ............................. 262
Towing ....................................... 263
Towing the vehicle ...................263
Towing another vehicle ...........264Appearance care .......................265
Exterior care ............................ 265
Interior care ............................. 267
Page 246 of 307

244Vehicle care
In right-hand drive vehicles, the fuse
box is located behind a cover in the
glovebox. Open the glovebox, then
open the cover and fold it down.
No.Circuit1Cruise control/Speed limiter/
Adaptive cruise control/Steering wheel controls2Exterior lights/Body control
module3Exterior lights/Body control
module4Infotainment system5Infotainment system/Instrument6Power outlet/Cigarette lighter7Power outlet8Left low beam/Body control
module9Right low beam/Body control
module/Airbag module10Door locks/Body control module11Interior fan12–13–14Diagnostic connectorNo.Circuit15Airbag16Power outlet17Air conditioning system18Logistics19Body control module20Body control module21Instrument panel cluster/Anti-
theft alarm system22Ignition sensor23Body control module24Body control module25–26–
Load compartment fuse box
The fuse box is on the left side of the
load compartment behind a cover.
Page 248 of 307

246Vehicle careNo.Circuit16Interior mirror/Rear view
camera17Power outlet18–19Steering wheel heating20Sunblind21Heated front seats22–23–24Selective catalytic reduction
system25–26–27–28–29–30–No.Circuit31–32Active damping system/Lane
departure warningVehicle tools
Tools
Some tools, the towing eye and (only on vehicles with spare wheel) the
vehicle jacking equipment are placed
in the rear storage in the load
compartment floor.
Open the cover in front of the tailgate.
Page 249 of 307

Vehicle care247Wheels and tyres
Tyre condition, wheel condition
Drive over edges slowly and at right
angles if possible. Driving over sharp
edges can cause tyre and wheel
damage. Do not trap tyres on the kerb when parking.
Regularly check the wheels for
damage. Seek the assistance of a
workshop in the event of damage or
unusual wear.
Winter tyres
Winter tyres improve driving safety at temperatures below 7 °C and should
therefore be fitted on all wheels.
In accordance with country-specific
regulations, affix the speed sticker in
the driver's field of view.
Tyre designations
E.g. 215/60 R 16 95 H215:tyre width, mm60:cross-section ratio (tyre height
to tyre width), %R:belt type: RadialRF:type: RunFlat16:wheel diameter, inches95:load index e.g. 95 is equivalent
to 690 kgH:speed code letter
Speed code letter:
Q:up to 100 mphS:up to 112 mphT:up to 118 mphH:up to 130 mphV:up to 150 mphW:up to 168 mph
Choose a tyre appropriate for the
maximum speed of your vehicle.
The maximum speed is achievable at kerb weight with driver (75 kg) plus125 kg payload. Optional equipment
could reduce the maximum speed of
the vehicle.
Performance 3 281.
Directional tyres
Fit directional tyres such that they roll in the direction of travel. The rolling
direction is indicated by a symbol
(e.g. an arrow) on the sidewall.
Tyre pressure
Check the pressure of cold tyres at
least every 14 days and before any
long journey. Do not forget the spare
wheel. This also applies to vehicles
with tyre pressure monitoring system.
Unscrew the valve cap.
Tyre pressure 3 288.
The tyre pressure information label
on the front left or right door frame
indicates the original equipment tyres
and the correspondent tyre
pressures.
Page 251 of 307
Vehicle care249Caution
Tyre pressure monitoring system
warns only about low tyre pressure condition and does not replace
regular tyre maintenance by the
driver.
All wheels must be equipped with pressure sensors and the tyres must
have the prescribed pressure.
Notice
In countries where the tyre pressure
monitoring system is legally
required, the use of wheels without
pressure sensors will invalidate the
vehicle type approval.
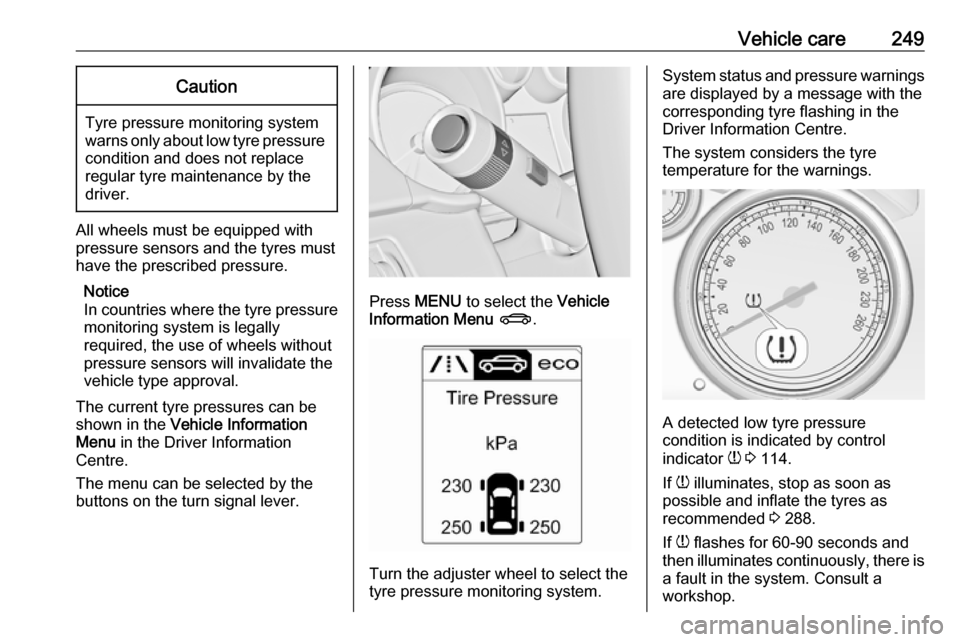
The current tyre pressures can be
shown in the Vehicle Information
Menu in the Driver Information
Centre.
The menu can be selected by the buttons on the turn signal lever.
Press MENU to select the Vehicle
Information Menu X .
Turn the adjuster wheel to select the
tyre pressure monitoring system.
System status and pressure warnings
are displayed by a message with the
corresponding tyre flashing in the
Driver Information Centre.
The system considers the tyre
temperature for the warnings.
A detected low tyre pressure
condition is indicated by control
indicator w 3 114.
If w illuminates, stop as soon as
possible and inflate the tyres as
recommended 3 288.
If w flashes for 60-90 seconds and
then illuminates continuously, there is
a fault in the system. Consult a
workshop.
Page 252 of 307

250Vehicle careAfter inflating, some driving may be
required to update the tyre pressure
values in the Driver Information
Centre. During this time w may
illuminate.
If w illuminates at lower temperatures
and extinguishes after some driving,
this could be an indicator for
approaching a low tyre pressure
condition. Check tyre pressure.
Vehicle messages 3 122.
If the tyre pressure must be reduced
or increased, switch off ignition.
Only mount wheels with pressure
sensors, otherwise the tyre pressure
will not be displayed and w
illuminates continuously.
A temporary spare wheel is not
equipped with pressure sensors. The
tyre pressure monitoring system is
not operational for these wheels.
Control indicator w illuminates. For
the further three wheels the system remains operational.
The use of commercially available
liquid tyre repair kits can impair the
function of the system. Factory-
approved repair kits can be used.Operating electronic devices or being
close to facilities using similar wave
frequencies could disrupt the tyre
pressure monitoring system.
Each time the tyres are replaced, tyre pressure monitoring system sensors
must be dismounted and serviced.
For the screwed sensor: replace
valve core and sealing ring. For
clipped sensor: replace complete
valve stem.
Vehicle loading status Adjust tyre pressure to load condition
according to the tyre information label or tyre pressure chart 3 288, and
select the appropriate setting in the Tyre load menu in the Driver
Information Centre 3 116. This
setting is the reference for the tyre
pressure warnings.
The menu Tyre Load only appears if
the vehicle is at a standstill and the
parking brake is applied. On vehicles
with automatic transmission the
selector lever must be in position P.
Select:
● Light for comfort pressure up to
3 people.
● Eco for Eco pressure up to
3 people.
● Max for full load.
Tyre pressure sensor matching process
Each tyre pressure sensor has a
unique identification code. The
identification code must be matched
to a new wheel position after rotating
the wheels or exchanging the
complete wheel set and if one or more tyre pressure sensors were replaced.
Page 253 of 307

Vehicle care251The tyre pressure sensor matching
process should also be performed
after replacing a spare wheel with a
road wheel containing the tyre
pressure sensor.
The malfunction light w and the
warning message or code should go
off at the next ignition cycle. The
sensors are matched to the wheel
positions, using a relearn tool, in the
following order: left side front wheel,
right side front wheel, right side rear
wheel and left side rear wheel. The
turn signal light at the current active
position is illuminated until sensor is
matched.
Consult your workshop for service or
to purchase a relearn tool. There are
two minutes to match the first wheel
position, and five minutes overall to
match all four wheel positions. If it
takes longer, the matching process stops and must be restarted.
The tyre pressure sensor matching
process is:
1. Apply the parking brake.
2. Turn the ignition on.3. On vehicles with automatic transmission: set the selector
lever to P.
On vehicles with manual
transmission: select neutral.
4. Press MENU on the turn signal
lever to select the Vehicle
Information Menu in the Driver
Information Centre.
5. Turn the adjuster wheel to scroll to
the tyre pressure menu.
6. Press SET/CLR to begin the
sensor matching process. A
message requesting acceptance
of the process should be
displayed.
7. Press SET/CLR again to confirm
the selection. The horn sounds
twice to indicate the receiver is in relearn mode.
8. Start with the left side front wheel.
9. Place the relearn tool against the tyre sidewall, near the valve stem.
Then press the button to activate
the tyre pressure sensor. A horn
chirp confirms that the sensor
identification code has been
matched to this wheel position.10. Proceed to the right side front wheel, and repeat the procedure
in Step 9.
11. Proceed to the right side rear wheel, and repeat the procedure
in Step 9.
12. Proceed to the left side rear wheel, and repeat the procedure
in Step 9. The horn sounds twice
to indicate the sensor
identification code has been
matched to the left side rear tyre,
and the tyre pressure sensor
matching process is no longer
active.
13. Turn off the ignition.
14. Set all four tyres to the recommended air pressure level
as indicated on the tyre pressure
label.
15. Ensure the tyre loading status is set according to the selected
pressure 3 116.
Tread depth
Check tread depth at regular
intervals.
Page 254 of 307

252Vehicle careTyres should be replaced for safety
reasons at a tread depth of 2-3 mm
(4 mm for winter tyres).
For safety reasons, it is
recommended that the tread depth of
the tyres on one axle should not vary
by more than 2 mm.
The legally permissible minimum
tread depth (1.6 mm) has been
reached when the tread has worn
down as far as one of the tread wear
indicators (TWI). Their position is
indicated by markings on the
sidewall.
If there is more wear at the front than
the rear, swap round front wheels and rear wheels periodically. Ensure that
the direction of rotation of the wheels
remains the same.
Tyres age, even if they are not used.
We recommend tyre replacement
every 6 years.
Changing tyre and wheel
size
If tyres of a different size than those
fitted at the factory are used, it may be necessary to reprogramme the
speedometer as well as the nominal
tyre pressure and make other vehicle modifications.
After converting to a different tyre
size, have the label with tyre
pressures replaced.9 Warning
Use of unsuitable tyres or wheels
may lead to accidents and will
invalidate the vehicle type
approval.
Wheel covers
Wheel covers and tyres that are
factory approved for the respective
vehicle and comply with all of the
relevant wheel and tyre combination requirements must be used.
If the wheel covers and tyres used are
not factory approved, the tyres must
not have a rim protection ridge.
Wheel covers must not impair brake
cooling.9 Warning
Use of unsuitable tyres or wheel
covers could lead to sudden
pressure loss and thereby
accidents.
Vehicles with steel wheels: When
using locking wheel nuts, do not
attach wheel covers.