Page 84 of 112

PERIODIC MAINTENANCE AND ADJUSTMENT
6-33
6
EAU23284
Checking the steerin gWorn or loose steering bearings may
cause danger. Therefore, the operation
of the steering must be checked as fol-
lows at the intervals specified in the
periodic maintenance and lubrication
chart.
1. Place a stand under the engine to raise the front wheel off the
ground. (See page 6-39 for more
information.) WARNING! To
avoi d injury, securely support
the vehicle so there is no dan ger
of it fallin g over.
[EWA10752]
2. Hold the lower ends of the front
fork legs and try to move them for-
ward and backward. If any free
play can be felt, have a Yamaha
dealer check or repair the steer-
ing.
EAU23292
Checkin g the wheel bearin gsThe front and rear wheel bearings must
be checked at the intervals specified in
the periodic maintenance and lubrica-
tion chart. If there is play in the wheel
hub or if the wheel does not turn
smoothly, have a Yamaha dealer
check the wheel bearings.
U2CXE1E0.book Page 33 Friday, July 25, 2014 11:05 AM
Page 88 of 112
PERIODIC MAINTENANCE AND ADJUSTMENT
6-37
63. Unhook the headlight bulb holder,
and then remove the burnt-out
bulb.
4. Place a new headlight bulb into position, and then secure it with
the bulb holder.
5. Connect the headlight coupler. 6. Install the headlight bulb cover by
turning it clockwise.
7. Have a Yamaha dealer adjust the headlight beam if necessary.
EAU44941
Auxiliary li ghtThis model is equipped with an LED-
type auxiliary light.
If the auxiliary light does not come on,
have a Yamaha dealer check it.
1. Headlight coupler
1. Headlight bulb holder
1. Auxiliary light
U2CXE1E0.book Page 37 Friday, July 25, 2014 11:05 AM
Page 91 of 112

PERIODIC MAINTENANCE AND ADJUSTMENT
6-40
6
a jack either under each side of the
frame in front of the rear wheel or under
each side of the swingarm.
EAU24361
Front wheel
EAU56350
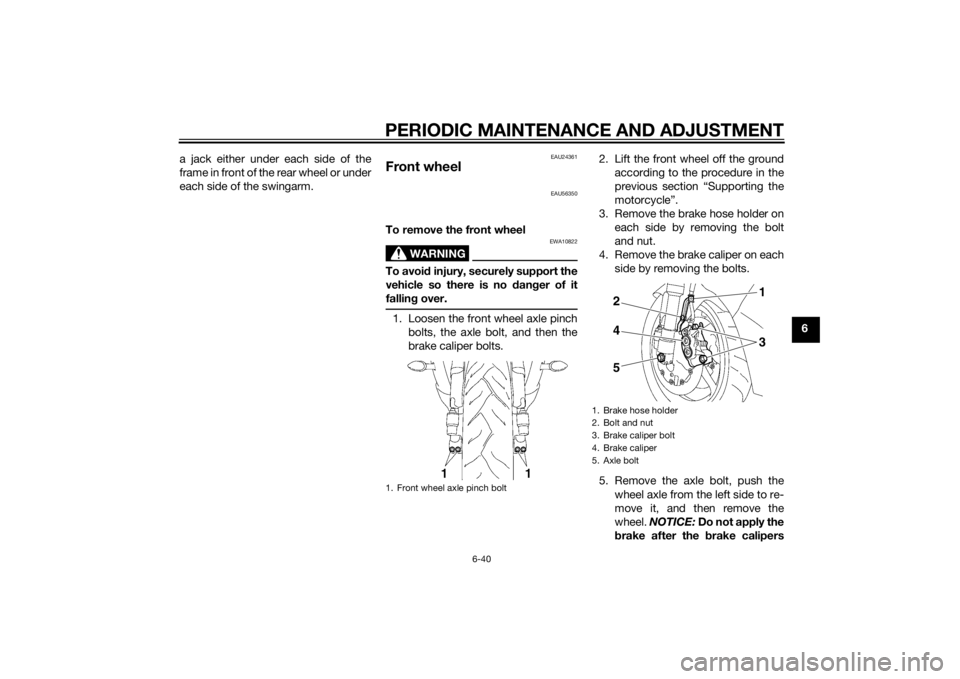
To remove the front wheel
WARNING
EWA10822
To avoi
d injury, securely support the
vehicle so there is no dan ger of it
fallin g over.1. Loosen the front wheel axle pinch
bolts, the axle bolt, and then the
brake caliper bolts. 2. Lift the front wheel off the ground
according to the procedure in the
previous section “Supporting the
motorcycle”.
3. Remove the brake hose holder on each side by removing the bolt
and nut.
4. Remove the brake caliper on each side by removing the bolts.
5. Remove the axle bolt, push the wheel axle from the left side to re-
move it, and then remove the
wheel. NOTICE: Do not apply the
b rake after the brake calipers1. Front wheel axle pinch bolt
1. Brake hose holder
2. Bolt and nut
3. Brake caliper bolt
4. Brake caliper
5. Axle bolt
31
2
4
5
U2CXE1E0.book Page 40 Friday, July 25, 2014 11:05 AM
Page 93 of 112

PERIODIC MAINTENANCE AND ADJUSTMENT
6-42
6
12. Retighten pinch bolt D to the
specified torque.
13. While applying the front brake, push down hard on the handlebar
several times to check for proper
fork operation.
EAU25081
Rear wheel
EAU56721
To remove the rear wheel
WARNING
EWA10822
To avoi d injury, securely support the
vehicle so there is no dan ger of it
fallin g over.1. Loosen the axle nut.
2. Lift the rear wheel off the ground
according to the procedure on
page 6-39. 3. Remove the axle nut.
4. Fully loosen the locknut on each
side of the swingarm.
5. Turn the drive chain slack adjust- ing bolts in direction (a) to loosen
the drive chain enough so it can
be removed from the rear sprock-
et, and then push the wheel for-
ward.
6. Remove the drive chain from the rear sprocket.
Tightenin g torque:
Wheel axle pinch bolt: 21 Nm (2.1 m·kgf, 15 ft·lbf)
1. Axle nut
2. Brake caliper
3. Brake caliper bracket
1
2
3
1. Drive chain slack adjusting bolt
2. Locknut
(a)
12
U2CXE1E0.book Page 42 Friday, July 25, 2014 11:05 AM