2015 YAMAHA YZF-R125 chain
[x] Cancel search: chainPage 6 of 98

TABLE OF CONTENTSSAFETY INFORMATION.................. 1-1
DESCRIPTION.................................. 2-1
Left view ......................................... 2-1
Right view ....................................... 2-2
Controls and instruments ............... 2-3
INSTRUMENT AND CONTROL
FUNCTIONS...................................... 3-1
Main switch/steering lock............... 3-1
Indicator lights and warning
lights............................................ 3-2
Multi-function meter unit ................ 3-4
Handlebar switches ...................... 3-11
Clutch lever .................................. 3-13
Shift pedal .................................... 3-13
Brake lever.................................... 3-13
Brake pedal .................................. 3-14
ABS (for ABS models) .................. 3-14
Fuel tank cap ................................ 3-15
Fuel ............................................... 3-16
Catalytic converter ....................... 3-17
Rider seat ..................................... 3-18
Sidestand ..................................... 3-18
Ignition circuit cut-off system ....... 3-19FOR YOUR SAFETY –
PRE-OPERATION CHECKS............. 4-1
OPERATION AND IMPORTANT
RIDING POINTS................................ 5-1
Starting the engine .......................... 5-1
Shifting ............................................ 5-2
Tips for reducing fuel
consumption ................................ 5-3
Engine break-in ............................... 5-3
Parking ............................................ 5-4
PERIODIC MAINTENANCE AND
ADJUSTMENT................................... 6-1
Owner’s tool kit ............................... 6-2
Periodic maintenance chart for the
emission control system .............. 6-3
General maintenance and
lubrication chart ........................... 6-4
Removing and installing the
cowlings and panel ...................... 6-8
Checking the spark plug ............... 6-10
Engine oil and oil filter element ..... 6-11
Coolant.......................................... 6-14
Replacing the air filter element
and cleaning the check hose..... 6-16
Checking the engine idling
speed ......................................... 6-16
Adjusting the throttle grip free
play ............................................ 6-17
Valve clearance ............................. 6-17Tires .............................................. 6-18
Cast wheels .................................. 6-20
Adjusting the clutch lever free
play ............................................ 6-21
Checking the front brake lever
free play..................................... 6-22
Adjusting the brake pedal free
play ............................................ 6-22
Brake light switches ..................... 6-22
Checking the front and rear brake
pads .......................................... 6-23
Checking the brake fluid level ...... 6-24
Changing the brake fluid .............. 6-25
Drive chain slack........................... 6-25
Cleaning and lubricating the drive
chain.......................................... 6-27
Checking and lubricating the
cables ........................................ 6-27
Checking and lubricating the
throttle grip and cable ............... 6-28
Checking and lubricating the
brake and clutch levers ............. 6-28
Checking and lubricating the
brake pedal ............................... 6-29
Checking and lubricating the
sidestand................................... 6-29
Lubricating the swingarm
pivots......................................... 6-29
Checking the front fork ................. 6-30
Checking the steering................... 6-30
Checking the wheel bearings ....... 6-31U5D7E5E0.book Page 1 Thursday, August 21, 2014 9:30 AM
Page 37 of 98

FOR YOUR SAFETY – PRE-OPERATION CHECKS
4-2
4
Rear brake• Check operation.
• If soft or spongy, have Yamaha dealer bleed hydraulic system.
• Check brake pads for wear.
• Replace if necessary.
• Check fluid level in reservoir.
• If necessary, add specified brake fluid to specified level.
• Check hydraulic system for leakage.6-23, 6-24
Clutch• Check operation.
• Lubricate cable if necessary.
• Check lever free play.
• Adjust if necessary.6-21
Throttle grip• Make sure that operation is smooth.
• Check throttle grip free play.
• If necessary, have Yamaha dealer adjust throttle grip free play and lubricate ca-
ble and grip housing.6-17, 6-28
Control cables• Make sure that operation is smooth.
• Lubricate if necessary.6-27
Drive chain• Check chain slack.
• Adjust if necessary.
• Check chain condition.
• Lubricate if necessary.6-25, 6-27
Wheels and tires• Check for damage.
• Check tire condition and tread depth.
• Check air pressure.
• Correct if necessary.6-18, 6-20
Brake pedal• Make sure that operation is smooth.
• Lubricate pedal pivoting point if necessary.6-29
Brake and clutch levers• Make sure that operation is smooth.
• Lubricate lever pivoting points if necessary.6-28
Sidestand• Make sure that operation is smooth.
• Lubricate pivot if necessary.6-29 ITEM CHECKS PAGE
U5D7E5E0.book Page 2 Thursday, August 21, 2014 9:30 AM
Page 47 of 98

PERIODIC MAINTENANCE AND ADJUSTMENT
6-5
6
10*Tires• Check tread depth and for dam-
age.
• Replace if necessary.
• Check air pressure.
• Correct if necessary.√√√√√
11*Wheel bearings• Check bearings for looseness or
damage.√√√√
12*Swingarm• Check operation and for exces-
sive play.√√√√
• Lubricate with lithium-soap-
based grease.Every 24000 km (14000 mi)
13 Drive chain• Check chain slack, alignment and
condition.
• Adjust and lubricate chain with a
special O-ring chain lubricant
thoroughly.Every 1000 km (600 mi) and after washing the motorcycle, riding in the rain or
riding in wet areas
14*Steering bearings• Check bearing play and steering
for roughness.√√√√√
• Lubricate with lithium-soap-
based grease.Every 24000 km (14000 mi)
15*Chassis fasteners• Make sure that all nuts, bolts and
screws are properly tightened.√√√√√
16Brake lever pivot
shaft• Lubricate with silicone grease.√√√√√
17Brake pedal pivot
shaft• Lubricate with lithium-soap-
based grease.√√√√√
18Clutch lever pivot
shaft• Lubricate with lithium-soap-
based grease.√√√√√ NO. ITEM CHECK OR MAINTENANCE JOBODOMETER READING
ANNUAL
CHECK 1000 km
(600 mi)6000 km
(3500 mi)12000 km
(7000 mi)18000 km
(10500 mi)24000 km
(14000 mi)
U5D7E5E0.book Page 5 Thursday, August 21, 2014 9:30 AM
Page 67 of 98

PERIODIC MAINTENANCE AND ADJUSTMENT
6-25
6 fluid level goes down suddenly, have a
Yamaha dealer check the cause before
further riding.
EAU22733
Changing the brake fluidHave a Yamaha dealer change the
brake fluid at the intervals specified in
the periodic maintenance and lubrica-
tion chart. In addition, have the oil seals
of the master cylinders and calipers as
well as the brake hoses replaced at the
intervals listed below or whenever they
are damaged or leaking.
Oil seals: Replace every two
years.
Brake hoses: Replace every four
years.
EAU22762
Drive chain slackThe drive chain slack should be
checked before each ride and adjusted
if necessary.
EAUM3550
To check the drive chain slack
1. Place the motorcycle on the side-
stand.TIPWhen checking and adjusting the drive
chain slack, there should be no weight
on the motorcycle.2. Shift the transmission into the
neutral position.
3. Measure the drive chain slack at
the arrow mark on the swingarm
as shown in the illustration.Drive chain slack:
35.0–45.0 mm (1.38–1.77 in)
U5D7E5E0.book Page 25 Thursday, August 21, 2014 9:30 AM
Page 68 of 98

PERIODIC MAINTENANCE AND ADJUSTMENT
6-26
64. If the drive chain slack is incorrect,
adjust it as follows.
EAU34318
To adjust the drive chain slack
Consult a Yamaha dealer before ad-
justing the drive chain slack.
1. Loosen the axle nut and the lock-
nut on each side of the swingarm.2. To tighten the drive chain, turn the
drive chain slack adjusting bolt on
each side of the swingarm in di-
rection (a). To loosen the drive
chain, turn the adjusting bolt on
each side of the swingarm in di-
rection (b), and then push the rear
wheel forward. NOTICE: Improp-
er drive chain slack will over-
load the engine as well as other
vital parts of the motorcycle and
can lead to chain slippage or
breakage. To prevent this fromoccurring, keep the drive chain
slack within the specified limits.
[ECA10572]
TIPUsing the alignment marks on each
side of the swingarm, make sure that
both drive chain pullers are in the same
position for proper wheel alignment.3. Tighten the axle nut, then the lock-
nuts to their specified torques.
4. Make sure that the drive chain
pullers are in the same position,
the drive chain slack is correct,
and the drive chain moves
smoothly.
1. Drive chain slackZAUM1182
1. Axle nut
2. Drive chain slack adjusting bolt
3. Locknut
4. Alignment marksZAUM1183
Tightening torques:
Axle nut:
85 Nm (8.5 m·kgf, 61 ft·lbf)
Locknut:
16 Nm (1.6 m·kgf, 12 ft·lbf)
U5D7E5E0.book Page 26 Thursday, August 21, 2014 9:30 AM
Page 69 of 98

PERIODIC MAINTENANCE AND ADJUSTMENT
6-27
6
EAU23026
Cleaning and lubricating the
drive chainThe drive chain must be cleaned and
lubricated at the intervals specified in
the periodic maintenance and lubrica-
tion chart, otherwise it will quickly wear
out, especially when riding in dusty or
wet areas. Service the drive chain as
follows.NOTICE
ECA10584
The drive chain must be lubricated
after washing the motorcycle, riding
in the rain or riding in wet areas.1. Clean the drive chain with kero-
sene and a small soft brush.
NOTICE: To prevent damaging
the O-rings, do not clean the
drive chain with steam cleaners,
high-pressure washers or inap-
propriate solvents.
[ECA11122]
2. Wipe the drive chain dry.
3. Thoroughly lubricate the drive
chain with a special O-ring chain
lubricant. NOTICE: Do not use
engine oil or any other lubri-
cants for the drive chain, as theymay contain substances that
could damage the O-rings.
[ECA11112]EAU23098
Checking and lubricating the
cablesThe operation of all control cables and
the condition of the cables should be
checked before each ride, and the ca-
bles and cable ends should be lubri-
cated if necessary. If a cable is
damaged or does not move smoothly,
have a Yamaha dealer check or re-
place it. WARNING! Damage to the
outer housing of cables may result
in internal rusting and cause inter-
ference with cable movement. Re-
place damaged cables as soon as
possible to prevent unsafe condi-
tions.
[EWA10712]
Recommended lubricant:
Yamaha cable lubricant or other
suitable cable lubricant
U5D7E5E0.book Page 27 Thursday, August 21, 2014 9:30 AM
Page 74 of 98
PERIODIC MAINTENANCE AND ADJUSTMENT
6-32
6Batteries produce explosive hy-
drogen gas. Therefore, keep
sparks, flames, cigarettes, etc.,
away from the battery and pro-
vide sufficient ventilation when
charging it in an enclosed
space.
Take care not to spill electrolyte
on the drive chain, as this may
weaken it, shorten chain life and
possibly result in an accident.
KEEP THIS AND ALL BATTER-
IES OUT OF THE REACH OF
CHILDREN.
To check the electrolyte level
1. Place the vehicle on a level sur-
face and hold it in an upright posi-
tion.TIPMake sure that the vehicle is posi-
tioned straight up when checking the
electrolyte level.2. Check the electrolyte level in the
battery.
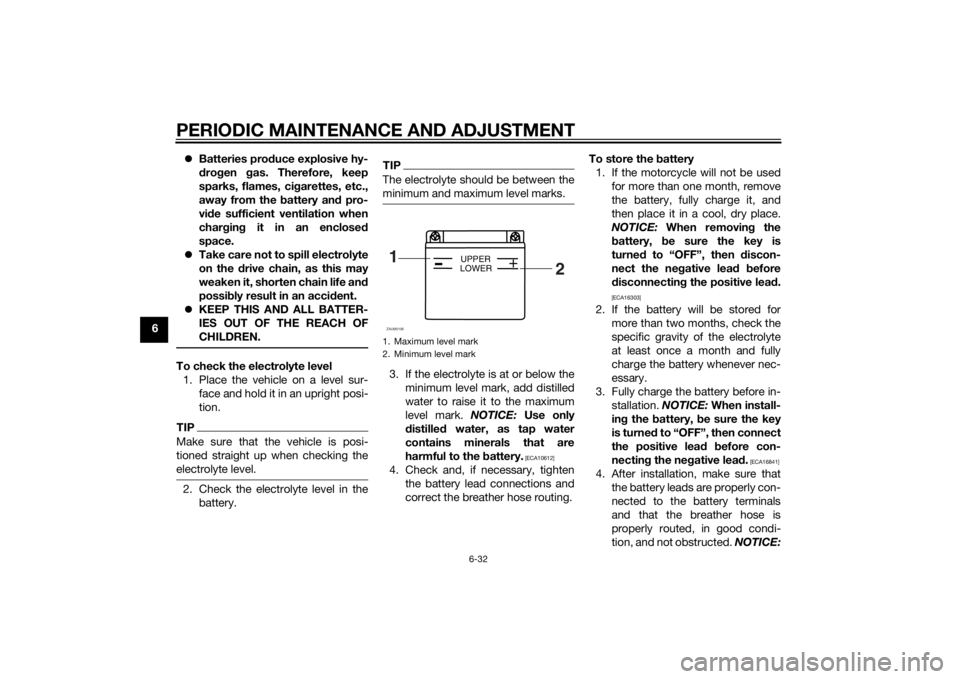
TIPThe electrolyte should be between the
minimum and maximum level marks.3. If the electrolyte is at or below the
minimum level mark, add distilled
water to raise it to the maximum
level mark. NOTICE: Use only
distilled water, as tap water
contains minerals that are
harmful to the battery.
[ECA10612]
4. Check and, if necessary, tighten
the battery lead connections and
correct the breather hose routing.To store the battery
1. If the motorcycle will not be used
for more than one month, remove
the battery, fully charge it, and
then place it in a cool, dry place.
NOTICE: When removing the
battery, be sure the key is
turned to “OFF”, then discon-
nect the negative lead before
disconnecting the positive lead.
[ECA16303]
2. If the battery will be stored for
more than two months, check the
specific gravity of the electrolyte
at least once a month and fully
charge the battery whenever nec-
essary.
3. Fully charge the battery before in-
stallation. NOTICE: When install-
ing the battery, be sure the key
is turned to “OFF”, then connect
the positive lead before con-
necting the negative lead.
[ECA16841]
4. After installation, make sure that
the battery leads are properly con-
nected to the battery terminals
and that the breather hose is
properly routed, in good condi-
tion, and not obstructed. NOTICE:
1. Maximum level mark
2. Minimum level mark1
2
+
UPPER
LOWER
ZAUM0106
U5D7E5E0.book Page 32 Thursday, August 21, 2014 9:30 AM
Page 81 of 98

PERIODIC MAINTENANCE AND ADJUSTMENT
6-39
6
2. Lift the rear wheel off the ground
according to the procedure on
page 6-36.
3. Remove the axle nut.
4. Fully loosen the locknut on each
side of the swingarm.
5. Turn the drive chain slack adjust-
ing bolts fully in direction (a) and
push the wheel forward.6. Remove the drive chain from the
rear sprocket.
TIPIf the drive chain is difficult to re-
move, remove the wheel axle first,
and then lift the wheel upward
enough to remove the drive chain
from the rear sprocket.
The drive chain cannot be disas-
sembled.7. While supporting the brake caliper
bracket, pull the wheel axle out,
and then remove the wheel.
NOTICE: Do not apply the brake
after the wheel and brake disc
have been removed, otherwise
the brake pads will be forced
shut.
[ECA11073]
To install the rear wheel
1. Install the wheel and the brake cal-
iper bracket by inserting the wheel
axle from the left-hand side.TIPMake sure that the slot in the
brake caliper bracket is fit over the
retainer on the swingarm.
1. Axle nut
2. Drive chain slack adjusting bolt
3. Locknut
4. Brake caliperZAUM1193
1. Drive chain slack adjusting bolt
2. Locknut
(a)1
2
ZAUM1194
U5D7E5E0.book Page 39 Thursday, August 21, 2014 9:30 AM