Page 34 of 118

INSTRUMENT AND CONTROL FUNCTIONS
3-19
32. Push the menu switch “MENU”,use the select switch to highlight
the display to change, and then
push the menu switch “MENU”
again.
3. Use the select switch to highlight the item to change, and then push
the menu switch “MENU”. 4. Use the select switch to select the
item to show, and then push the
menu switch “MENU”.
5. When you are finished changing the settings, use the select switch
to highlight “ ”, and then push the
menu switch “MENU” to return to
the previous display. 6. Use the select switch to
highlight “ ”, and then push the
menu switch “MENU” to return to
the setting mode menu.
Adjusting the meter panel brightness
1. Use the select switch to highlight “Brightness”.
2. Push the menu switch “MENU”.
MENUMaintenanceTime TripUnitDisplayBrightnessClockAll ResetDisplay
Display-1Display-2Display-3
Display-11-1
A.TEMP
1-2
C.TEMP
1-3
TIME TRIP
Display-11-1
ODO
1-2
C.TEMP
1-3
TIME TRIP
Display-11-1
ODO
1-2
C.TEMP
1-3
TIME TRIP
MENUMaintenanceTime TripUnitDisplayBrightnessClockAll Reset
U2BSE1E0.book Page 19 Thursday, July 31, 2014 4:31 PM
Page 35 of 118

INSTRUMENT AND CONTROL FUNCTIONS
3-20
3
3. Use the select switch to select the
desired brightness level, and then
push the menu switch “MENU” to
return to the setting mode menu.
Setting the clock
1. Use the select switch to highlight “Clock”.
2. Push the menu switch “MENU”. 3. When the hour digits start flash-
ing, use the select switch to set
the hours.
4. Push the menu switch “MENU”, and the minute digits start flash-
ing.
5. Use the select switch to set the minutes.
6. Push the menu switch “MENU” to return to the setting mode menu.
Resetting all of the display items
1. Use the select switch to highlight “All Reset”. 2. Push the menu switch “MENU”.
3. Use the select switch to highlight
“YES”, and then push the menu
switch “MENU”.
TIPThe odometer and the clock cannot be
reset.
BrightnessMENUMaintenanceTime TripUnitDisplayBrightnessClockAll Reset
Clock
5
55
AM
MENUMaintenanceTime TripUnitDisplayBrightnessClockAll ResetAll Reset
YESNO
U2BSE1E0.book Page 20 Thursday, July 31, 2014 4:31 PM
Page 43 of 118

INSTRUMENT AND CONTROL FUNCTIONS
3-28
3
pin
g. As with any motorcycle, ap-
proach surfaces that may be
slippery with caution an d avoi d es-
pecially slippery surfaces.
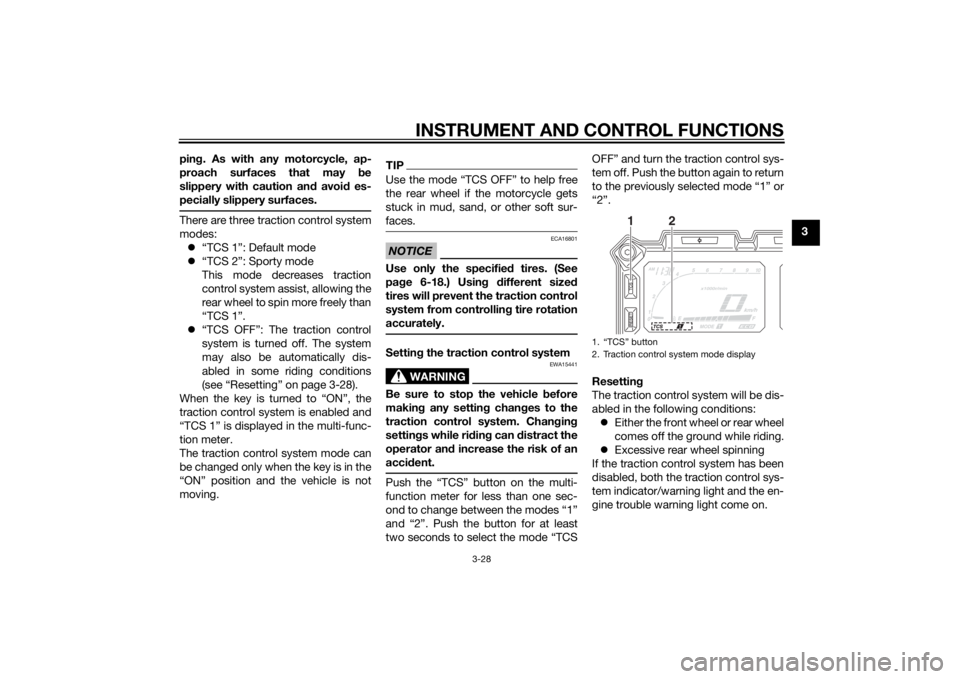
There are three traction control system
modes: “TCS 1”: Default mode
“TCS 2”: Sporty mode
This mode decreases traction
control system assist, allowing the
rear wheel to spin more freely than
“TCS 1”.
“TCS OFF”: The traction control
system is turned off. The system
may also be automatically dis-
abled in some riding conditions
(see “Resetting” on page 3-28).
When the key is turned to “ON”, the
traction control system is enabled and
“TCS 1” is displayed in the multi-func-
tion meter.
The traction control system mode can
be changed only when the key is in the
“ON” position and the vehicle is not
moving.
TIPUse the mode “TCS OFF” to help free
the rear wheel if the motorcycle gets
stuck in mud, sand, or other soft sur-
faces.NOTICE
ECA16801
Use only the specifie d tires. (See
pa ge 6-18.) Usin g different sized
tires will prevent the traction control
system from controllin g tire rotation
accurately.Settin g the traction control system
WARNING
EWA15441
Be sure to stop the vehicle before
makin g any settin g chan ges to the
traction control system. Chan gin g
settin gs while ri din g can distract the
operator an d increase the risk of an
acci dent.Push the “TCS” button on the multi-
function meter for less than one sec-
ond to change between the modes “1”
and “2”. Push the button for at least
two seconds to select the mode “TCS OFF” and turn the traction control sys-
tem off. Push the button again to return
to the previously selected mode “1” or
“2”.
Resettin
g
The traction control system will be dis-
abled in the following conditions: Either the front wheel or rear wheel
comes off the ground while riding.
Excessive rear wheel spinning
If the traction control system has been
disabled, both the traction control sys-
tem indicator/warning light and the en-
gine trouble warning light come on.
1. “TCS” button
2. Traction control system mode display
1
2
U2BSE1E0.book Page 28 Thursday, July 31, 2014 4:31 PM
Page 44 of 118

INSTRUMENT AND CONTROL FUNCTIONS
3-29
3To reset the traction control system:
Turn the key to “OFF”. Wait at least one
second, then turn the key back to
“ON”. The traction control system indi-
cator/warning light should go off and
the system will be enabled. The engine
trouble warning light should go off after
the motorcycle reaches at least 20
km/h (12 mi/h). If the traction control
system indicator/warning light or the
engine trouble warning light remains
on after resetting, the motorcycle may
still be ridden; however, have a
Yamaha dealer check the motorcycle as soon as possible.
EAU13075
Fuel tank capTo open the fuel tank cap
Open the fuel tank cap lock cover, in-
sert the key into the lock, and then turn
it 1/4 turn clockwise. The lock will be
released and the fuel tank cap can be
opened.
To close the fuel tank cap 1. Push the fuel tank cap into posi- tion with the key inserted in the
lock.
2. Turn the key counterclockwise to the original position, remove it,
and then close the lock cover.
TIPThe fuel tank cap cannot be closed un-
less the key is in the lock. In addition,
the key cannot be removed if the cap is
not properly closed and locked.
WARNING
EWA11092
Make sure that the fuel tank cap is
properly close d after fillin g fuel.
Leakin g fuel is a fire hazar d.
1. Unlock.
2. Fuel tank cap lock cover
2
1
U2BSE1E0.book Page 29 Thursday, July 31, 2014 4:31 PM