Page 13 of 100
2-1
123
4
5
6
7
8
9
10
11
12
DESCRIPTION
EAU10411
Left view
12
1, 2 3
4, 5 6
7810
9
11
1. Front fork compression damping force adjusting screw (page 3-14)
2. Bleed screw (page 3-15)
3. Starter knob/idle adjus ting screw (page 3-12/6-17)
4. Battery (page 6-31)
5. Main fuse (page 6-32)
6. Air filter element (page 6-14)
7. Engine oil check bolt (page 6-8)
8. Shift pedal (page 3-8) 9. Engine oil filler cap (page 6-8)
10.Engine oil drain bolt
(oil tank) (page 6-8)
11.Engine oil tank cap (page 6-8)
12.Front fork rebound damping force adjusting screw (page 3-14)
1DX-9-E3.book 1 ページ 2014年2月17日 月曜日 午後2時21分
Page 14 of 100
DESCRIPTION
2-2
12
3
4
5
6
7
8
9
10
11
12
EAU10421
Right view
1, 2 3 5
7
8
11
6
10
12
9 4
1. Shock absorber assembly comp
ression damping force adjusting
screw (for slow compression damping) (page 3-16)
2. Shock absorber assembly compression damping force adjusting nut (for fast compression damping) (page 3-16)
3. Kickstarter (page 3-12)
4. Fuel tank cap (page 3-9)
5. Radiator cap (page 6-13)
6. Steering lock (page 3-13) 7. Coolant drain bolt (page 6-13)
8. Brake pedal (page 3-9)
9. Engine oil drain bolt (crankcase) (page 6-8)
10.Rear brake fluid reservoir (page 6-24)
11.Shock absorber assembly reboun
d damping force adjusting screw
(page 3-16)
12.Rear brake light switch (page 6-23)
1DX-9-E3.book 2 ページ 2014年2月17日 月曜日 午後2時21分
Page 52 of 100

PERIODIC MAINTENANCE AND ADJUSTMENT
6-9
1
2
3
4
56
7
8
9
10
11
12 And do not touch the radiator
pipe after high-speed operation,
otherwise the cooling system is
hot and cause burns. Always let
the engine oil cool down suffi-
ciently before removing the oil
tank cap.
[EWA16141]
NOTICE: Do not
operate the vehicle until you
know that the engine oil level is
sufficient.
[ECA10012]
4. The engine oil should be above the minimum level mark. If the engine
oil level is above the minimum lev-
el mark, continue to the next step.
If the engine oil level is below the
minimum level mark, remove the
engine oil filler cap and add the
recommended oil to bring the en-
gine oil level above the minimum
level mark.
5. Place an oil pan under the engine and then remove the engine oil
check bolt and gasket. 6. The engine oil level should be be-
low the level of the check bolt hole.
If any oil does come out, allow it to
drain.
7. Install the engine oil tank cap and
1. Engine oil tank cap
2. Engine oil filler cap
1
2
1. Engine oil tank cap
2. Dipstick
3. Minimum level mark
312
1. Engine oil check bolt
2. Gasket
1. Engine oil check bolt hole
21
1
1DX-9-E3.book 9 ページ 2014年2月17日 月曜日 午後2時21分
Page 53 of 100
PERIODIC MAINTENANCE AND ADJUSTMENT
6-10
1
2
3
4
567
8
9
10
11
12
engine oil filler cap.
8. Install the engine oil check bolt and gasket, and then tighten the bolt to
the specified torque.
9. Start the engine and warm it up for a few minutes. Then turn the en-
gine off and wait a few minutes to
allow the oil to settle. Use the en-
gine oil tank cap and dipstick to
confirm that the engine oil level is
correct.
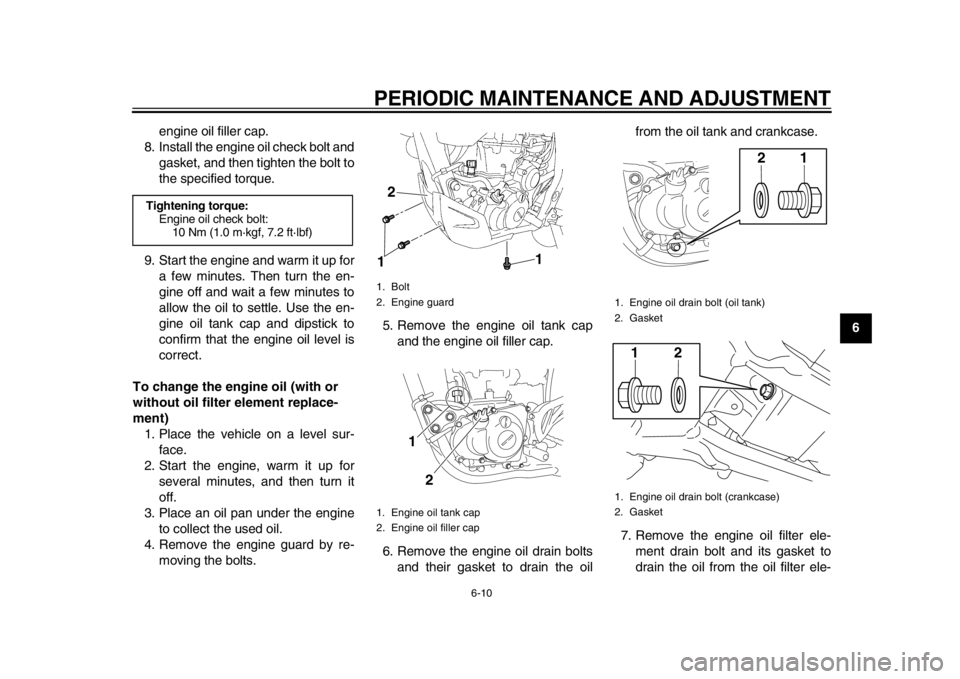
To change the engine oil (with or
without oil filter element replace-
ment) 1. Place the vehicle on a level sur- face.
2. Start the engine, warm it up for several minutes, and then turn it
off.
3. Place an oil pan under the engine to collect the used oil.
4. Remove the engine guard by re- moving the bolts. 5. Remove the engine oil tank cap
and the engine oil filler cap.
6. Remove the engine oil drain bolts and their gasket to drain the oil from the oil tank and crankcase.
7. Remove the engine oil filter ele- ment drain bolt and its gasket to
drain the oil from the oil filter ele-
Tightening torque:Engine oil check bolt: 10 Nm (1.0 m·kgf, 7.2 ft·lbf)
1. Bolt
2. Engine guard
1. Engine oil tank cap
2. Engine oil filler cap2
1
1
1
2
1. Engine oil drain bolt (oil tank)
2. Gasket
1. Engine oil drain bolt (crankcase)
2. Gasket
21
21
1DX-9-E3.book 10 ページ 2014年2月17日 月曜日 午後2時21分
Page 54 of 100

PERIODIC MAINTENANCE AND ADJUSTMENT
6-11
1
2
3
4
56
7
8
9
10
11
12 ment.
TIPSkip steps 8–10 if the oil filter elementis not being replaced.
8. Remove the oil filter element cover by removing the bolts. 9. Remove and replace the oil filter
element and O-rings.
10. Install the oil filter element cover by installing the bolts, and then tight-
en the bolts to the specified torque.
TIPMake sure that the O-rings are properlyseated.
11. Install the engine oil drain bolts and their new gasket, and then
tighten the bolts to the specified
torques.
12. Refill with the specified amount of the recommended engine oil, and
then install and tighten the engine
oil tank cap and the oil filler cap.
1. Engine oil filter element drain bolt
2. Gasket
21
1. Oil filter element cover
2. Oil filter element cover bolt
1. Oil filter element cover
2. Oil filter element
3. O-ring
1
2
1 2
3
3
3
Tightening torque: Oil filter element cover bolt:10 Nm (1.0 m·kgf, 7.2 ft·lbf)
Tightening torques: Engine oil drain bolt (oil tank):20 Nm (2.0 m·kgf, 14 ft·lbf)
Engine oil drain bolt (crank case): 20 Nm (2.0 m·kgf, 14 ft·lbf)
Engine oil filter element drain bolt:
10 Nm (1.0 m·kgf, 7.2 ft·lbf)
1DX-9-E3.book 11 ページ 2014年2月17日 月曜日 午後2時21分

