2015 YAMAHA WR 250F air suspension
[x] Cancel search: air suspensionPage 65 of 430

CHASSIS SPECIFICATIONS
2-10
Rear suspension
Type Swingarm (link suspension)
Spring/shock absorber type Coil spring/gas-oil damper
Rear shock absorber assembly travel 126.0 mm (4.96 in)
Spring free length 275.0 mm (10.83 in)
Spring installed length 265.0 mm (10.43 in)
Spring rate K1 54.00 N/mm (5.51 kgf/mm, 308.34 lbf/in)
Spring stroke K1 0.0–150.0 mm (0.00–5.91 in)
Optional spring available Yes
Enclosed gas/air pressure (STD) 980 kPa (9.8 kgf/cm
2, 139.4 psi)
Spring preload adjusting positions
Minimum Position in which the spring is turned in 1.5 mm
(0.06 in) from its free length.
Standard Position in which the spring is turned in 10 mm
(0.39 in) from its free length.
Maximum Position in which the spring is turned in 18 mm
(0.71 in) from its free length.
Rebound damping adjusting positions
* Position in which the adjuster is turned in finger tight
Minimum 30 click (s) out*
Standard 14 click (s) out*
Maximum Fully turned in
Compression damping adjusting positions
(for fast compression damping)
* Position in which the adjuster is turned in finger tight
Minimum 2 turn (s) out*
Standard 1-1/4 turn (s) out*
Maximum Fully turned in
Compression damping adjusting positions
(for slow compression damping)
* Position in which the adjuster is turned in finger tight
Minimum 20 click (s) out*
Standard 10 click (s) out*
Maximum Fully turned in
Swingarm
Swingarm end free play limit (radial) 1.0 mm (0.04 in)
Swingarm end free play limit (axial) 0.2–0.9 mm (0.01–0.04 in)
Drive chain
Size/manufacturer 520VM2/DAIDO
Number of links 114
Drive chain slack 50–60 mm (1.97–2.36 in)
15-link length limit 239.3 mm (9.42 in)
Page 103 of 430

3
PERIODIC CHECKS AND ADJUSTMENTS
PERIODIC MAINTENANCE............................................................................. 3-1
INTRODUCTION ........................................................................................ 3-1
PERIODIC MAINTENANCE CHART FOR THE EMISSION
CONTROL SYSTEM ................................................................................. 3-1
GENERAL MAINTENANCE AND LUBRICATION CHART ........................ 3-2
MAINTENANCE INTERVALS FOR COMPETITION USE ......................... 3-4
PRE-OPERATION INSPECTION AND MAINTENANCE................................. 3-9
GENERAL INSPECTION AND MAINTENANCE........................................ 3-9
ENGINE.......................................................................................................... 3-10
CHECKING THE COOLANT LEVEL ........................................................ 3-10
CHECKING THE COOLING SYSTEM ..................................................... 3-10
CHANGING THE COOLANT.................................................................... 3-10
CHECKING THE RADIATOR CAP .......................................................... 3-11
CHECKING THE RADIATOR CAP OPENING PRESSURE .................... 3-11
CHECKING THE COOLANT CIRCULATORY SYSTEM FOR LEAKS .... 3-12
ADJUSTING THE CLUTCH LEVER FREE PLAY .................................... 3-12
ADJUSTING THE THROTTLE GRIP FREE PLAY .................................. 3-13
LUBRICATING THE THROTTLE CABLE ................................................ 3-13
CLEANING THE AIR FILTER ELEMENT................................................. 3-14
CHECKING THE THROTTLE BODY JOINT ............................................ 3-15
CHECKING THE BREATHER HOSES .................................................... 3-15
CHECKING THE EXHAUST SYSTEM..................................................... 3-15
CHECKING THE FUEL LINE ................................................................... 3-16
CHECKING THE ENGINE OIL LEVEL..................................................... 3-16
CHANGING THE ENGINE OIL ................................................................ 3-17
ADJUSTING THE ENGINE IDLING SPEED ............................................ 3-18
ADJUSTING THE VALVE CLEARANCE ................................................. 3-19
CLEANING THE SPARK ARRESTER ..................................................... 3-23
CHASSIS........................................................................................................ 3-24
BLEEDING THE BRAKE SYSTEM .......................................................... 3-24
CHECKING THE BRAKE HOSE .............................................................. 3-25
ADJUSTING THE FRONT BRAKE .......................................................... 3-25
ADJUSTING THE REAR BRAKE ............................................................. 3-26
CHECKING THE FRONT BRAKE PADS ................................................. 3-26
CHECKING THE REAR BRAKE PADS ................................................... 3-28
CHECKING THE REAR BRAKE PAD INSULATOR ................................ 3-29
CHECKING THE BRAKE FLUID LEVEL.................................................. 3-29
ADJUSTING THE DRIVE CHAIN SLACK ................................................ 3-30
CHECKING THE FRONT FORK LEGS ................................................... 3-31
CHECKING THE FRONT FORK PROTECTOR GUIDE .......................... 3-31
CLEANING THE FRONT FORK OIL SEAL AND DUST SEAL ................ 3-31
AIR BLEEDING FROM FRONT FORK .................................................... 3-31
ADJUSTING THE FRONT FORK LEGS .................................................. 3-32
CHECKING THE SWINGARM OPERATION ........................................... 3-33
CHECKING THE REAR SUSPENSION ................................................... 3-33
Page 136 of 430

CHASSIS
3-32
3. Tighten:
• Air bleed screw
EAS2GB2117ADJUSTING THE FRONT FORK LEGSEWA
WARNING
• Always adjust the left and right front forks
evenly. If this is not done, the vehicle may
have poor stability.
• Securely support the vehicle so that there
is no danger of it falling over.
Rebound damping force
ECA
NOTICE
Do not turn the adjuster forcibly beyond its
adjusting range.
1. Adjust:
• Rebound damping force
▼▼▼▼▼▼▼▼▼▼▼▼▼▼▼▼▼▼▼▼▼▼▼▼▼▼▼▼▼▼▼▼
a. Turn the adjuster “1” in the direction of “a” or
“b” to make an adjustment.
▲▲▲▲▲▲▲▲▲▲▲▲▲▲▲▲▲▲▲▲▲▲▲▲▲▲▲▲▲▲▲▲
Compression damping forceECA
NOTICE
Do not turn the adjuster forcibly beyond its
adjusting range.
1. Adjust:
• Compression damping force
▼▼▼▼▼▼▼▼▼▼▼▼▼▼▼▼▼▼▼▼▼▼▼▼▼▼▼▼▼▼▼▼
a. Turn the adjuster “1” in the direction of “a” or
“b” to make an adjustment.
▲▲▲▲▲▲▲▲▲▲▲▲▲▲▲▲▲▲▲▲▲▲▲▲▲▲▲▲▲▲▲▲
Air bleed screw
1.3 Nm (0.13 m·kgf, 0.94 ft·lbf)
Direction “a”
Rebound damping force is increased
(suspension is harder).
Direction “b”
Rebound damping force is decreased
(suspension is softer).
Rebound damping force
Maximum
Turn it in finger-tight.
STD
Turn it out by 10 clicks.*
Minimum
Turn it out by 20 clicks.*
* With the adjuster fully turned in
T R..
1
Direction “a”
Compression damping force is in-
creased (suspension is harder).
Direction “b”
Compression damping force is de-
creased (suspension is softer).
Compression damping force
Maximum
Turn it in finger-tight.
STD
Turn it out by 11 clicks.*
Minimum
Turn it out by 20 clicks.*
* With the adjuster fully turned in
1
a
b
a b
1
Page 139 of 430

CHASSIS
3-35
▲▲▲▲▲▲▲▲▲▲▲▲▲▲▲▲▲▲▲▲▲▲▲▲▲▲▲▲▲▲▲▲
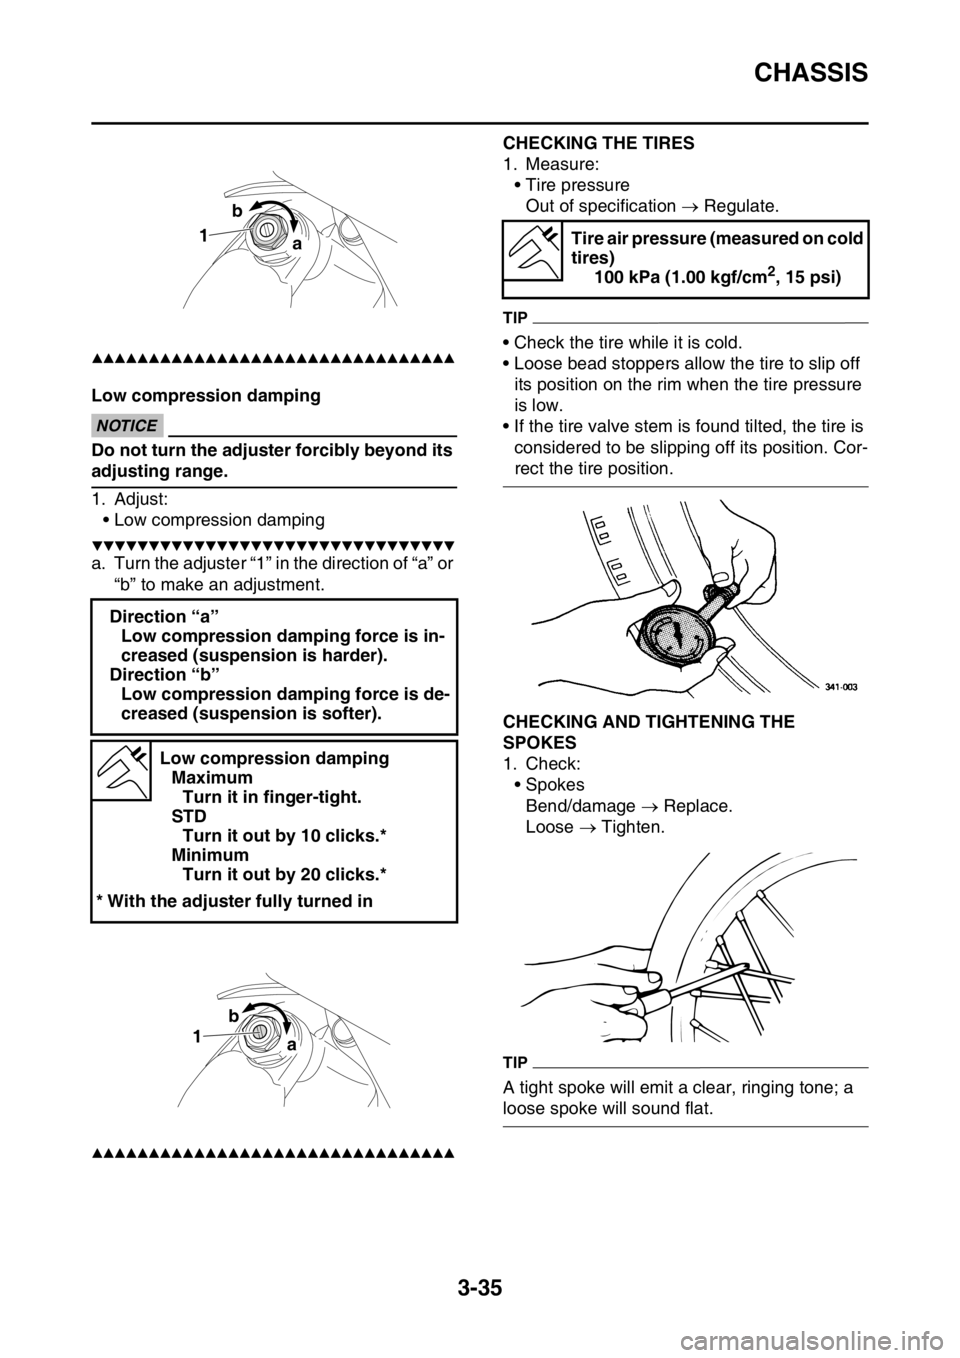
Low compression dampingECA
NOTICE
Do not turn the adjuster forcibly beyond its
adjusting range.
1. Adjust:
• Low compression damping
▼▼▼▼▼▼▼▼▼▼▼▼▼▼▼▼▼▼▼▼▼▼▼▼▼▼▼▼▼▼▼▼
a. Turn the adjuster “1” in the direction of “a” or
“b” to make an adjustment.
▲▲▲▲▲▲▲▲▲▲▲▲▲▲▲▲▲▲▲▲▲▲▲▲▲▲▲▲▲▲▲▲
EAS2GB2121
CHECKING THE TIRES
1. Measure:
• Tire pressure
Out of specification Regulate.
TIP
• Check the tire while it is cold.
• Loose bead stoppers allow the tire to slip off
its position on the rim when the tire pressure
is low.
• If the tire valve stem is found tilted, the tire is
considered to be slipping off its position. Cor-
rect the tire position.
EAS2GB2122CHECKING AND TIGHTENING THE
SPOKES
1. Check:
• Spokes
Bend/damage Replace.
Loose Tighten.
TIP
A tight spoke will emit a clear, ringing tone; a
loose spoke will sound flat. Direction “a”
Low compression damping force is in-
creased (suspension is harder).
Direction “b”
Low compression damping force is de-
creased (suspension is softer).
Low compression damping
Maximum
Turn it in finger-tight.
STD
Turn it out by 10 clicks.*
Minimum
Turn it out by 20 clicks.*
* With the adjuster fully turned in
1
a b
1ba
Tire air pressure (measured on cold
tires)
100 kPa (1.00 kgf/cm
2, 15 psi)
Page 149 of 430

CHASSIS
4-2
• Under a stony or a hard road condition, the
tire pressure should be higher to prevent a flat
tire.
EAS2GB2142FRONT FORK SETTING
The front fork setting should be made depend-
ing on the rider’s feeling of an actual run and
the circuit conditions.
The front fork setting includes the following
three factors:
1. Setting of air spring characteristics
• Change the fork oil amount.
2. Setting of spring preload
• Change the spring.
3. Setting of damping force
• Change the compression damping force.
• Change the rebound damping force.
The spring acts on the load and the damping
force acts on the cushion travel speed.
EAS2GB2143CHANGE IN AMOUNT AND CHARACTERIS-
TICS OF FORK OIL
Damping characteristic near the final stroke
can be changed by changing the fork oil
amount.
EWA
WARNING
Adjust the oil amount in 5 cm3 (0.2 US oz,
0.2 Imp.oz) increments or decrements. Too
small oil amount causes the front fork to
produce a noise at full rebound or the rider
to feel some pressure on his hands or body.
Alternatively, too large oil amount will
cause the air spring characteristics to have
a tendency to be stiffer with the consequent
deteriorated performance and characteris-
tics. Therefore, adjust the front fork within
the specified range.
EAS2GB2144SETTING OF SPRING AFTER REPLACE-
MENT
As the front fork setting can be easily affected
by the rear suspension, take care so that the
front and the rear are balanced (in position etc.)
when setting the front fork.
1. Use of soft spring
• Change the rebound damping force.
Turn out one or two clicks.
• Change the compression damping force.
Turn in one or two clicks.
TIP
Generally a soft spring gives a soft riding feel-
ing. Rebound damping tends to become stron-
ger and the front fork may sink deeply over a
series of gaps.
2. Use of stiff spring
• Change the rebound damping force.
Turn in one or two clicks.
• Change the compression damping force.
Turn out one or two clicks. Extent of adjustment
100–120 kPa (1.0–1.2 kgf/cm
2,
15–18 psi)
Standard oil amount
340 cm
3 (11.50 US oz, 11.99
lmp.oz)
Extent of adjustment
300–365 cm
3 (10.14–12.34 US
oz, 10.58–12.87 Imp.oz)
A. Air spring characteristics in relation to oil
amount change
B. Load
C. Stroke
1. Max. oil amount
2. Standard oil amount
3. Min. oil amount
Page 202 of 430

FRONT FORK
5-44
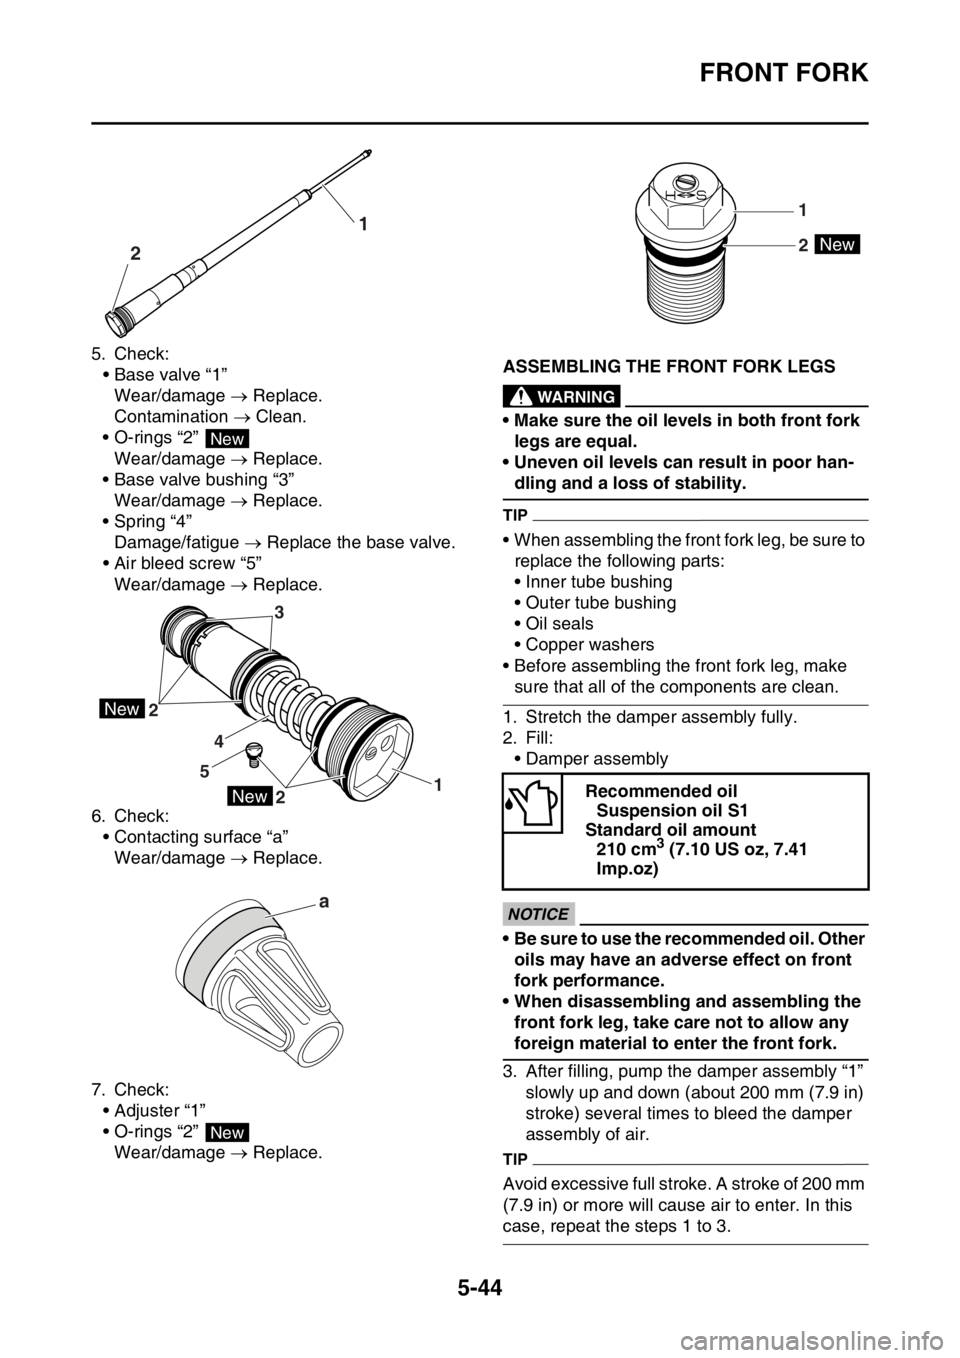
5. Check:
• Base valve “1”
Wear/damage Replace.
Contamination Clean.
• O-rings “2”
Wear/damage Replace.
• Base valve bushing “3”
Wear/damage Replace.
• Spring “4”
Damage/fatigue Replace the base valve.
• Air bleed screw “5”
Wear/damage Replace.
6. Check:
• Contacting surface “a”
Wear/damage Replace.
7. Check:
• Adjuster “1”
• O-rings “2”
Wear/damage Replace.EAS2GB2203ASSEMBLING THE FRONT FORK LEGSEWA
WARNING
• Make sure the oil levels in both front fork
legs are equal.
• Uneven oil levels can result in poor han-
dling and a loss of stability.
TIP
• When assembling the front fork leg, be sure to
replace the following parts:
• Inner tube bushing
• Outer tube bushing
• Oil seals
• Copper washers
• Before assembling the front fork leg, make
sure that all of the components are clean.
1. Stretch the damper assembly fully.
2. Fill:
• Damper assembly
ECA
NOTICE
• Be sure to use the recommended oil. Other
oils may have an adverse effect on front
fork performance.
• When disassembling and assembling the
front fork leg, take care not to allow any
foreign material to enter the front fork.
3. After filling, pump the damper assembly “1”
slowly up and down (about 200 mm (7.9 in)
stroke) several times to bleed the damper
assembly of air.
TIP
Avoid excessive full stroke. A stroke of 200 mm
(7.9 in) or more will cause air to enter. In this
case, repeat the steps 1 to 3.
21
New
New
New
2
21 543
a
New
Recommended oil
Suspension oil S1
Standard oil amount
210 cm
3 (7.10 US oz, 7.41
Imp.oz)
New
1
2