2015 YAMAHA FZ6 S lights
[x] Cancel search: lightsPage 49 of 110

OPERATION AND IMPORTANT RIDING POINTS
5-3
5
NOTICE
ECA10261
Even with the transmission in
the neutral position, do not
coast for lon g perio ds of time
with the en gine off, an d d o not
tow the motorcycle for lon g d is-
tances. The transmission is
properly lu bricate d only when
the en gine is runnin g. Ina de-
quate lu brication may damag e
the transmission.
Always use the clutch while
chan gin g g ears to avoi d d am-
a g in g the en gine, transmission,
an d d rive train, which are not
d esi gne d to withstan d the
shock of force d shiftin g.
EAU16811
Tips for re ducin g fuel con-
sumptionFuel consumption depends largely on
your riding style. Consider the follow-
ing tips to reduce fuel consumption:
Shift up swiftly, and avoid high en-
gine speeds during acceleration.
Do not rev the engine while shift-
ing down, and avoid high engine
speeds with no load on the en-
gine.
Turn the engine off instead of let-
ting it idle for an extended length
of time (e.g., in traffic jams, at traf-
fic lights or at railroad crossings).
EAU16842
Engine break-inThere is never a more important period
in the life of your engine than the period
between 0 and 1600 km (1000 mi). For
this reason, you should read the fol-
lowing material carefully.
Since the engine is brand new, do not
put an excessive load on it for the first
1600 km (1000 mi). The various parts in
the engine wear and polish themselves
to the correct operating clearances.
During this period, prolonged full-throt-
tle operation or any condition that
might result in engine overheating
must be avoided.
EAU17094
0–1000 km (0–600 mi)
Avoid prolonged operation above 5800
r/min. NOTICE: After 1000 km (600
mi) of operation, the en gine oil must
b e chan ged an d the oil filter car-
tri dge or element replace d.
[ECA10303]
1000–1600 km (600–1000 mi)
Avoid prolonged operation above 6900
r/min.
U42PE4E0.book Page 3 Wedne sday, August 6, 2014 3:25 PM
Page 87 of 110

PERIODIC MAINTENANCE AND ADJUSTMENT
6-37
6
EAU23935
Replacing a hea dlig ht bul bThis model is equipped with halogen
bulb headlights. If a headlight bulb
burns out, replace it as follows.NOTICE
ECA10651
Take care not to damag e the follow-
in g parts:
Hea dlig ht bul b
Do not touch the glass part of
the hea dlig ht bul b to keep it free
from oil, otherwise the transpar-
ency of the g lass, the luminosity
of the b ulb, an d the b ulb life will
b e ad versely affected . Thor-
ou ghly clean off any d irt and fin-
g erprints on the head light bul b
using a cloth moistene d with al-
cohol or thinner.
Hea dlig ht lens
Do not affix any type of tinted
film or stickers to the head light
lens.
Do not use a hea dlig ht bul b of a
watta ge hi gher than specified .
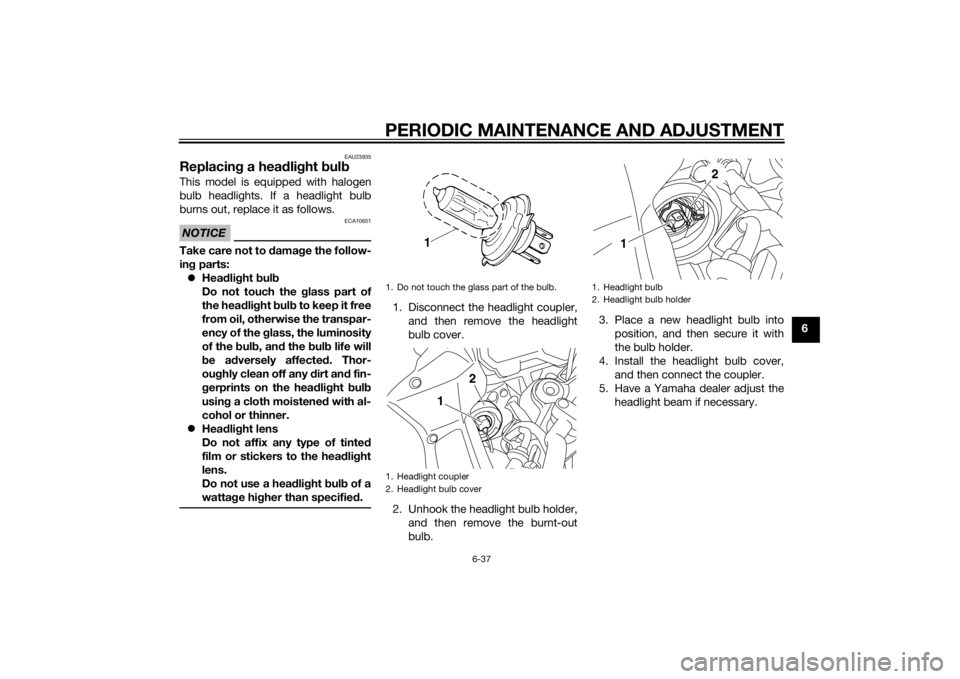
1. Disconnect the headlight coupler,
and then remove the headlight
bulb cover.
2. Unhook the headlight bulb holder, and then remove the burnt-out
bulb. 3. Place a new headlight bulb into
position, and then secure it with
the bulb holder.
4. Install the headlight bulb cover, and then connect the coupler.
5. Have a Yamaha dealer adjust the headlight beam if necessary.1. Do not touch the glass part of the bulb.
1. Headlight coupler
2. Headlight bulb cover
2
1
1. Headlight bulb
2. Headlight bulb holder
2
1
U42PE4E0.book Page 37 Wedne sday, August 6, 2014 3:25 PM
Page 88 of 110

PERIODIC MAINTENANCE AND ADJUSTMENT
6-38
6
EAU32835
Replacing an auxiliary li ght
b ul bThis model is equipped with two auxil-
iary lights. If an auxiliary light bulb
burns out, replace it as follows.
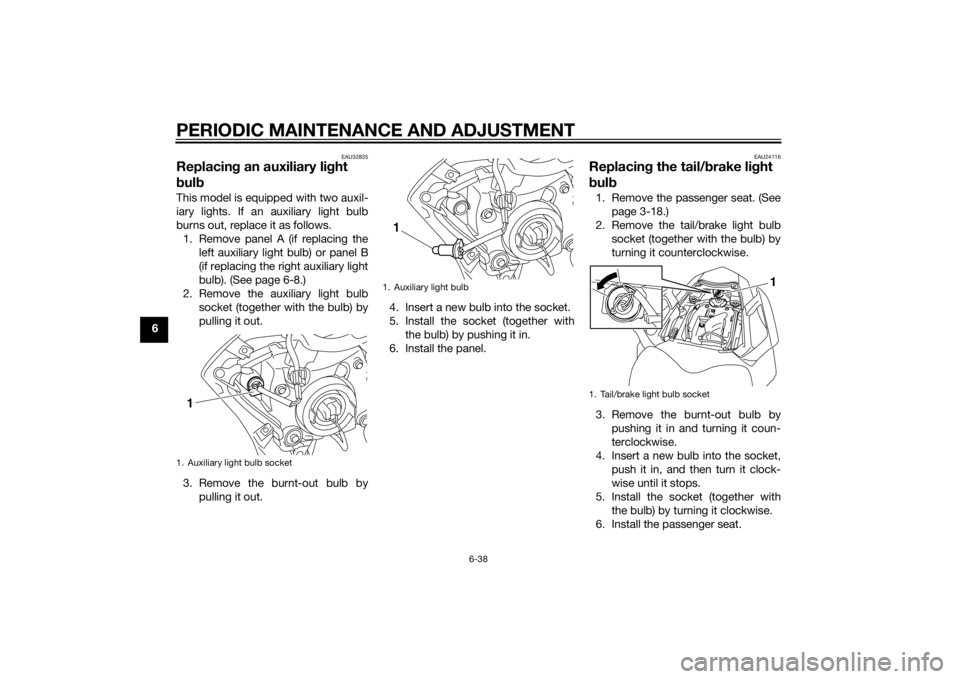
1. Remove panel A (if replacing the left auxiliary light bulb) or panel B
(if replacing the right auxiliary light
bulb). (See page 6-8.)
2. Remove the auxiliary light bulb socket (together with the bulb) by
pulling it out.
3. Remove the burnt-out bulb by pulling it out. 4. Insert a new bulb into the socket.
5. Install the socket (together with
the bulb) by pushing it in.
6. Install the panel.
EAU24116
Replacin g the tail/ brake li ght
b ul b1. Remove the passenger seat. (See
page 3-18.)
2. Remove the tail/brake light bulb socket (together with the bulb) by
turning it counterclockwise.
3. Remove the burnt-out bulb by pushing it in and turning it coun-
terclockwise.
4. Insert a new bulb into the socket, push it in, and then turn it clock-
wise until it stops.
5. Install the socket (together with the bulb) by turning it clockwise.
6. Install the passenger seat.
1. Auxiliary light bulb socket1
1. Auxiliary light bulb1
1. Tail/brake light bulb socket
1
U42PE4E0.book Page 38 Wedne sday, August 6, 2014 3:25 PM
Page 107 of 110

10-1
10
INDEX
AABS (for ABS models) .......................... 3-14
ABS warning light (for ABS models) ....... 3-7
Air filter element, replacing ................... 6-16
Auxiliary light bulb, replacing ............... 6-38BBattery .................................................. 6-33
Brake and clutch levers, checking and lubricating .................... 6-30
Brake and shift pedals, checking and lubricating .................... 6-30
Brake fluid, changing............................ 6-26
Brake fluid level, checking.................... 6-25
Brake lever............................................ 3-13
Brake lever free play, checking ............ 6-23
Brake light switches ............................. 6-24
Brake pedal .......................................... 3-14CCables, checking and lubricating ......... 6-29
Care ........................................................ 7-1
Catalytic converter ............................... 3-17
Clutch lever........................................... 3-13
Clutch lever free play, adjusting ........... 6-22
Coolant ................................................. 6-14
Coolant temperature warning light ......... 3-4
Cowling and panels, removing and
installing ............................................... 6-8DDimmer switch...................................... 3-12
Drive chain, cleaning and lubricating ... 6-28
Drive chain slack .................................. 6-27EEngine break-in ...................................... 5-3
Engine idling speed .............................. 6-18 Engine oil and oil filter cartridge........... 6-11
Engine serial number ............................. 9-1
Engine stop switch............................... 3-12
Engine trouble warning light .................. 3-7
FFront and rear brake pads, checking ... 6-24
Front fork, adjusting ............................. 3-20
Front fork, checking ............................. 6-31
Fuel ...................................................... 3-16
Fuel consumption, tips for reducing ...... 5-3
Fuel tank breather hose and overflow
hose ................................................... 3-17
Fuel tank cap........................................ 3-15
Fuses, replacing ................................... 6-34HHandlebar switches ............................. 3-11
Hazard switch ...................................... 3-12
Headlight bulb, replacing ..................... 6-37
High beam indicator light ....................... 3-4
Horn switch .......................................... 3-12IIdentification numbers ........................... 9-1
Ignition circuit cut-off system .............. 3-25
Immobilizer system ................................ 3-1
Immobilizer system indicator light ......... 3-7
Indicator lights and warning lights ......... 3-4LLicense plate light bulb, replacing ....... 6-39
Luggage strap holders ......................... 3-24MMain switch/steering lock ...................... 3-2
Maintenance and lubrication, periodic... 6-4
Maintenance, emission control
system ................................................. 6-3 Matte color, caution................................ 7-1
Model label ............................................. 9-2
Multi-function meter unit ........................ 3-8
NNeutral indicator light ............................. 3-4OOil level warning light .............................. 3-4PParking.................................................... 5-4
Part locations.......................................... 2-1
Pass switch........................................... 3-12RRear view mirrors .................................. 3-20SSafety information................................... 1-1
Seats ..................................................... 3-18
Shifting.................................................... 5-2
Shift pedal............................................. 3-13
Shock absorber assembly, adjusting ... 3-22
Sidestand.............................................. 3-24
Sidestand, checking and lubricating .... 6-31
Spark plugs, checking .......................... 6-10
Specifications ......................................... 8-1
Starting the engine ................................. 5-1
Start switch ........................................... 3-12
Steering, checking ................................ 6-32
Storage ................................................... 7-4
Storage compartment........................... 3-19
Supporting the motorcycle ................... 6-40TTail/brake light bulb, replacing ............. 6-38
Throttle grip and cable,
checking and lubricating .................... 6-29
Throttle grip free play, checking ........... 6-19
U42PE4E0.book Page 1 Wedne sday, August 6, 2014 3:25 PM