2015 YAMAHA FX SVHO seats
[x] Cancel search: seatsPage 96 of 118

Care and storage
90
ter flows out continually from the jet
thrust nozzle.
(8) Run the engine at idling speed for about 3 minutes watching the engine condition.
If the engine stops while flushing, turn
the water supply off immediately and
perform the procedure again from step 7.
NOTICE: Do not supply water to the
cooling water passages when the en-
gine is not running. The water could
flow back through the muffler into the
engine, causing severe engine dam-
age.
[ECJ00123]
(9) Turn the water supply off.
(10) Discharge the remaining water out of the cooling water passages by alternately
squeezing and releasing the throttle lever
quickly for 10 to 15 seconds.
(11) Stop the engine.
(12) Remove the garden hose adapter, and then securely install the flushing hose
connector cap by tightening it until it
stops.
(13) Securely close the stern storage com- partment.
(14) Securely install the removable watertight storage compartment and seats in their
original positions.
EJU33736Cleaning the watercraft
(1) Remove the seats. (See page 50 for seatremoval and installation procedures.) (2) Rinse the engine and engine compart-
ment with a small amount of water.
NOTICE: Do not use high-pressure
water when rinsing the engine or en-
gine compartment as severe engine
damage could result.
[ECJ00572]
(3) Drain the water from the engine com- partment. (See page 63 for information
on draining the bilge water.)
(4) Wipe the engine and engine compart- ment with a dry cloth.
(5) Wash down the hull, deck, and jet pump with fresh water.
(6) Wipe the hull, deck, and jet pump with a dry cloth.
(7) Wipe all vinyl and rubber components, such as the seats and engine compart-
ment seals, with a vinyl protectant.
(8) To minimize corrosion, spray metallic parts of the hull, deck, and engine with a
rust inhibitor.
(9) Allow the engine compartment to air dry completely before installing the seats.
(10) Securely install the seats in their original positions.
EJU33687Battery care
If the watercraft will not be used for more than
a month, remove the battery from the water-
craft, check it, and then store it in a cool, dry
place.
WARNING
EWJ00792
Battery electrolyte is poisonous and dan-
gerous, causing severe burns, etc. Elec-
trolyte contains sulfuric acid. Avoid
contact with skin, eyes, or clothing.
Antidotes
External: Flush with water.
Internal: Drink large quantities of water or
milk. Follow with milk of magnesia, beaten
UF3J71E0.book Page 90 Friday, June 27, 2014 1:50 PM
Page 100 of 118

Maintenance
94
EJU33769
Maintenance
Periodic checks and lubrication will keep
your watercraft in the safest and most effi-
cient condition possible. Therefore, make
sure to carry out the periodic maintenance.
Safety is an obligation of the watercraft own-
er. Proper maintenance must be carried out
to keep the exhaust emission and sound lev-
els within the regulated limits. The most im-
portant points of watercraft inspection and
lubrication are explained on the following pa-
ges.
See a Yamaha dealer for genuine Yamaha re-
placement parts and optional accessories
designed for your watercraft.
Remember, failures that are the result of the
installation of parts or accessories which are
not qualitatively equivalent to genuine
Yamaha parts are not covered by the limited warranty.
Maintenance, replacement, or repair of
the emission control devices and system
may be performed by any marine SI engine
repair establishment or individual. War-
ranty repair, however, must be performed
at an authorized Yamaha marine dealer-
ship.
WARNING
EWJ00312
Be sure to turn off the engine when you
perform maintenance unless otherwise
specified. If you are not familiar with ma-
chine servicing, this work should be done
by a Yamaha dealer or other qualified me-
chanic.
EJU33803Tool kit
A tool kit is included with this watercraft. Pla-
ce the tool kit in a waterproof bag and always carry it with you whenever you use the water-
craft.
EJU42021Removing and installing the engine
cover
The engine cover is removable.
To remove the engine cover:
(1) Remove the seats. (See page 50 for seat
removal and installation procedures.)
(2) Remove the engine cover screws.
1 Tool bag
2 Screwdriver
3 Garden hose adapter
4 10/12 mm box wrench
5 Pliers
6 10/12 mm open-end wrench
1 Engine cover screw
1
UF3J71E0.book Page 94 Friday, June 27, 2014 1:50 PM
Page 101 of 118

Maintenance
95
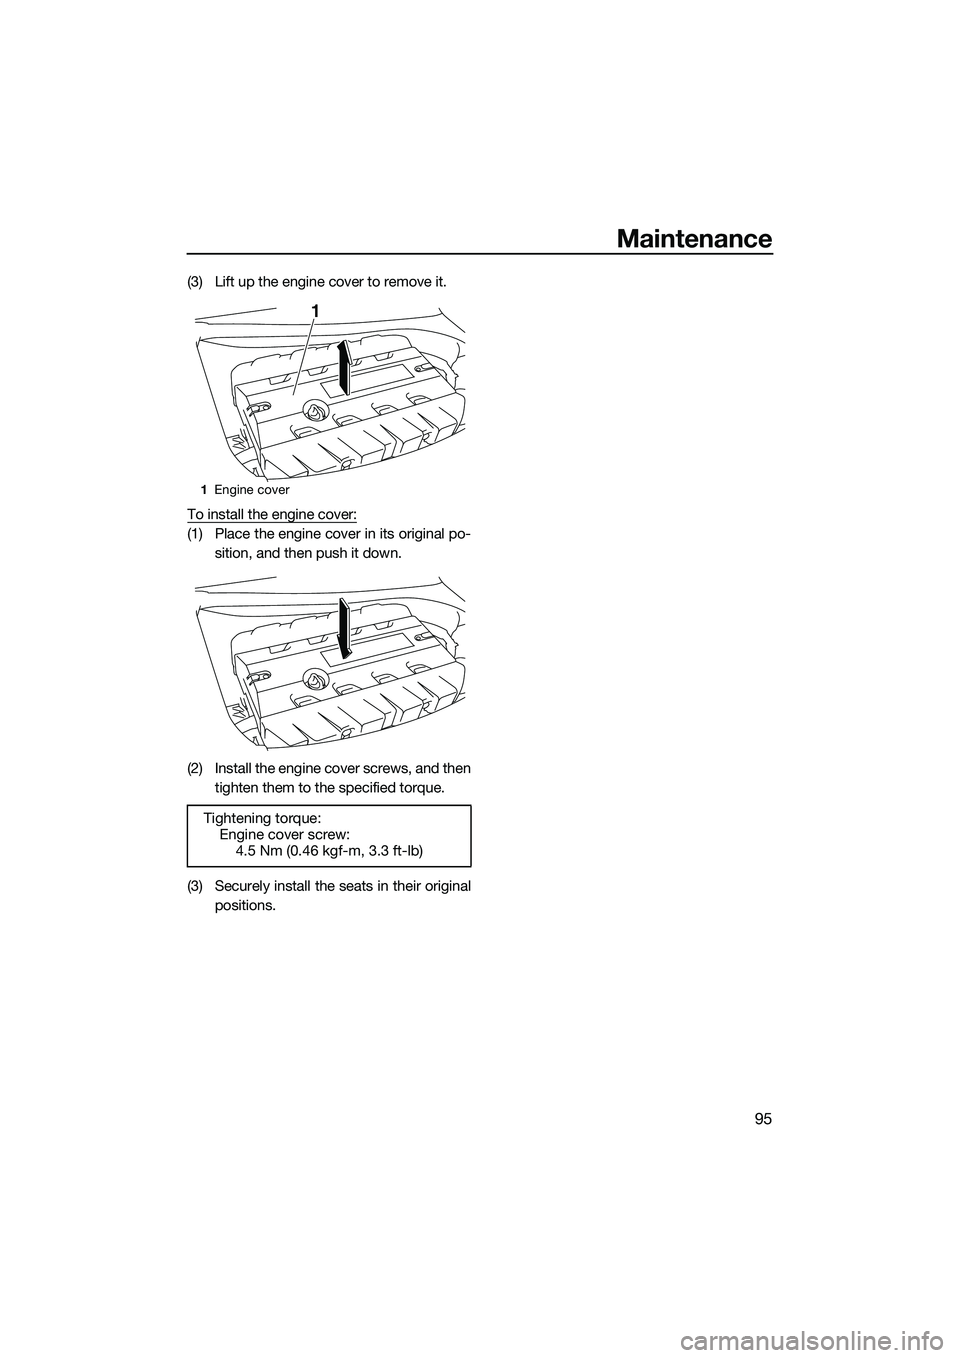
(3) Lift up the engine cover to remove it.
To install the engine cover:
(1) Place the engine cover in its original po-sition, and then push it down.
(2) Install the engine cover screws, and then tighten them to the specified torque.
(3) Securely install the seats in their original positions.
1Engine cover
Tightening torque:
Engine cover screw:
4.5 Nm (0.46 kgf-m, 3.3 ft-lb)
1
UF3J71E0.book Page 95 Friday, June 27, 2014 1:50 PM
Page 111 of 118

Trouble recovery
105
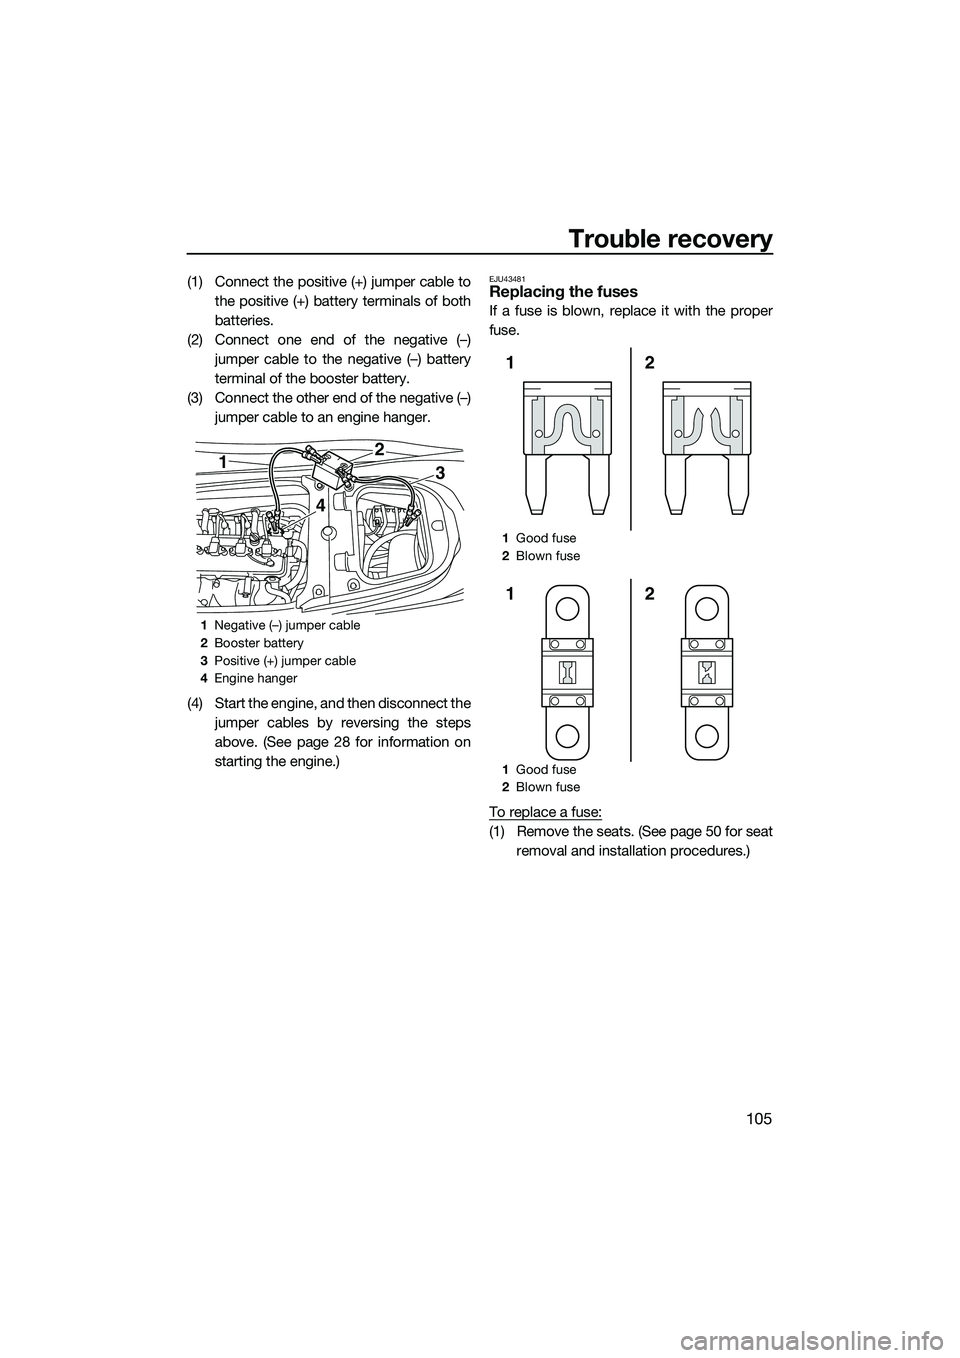
(1) Connect the positive (+) jumper cable tothe positive (+) battery terminals of both
batteries.
(2) Connect one end of the negative (–) jumper cable to the negative (–) battery
terminal of the booster battery.
(3) Connect the other end of the negative (–) jumper cable to an engine hanger.
(4) Start the engine, and then disconnect the jumper cables by reversing the steps
above. (See page 28 for information on
starting the engine.)EJU43481Replacing the fuses
If a fuse is blown, replace it with the proper
fuse.
To replace a fuse:
(1) Remove the seats. (See page 50 for seatremoval and installation procedures.)
1Negative (–) jumper cable
2 Booster battery
3 Positive (+) jumper cable
4 Engine hanger
1
4
3
2
1Good fuse
2 Blown fuse
1 Good fuse
2 Blown fuse
2
1
2
1
UF3J71E0.book Page 105 Friday, June 27, 2014 1:50 PM
Page 113 of 118

Trouble recovery
107
(6) Securely install the fuse box cover in itsoriginal position.
(7) Securely install the electrical box cover in its original position.
(8) Securely install the seats in their original positions.
If the fuse immediately blows again, the elec-
trical system may be defective. If this occurs,
have a Yamaha dealer service the watercraft.
EJU34716Towing the watercraft
WARNING
EWJ00812
The operator of the towing boat must
keep speed to a minimum and avoid
traffic or obstacles which could be a
hazard to the operator on the water-
craft.
The towline should be long enough so
that the watercraft will not collide with
the towing boat when slowing down.
If the watercraft becomes inoperative in the
water, it can be towed to shore. To tow the watercraft:
Use a towline that is three times the com-
bined length of the towing boat and the wa-
tercraft.
(1) Securely attach the towline to the bow
eye of the watercraft being towed.
(2) Sit astride the seat and hold on to the handlebars in order to balance the water-
craft. NOTICE: The bow must be kept
up out of the water during towing, oth-
erwise water could flood the engine
compartment or water could flow
back into the engine, causing severe
engine damage.
[ECJ01331]
Tow the watercraft at 8 km/h (5 mph) or less.
NOTICE: Tow the watercraft at 8 km/h (5
mph) or less, otherwise water could flood
the engine compartment or water could
flow back into the engine, causing severe
engine damage.
[ECJ01322]
EJU36156
Submerged watercraft
If the watercraft is submerged or flooded with
water, drain the bilge water from the engine
compartment. Then, have a Yamaha dealer
service the watercraft as soon as possible.
If the watercraft was submerged:
(1) Remove the watercraft from the water and drain the water from the storage
compartments. (See page 53 for infor-
Fuse amperage:
Electronic throttle valve fuse:
10 A
Fuel pump fuse: 10 A
Main relay drive fuse: 10 A
Main fuse:
20 A
Battery fuse: 30 A
SCU fuse: 50 A
Bilge pump fuse:
3 A
Security system fuse: 3 A
1Bow eye
1
UF3J71E0.book Page 107 Friday, June 27, 2014 1:50 PM
Page 116 of 118

Index
110
Labels, warning .......................................... 5
Launching the watercraft ......................... 78
Learning to operate your watercraft ........ 77
Leaving the watercraft ............................. 79
Limitations on who may operate the watercraft.............................................. 11
Long-term storage ................................... 93
Low RPM Mode ....................................... 36
Lubrication ............................................... 93
M
Main components, location of ................. 22
Maintenance ............................................ 94
Manufactured date label ............................ 2
Model information ...................................... 2
Multifunction display ................................ 45
Multifunction information center .............. 40
Multifunction information center check ... 74
N
No-wake mode ........................................ 37
O
Oil pressure warning ................................ 44
Operating in weeded areas ...................... 87
Operating the watercraft .......................... 79
Operating the watercraft in reverse or neutral ................................................... 82
Operating your watercraft ........................ 77
Operation requirements ........................... 13
P
Periodic maintenance chart ..................... 96
Post-launch checks ................................. 74
Post-operation care ................................. 89
Pre-launch checks ................................... 68
Pre-operation check points ..................... 68
Pre-operation checklist ............................ 66
Primary Identification (PRI-ID) number ...... 1
Pull-up cleats (FX Cruiser SVHO)............. 53
R
Raising the reverse gate ........................ 104
Reboarding grip ....................................... 51
Reboarding step ...................................... 51
Recommended equipment ...................... 15
Remote control transmitter ...................... 26
Remote control transmitter check ........... 72
RiDE lever................................................. 29
RiDE lever checks .................................... 71 Riding position ......................................... 78
Rustproofing ............................................ 93
S
Safe boating rules .................................... 19
Safety equipment check .......................... 73
Seats ........................................................ 50
Shift indicator ........................................... 46
Shift system ............................................. 32
Shift system check ................................... 75
Start switch .............................................. 28
Starting off ............................................... 85
Starting off from a trailer .......................... 86
Starting the engine on water .................... 78
Steering system ....................................... 29
Steering system checks ........................... 70
Stern drain plug checks ........................... 73
Stern eyes ................................................ 52
Stern storage compartment ..................... 55
Stopping the engine ................................. 79
Stopping the watercraft ........................... 81
Storage compartment checks.................. 73
Storage compartments ............................ 53
Submerged watercraft ........................... 107
Switch checks .......................................... 72
T
Throttle lever ............................................ 29
Throttle lever checks ................................ 71
Tool kit ..................................................... 94
Towing the watercraft ............................ 107
Transporting on a trailer ........................... 64
Trim indicator ........................................... 46
Trim indicator check ................................ 75
Troubleshooting ..................................... 100
Troubleshooting chart ............................ 100
Turning the watercraft .............................. 80
W
Wakeboarding and water-skiing .............. 18
Water separator ....................................... 31
Water separator check ............................. 68
Watercraft characteristics ........................ 16
Watercraft control functions..................... 26
Watercraft information ............................. 47
Watercraft operation functions ................ 32
Watercraft operation modes .................... 36
Watertight storage compartments ........... 56
UF3J71E0.book Page 110 Friday, June 27, 2014 1:50 PM