Page 56 of 118
Equipment operation
50
EJU40334
EquipmentEJU42203Seats
The front and rear seats are removable.
Remove the seats to access the engine com-
partment and removable watertight storage
compartment.
To remove the rear seat:
(1) Pull the rear seat latch up, and then lift upthe rear of the seat.
(2) Pull the seat rearward and remove it. To install the rear seat:
(1) Insert the projections on the front of the
seat into the stays on the deck.
(2) Push the rear of the seat down to secure- ly lock it in place.
To remove the front seat:
(1) Remove the rear seat.
(2) Pull the front seat latch up, and then lift up the rear of the seat.
1Seat latch
1
1Seat latch
1
UF3J71E0.book Page 50 Friday, June 27, 2014 1:50 PM
Page 57 of 118

Equipment operation
51
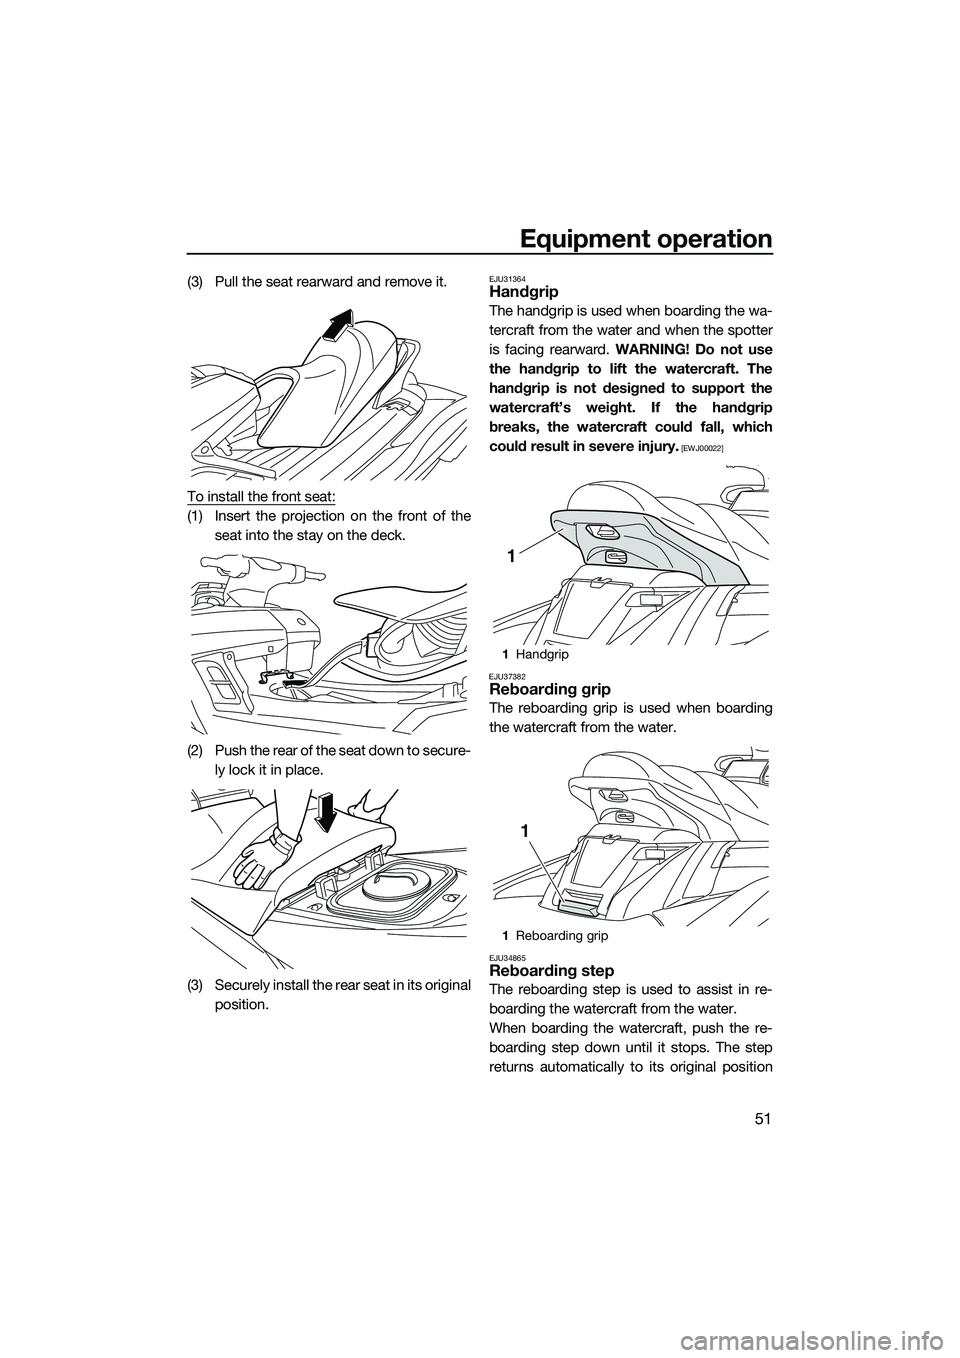
(3) Pull the seat rearward and remove it.
To install the front seat:
(1) Insert the projection on the front of theseat into the stay on the deck.
(2) Push the rear of the seat down to secure- ly lock it in place.
(3) Securely install the rear seat in its original position.
EJU31364Handgrip
The handgrip is used when boarding the wa-
tercraft from the water and when the spotter
is facing rearward. WARNING! Do not use
the handgrip to lift the watercraft. The
handgrip is not designed to support the
watercraft’s weight. If the handgrip
breaks, the watercraft could fall, which
could result in severe injury.
[EWJ00022]
EJU37382
Reboarding grip
The reboarding grip is used when boarding
the watercraft from the water.
EJU34865Reboarding step
The reboarding step is used to assist in re-
boarding the watercraft from the water.
When boarding the watercraft, push the re-
boarding step down until it stops. The step
returns automatically to its original position
1Handgrip
1 Reboarding grip
1
1
UF3J71E0.book Page 51 Friday, June 27, 2014 1:50 PM
Page 60 of 118
Equipment operation
54
To close the bow storage compartment:
Push the rear of the hood down to securely
lock it in place.
To drain water from the bow storage com-
partment:
(1) Remove the drain plug on the bottom ofthe storage compartment to drain the
water into the engine compartment.
(2) Securely install the drain plug in its origi- nal position.
EJU35164Glove compartment
The glove compartment is located in front of
the seat. To open the glove compartment:
Turn the glove compartment knob 90° to the
left or right, and then lift up the lid.
1
Drain plug
1
1Glove compartment knob
1 Glove compartment
Glove compartment:
Capacity: 7.0 L (1.8 US gal, 1.5 Imp.gal)
Load limit: 1.0 kg (2 lb)
1
1
UF3J71E0.book Page 54 Friday, June 27, 2014 1:50 PM
Page 61 of 118

Equipment operation
55
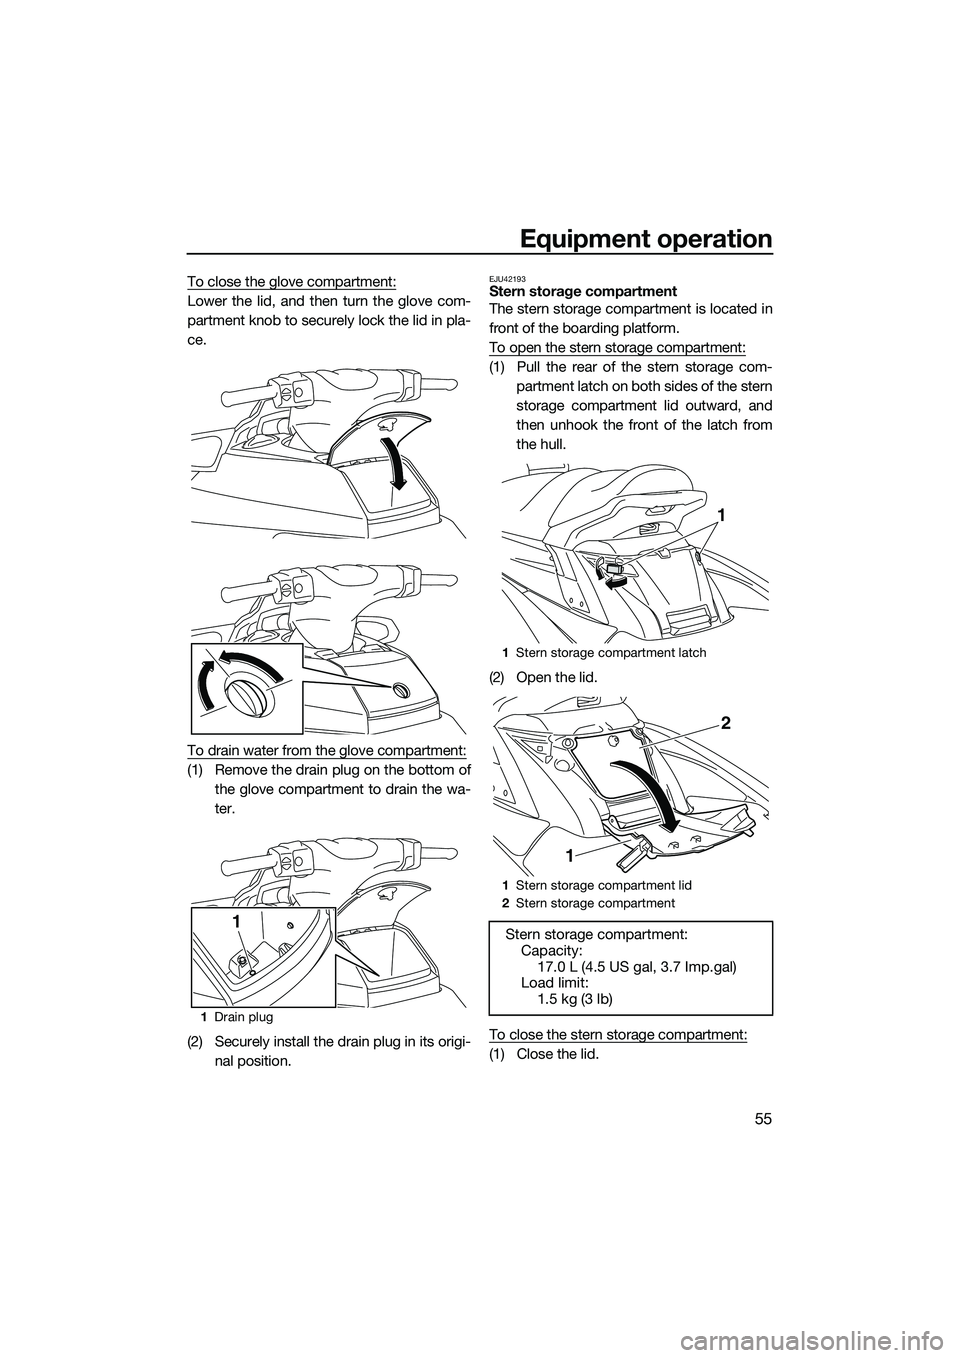
To close the glove compartment:
Lower the lid, and then turn the glove com-
partment knob to securely lock the lid in pla-
ce.
To drain water from the glove compartment:
(1) Remove the drain plug on the bottom ofthe glove compartment to drain the wa-
ter.
(2) Securely install the drain plug in its origi- nal position.
EJU42193Stern storage compartment
The stern storage compartment is located in
front of the boarding platform.
To open the stern storage compartment:
(1) Pull the rear of the stern storage com-partment latch on both sides of the stern
storage compartment lid outward, and
then unhook the front of the latch from
the hull.
(2) Open the lid.
To close the stern storage compartment:
(1) Close the lid.
1 Drain plug
1
1Stern storage compartment latch
1 Stern storage compartment lid
2 Stern storage compartment
Stern storage compartment:
Capacity:
17.0 L (4.5 US gal, 3.7 Imp.gal)
Load limit: 1.5 kg (3 lb)
1
1
2
UF3J71E0.book Page 55 Friday, June 27, 2014 1:50 PM
Page 62 of 118

Equipment operation
56
(2) Hook the front of the latch on both sidesof the lid onto the hull, and then push the
rear of the latch inward to securely lock it
in place.
TIP:
The ski rope slot in the stern storage com-
partment lid can be used to store the rope in
the stern storage compartment while the
rope is attached to the cleat.
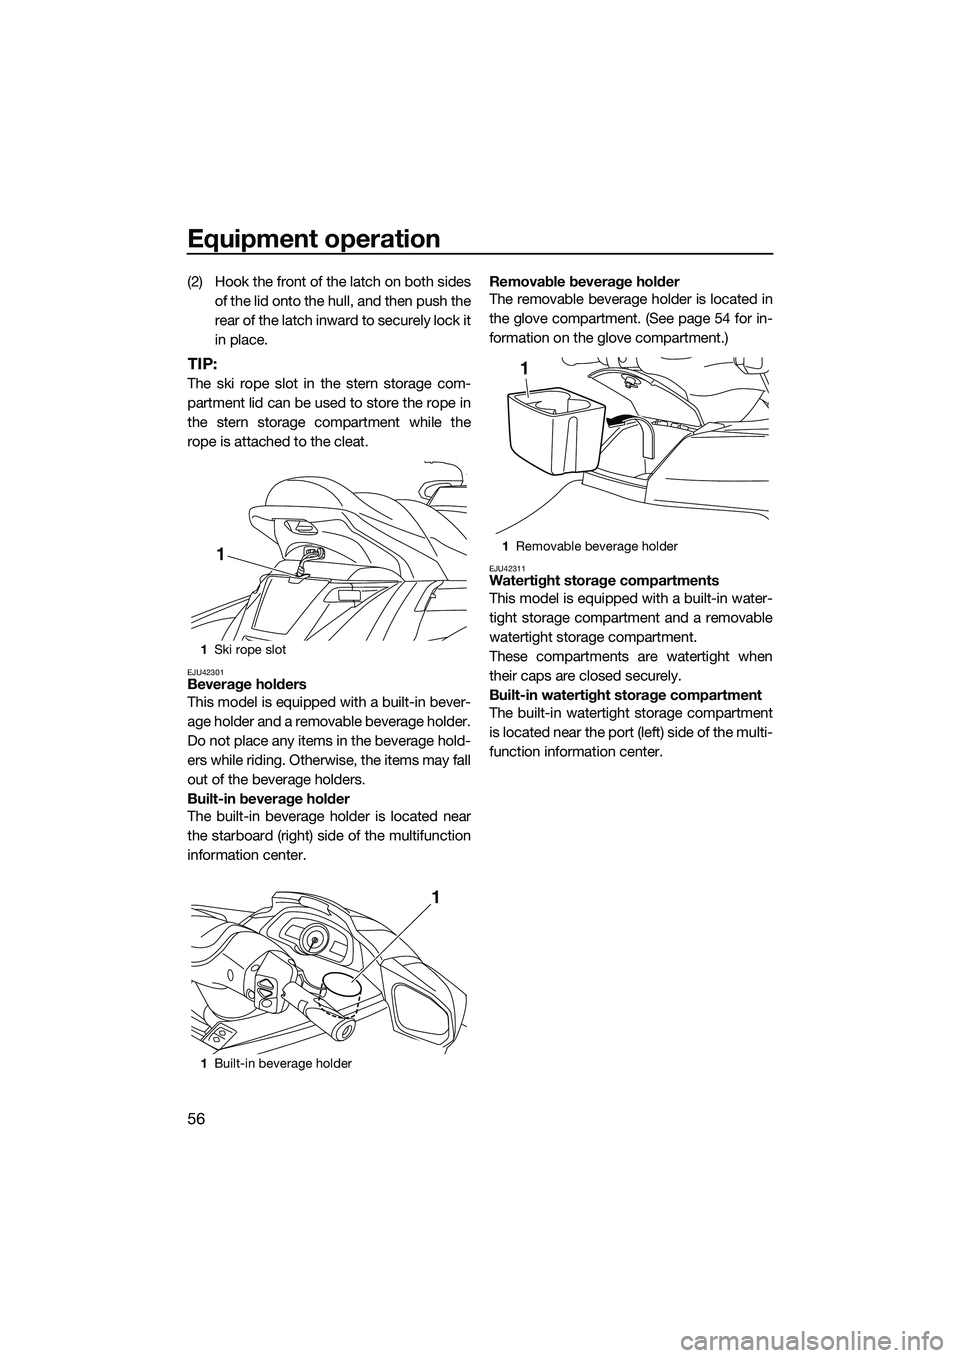
EJU42301Beverage holders
This model is equipped with a built-in bever-
age holder and a removable beverage holder.
Do not place any items in the beverage hold-
ers while riding. Otherwise, the items may fall
out of the beverage holders.
Built-in beverage holder
The built-in beverage holder is located near
the starboard (right) side of the multifunction
information center. Removable beverage holder
The removable beverage holder is located in
the glove compartment. (See page 54 for in-
formation on the glove compartment.)
EJU42311Watertight storage compartments
This model is equipped with a built-in water-
tight storage compartment and a removable
watertight storage compartment.
These compartments are watertight when
their caps are closed securely.
Built-in watertight storage compartment
The built-in watertight storage compartment
is located near the port (left) side of the multi-
function information center.
1
Ski rope slot
1 Built-in beverage holder
1
1
1Removable beverage holder
1
UF3J71E0.book Page 56 Friday, June 27, 2014 1:50 PM
Page 64 of 118
Equipment operation
58
EJU42391Fire extinguisher holder and cover
The fire extinguisher holder and cover are lo-
cated in the bow storage compartment.
To use the fire extinguisher holder and cover:
(1) Pull the hood latch rearward, and then liftup the rear of the hood.
(2) Unhook the band and remove the fire ex- tinguisher cover.
(3) Place the fire extinguisher in the holder, and then place the cover over the fire ex-
tinguisher.
(4) Securely fasten the cover and the fire ex- tinguisher with the band.
(5) Push the rear of the hood down to se- curely lock it in place. Make sure that the hood is securely closed before using the
watercraft.
1
Hood latch
1 Fire extinguisher holder and cover
2 Band
1
1
2
UF3J71E0.book Page 58 Friday, June 27, 2014 1:50 PM
Page 66 of 118

Operation and handling requirements
60
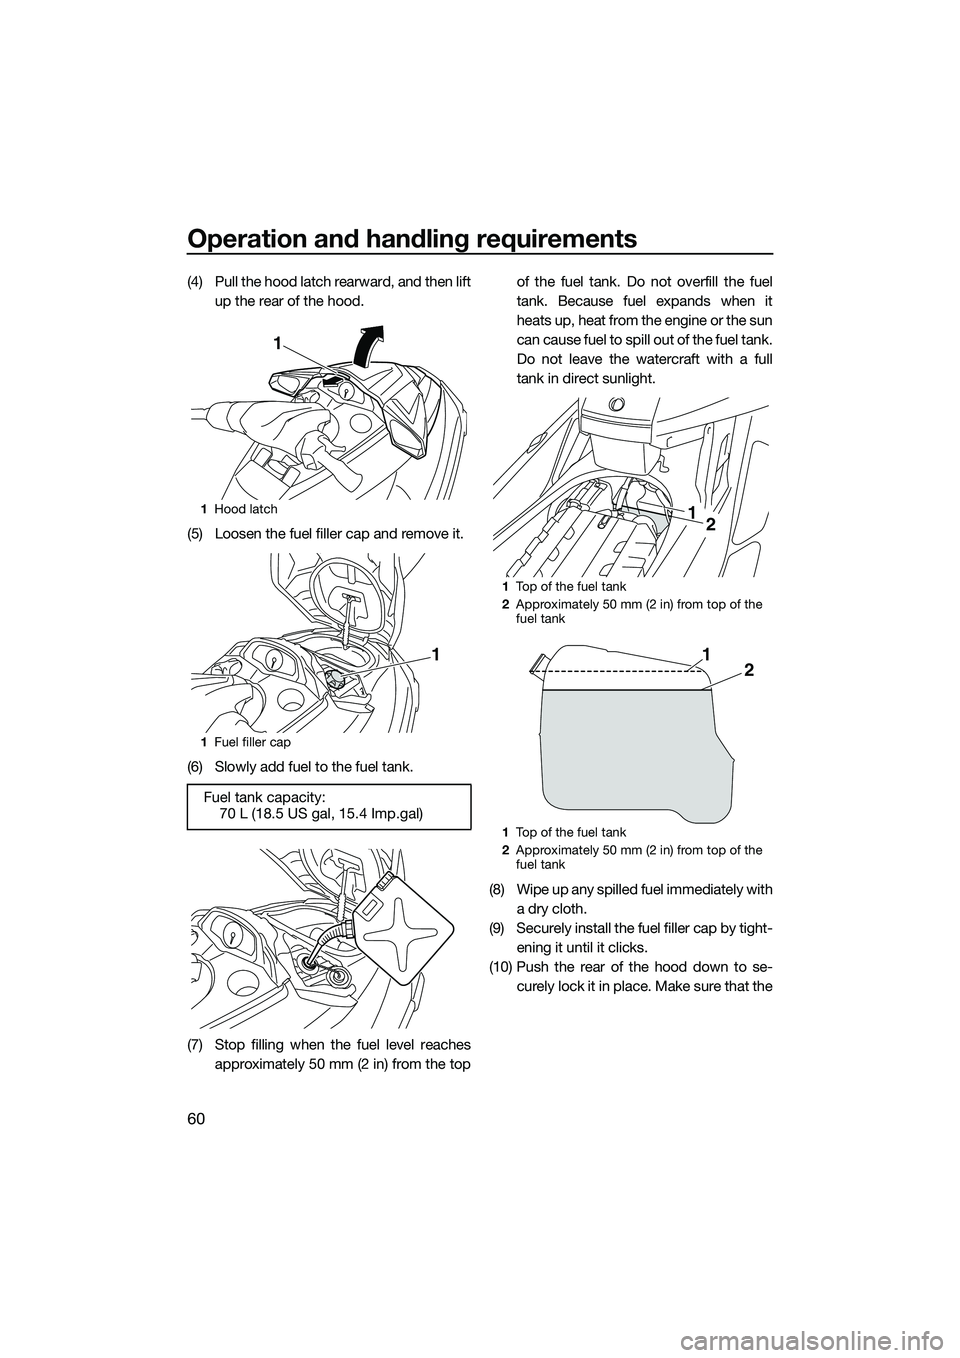
(4) Pull the hood latch rearward, and then liftup the rear of the hood.
(5) Loosen the fuel filler cap and remove it.
(6) Slowly add fuel to the fuel tank.
(7) Stop filling when the fuel level reaches approximately 50 mm (2 in) from the top of the fuel tank. Do not overfill the fuel
tank. Because fuel expands when it
heats up, heat from the engine or the sun
can cause fuel to spill out of the fuel tank.
Do not leave the watercraft with a full
tank in direct sunlight.
(8) Wipe up any spilled fuel immediately with a dry cloth.
(9) Securely install the fuel filler cap by tight- ening it until it clicks.
(10) Push the rear of the hood down to se- curely lock it in place. Make sure that the
1Hood latch
1 Fuel filler cap
Fuel tank capacity:
70 L (18.5 US gal, 15.4 Imp.gal)
1
1
1Top of the fuel tank
2 Approximately 50 mm (2 in) from top of the
fuel tank
1 Top of the fuel tank
2 Approximately 50 mm (2 in) from top of the
fuel tank
21
21
UF3J71E0.book Page 60 Friday, June 27, 2014 1:50 PM
Page 72 of 118

Pre-operation checks
66
EJU31982
WARNING
EWJ00412
Failure to inspect or maintain the watercraft properly increases the possibility of an ac-
cident or damage to the watercraft. Do not operate the watercraft if you find any prob-
lem. If a problem cannot be corrected by the procedures provided in this manual, have
the watercraft inspected by a Yamaha dealer.
EJU41234Pre-operation checklist
Before using this watercraft, be sure to perform the checks in the following checklist.
ITEMROUTINEPAGE
PRE-LAUNCH CHECKS
Engine compartment Ventilate the engine compartment.
Check inside the engine compartment for damage.
68
Fuel system Check the fuel system for leakage.
Check the fuel level in the fuel tank.
68
Water separator Check the water separator for water. 68
Engine unit Check the exterior of the engine unit for damage. 69
Engine oil level Check the engine oil level. 69
Bilge water Check the engine compartment for bilge water. 69
Battery Check the battery connections and electrolyte level. 69
Steering system Check the steering system for proper operation. 70
Adjustable tilt steering sys-
tem Check the adjustable tilt steering system for proper
operation and check that the handlebars are se-
curely locked in place.
71
RiDE lever Check the RiDE lever for proper operation. 71
Throttle lever Check the throttle lever for proper operation. 71
Remote control transmitter Check the remote control transmitter for proper op-
eration.
72
Engine shut-off cord (lan-
yard) Check the engine shut-off cord (lanyard) for dam-
age.
72
Switches Check the start switch, engine stop switch, and en-
gine shut-off switch for proper operation.
72
Storage compartments Check the storage compartments for damage and
water.
73
Fire extinguisher holder,
cover, and band Check the fire extinguisher holder, cover, and band
for damage.
73
Fire extinguisher Check the condition of the fire extinguisher. 73
Safety equipment Check that safety equipment meeting the applica-
ble regulations is on board.
73
Hull and deck Check the hull and deck for damage. 73
Jet intake Check the jet intake for damage and clogging. 73
UF3J71E0.book Page 66 Friday, June 27, 2014 1:50 PM