2015 YAMAHA FX HO CRUISER engine
[x] Cancel search: enginePage 91 of 118

Operation
85
throttle lever when trying to steer away
from objects—you need throttle to
steer.
NOTICE
ECJ01341
Never run the engine in water that is less
than 60 cm (2 ft) deep from the bottom of
the watercraft, otherwise pebbles or sand
could be sucked into the jet intake, caus-
ing impeller damage and engine overheat-
ing.
EJU43271Starting off from a trailer
(1) Launch the watercraft.
(2) Attach the engine shut-off cord (lanyard)
to your left wrist, and then attach the clip
to the engine shut-off switch.
(3) Look in all directions, and then start the
engine.
(4) Squeeze the RiDE lever and move the
watercraft back slowly. (See page 32 for
RiDE lever operation procedures.)
EJU33114Boarding and starting off from a dock
(1) Board the watercraft from the side.
(2) Attach the engine shut-off cord (lanyard)
to your left wrist, and then attach the clip
to the engine shut-off switch.
(3) Push the watercraft away from the dock,
grip the handlebars with both hands, andplace both feet on the floor of the foot-
well.
(4) Look in all directions, start the engine,
and then start off slowly.
EJU33236Capsized watercraft
WARNING
EWJ00672
Improper uprighting can cause injury.
Be sure to shut the engine off by pulling
on the engine shut-off cord (lanyard) to
remove the clip from the engine shut-off
switch.
Do not put your hands in the intake
grate.
If the watercraft capsizes, turn it over imme-
diately.
To upright the watercraft:
(1) Remove the clip from the engine shut-off
switch.
(2) Swim to the rear of the watercraft. Turn
the watercraft over clockwise by pulling
on the ride plate with your left hand while
pushing down on the gunwale with your
right hand or foot.
If the port (left) side of the capsized wa-
tercraft is tilting up, push down on the
gunwale so that the port (left) side is
down before turning the watercraft
clockwise. NOTICE: Do not turn the
watercraft over counterclockwise,
UF2T74E0.book Page 85 Wednesday, July 2, 2014 11:17 AM
Page 92 of 118
![YAMAHA FX HO CRUISER 2015 Owners Manual Operation
86
otherwise water can enter the engine,
which can result in severe damage.
[ECJ00542]
(3) Start the engine and operate the water-
craft at planing speed to drain the bilge
water from the en YAMAHA FX HO CRUISER 2015 Owners Manual Operation
86
otherwise water can enter the engine,
which can result in severe damage.
[ECJ00542]
(3) Start the engine and operate the water-
craft at planing speed to drain the bilge
water from the en](/manual-img/51/49822/w960_49822-91.png)
Operation
86
otherwise water can enter the engine,
which can result in severe damage.
[ECJ00542]
(3) Start the engine and operate the water-
craft at planing speed to drain the bilge
water from the engine compartment.
(See page 62 for information on draining
the bilge water. If the engine does not
start, see “Towing the watercraft” on
page 106 or “Submerged watercraft” on
page 106.) NOTICE: Do not run the en-
gine at full throttle for at least 1 minute
after the engine has been restarted.
Bilge water in the engine compart-
ment can splash into the engine,
which can result in severe damage.
[ECJ00554]
EJU43281
Beaching and docking the watercraft
To beach the watercraft:
(1) Make sure that there are no boats, swim-
mers, or obstacles near the beach.(2) Release the throttle lever to reduce
speed about 110 m (360 ft) before you
reach the intended beaching area.
(3) Slowly approach the beach using the
throttle lever and RiDE lever to control
the watercraft speed.
(4) After reaching land, stop the engine, and
then get off the watercraft and pull it up
on the beach.
To dock the watercraft:
(1) Make sure that there are no boats, swim-
mers, or obstacles near the dock.
(2) Release the throttle lever to reduce
speed about 110 m (360 ft) away from
the dock.
(3) Slowly approach the dock using the
throttle lever and RiDE lever to control
the watercraft speed.
(4) After coming alongside the dock, stop
the engine, and then get off the water-
craft.
EJU37194Operating in weeded areas
Always avoid using your watercraft in areas
where weed growth is thick. If operating in
weeded areas is unavoidable, alternately
squeeze the throttle lever and relax your grip
on the throttle lever to vary the engine speed.
Weeds tend to become clogged more when
operating at a steady speed and at trolling
speed. If weeds may have clogged the intake
area, clean the jet intake. (See page 102 for
information on the jet intake.)
EJU40242After removing the watercraft from
the water
NOTICE
ECJ01311
Do not run the engine over 4000 r/min on
land. Also, do not run the engine for more
than 15 seconds without supplying water,
otherwise the engine could overheat.
UF2T74E0.book Page 86 Wednesday, July 2, 2014 11:17 AM
Page 93 of 118

Operation
87
After operating and removing the watercraft
from the water, promptly discharge the re-
maining water from the cooling water pas-
sages.
To discharge water from the cooling water
passages:
(1) Make sure that the area around the wa-
tercraft is clear, and then start the en-
gine.
(2) Discharge the remaining water out of the
cooling water passages by alternately
squeezing and releasing the throttle lever
quickly for 10 to 15 seconds.
(3) Stop the engine.
UF2T74E0.book Page 87 Wednesday, July 2, 2014 11:17 AM
Page 94 of 118
Care and storage
88
EJU37146
Post-operation care
WARNING
EWJ00331
Always place the watercraft upright in a
horizontal position when storing it, other-
wise fuel could leak out into the engine or
engine compartment, which could create
a fire hazard.
After using the watercraft, always take it out
of the water, clean it, and store it. Leaving the
watercraft in the water for extended periods
will accelerate the rate of normal deteriora-
tion of the jet pump and hull. Marine organ-
isms and corrosion are some of the
conditions that can shorten the life of many
watercraft components.
EJU42221Flushing the cooling water passages
NOTICE
ECJ01311
Do not run the engine over 4000 r/min on
land. Also, do not run the engine for more
than 15 seconds without supplying water,
otherwise the engine could overheat.
Flush the cooling water passages to prevent
them from clogging with salt, sand, or dirt.
(1) Place the watercraft in a horizontal posi-
tion.
(2) Remove the seats and removable water-
tight storage compartment. (See page 49
for seat removal and installation proce-
dures and page 55 for information on the
removable watertight storage compart-
ment.)
(3) Open the stern storage compartment.
(See page 54 for information on the stern
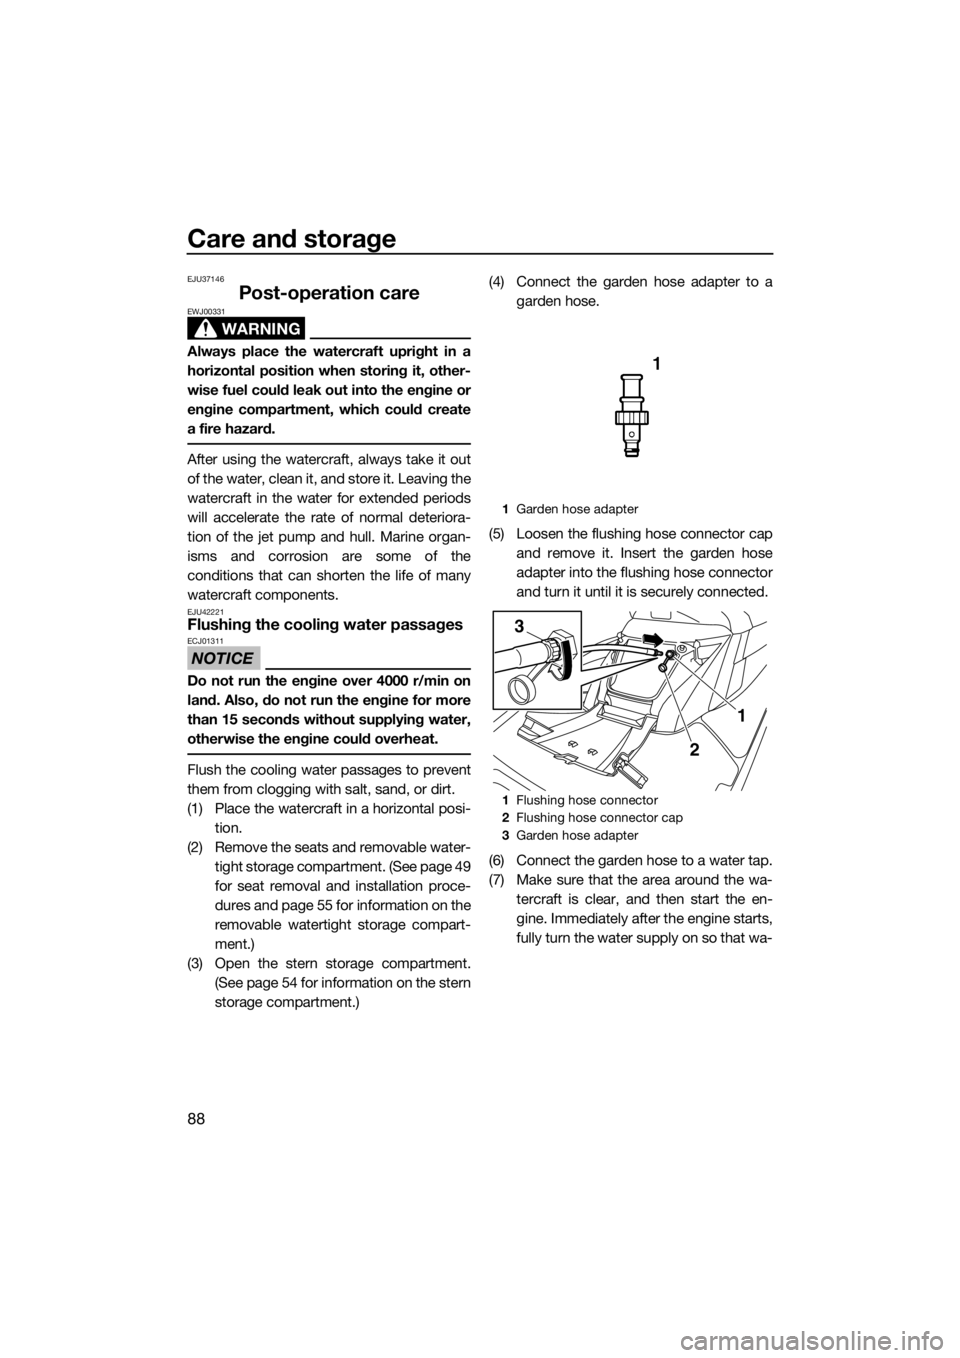
storage compartment.)(4) Connect the garden hose adapter to a
garden hose.
(5) Loosen the flushing hose connector cap
and remove it. Insert the garden hose
adapter into the flushing hose connector
and turn it until it is securely connected.
(6) Connect the garden hose to a water tap.
(7) Make sure that the area around the wa-
tercraft is clear, and then start the en-
gine. Immediately after the engine starts,
fully turn the water supply on so that wa-
1Garden hose adapter
1Flushing hose connector
2Flushing hose connector cap
3Garden hose adapter
1
3
2
UF2T74E0.book Page 88 Wednesday, July 2, 2014 11:17 AM
Page 95 of 118
Care and storage
89
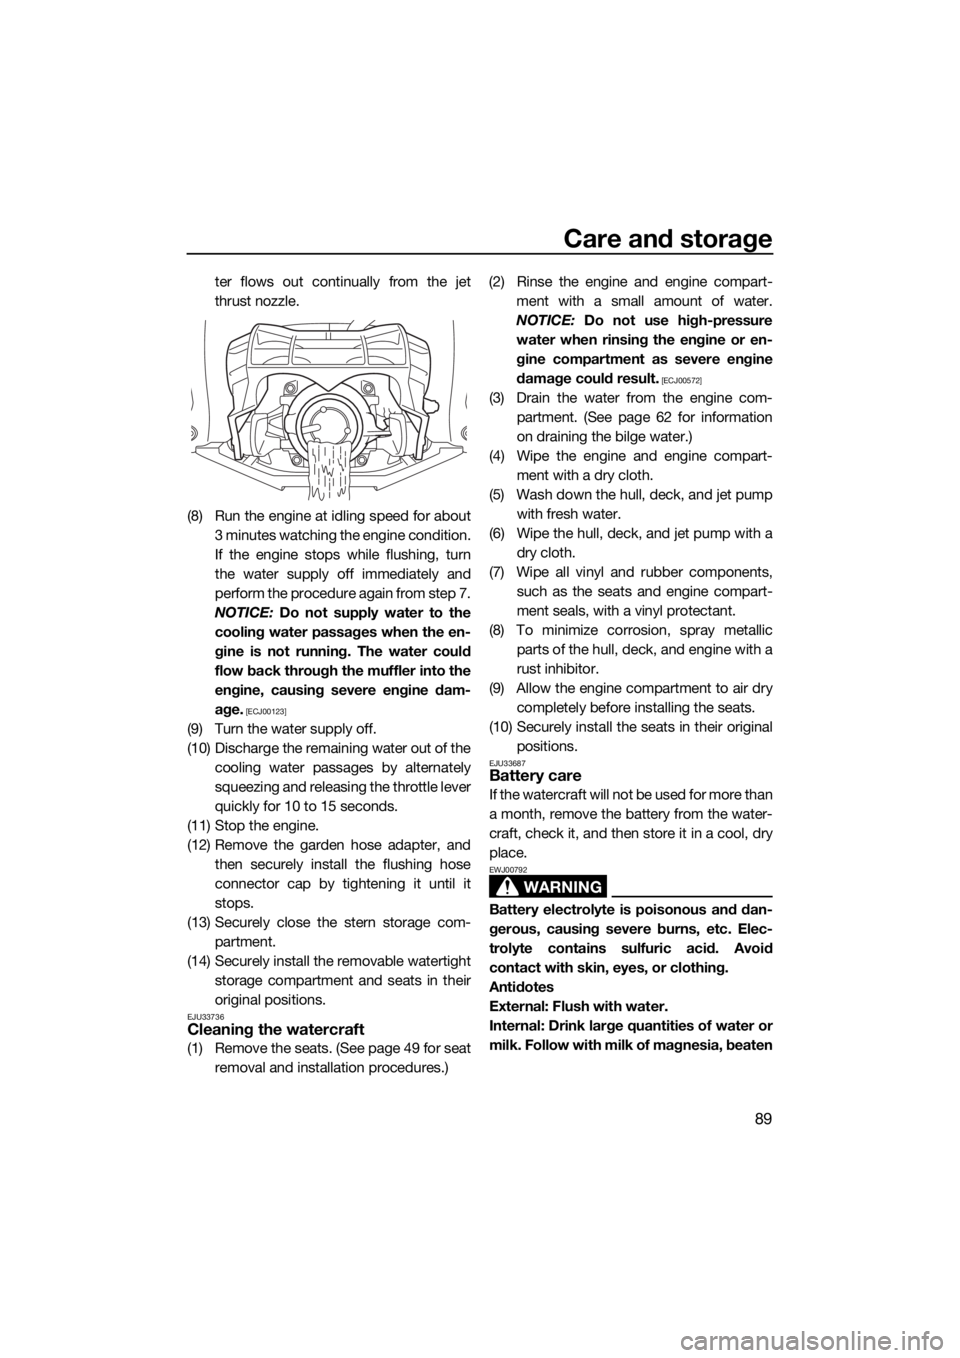
ter flows out continually from the jet
thrust nozzle.
(8) Run the engine at idling speed for about
3 minutes watching the engine condition.
If the engine stops while flushing, turn
the water supply off immediately and
perform the procedure again from step 7.
NOTICE: Do not supply water to the
cooling water passages when the en-
gine is not running. The water could
flow back through the muffler into the
engine, causing severe engine dam-
age.
[ECJ00123]
(9) Turn the water supply off.
(10) Discharge the remaining water out of the
cooling water passages by alternately
squeezing and releasing the throttle lever
quickly for 10 to 15 seconds.
(11) Stop the engine.
(12) Remove the garden hose adapter, and
then securely install the flushing hose
connector cap by tightening it until it
stops.
(13) Securely close the stern storage com-
partment.
(14) Securely install the removable watertight
storage compartment and seats in their
original positions.
EJU33736Cleaning the watercraft
(1) Remove the seats. (See page 49 for seat
removal and installation procedures.)(2) Rinse the engine and engine compart-
ment with a small amount of water.
NOTICE: Do not use high-pressure
water when rinsing the engine or en-
gine compartment as severe engine
damage could result.
[ECJ00572]
(3) Drain the water from the engine com-
partment. (See page 62 for information
on draining the bilge water.)
(4) Wipe the engine and engine compart-
ment with a dry cloth.
(5) Wash down the hull, deck, and jet pump
with fresh water.
(6) Wipe the hull, deck, and jet pump with a
dry cloth.
(7) Wipe all vinyl and rubber components,
such as the seats and engine compart-
ment seals, with a vinyl protectant.
(8) To minimize corrosion, spray metallic
parts of the hull, deck, and engine with a
rust inhibitor.
(9) Allow the engine compartment to air dry
completely before installing the seats.
(10) Securely install the seats in their original
positions.
EJU33687Battery care
If the watercraft will not be used for more than
a month, remove the battery from the water-
craft, check it, and then store it in a cool, dry
place.
WARNING
EWJ00792
Battery electrolyte is poisonous and dan-
gerous, causing severe burns, etc. Elec-
trolyte contains sulfuric acid. Avoid
contact with skin, eyes, or clothing.
Antidotes
External: Flush with water.
Internal: Drink large quantities of water or
milk. Follow with milk of magnesia, beaten
UF2T74E0.book Page 89 Wednesday, July 2, 2014 11:17 AM
Page 98 of 118
Care and storage
92
EJU33493
Long-term storage
WARNING
EWJ00331
Always place the watercraft upright in a
horizontal position when storing it, other-
wise fuel could leak out into the engine or
engine compartment, which could create
a fire hazard.
Storage for long periods of time, such as win-
ter storage, requires preventive maintenance
to ensure against deterioration. It is advisable
to have the watercraft serviced by a Yamaha
dealer prior to storage.
However, the following procedures can be
performed easily by the owner.
EJU40763Cleaning
(1) Flush the cooling water passages. (See
page 88 for information on flushing the
cooling water passages.)
TIP:
If you will be storing the watercraft for a pro-
longed period, such as winter storage, top off
the fuel tank with fresh gasoline and add fuel
stabilizer and conditioner to the fuel tank ac-
cording to the manufacturer’s instruction be-
fore starting the engine.
(2) Clean the watercraft. (See page 89 for in-
formation on cleaning the watercraft.)
Wax the hull with a non-abrasive wax.
EJU43301Lubrication
Use a suitable marine grease applicator and
spray a rust inhibitor between the inner and
outer cables to lubricate the cables and
purge out any dirt and moisture.
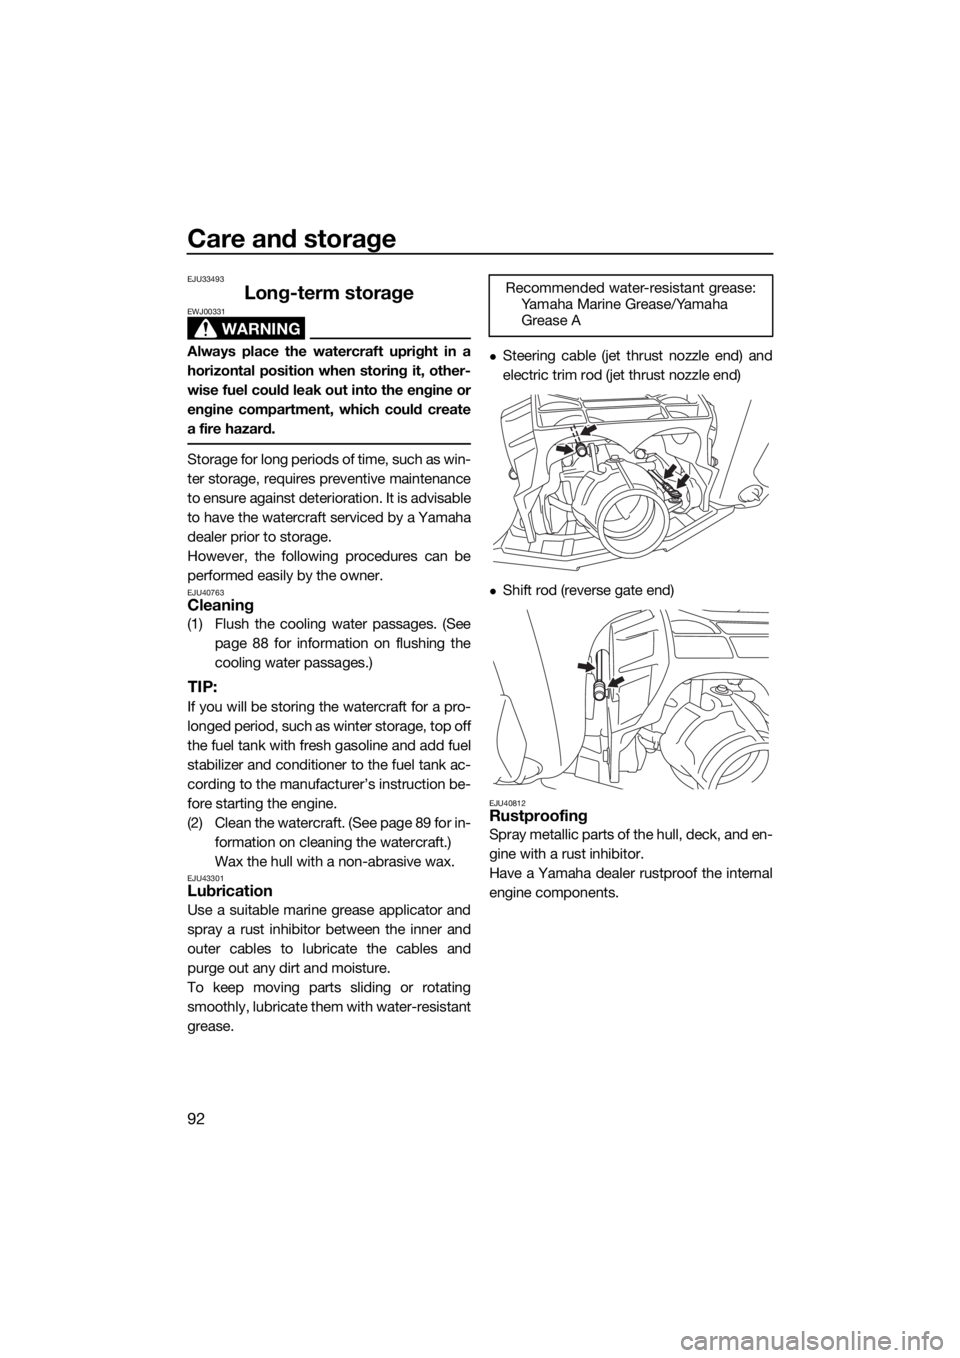
To keep moving parts sliding or rotating
smoothly, lubricate them with water-resistant
grease.
Steering cable (jet thrust nozzle end) and
electric trim rod (jet thrust nozzle end)
Shift rod (reverse gate end)
EJU40812Rustproofing
Spray metallic parts of the hull, deck, and en-
gine with a rust inhibitor.
Have a Yamaha dealer rustproof the internal
engine components.Recommended water-resistant grease:
Yamaha Marine Grease/Yamaha
Grease A
UF2T74E0.book Page 92 Wednesday, July 2, 2014 11:17 AM
Page 99 of 118
Maintenance
93
EJU33769
Maintenance
Periodic checks and lubrication will keep
your watercraft in the safest and most effi-
cient condition possible. Therefore, make
sure to carry out the periodic maintenance.
Safety is an obligation of the watercraft own-
er. Proper maintenance must be carried out
to keep the exhaust emission and sound lev-
els within the regulated limits. The most im-
portant points of watercraft inspection and
lubrication are explained on the following pa-
ges.
See a Yamaha dealer for genuine Yamaha re-
placement parts and optional accessories
designed for your watercraft.
Remember, failures that are the result of the
installation of parts or accessories which are
not qualitatively equivalent to genuine
Yamaha parts are not covered by the limited
warranty.
Maintenance, replacement, or repair of
the emission control devices and system
may be performed by any marine SI engine
repair establishment or individual. War-
ranty repair, however, must be performed
at an authorized Yamaha marine dealer-
ship.
WARNING
EWJ00312
Be sure to turn off the engine when you
perform maintenance unless otherwise
specified. If you are not familiar with ma-
chine servicing, this work should be done
by a Yamaha dealer or other qualified me-
chanic.
EJU33803Tool kit
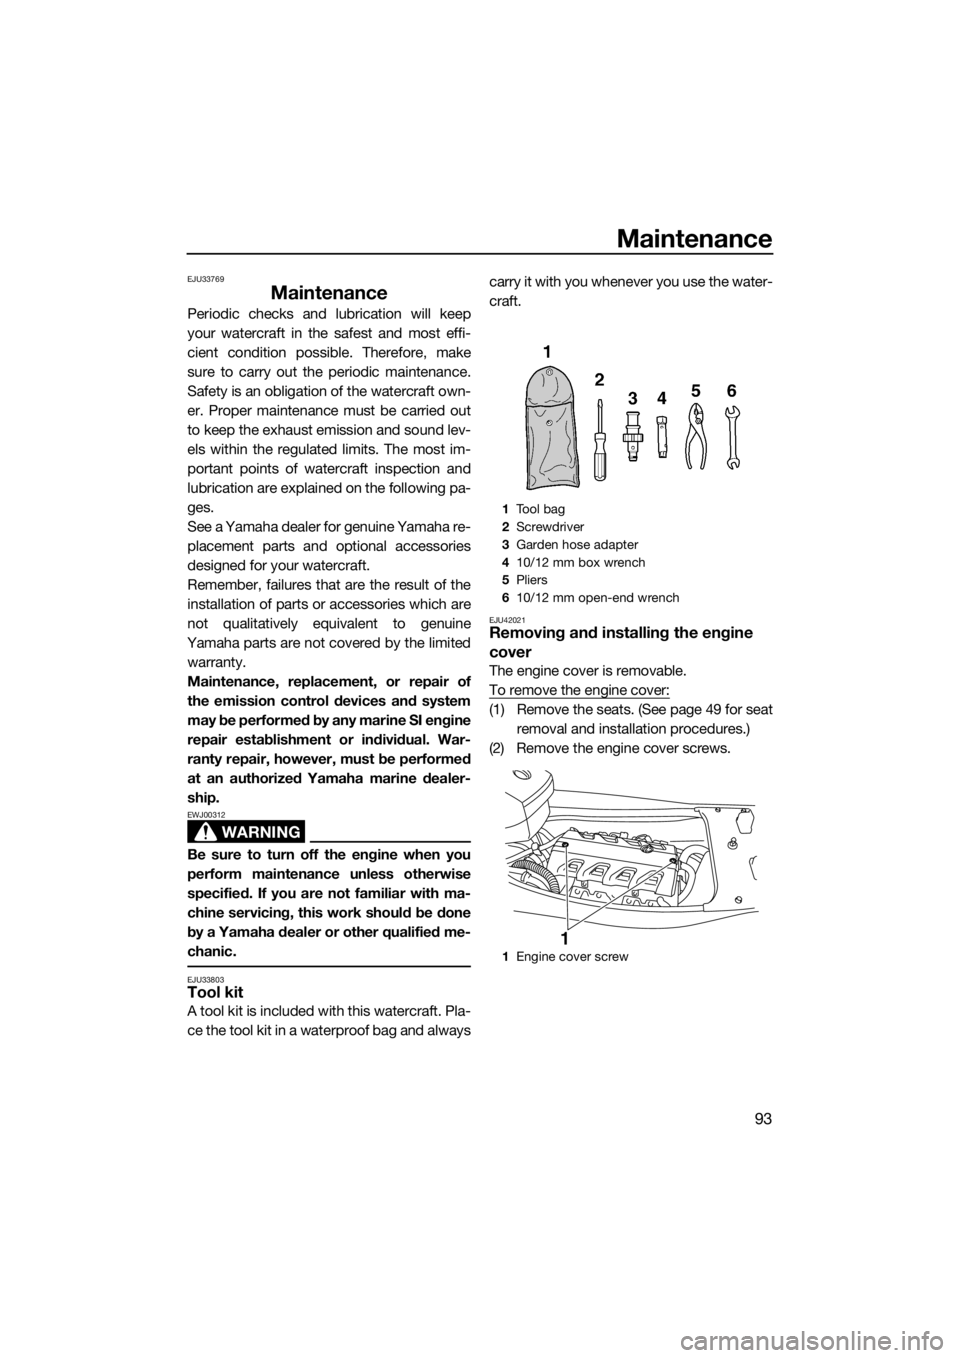
A tool kit is included with this watercraft. Pla-
ce the tool kit in a waterproof bag and alwayscarry it with you whenever you use the water-
craft.
EJU42021Removing and installing the engine
cover
The engine cover is removable.
To remove the engine cover:
(1) Remove the seats. (See page 49 for seat
removal and installation procedures.)
(2) Remove the engine cover screws.
1Tool bag
2Screwdriver
3Garden hose adapter
410/12 mm box wrench
5Pliers
610/12 mm open-end wrench
1Engine cover screw
1
UF2T74E0.book Page 93 Wednesday, July 2, 2014 11:17 AM
Page 100 of 118
Maintenance
94
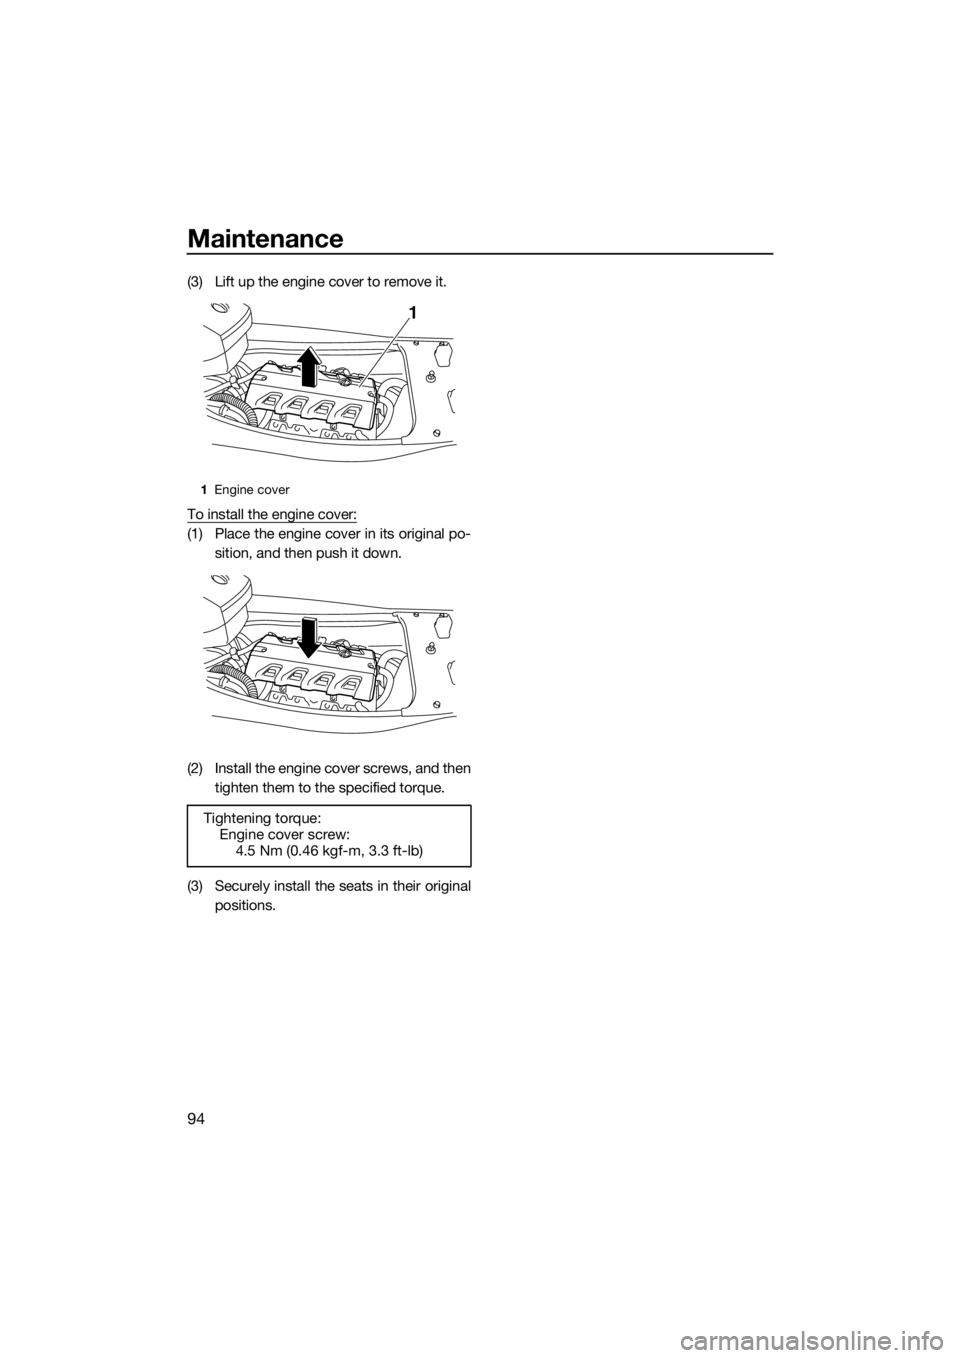
(3) Lift up the engine cover to remove it.
To install the engine cover:
(1) Place the engine cover in its original po-
sition, and then push it down.
(2) Install the engine cover screws, and then
tighten them to the specified torque.
(3) Securely install the seats in their original
positions.
1Engine cover
Tightening torque:
Engine cover screw:
4.5 Nm (0.46 kgf-m, 3.3 ft-lb)
1
UF2T74E0.book Page 94 Wednesday, July 2, 2014 11:17 AM