2015 VOLVO V60 check engine
[x] Cancel search: check enginePage 344 of 414

08 Wheels and tires
Tire Pressure Monitoring System (TPMS)
08
342* Option/accessory, for more information, see Introduction.
NOTE
• If you change to tires with a different recommended inflation pressure, theTPMS system must be recalibrated tothese tires. On U.S. models, this mustbe done by a trained and qualifiedVolvo service technician. On Canadianmodels, see the following section"Recalibrating TPMS."
• If a tire is changed, or if the TPMS sen-sor is moved to another wheel, thesensor's seal, nut, and valve coreshould be replaced.
• When installing TPMS sensors, thevehicle must be parked for at least15 minutes with the ignition off. If thevehicle is driven within 15 minutes, aTPMS error message will be displayed.
Recalibrating TPMS (Canadian models only)*
In certain cases, it may be necessary to reca- librate TPMS to conform to Volvo's recom-mended tire inflation pressures (see the infla-tion pressure table on page 320), for exam-ple, if higher inflation pressure is necessarywhen transporting heavy loads, etc. This is done in the vehicle's menu system. See page 219 for a description of the menusystem. To recalibrate:
1. Switch off the engine.
2. Inflate the tires to the desired pressure
and put the ignition in mode I or II (see
page 91 for additional information).
3. Press the MY CAR key in the center con-
sole control panel and select
Settings
Car settingsTyre pressure
4. Press OK/MENU , select Calibrate tyre
pressure and press OK/MENU again.
5. Drive the vehicle at a speed above 25 mph (40 km/h) continuously for at least 10 minutes.
> When the calibration message is nolonger displayed, TPMS has been recalibrated to the new inflation pres-sure.
Activating/deactivating TPMS
(Canadian models only)*
1. Switch off the engine.
2. Put the ignition in mode I or II (see page
91 for additional information).
3. Press the MY CAR key in the center con-
sole control panel and select
Settings
Car settingsTyre pressure
4. Select Tyre pressure system and press
OK/MENU to turn the system on or off.
Self-supporting run flat tires (SST)*
Self-supporting run flat tires are available as optional equipment. The vehicle must beequipped with the Tire Pressure MonitoringSystem (TPMS) if tires of this type are instal-led. Tires of this type have specially reinforced sidewalls that make it possible to continuedriving to a limited extent even though the tirehas lost some or all of its inflation pressure.These tires are mounted on special rims (nor-mal tires can also be mounted on these rims). If an SST tire loses inflation pressure, the yel- low TPMS symbol illuminates in the instru-ment panel and a text message is also dis-played. If this happens, reduce speed to notmore than 50 mph (80 km/h). The tire shouldbe replaced as soon as possible. Drive carefully; it may be difficult to determine which tire is damaged. To find the damagedtire, check the inflation pressure in all fourtires.
Page 349 of 414

09 Maintenance and specifications
Maintaining your car09
}}
347
Owner maintenance
Periodic maintenance requirements and inter- vals are described in your vehicle's Warrantyand Service Records Information booklet. The following points can be carried out between the normally scheduled maintenanceservices.
Each time the car is refueled:
•Check the engine oil level.
• Clean the windshield, windshield wipers, headlights, and taillights.
Monthly:
• Check cold tire pressure in all tires.Inspect the tires for wear.
• Check that engine coolant and other fluidlevels are between the indicated "min"and "max" markings.
• Clean interior glass surfaces with a glasscleaner and soft paper towels.
• Wipe driver information displays with asoft cloth.
• Visually inspect battery terminals for cor-rosion. Corrosion may indicate a looseterminal connector, or a battery near theend of its useful service life. Consult yourVolvo retailer for additional information.
As needed:Wash the car, including the undercarriage, to reduce wear that can be caused by a buildupof dirt, and corrosion that can be caused bysalt residues. Clean leaves and twigs from air intake vents at the base of the windshield, and from otherplaces where they may collect.
NOTE
Complete service information for qualified technicians is available online for purchaseor subscription at www.volvotechinfo.com.
Page 350 of 414

09 Maintenance and specifications
Maintaining your car 09
348
Hoisting the vehicle
If a garage jack is used to lift the vehicle, it should be placed: Front: under either of the two reinforced
areas under the front section of the vehicle, not under to jack attachment points (the outermost points shown in the illustration) .
Rear : Under the jack attachment points.
Ensure that the jack is positioned so that the vehicle cannot slide off it. Always use axlestands or similar structures.Emission inspection readiness
What is an Onboard Diagnostic System (OBD II)?
OBD II is part of your vehicle's computerized engine management system. It stores diag-nostic information about your vehicle's emis-sion controls. It can light the Check Enginelight (MIL) if it detects an emission control"fault." A "fault" is a component or systemthat is not performing within an expectedrange. A fault may be permanent or tempo-rary. OBD II will store a message about anyfault.
How do states use OBD II for emission inspections?
Many states connect a computer directly to a vehicle's OBD II system. The inspector canthen read "faults." In some states, this type ofinspection has replaced the tailpipe emissiontest.
How can my vehicle fail OBD II emission inspection?
Your vehicle can fail OBD II emission inspec-tion for any of the following reasons.
Page 351 of 414

09 Maintenance and specifications
Maintaining your car09
349
•
If your Check Engine (MIL) light is lit, your vehicle may fail inspection.
• If your vehicle's Check Engine light waslit, but went out without any action onyour part, OBD II will still have a recordedfault. Your vehicle may pass or fail,depending on the inspection practices inyour area.
• If you had recent service that requireddisconnecting the battery, OBD II diag-nostic information may be incompleteand "not ready" for inspection. A vehiclethat is not ready may fail inspection.
How can I prepare for my next OBD II
emission inspection?
• If your Check Engine (MIL) light is lit – orwas lit but went out without service, haveyour vehicle diagnosed and, if necessary,serviced by a qualified Volvo technician.
• If you recently had service for a lit CheckEngine light, or if you had service thatrequired disconnecting the battery, aperiod of driving is necessary to bring theOBD II system to "ready" for inspection.Two half-hour trips of mixed stop-and-go/highway driving are typically neededto allow OBD II to reach readiness. YourVolvo retailer can provide you with moreinformation on planning a trip.
• Maintain your vehicle in accordance withyour vehicle's maintenance schedule.
Page 352 of 414

09 Maintenance and specifications
Hood and engine compartment 09
350
Opening and closing the hood
Turn the handle located under the left side of the dash approximately 20-25degrees clockwise to release the hoodlock.
Lift the hood slightly. Press the release control (located under the right front edgeof the hood) to the left, and lift the hood.
WARNING
Check that the hood locks properly when closed.
Engine compartment, overview
Coolant expansion tank
Power steering fluid reservoir
Dipstick-engine oil
Filler cap-engine oil
Cover over brake fluid reservoir
Battery
Relay/fuse box
Washer fluid reservoir
Engine compartment - 4-cylinder engines only
Filler cap-engine oil
Coolant expansion tank
Radiator
Brake fluid reservoir
Battery
Relay/fuse box
Washer fluid reservoir
Air cleaner
The appearance of the engine compartment may vary depending on engine model.
Page 354 of 414

09 Maintenance and specifications
Engine oil 09
352
Checking the engine oil
The oil level should be checked at regular intervals, particularly during the period up tothe first scheduled maintenance service.• See page 393 for oil specifications.
• Also, refer to the Warranty and Service Records information booklet for informa-tion on oil change intervals and oil speci-fications.
CAUTION
•Not checking the oil level regularly can result in serious engine damage if theoil level becomes too low.
• Oil that is lower than the specifiedquality can damage the engine.
• Volvo does not recommend the use ofoil additives.
• Always add oil of the same type andviscosity as already used.
• Never fill oil above the
MAX mark. This
could cause an increase in oil con-sumption.
• Oil changes should be carried out by atrained and qualified Volvo servicetechnician.
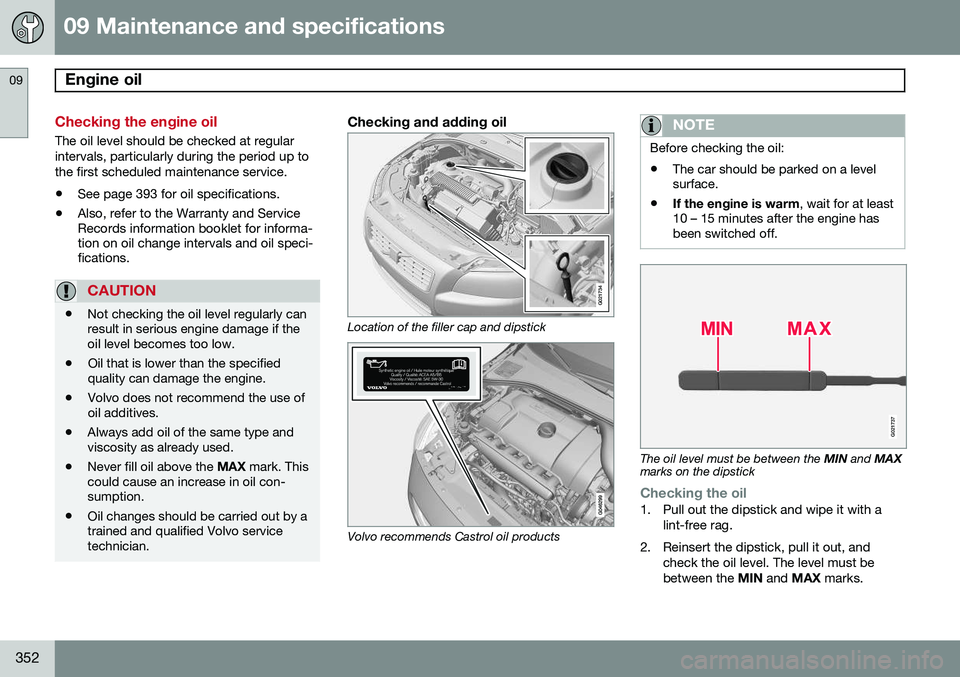
Checking and adding oil
G021734
Location of the filler cap and dipstick
Volvo recommends Castrol oil products
NOTE
Before checking the oil: •The car should be parked on a level surface.
• If the engine is warm
, wait for at least
10 – 15 minutes after the engine hasbeen switched off.
G021737
The oil level must be between the MIN and MAX
marks on the dipstick
Checking the oil1. Pull out the dipstick and wipe it with a
lint-free rag.
2. Reinsert the dipstick, pull it out, and check the oil level. The level must be between the MIN and MAX marks.
Page 355 of 414

09 Maintenance and specifications
Engine oil09
353
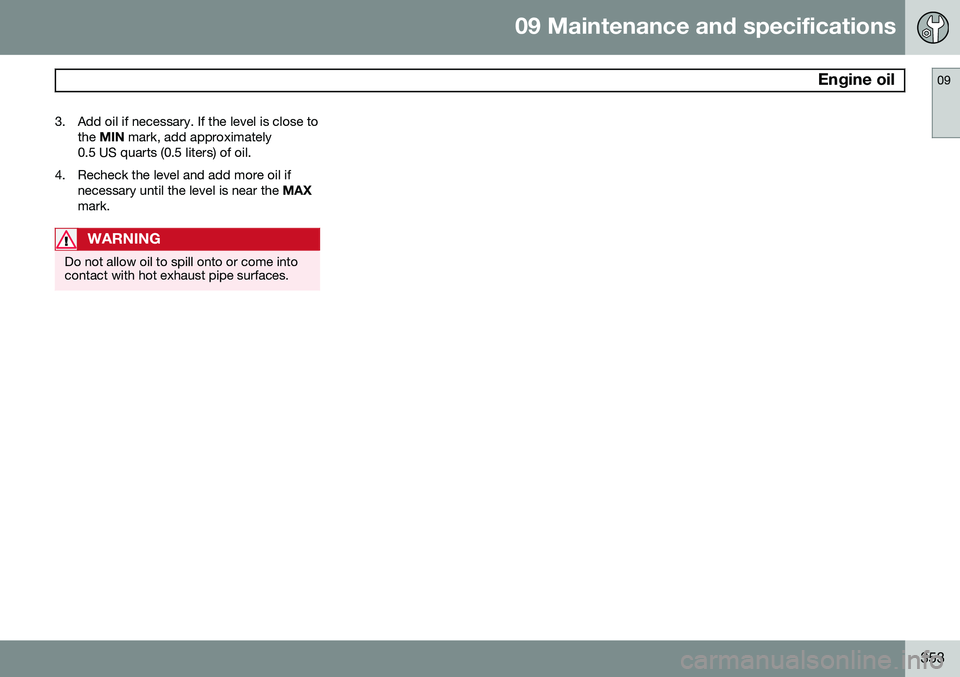
3. Add oil if necessary. If the level is close to
the MIN mark, add approximately
0.5 US quarts (0.5 liters) of oil.
4. Recheck the level and add more oil if necessary until the level is near the MAX
mark.
WARNING
Do not allow oil to spill onto or come into contact with hot exhaust pipe surfaces.
Page 356 of 414

09 Maintenance and specifications
Fluids 09
354
Coolant
Location of the coolant reservoir
Normally, the coolant does not need to be changed. If the system must be drained, con-sult a trained and qualified Volvo servicetechnician. See page 394 for information on cooling sys- tem capacities.
CAUTION
• If necessary, top up the cooling sys- tem with Volvo Genuine Coolant/Anti-freeze only (a 50/50 mix of water andantifreeze).
• Different types of antifreeze/coolantmay not be mixed.
• If the cooling system is drained, itshould be flushed with clean water orpremixed anti-freeze before it is refilledwith the correct mixture of water/anti-freeze.
• The cooling system must always bekept filled to the correct level, and thelevel must be between the
MIN and
MAX marks. If it is not kept filled, there
can be high local temperatures in theengine which could result in damage.Check coolant regularly!
• Do not top up with water only. Thisreduces the rust-protective and anti-freeze qualities of the coolant and hasa lower boiling point. It can also causedamage to the cooling system if itshould freeze.
• Do not use chlorinated tap water in thevehicle's cooling system.
WARNING
• Never remove the expansion tank cap while the engine is warm. Wait until theengine cools.
• If it is necessary to top off the coolantwhen the engine is warm, unscrew theexpansion tank cap slowly so that theoverpressure dissipates.
Brake fluid
Location of the brake fluid reservoir
Checking the levelThe fluid reservoir is concealed under the round cover at the rear of the engine com-partment. The round cover must be removedfirst before the reservoir cap can beaccessed.