2015 VOLVO S80 display
[x] Cancel search: displayPage 111 of 392

03 Your driving environment
Digial compass*
03
}}
* Option/accessory, for more information, see Introduction.109
Operation
G029737
Rearview mirror with compass.
The rear-view mirror has an integrated display that shows the compass direction in whichthe vehicle is pointing. Eight different direc- tions are shown with the abbreviations:
N(north), NE (north east), E (east), SE (south-
east), S (south), SW (southwest), W (west)
and NW (northwest).
The compass is displayed automatically when the vehicle is started or in ignition mode II. To
switch the compass on/off use a pen, paper-clip or similar object and press in the buttonon the rear side of the mirror.
CalibrationNorth America is divided into 15 magneticzones and the compass will need to be cali- brated if the vehicle is driven into a new one(see the magnetic zones on the map in thefollowing section "Selecting a magneticzone"). To do so:
1. Stop the vehicle in a large open area,
safely out of traffic and away from steel structures and high-tension electricalwires.
2. Start the vehicle.
NOTE
• For best calibration results, switch off all electrical equipment in the vehicle(climate system, windshield wipers,audio system, etc.) and make sure thatall doors are closed.
• Calibration may not succeed or beincorrect if the vehicle's electricalequipment is not switched off.
3. Using a pen, paperclip or similar object,
press and hold the button on the rear side of mirror for approx. 6 seconds until
C is
displayed in the mirror.
4. Press and hold the button for 3 seconds until the number of the current magnetic zone is displayed. 5. Press the button repeatedly until the
number of the desired magnetic zone (
1-15) is displayed. See the magnetic
zones on the map in the following section "Selecting a magnetic zone").
6. Wait until
C is again displayed in the mir-
ror.
7. Drive slowly in a circle at a speed of no more than 6 mph (10 km/h) until a direc- tion is displayed. This indicates that cali-bration is complete.
8. Drive around in a circle an additional two times to fine-tune the calibration.
9. Vehicles with an electrically heated windshield:
* if
C is displayed when the
heating function is activated, perform step 7 with the heating function on. Seealso page 213 for additional informationabout the heated windshield.
Repeat the calibration procedure if neces-sary.
Page 112 of 392

03 Your driving environment
Digial compass*
03
110* Option/accessory, for more information, see Introduction.
Selecting a magnetic zone
15
14
13
12
11
9
8
7
6
5
4
3
2
1
10
G018632
Magnetic zones.The earth is divided into 15 magnetic zones. The correct zone must be selected for thecompass to work correctly.
1. Put the ignition in mode II.
2. Using a pen or similar object, press and hold the button on the rear side of mirror for at least 3 seconds. The number for thecurrent area will be shown.
3. Press the button repeatedly until the number for the required geographic area(1 – 15) is shown.
4. The display will revert to showing the compass direction after several seconds.
Page 121 of 392

03 Your driving environment
Starting the engine
03
}}
* Option/accessory, for more information, see Introduction.119
Models with a Personal Car
Communicator (PCC) remote key* (seepage 58)
The indicator light for approach lighting will flash several times andthen glow continuously if all of therequirements for ERS have been
met. However, this does not indicate thatERS has started the engine. To check if ERS has started the engine, press the information button (3). If the engine hasstarted, the indicator light for buttons(1) och (4) will illuminate.
Active functionsWhen the engine is started with ERS, the fol- lowing functions are activated: • The climate control system
• The infotainment system.
Deactivated functionsWhen the engine is started with ERS, the fol- lowing functions are deactivated: •Headlights
• Parking lights
• License plate lights
• Windshield wipers
Switching off an engine started with ERS
Any of the following will switch off the engine if it has been started with ERS:
• Pressing the lock button (1) or the unlock button (2) on the remote key
• Unlocking the vehicle
• Opening a door
• Depressing the accelerator or brake pedal
• Moving the gear selector from the
P posi-
tion
• If there are less than approx. 2.5 gallons(10 liters) of fuel in the tank
• More than 15 minutes have elapsed.
If the engine has been started with ERS and switches off, the turn signals will illuminate for3 seconds.
Message in the instrument panel
display
If ERS is interrupted, a text message will bedisplayed in the instrument panel.
Switching off the engine
With the engine running, press the START/
STOP ENGINE button.
If the gear selector is not in the P position or
if the vehicle is moving, press the START/
STOP ENGINE button twice or press and
hold it in until the engine switches off.
Jump starting
G021347
Connecting the jumper cables
Page 123 of 392

03 Your driving environment
Transmission
03
}}
121
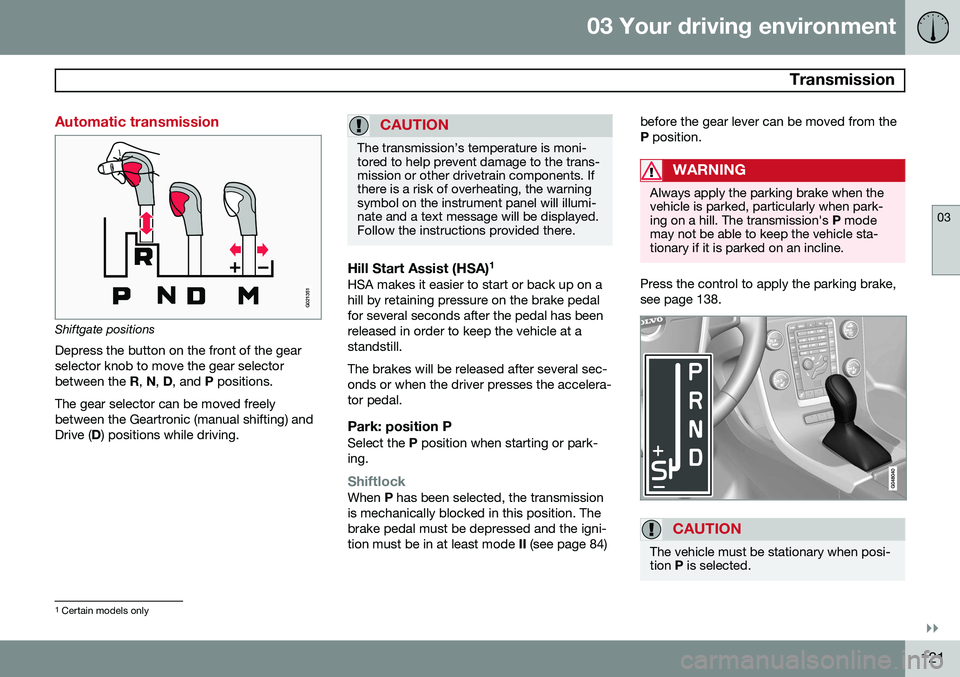
Automatic transmission
G021351
Shiftgate positions
Depress the button on the front of the gear selector knob to move the gear selectorbetween the R, N , D , and P positions.
The gear selector can be moved freelybetween the Geartronic (manual shifting) andDrive ( D) positions while driving.
CAUTION
The transmission’s temperature is moni- tored to help prevent damage to the trans-mission or other drivetrain components. Ifthere is a risk of overheating, the warningsymbol on the instrument panel will illumi-nate and a text message will be displayed.Follow the instructions provided there.
Hill Start Assist (HSA) 1HSA makes it easier to start or back up on a hill by retaining pressure on the brake pedalfor several seconds after the pedal has beenreleased in order to keep the vehicle at astandstill. The brakes will be released after several sec- onds or when the driver presses the accelera-tor pedal.
Park: position PSelect the
P position when starting or park-
ing.
ShiftlockWhen P has been selected, the transmission
is mechanically blocked in this position. The brake pedal must be depressed and the igni-tion must be in at least mode II (see page 84) before the gear lever can be moved from theP
position.
WARNING
Always apply the parking brake when the vehicle is parked, particularly when park-ing on a hill. The transmission's P mode
may not be able to keep the vehicle sta-tionary if it is parked on an incline.
Press the control to apply the parking brake, see page 138.
CAUTION
The vehicle must be stationary when posi- tion P is selected.
1
Certain models only
Page 124 of 392

03 Your driving environment
Transmission
03
122* Option/accessory, for more information, see Introduction.
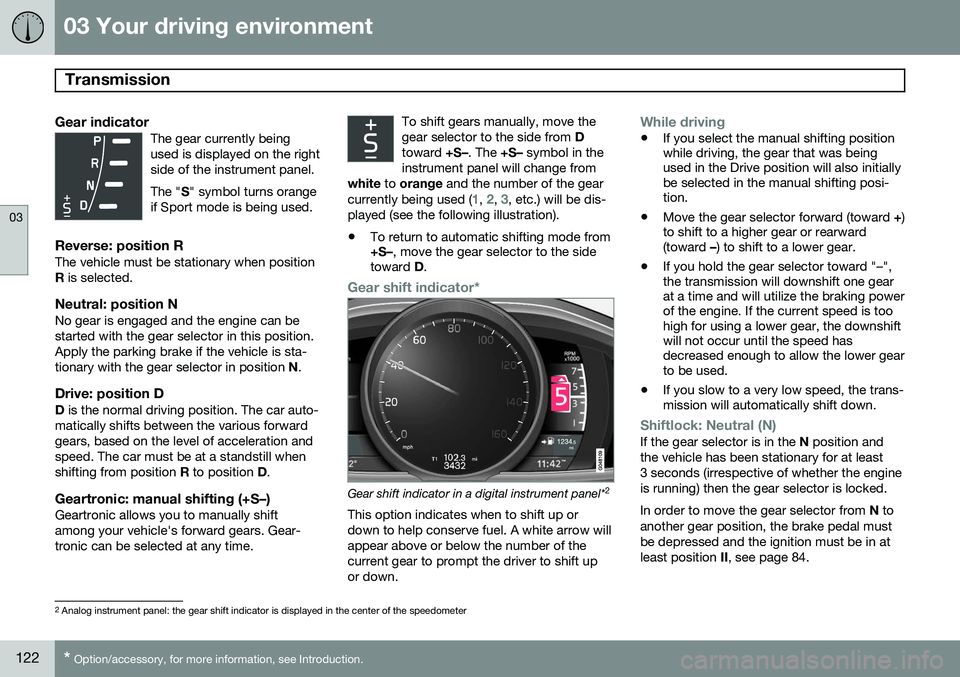
Gear indicatorThe gear currently being used is displayed on the rightside of the instrument panel. The " S" symbol turns orange
if Sport mode is being used.
Reverse: position RThe vehicle must be stationary when position R is selected.
Neutral: position NNo gear is engaged and the engine can bestarted with the gear selector in this position.Apply the parking brake if the vehicle is sta-tionary with the gear selector in position N.
Drive: position DD is the normal driving position. The car auto-
matically shifts between the various forwardgears, based on the level of acceleration andspeed. The car must be at a standstill whenshifting from position R to position D.
Geartronic: manual shifting (+S–)Geartronic allows you to manually shiftamong your vehicle's forward gears. Gear-tronic can be selected at any time. To shift gears manually, move thegear selector to the side from
D
toward +S–. The +S– symbol in the
instrument panel will change from
white to orange and the number of the gear
currently being used (
1, 2, 3, etc.) will be dis-
played (see the following illustration).
• To return to automatic shifting mode from +S–
, move the gear selector to the side
toward D.
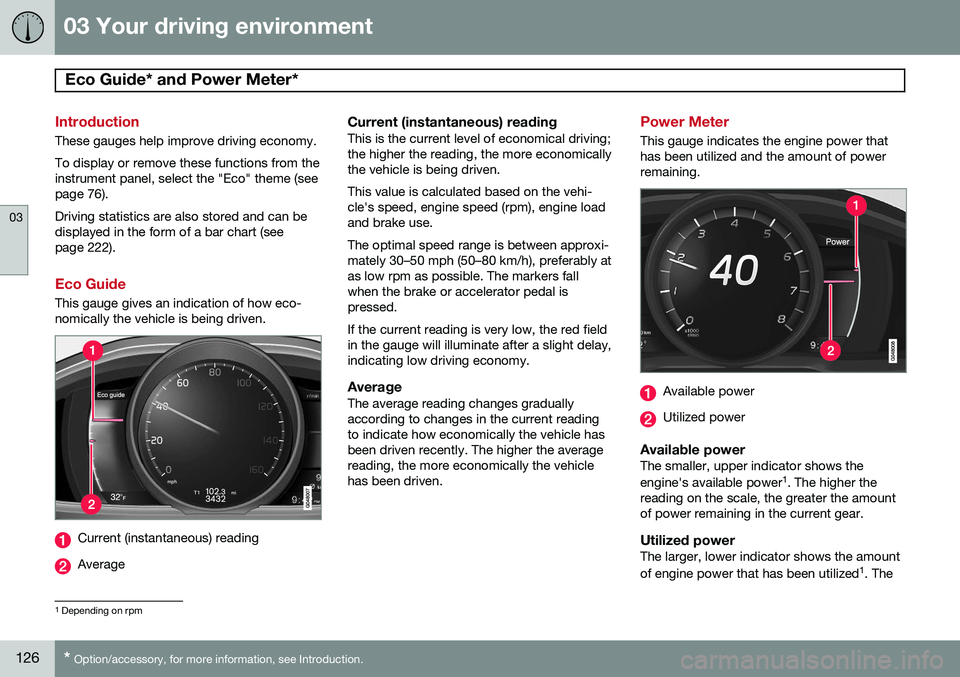
Gear shift indicator*
Gear shift indicator in a digital instrument panel* 2
This option indicates when to shift up or down to help conserve fuel. A white arrow willappear above or below the number of thecurrent gear to prompt the driver to shift upor down.
While driving
• If you select the manual shifting position while driving, the gear that was beingused in the Drive position will also initiallybe selected in the manual shifting posi-tion.
• Move the gear selector forward (toward
+)
to shift to a higher gear or rearward(toward –) to shift to a lower gear.
• If you hold the gear selector toward "–",the transmission will downshift one gearat a time and will utilize the braking powerof the engine. If the current speed is toohigh for using a lower gear, the downshiftwill not occur until the speed hasdecreased enough to allow the lower gearto be used.
• If you slow to a very low speed, the trans-mission will automatically shift down.
Shiftlock: Neutral (N)If the gear selector is in the
N position and
the vehicle has been stationary for at least 3 seconds (irrespective of whether the engineis running) then the gear selector is locked. In order to move the gear selector from N to
another gear position, the brake pedal must be depressed and the ignition must be in atleast position II, see page 84.
2
Analog instrument panel: the gear shift indicator is displayed in the center of the speedometer
Page 125 of 392

03 Your driving environment
Transmission
03
}}
* Option/accessory, for more information, see Introduction.123
Geartronic: steering wheel paddles*In addition to the manual gearshift function using the gear selector, this option makes itpossible to manually shift gears from thesteering wheel.
Steering-wheel mounted gear shift paddles
" – ": Shift down to a lower gear.
"+ ": Shift up to a higher gear.
In order to shift gears with the paddles, they have to first be activated. The gear selector
can be in either the D or S position. Activating the paddles:
• Pull either paddle toward the steering wheel and release it; the
D in the instru- ment panel will change to the number ofthe gear currently being used.
Shifting gears:
• Pull the paddle toward the steering wheeland release it.
NOTE
If the gear selector was in
D when paddle
shifting was activated ( D changed to the
number of the gear being used), the trans- mission will automatically revert to D after
approximately 5 seconds if the paddlesare not used to shift gears. This will not occur:
• during active driving (e.g., on a wind- ing road, while accelerating, etc)
• if the gear selector was in
S when the
paddles were activated
If the transmission reverts to D, the pad-
dles will have to be reactivated (pull either paddle toward the steering wheel andrelease it) before they can be used to shiftgears again. The paddles can also be manually deacti- vated by pulling both paddles toward thesteering wheel and holding them until thegear number shown in the instrumentpanel changes to D.
Geartronic: Sport mode (S) 3This transmission mode provides sportier shifting characteristics and enables a moreactive driving style by making it possible todrive at higher rpm in each gear before shift-ing up. The engine also responds faster whenthe accelerator pedal is pressed. To access Sport mode from Drive (
D), move
the gear selector to the left. The transmission will not switch to manual shifting mode untilthe gear selector is moved forward or rear-ward toward + or –. Sport mode can be selected any time.
NOTE
• On vehicles equipped with Sport mode, the transmission symbol in themain instrument panel will changefrom
D to S when the gear selector is
moved to the manual shifting mode. Ifthe gear selector is moved toward "+"or "-", the number of the gear currentlybeing used will be displayed, seepage 75).
• Please be aware that using Sportmode may result in a slight decrease infuel economy. Driving in
D can help
improve fuel economy.
3 Certain models only
Page 127 of 392

03 Your driving environment
Transmission
03
125
NOTE
The message AWD disabled Service
required will be appear in the information
display if an electrical fault should occur in the AWD system. A warning light will alsoilluminate in the instrument panel. If thisoccurs, have the system checked by atrained and qualified Volvo service techni-cian.
Page 128 of 392

03 Your driving environment
Eco Guide* and Power Meter*
03
126* Option/accessory, for more information, see Introduction.
Introduction
These gauges help improve driving economy. To display or remove these functions from the instrument panel, select the "Eco" theme (seepage 76). Driving statistics are also stored and can be displayed in the form of a bar chart (seepage 222).
Eco Guide
This gauge gives an indication of how eco- nomically the vehicle is being driven.
Current (instantaneous) reading
Average
Current (instantaneous) readingThis is the current level of economical driving; the higher the reading, the more economicallythe vehicle is being driven. This value is calculated based on the vehi- cle's speed, engine speed (rpm), engine loadand brake use. The optimal speed range is between approxi- mately 30–50 mph (50–80 km/h), preferably atas low rpm as possible. The markers fallwhen the brake or accelerator pedal ispressed. If the current reading is very low, the red field in the gauge will illuminate after a slight delay,indicating low driving economy.
AverageThe average reading changes graduallyaccording to changes in the current readingto indicate how economically the vehicle hasbeen driven recently. The higher the averagereading, the more economically the vehiclehas been driven.
Power Meter
This gauge indicates the engine power that has been utilized and the amount of powerremaining.
Available power
Utilized power
Available powerThe smaller, upper indicator shows the engine's available power 1
. The higher the
reading on the scale, the greater the amount of power remaining in the current gear.
Utilized powerThe larger, lower indicator shows the amount of engine power that has been utilized 1
. The
1 Depending on rpm