Page 167 of 223

Vehicle care165
1. Remove 2 screws from panel onunderside of vehicle below front
fog lights and remove panel.
2. Disconnect harness connector from bulb holder and rotate bulb
holder anticlockwise.
3. Remove bulb holder from lamp assembly, rotate bulb
anticlockwise and remove from
bulb holder.
4. Insert new bulb into bulb holder and rotate it clockwise.
5. Reinstall bulb holder in lamp assembly and reconnect harnessconnector.
6. Reinstall panel to underside of vehicle using 2 screws removed
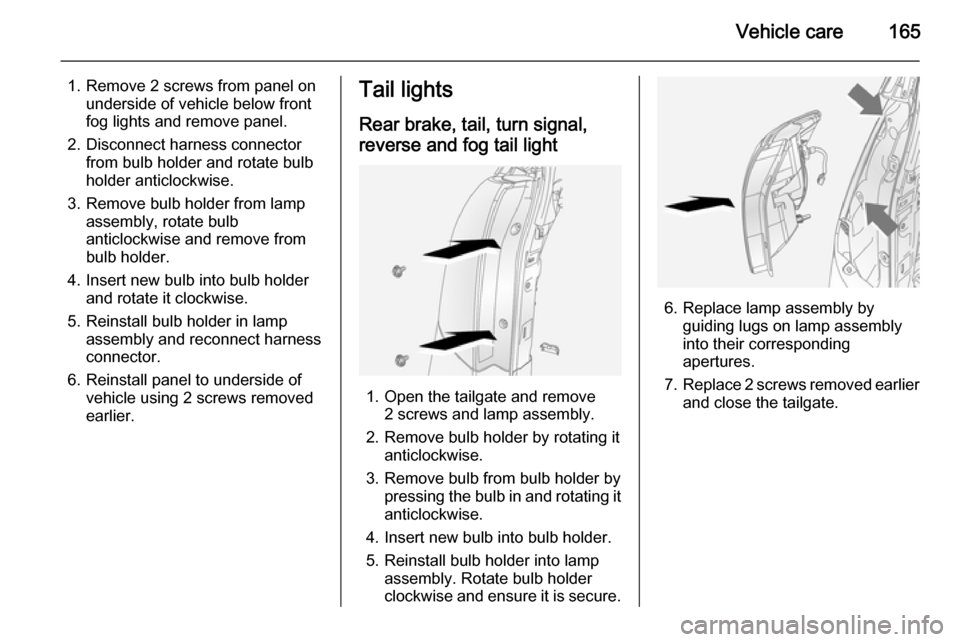
earlier.Tail lights
Rear brake, tail, turn signal,
reverse and fog tail light
1. Open the tailgate and remove 2 screws and lamp assembly.
2. Remove bulb holder by rotating it anticlockwise.
3. Remove bulb from bulb holder by pressing the bulb in and rotating it
anticlockwise.
4. Insert new bulb into bulb holder.
5. Reinstall bulb holder into lamp assembly. Rotate bulb holder
clockwise and ensure it is secure.
6. Replace lamp assembly by guiding lugs on lamp assembly
into their corresponding
apertures.
7. Replace 2 screws removed earlier
and close the tailgate.
Page 168 of 223
166Vehicle careSide turn signal lights
1. Using a suitable screwdriver, prylamp assembly away from wing.
2. Rotate bulb holder anticlockwise.
3. Remove bulb from lamp assembly
by pulling bulb straight out of bulb holder.
4. Insert new bulb into bulb holder by
pressing it in and rotating the bulb holder clockwise.
5. Push lamp assembly back into aperture.
Centre high-mounted
brake light Have bulbs replaced by a workshop.
Number plate light
1. Remove 4 screws (arrowed) and remove lamp covers.
2. Remove bulb holder from lamp assembly by rotating it
anticlockwise.
3. Pull bulb straight out of bulb holder.
4. Insert new bulb.
5. Reinstall bulb holder into lamp assembly, rotate bulb holder
clockwise and ensure it is secure.
6. Replace lamp covers using the 4 screws removed earlier.
Interior lights
Front reading lights
1. Using a suitable screwdriver, pry lamp lens away from roof lining.
2. Remove bulb.
3. Insert new bulb.
4. Reinstall lamp lens in roof lining.
Page 169 of 223

Vehicle care167
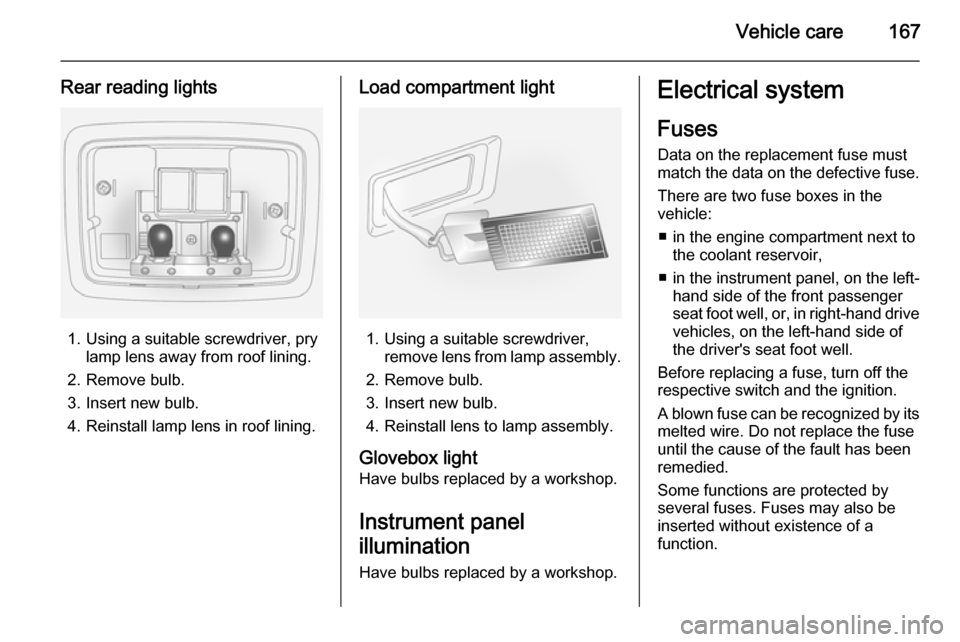
Rear reading lights
1. Using a suitable screwdriver, prylamp lens away from roof lining.
2. Remove bulb.
3. Insert new bulb.
4. Reinstall lamp lens in roof lining.
Load compartment light
1. Using a suitable screwdriver, remove lens from lamp assembly.
2. Remove bulb.
3. Insert new bulb.
4. Reinstall lens to lamp assembly.
Glovebox light
Have bulbs replaced by a workshop.
Instrument panel
illumination Have bulbs replaced by a workshop.
Electrical system
Fuses
Data on the replacement fuse must
match the data on the defective fuse.
There are two fuse boxes in the
vehicle:
■ in the engine compartment next to the coolant reservoir,
■ in the instrument panel, on the left- hand side of the front passenger
seat foot well, or, in right-hand drive
vehicles, on the left-hand side of
the driver's seat foot well.
Before replacing a fuse, turn off the
respective switch and the ignition.
A blown fuse can be recognized by its melted wire. Do not replace the fuse
until the cause of the fault has been
remedied.
Some functions are protected by
several fuses. Fuses may also be
inserted without existence of a
function.
Page 173 of 223
Vehicle care171
FuseCircuitABSAnti-lock Brake
SystemA/CClimate control,
air conditioning
systemBATT1Instrument panel
fuse boxBATT2Instrument panel
fuse boxBATT3Instrument panel
fuse boxBCMBody Control
ModuleECMEngine Control
ModuleECM PWR TRNEngine Control
Module, Power‐
trainENG SNSREngine sensorsEPBElectrical parking
brakeFuseCircuitFAN1Cooling fanFAN3Cooling fanFRT FOGFront fog lightsFRT WPRFront wiperFUEL/VACFuel pump,
vacuum pumpHDLP WASHERHeadlight washerHI BEAM LHHigh beam (left-
hand)HI BEAM RHHigh beam (right-
hand)HORNHornHTD WASH/MIRHeated washer
fluid, heated exte‐
rior mirrorsIGN COIL AIgnition coilIGN COIL BIgnition coilLO BEAM LHLow beam (left-
hand)FuseCircuitLO BEAM RHLow beam (right-
hand)PRK LP LHParking light (left-
hand)PRK LP RHParking light
(right-hand)PWM FANPulse width modu‐ lation fanREAR DEFOGHeated rear
windowREAR WPRRear wiperSPARE–STOP LAMPBrake lightsSTRTRStarterTCMTransmission
Control ModuleTRLR PRL LPTrailer parking
lights
Page 176 of 223

174Vehicle care
FuseCircuitAMPAmplifierAPO JACK
(CONSOLE)Power outlet
(centre console)APO JACK
(REAR CARGO)Power outlet
(load compart‐
ment)AWD/VENTAll-wheel drive,
ventilationBCM (CTSY)Courtesy lightsBCM (DIMMER)Instrument illu‐
minationBCM (INT LIGHT
TRLR FOG)Interior lights,
trailer fog lightBCM (PRK/TRN)Parking lights,
turn signalsBCM (STOP)Brake lightsBCM (TRN SIG)Turn signalsBCM (VBATT)Battery voltageFuseCircuitCIMCommunica‐
tions Integration
ModuleCLSTRInstrument
clusterDRLDaytime running
lightsDR/LCKDriver door lockDRVR PWR
SEATDriver power
seatDRV/PWR
WNDWDriver power
windowF/DOOR LOCKFuel filler flapFRT WSRFront washerFSCMFuel systemFSCM/VENT SOLFuel system,
vent solenoidHEATING MAT
SWHeating mat
switchHTD SEAT PWRSeat heatingFuseCircuitHVAC BLWRClimate control,
air conditioning
fanIPCInstrument panel clusterISRVM/RCMInterior mirror,
remote compass moduleKEY CAPTUREKey captureL/GATETailgateLOGISTIC MODELogistic modeOSRVMExterior mirrorsPASS PWR
WNDWPassenger
power windowPWR DIODEPower diodePWR MODINGPower modingRADIORadioRR FOGHeated rear
window
Page 182 of 223

180Vehicle care
For example, the following messagescan be displayed:
A graphic indicating the left rear tyre
is shown together with the current tyre
pressure; slight pressure deviation.
Reduce speed. Check tyre pressure
at next opportunity with an
appropriate gauge and correct if
necessary.
On the Colour-Info-Display, this
message will appear in yellow.
A graphic indicating the front left tyre is shown together with the current tyre
pressure; significant pressure
deviation or direct pressure loss.
Steer out of the flow of traffic as
quickly as possible without
endangering other vehicles. Stop and check the tyres. Mount the spare
wheel if necessary 3 186.
On the Colour-Info-Display, this
message will appear in red.
Acknowledgement of warnings 3 92,
3 95.
Vehicle messages 3 100.
If the tyre pressure is to be reduced or
increased, switch off the ignition. Tyre
pressures 3 178, 3 210.
Temperature dependency Tyre pressure depends on the
temperature of the tyre. During
driving, tyre temperature and
pressure increase.
The tyre pressure value shown in the Info-Display is the actual tyre
pressure. Therefore it is important to
check tyre pressure with cold tyres.
General information
The use of commercially available
liquid tyre repair kits can impair the
function of the system. Factory-
approved tyre repair kits can be used.
Tyre repair kit 3 183.
External high-power radio equipment
could disrupt the TPMS.
The tyre pressure monitoring system
valve cores and sealing rings must be
replaced each time the tyres are
changed.
Page 187 of 223

Vehicle care185
is obtained, switch off thecompressor.
If the prescribed tyre pressure is
not obtained within 10 minutes,
remove the tyre repair kit. Move
the vehicle one tyre rotation.
Reattach the tyre repair kit and
continue the filling procedure for
10 minutes. If the prescribed tyre
pressure is still not obtained, the
tyre is too badly damaged. Seek
the assistance of a workshop.
Drain excess tyre pressure with
the button next to the pressure
gauge.
Do not run the compressor for
longer than 10 minutes.
8. Detach the tyre repair kit and replace the tyre valve cap.
9. Remove any excess sealant using a cloth.
10. Take the label indicating maximum permitted speed from
the sealant canister and affix in
the driver's field of view.
11. Continue driving immediately so that sealant is evenly distributed
in the tyre. After driving approx.
6 miles (but no more than
10 minutes) stop and check tyre
pressure.
If the tyre pressure has fallen
slightly, set it to the correct value.
Repeat the procedure until there
is no more loss of pressure.
If the tyre pressure has fallen by
more than 10 psi, the vehicle must
not be driven. Seek the
assistance of a workshop.
12. To adjust tyre pressure, screw compressor air hose (arrowed)
directly onto tyre valve.
Page 190 of 223

188Vehicle care
5. Attach wheel wrench to eye ofthreaded rod and rotate wrench
clockwise to raise vehicle.
If this is not the case, carefully
lower the vehicle immediately and
reposition the jack. Raise the
vehicle until the wheel is just clear of the ground.
6. Unscrew wheel nuts completely and wipe clean with a cloth.
Do not grease the threads. Put
wheel nuts somewhere where the threads will not be soiled.
7. Change the wheel. Notes on spare wheel 3 189.
8. Screw on the wheel nuts and
tighten slightly by hand by turning
clockwise until wheel is held
against the hub.
9. Rotate wrench anticlockwise and lower vehicle to the ground.
10. Install the wheel wrench ensuring that it locates securely and tighten
each wheel nut in a crosswise
sequence. Tightening torque is
140 Nm.
11. Stow the replaced wheel 3 189
and the vehicle tools 3 175.
12. Check the tyre pressure of the installed tyre as soon as possible.
Have the defective tyre renewed and
replace temporary spare wheel with a
full specification wheel without delay.
Jacking position for lifting platform
Rear arm position of the lifting
platform centrically under the recess
of the sill.