2015 VAUXHALL ANTARA ESP
[x] Cancel search: ESPPage 151 of 223

Driving and operating149
especially in the case of heavy
trailers. The vertical coupling load
should never fall below 25 kg.
When measuring the vertical coupling
load, ensure the drawbar of the
loaded trailer is at the same height as it will be when the trailer is coupled
with the towing vehicle loaded. This is
particularly important for trailers with
tandem axle.
Rear axle load
When the trailer is coupled and the
towing vehicle is fully loaded
(including all occupants), the
permissible rear axle load (see
identification plate or vehicle
documents) must not be exceeded.
National regulations regarding
maximum speeds for vehicles towing
a trailer must be observed.Towing equipmentCaution
When operating without a trailer,
remove the coupling ball bar.
Towing equipment with
detachable coupling ball bar The coupling ball bar is kept in a bag,
fastened with a strap and is stowed
below the floor cover in the load
compartment.
Fitting the coupling ball bar
Remove sealing plug from the hole for
the coupling ball bar and stow it in the load compartment.
Confirm that the colour marking on
the lever is red.
Page 156 of 223

154Vehicle careBonnetOpening
Pull the release lever and return it to
its original position.
Locate the safety catch, found slightly left of centre on the underside of the
bonnet, push the catch upwards and
lift the bonnet gently.
The bonnet is held open
automatically.
If the bonnet is opened during an Autostop, the engine will be restarted automatically for safety reasons.
Air intake 3 121.
Closing
Lower the bonnet and let it fall into the latch from a low height (20-25 cm).
Check that the bonnet is engaged.
Caution
Do not press the bonnet into the
latch to avoid dents.
Engine oil
Check the engine oil level manually on a regular basis to prevent damage
to the engine.
Ensure that the correct specification
of oil is used. Recommended fluids
and lubricants 3 198.
Check with the vehicle on a level
surface. The engine must be at
operating temperature and switched
off for at least 5 minutes.
Pull out the dipstick, wipe it clean, insert it to the stop on the handle, pull
out and read the engine oil level.
Caution
It is the owner's responsibility to
maintain the proper level of an
appropriate quality oil in the
engine.
Page 167 of 223

Vehicle care165
1. Remove 2 screws from panel onunderside of vehicle below front
fog lights and remove panel.
2. Disconnect harness connector from bulb holder and rotate bulb
holder anticlockwise.
3. Remove bulb holder from lamp assembly, rotate bulb
anticlockwise and remove from
bulb holder.
4. Insert new bulb into bulb holder and rotate it clockwise.
5. Reinstall bulb holder in lamp assembly and reconnect harnessconnector.
6. Reinstall panel to underside of vehicle using 2 screws removed
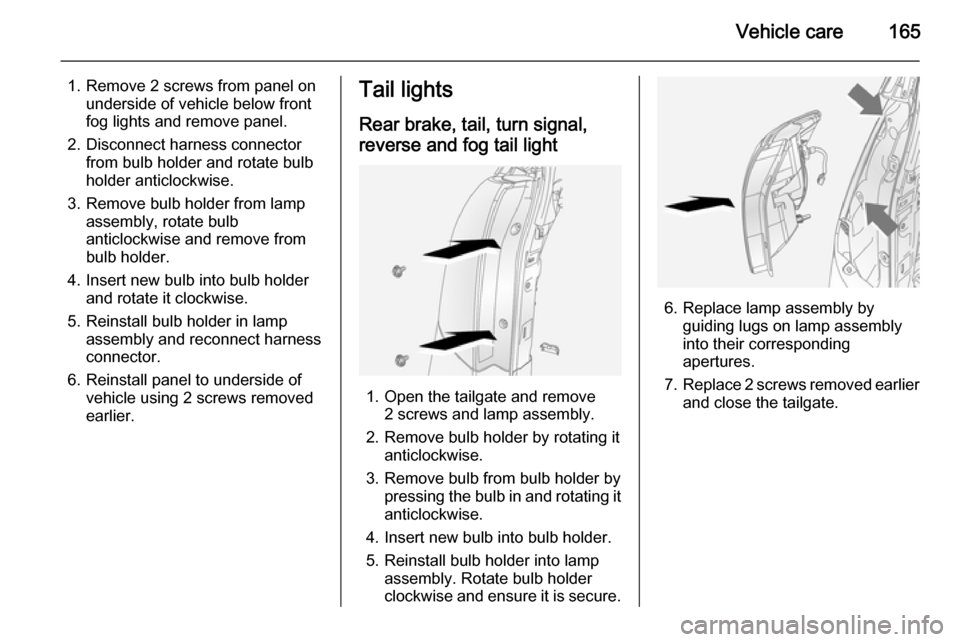
earlier.Tail lights
Rear brake, tail, turn signal,
reverse and fog tail light
1. Open the tailgate and remove 2 screws and lamp assembly.
2. Remove bulb holder by rotating it anticlockwise.
3. Remove bulb from bulb holder by pressing the bulb in and rotating it
anticlockwise.
4. Insert new bulb into bulb holder.
5. Reinstall bulb holder into lamp assembly. Rotate bulb holder
clockwise and ensure it is secure.
6. Replace lamp assembly by guiding lugs on lamp assembly
into their corresponding
apertures.
7. Replace 2 screws removed earlier
and close the tailgate.
Page 169 of 223

Vehicle care167
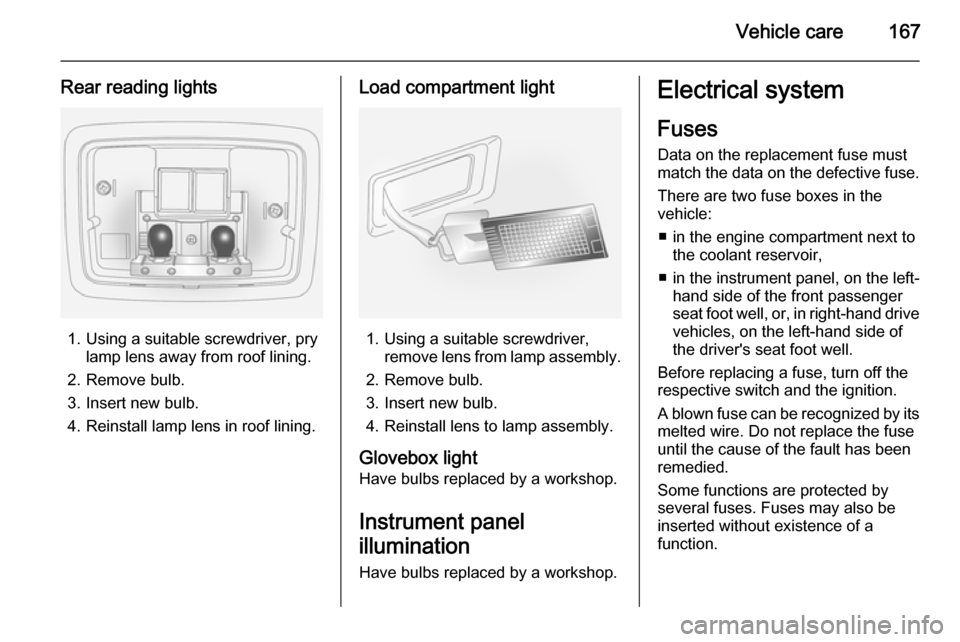
Rear reading lights
1. Using a suitable screwdriver, prylamp lens away from roof lining.
2. Remove bulb.
3. Insert new bulb.
4. Reinstall lamp lens in roof lining.
Load compartment light
1. Using a suitable screwdriver, remove lens from lamp assembly.
2. Remove bulb.
3. Insert new bulb.
4. Reinstall lens to lamp assembly.
Glovebox light
Have bulbs replaced by a workshop.
Instrument panel
illumination Have bulbs replaced by a workshop.
Electrical system
Fuses
Data on the replacement fuse must
match the data on the defective fuse.
There are two fuse boxes in the
vehicle:
■ in the engine compartment next to the coolant reservoir,
■ in the instrument panel, on the left- hand side of the front passenger
seat foot well, or, in right-hand drive
vehicles, on the left-hand side of
the driver's seat foot well.
Before replacing a fuse, turn off the
respective switch and the ignition.
A blown fuse can be recognized by its melted wire. Do not replace the fuse
until the cause of the fault has been
remedied.
Some functions are protected by
several fuses. Fuses may also be
inserted without existence of a
function.
Page 179 of 223

Vehicle care177
To remove the tyre repair kit, open thetailgate and pull the floor cover handle
upwards 3 69.
Caution
Do not allow objects to protrude
above the top of the rear floor
storage compartment, to avoid
damage to the storage area and
the load compartment floor.
Tyre repair kit 3 183.
Wheels and tyres
Tyre condition, wheel condition Drive over edges slowly and at right
angles if possible. Driving over sharp
edges can cause tyre and wheel
damage. Do not trap tyres on the kerb
when parking.
Regularly check the wheels for
damage. Seek the assistance of a
workshop in the event of damage or
unusual wear.
Winter tyres Winter tyres improve driving safety attemperatures below 7 °C and shouldtherefore be fitted on all wheels.
Tyres of size 215/70 R 16 are
recommended as winter tyres.
In accordance with country-specific
regulations, affix the speed sticker in
the driver's field of view.
If winter tyres are installed that have
not been approved for your vehicle,
Electronic Stability Control (ESC)
system performance may be affected3 139. Seek the assistance of a
workshop regarding availability of
approved winter tyres.
If winter tyres are in use, the
temporary spare wheel may still be
fitted with a summer tyre. Vehicle
driveability could be affected,
especially on slippery road surfaces.
Spare wheel 3 189.
Tyre designations E.g. 235/65 R 17 104 H235=Tyre width, in mm65=Cross-section ratio (tyre height
to tyre width), %R=Belt type: RadialRF=Type: RunFlat17=Wheel diameter, in inches104=Load index e.g. 91 is
equivalent to 618 kgH=Speed code letter
Speed code letter:
Q=up to 100 mphS=up to 112 mphT=up to 118 mphH=up to 130 mph
Page 180 of 223

178Vehicle care
V=up to 150 mphW=up to 168 mph
Tyre pressureCheck the pressure of cold tyres at
least every 14 days and before any
long journey. Do not forget the spare
wheel. This also applies to vehicles
with tyre pressure monitoring system.
Use the valve cap key to make
unscrewing the valve caps easier.
The valve cap key is located on the
inside of the tank flap.
Tyre pressure 3 210.
The tyre pressure data refers to cold
tyres. It applies to summer and winter tyres.
Always inflate the spare tyre to the
pressure specified for full load.
The ECO tyre pressure serves to
achieve the smallest amount of fuel
consumption possible.
Incorrect tyre pressures will impair
safety, vehicle handling, comfort and
fuel economy and will increase tyre
wear.
Tyre pressures differ depending on
various options. For the correct tyre
pressure value, follow the procedure
below:
1. Identify the engine identifier code.
Engine data 3 205.
2. Identify the respective tyre.
The tyre pressure tables show all
possible tyre combinations 3 210.
For the tyres approved for your
vehicle, refer to the EEC Certificate of Conformity provided with your vehicle
or other national registration
documents.
The driver is responsible for correct
adjustment of tyre pressure.9 Warning
If the pressure is too low, this can
result in considerable tyre warm-
up and internal damage, leading to tread separation and even to tyre
blow-out at high speeds.
If the tyre pressure must be reduced
or increased on a vehicle with tyre
pressure monitoring system, switch
off ignition.
Tyre pressure monitoring system The tyre pressure monitoring system
checks the pressure of all four wheels
once per minute when vehicle speed
exceeds a certain limit.Caution
Tyre pressure monitoring system
warns only about low tyre pressure
condition and does not replace
regular tyre maintenance by the
driver.
All wheels must be equipped with pressure sensors and the tyres must
have the prescribed pressure. If
wheels without sensors are mounted,
the tyre pressure monitoring system
is not operational.
Page 181 of 223

Vehicle care179
Notice
In countries where the tyre pressure
monitoring system is legally
required, the use of wheels without
pressure sensors will invalidate the
vehicle type approval.
The TPMS sensors monitor the air
pressure in the tyres and transmit tyre pressure readings to a receiver
located in the vehicle.
Each tyre, including the spare, should be checked monthly when cold and
inflated to the recommended inflation
pressure 3 210.
Low tyre pressure conditionA detected low tyre pressure
condition is indicated by control
indicator w 3 89.
If w illuminates, stop as soon as
possible and inflate the tyres as
recommended 3 210.
When the system detects a
malfunction, w will flash for approx.
one minute and then remain
continuously illuminated. This
sequence will continue upon
subsequent vehicle start-ups as long as the malfunction exists.
When w is illuminated, the system
may not be able to detect or signal low tyre pressure as intended.Tyre pressures in Info-Display
The current tyre pressures can be
shown in the menu item Tyres in the
Board Computer menu. Press the
BC button on the Infotainment system
and select the menu item.
The tyre pressure monitoring system
automatically detects the vehicle
load. A corresponding message may appear on the Info-Display if
inconsistent tyre pressures are
detected. In some versions, the
message is displayed in abbreviated
form.
Page 184 of 223

182Vehicle careTread depth
Check tread depth at regular
intervals.
Tyres should be replaced for safety
reasons at a tread depth of 2-3 mm
(4 mm for winter tyres).
For safety reasons it is recommended that the tread depth of the tyres on
one axle should not vary by more than
2 mm.
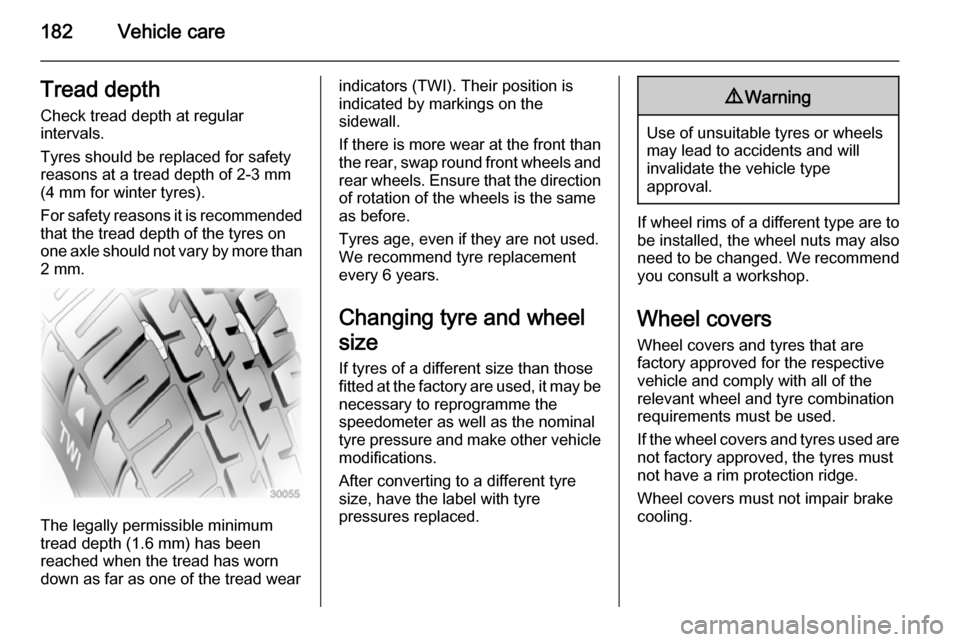
The legally permissible minimum
tread depth (1.6 mm) has been
reached when the tread has worn
down as far as one of the tread wear
indicators (TWI). Their position is
indicated by markings on the
sidewall.
If there is more wear at the front than
the rear, swap round front wheels and rear wheels. Ensure that the direction
of rotation of the wheels is the same
as before.
Tyres age, even if they are not used.
We recommend tyre replacement
every 6 years.
Changing tyre and wheel
size
If tyres of a different size than those
fitted at the factory are used, it may be necessary to reprogramme the
speedometer as well as the nominal tyre pressure and make other vehicle modifications.
After converting to a different tyre
size, have the label with tyre
pressures replaced.9 Warning
Use of unsuitable tyres or wheels
may lead to accidents and will
invalidate the vehicle type
approval.
If wheel rims of a different type are to
be installed, the wheel nuts may also
need to be changed. We recommend you consult a workshop.
Wheel covers Wheel covers and tyres that are
factory approved for the respective
vehicle and comply with all of the
relevant wheel and tyre combination
requirements must be used.
If the wheel covers and tyres used are
not factory approved, the tyres must
not have a rim protection ridge.
Wheel covers must not impair brake
cooling.