Page 230 of 364

2306-3. Do-it-yourself maintenance
NOTICE
■Repairing or replacing tires, wheels, tire pressure warning valves,
transmitters and tire valve caps (vehicles with a tire pressure warn-
ing system)
●When removing or fitting the wheels, tires or the tire pressure warning
valves and transmitters, contact your Toyota dealer as the tire pres-
sure warning valves and transmitters may be damaged if not handled
correctly.
●When replacing tire valve caps, do not use tire valve caps other than
those specified. The cap may become stuck.
■To avoid damage to the tire pressure warning valves and transmit-
ters (vehicles with a tire pressure warning system)
When a tire is repaired with liquid sealants, the tire pressure warning
valve and transmitter may not operate properly. If a liquid sealant is
used, contact your Toyota dealer or other qualified service shop as soon
as possible. Make sure to replace the tire pressure warning valve and
transmitter when replacing the tire. ( P. 224)
■Driving on rough roads
Take particular care when driving on roads with loose surfaces or pot-
holes.
These conditions may cause losses in tire inflation pressure, reducing
the cushioning ability of the tires. In addition, driving on rough roads
may cause damage to the tires themselves, as well as the vehicle’s
wheels and body.
■Low profile tires (vehicle s with 195/50R16 tires)
Low profile tires may cause greater damage than usual to the tire wheel
when sustaining impact from the road surface. Therefore, pay attention
to the following:
●Be sure to use proper tire inflation pressure. If tires are under-inflated,
they may be damaged more severely.
●Avoid potholes, uneven pavement, curbs and other road hazards. Fail-
ure to do so may lead to severe tire and wheel damage.
■If tire inflation pressure of e ach tire becomes low while driving
Do not continue driving, or your tires and/or wheels may be ruined.
Page 234 of 364
2346-3. Do-it-yourself maintenance
WARNING
■Proper inflation is critical to save tire performance
Keep your tires properly inflated . Otherwise, the following conditions
may occur and result in an accident causing death or serious injury:
●Excessive wear
●Uneven wear
●Poor handling
●Possibility of blowouts result ing from overheated tires
●Poor sealing of the tire bead
●Wheel deformation and/or tire separation
●A greater possibility of tire damage from road hazards
NOTICE
■When inspecting and adjusting tire inflation pressure
Be sure to put the tire valve caps back on.
Without the valve caps, dirt or moisture could get into the valve and
cause air leakage, which could result in an accident. If the caps are lost,
replace them as soon as possible.
Page 236 of 364

2366-3. Do-it-yourself maintenance
■When replacing wheels (vehicles with a tire pressure warning sys-
tem)
The wheels of your vehicle, except for the compact spare tire, are
equipped with tire pressure warning valves and transmitters that allow the
tire pressure warning system to provide advance warning in the event of
a loss in tire inflation pressure. Whenever wheels are replaced, tire pres-
sure warning valves and transmitters must be installed. (P. 224)
WARNING
■When replacing wheels
●Do not use wheels that are a different size from those recommended in
the Owner’s Manual, as this may result in a loss of handling control.
●Never use an inner tube in a leak ing wheel which is designed for a
tubeless tire. Doing so may result in an accident, causing death or seri-
ous injury.
■When installing the wheel nuts
●Never use oil or grease on the wheel bolts or wheel nuts.
Oil and grease may cause the wheel nuts to be excessively tightened,
leading to bolt or disc wheel damage. In addition, the oil or grease can
cause the wheel nuts to loosen and the wheel may fall off, causing an
accident and resulting in death or serious injury. Remove any oil or
grease from the wheel bolts or wheel nuts.
■Use of defective wheels prohibited
Do not use cracked or deformed wheels.
Doing so could cause the tire to leak air during driving, possibly causing
an accident.
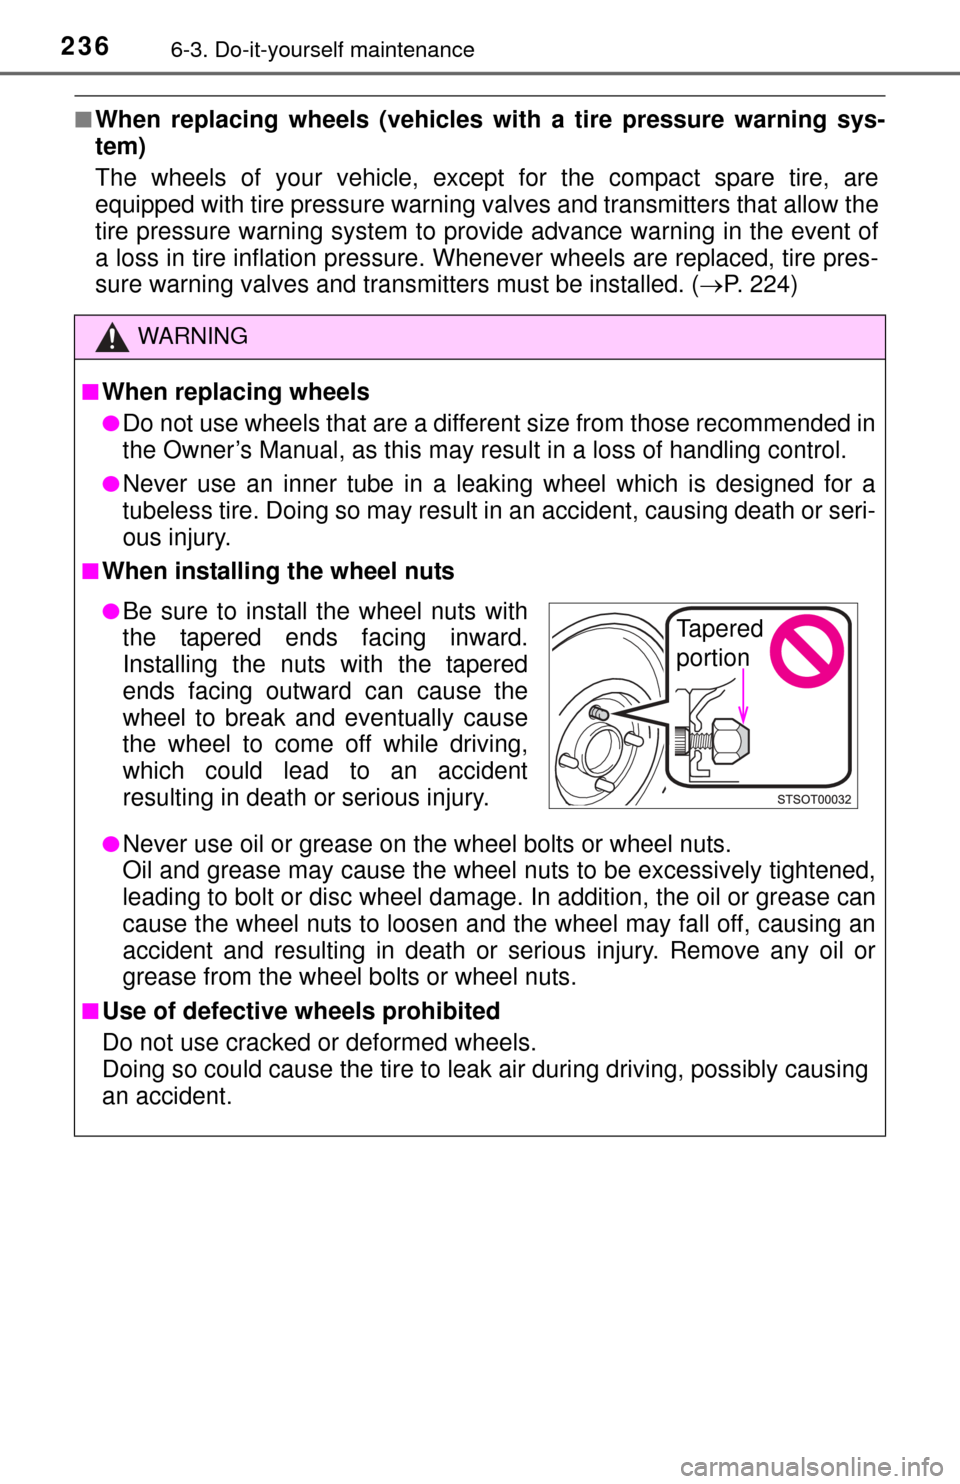
●Be sure to install the wheel nuts with
the tapered ends facing inward.
Installing the nuts with the tapered
ends facing outward can cause the
wheel to break and eventually cause
the wheel to come off while driving,
which could lead to an accident
resulting in death or serious injury.Tapered
portion
Page 237 of 364
2376-3. Do-it-yourself maintenance
6
Maintenance and care
NOTICE
■Replacing tire pressure warning valves and transmitters (vehicles
with a tire pressure warning system)
●Because tire repair or replacement may affect the tire pressure warn-
ing valves and transmitters, make sure to have tires serviced by your
Toyota dealer or other qualified service shop. In addition, make sure to
purchase your tire pressure warning valves and transmitters at your
Toyota dealer.
●Ensure that only genuine Toyota wheels are used on your vehicle.
Tire pressure warning valves and transmitters may not work properly
with non-genuine wheels.
Page 242 of 364

2426-3. Do-it-yourself maintenance
■Use a CR2016 lithium battery
●Batteries can be purchased at your Toyota dealer, local electrical appliance
shops or camera stores.
● Replace only with the same or equivalent type recommended by the manu-
facturer.
● Dispose of used batteries according to local laws.
■ If the key battery is depleted
The following symptoms may occur:
●The wireless remote control will not function properly.
● The operational range will be reduced.
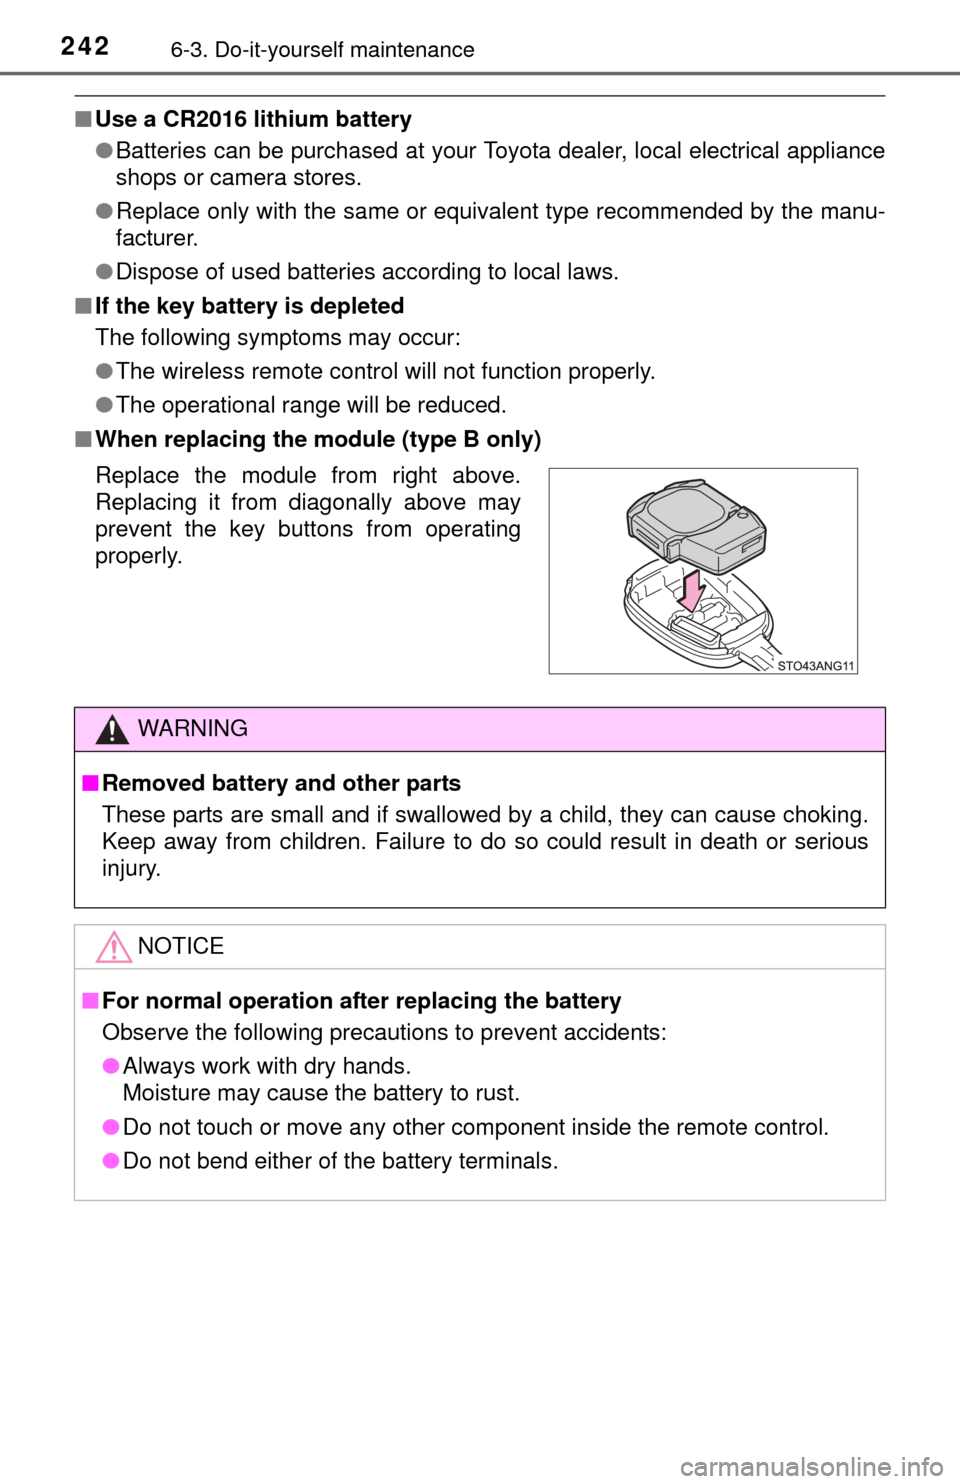
■ When replacing the module (type B only)
Replace the module from right above.
Replacing it from diagonally above may
prevent the key buttons from operating
properly.
WARNING
■Removed battery and other parts
These parts are small and if swallowed by a child, they can cause choking.
Keep away from children. Failure to do so could result in death or serious
injury.
NOTICE
■For normal operation after replacing the battery
Observe the following precautions to prevent accidents:
● Always work with dry hands.
Moisture may cause the battery to rust.
● Do not touch or move any other component inside the remote control.
● Do not bend either of the battery terminals.
Page 246 of 364

2466-3. Do-it-yourself maintenance
■After a fuse is replaced
●If the lights do not turn on even after the fuse has been replaced, a bulb may
need replacement. ( P. 248)
● If the replaced fuse blows again, have the vehicle inspected by your Toyota
dealer.
■ If there is an overload in a circuit
The fuses are designed to blow, protecting the wiring harness from damage.
■ When replacing light bulbs
Toyota recommends that you use genuine Toyota products designed for this
vehicle. Because certain bulbs are connected to circuits designed to prevent
overload, non-genuine parts or parts not designed for this vehicle may be
unusable.
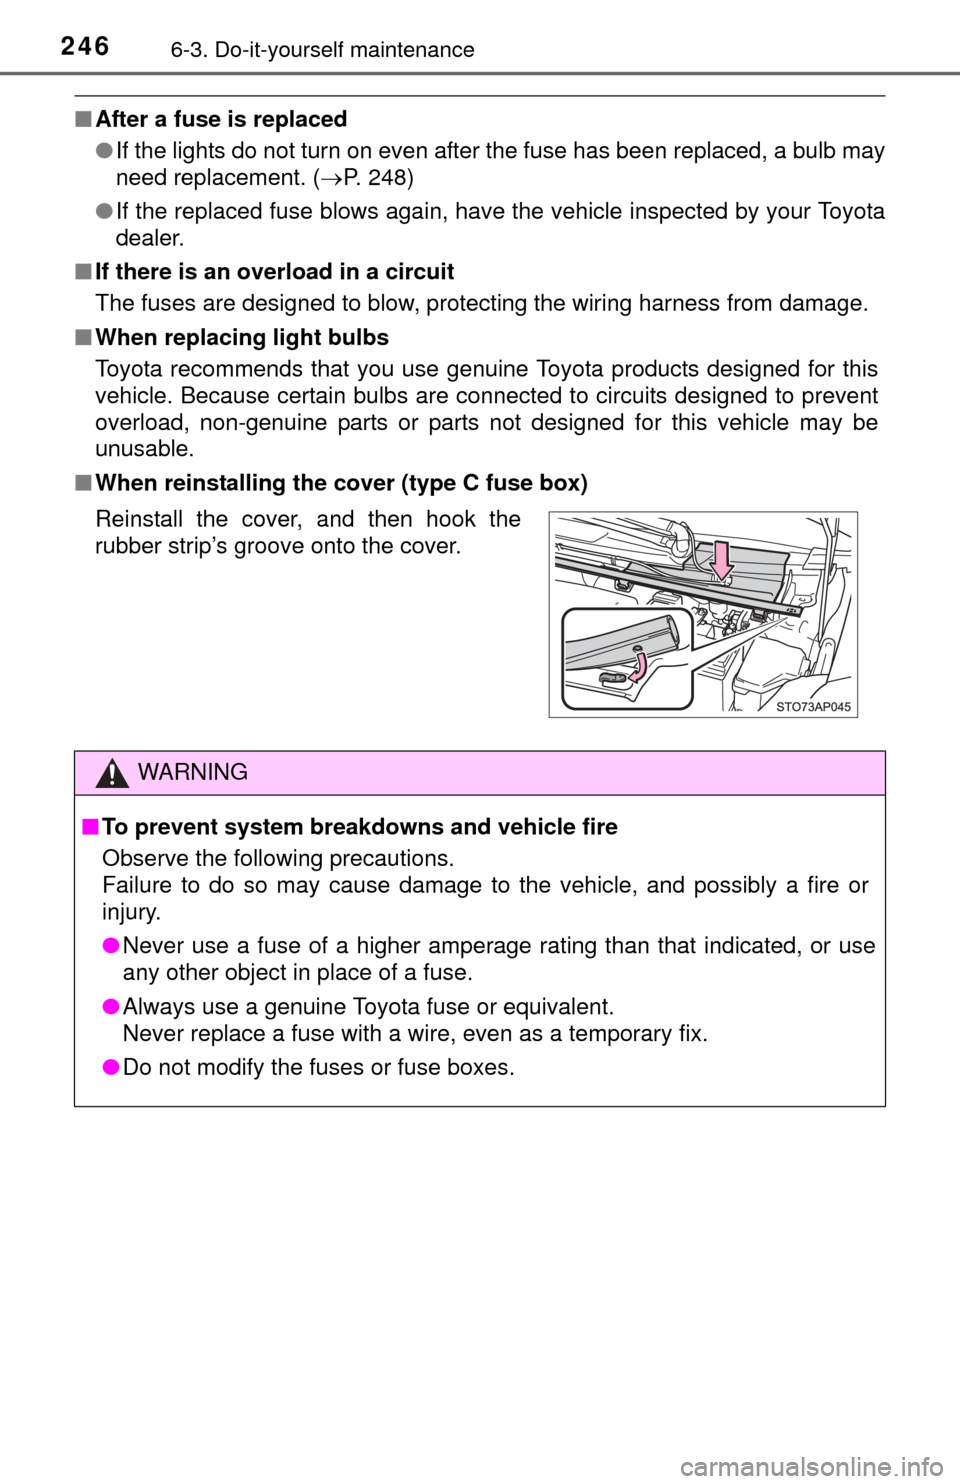
■ When reinstalling the cover (type C fuse box)
Reinstall the cover, and then hook the
rubber strip’s groove onto the cover.
WARNING
■ To prevent system breakdowns and vehicle fire
Observe the following precautions.
Failure to do so may cause damage to the vehicle, and possibly a fire or
injury.
● Never use a fuse of a higher amperage rating than that indicated, or use\
any other object in place of a fuse.
● Always use a genuine Toyota fuse or equivalent.
Never replace a fuse with a wire, even as a temporary fix.
● Do not modify the fuses or fuse boxes.
Page 259 of 364

2596-3. Do-it-yourself maintenance
6
Maintenance and care
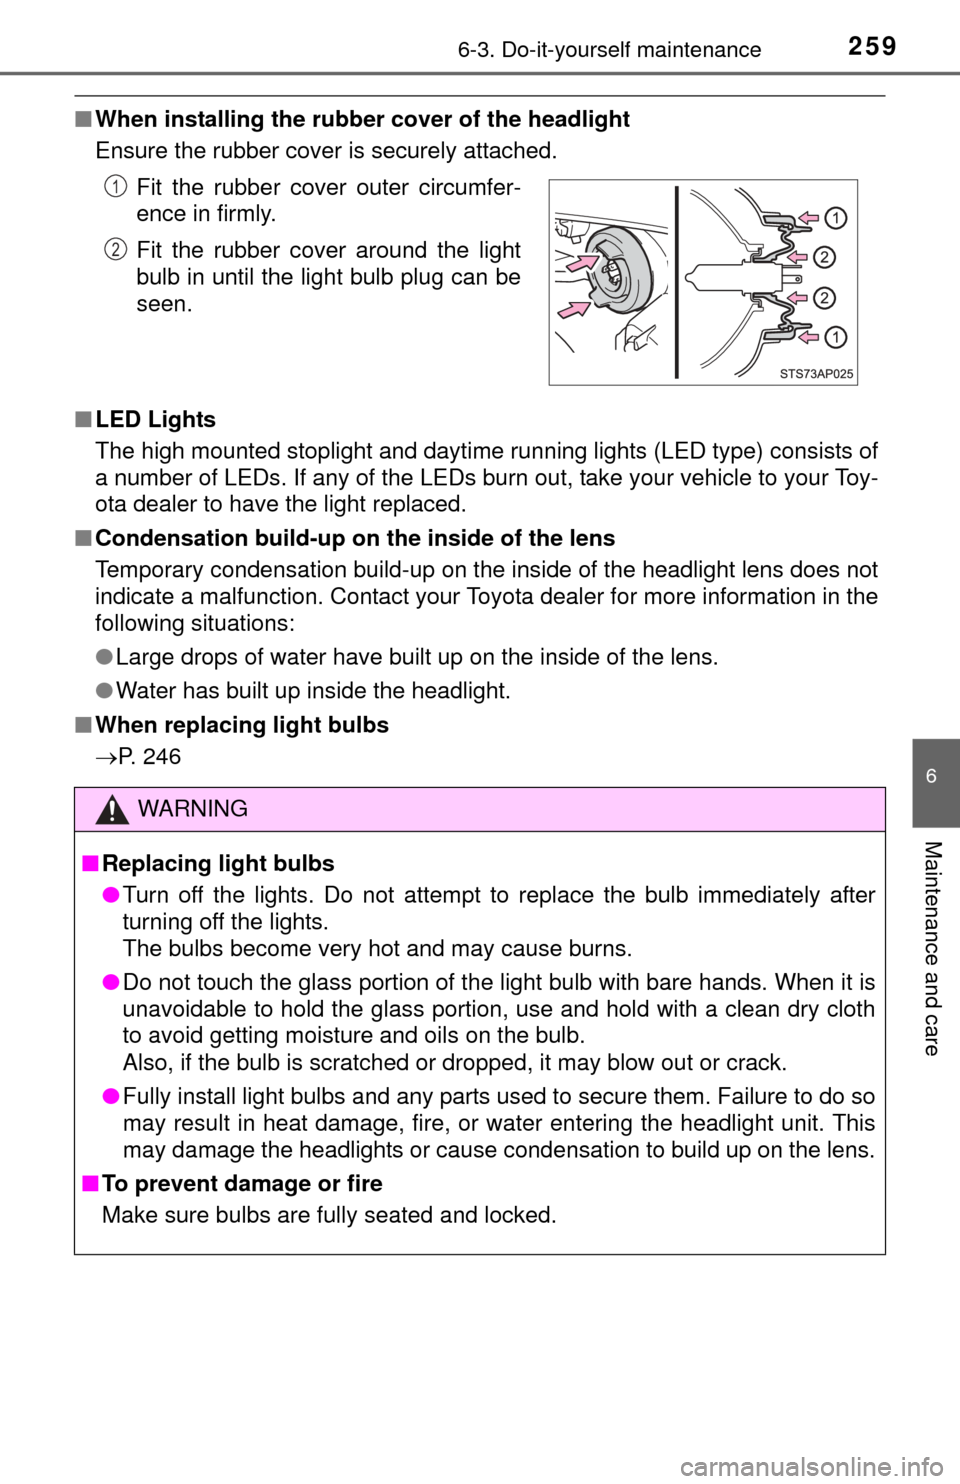
■When installing the rubber cover of the headlight
Ensure the rubber cover is securely attached.
■ LED Lights
The high mounted stoplight and daytime running lights (LED type) consists of
a number of LEDs. If any of the LEDs burn out, take your vehicle to your Toy-
ota dealer to have the light replaced.
■ Condensation build-up on the inside of the lens
Temporary condensation build-up on the inside of the headlight lens does not
indicate a malfunction. Contact your Toyota dealer for more information in the
following situations:
●Large drops of water have built up on the inside of the lens.
● Water has built up inside the headlight.
■ When replacing light bulbs
P. 246 Fit the rubber cover outer circumfer-
ence in firmly.
Fit the rubber cover around the light
bulb in until the light bulb plug can be
seen.
WARNING
■
Replacing light bulbs
● Turn off the lights. Do not attempt to replace the bulb immediately after
turning off the lights.
The bulbs become very hot and may cause burns.
● Do not touch the glass portion of the light bulb with bare hands. When it is
unavoidable to hold the glass portion, use and hold with a clean dry cloth
to avoid getting moisture and oils on the bulb.
Also, if the bulb is scratched or dropped, it may blow out or crack.
● Fully install light bulbs and any parts used to secure them. Failure to do so
may result in heat damage, fire, or water entering the headlight unit. This
may damage the headlights or cause condensation to build up on the lens.
■ To prevent damage or fire
Make sure bulbs are fully seated and locked.
1
2
Page 261 of 364
261
7When trouble arises
7-1. Essential informationEmergency flashers .......... 262
If your vehicle has to be stopped in
an emergency ................. 263
7-2. Steps to take in an emergency
If your vehicle needs to be towed ......................... 265
If you think something is wrong .............................. 270
Fuel pump shut off system ............................ 271
If a warning light turns on or a warning buzzer
sounds ............................ 272
If you have a flat tire.......... 281
If the engine will not start .. 294
If the shift lever cannot be shifted from P (vehicles
with an automatic
transmission) .................. 296
If the vehicle battery is discharged ...................... 297
If your vehicle overheats ... 300
If the vehicle becomes stuck ............................... 303