Page 400 of 576

4007-2. Maintenance
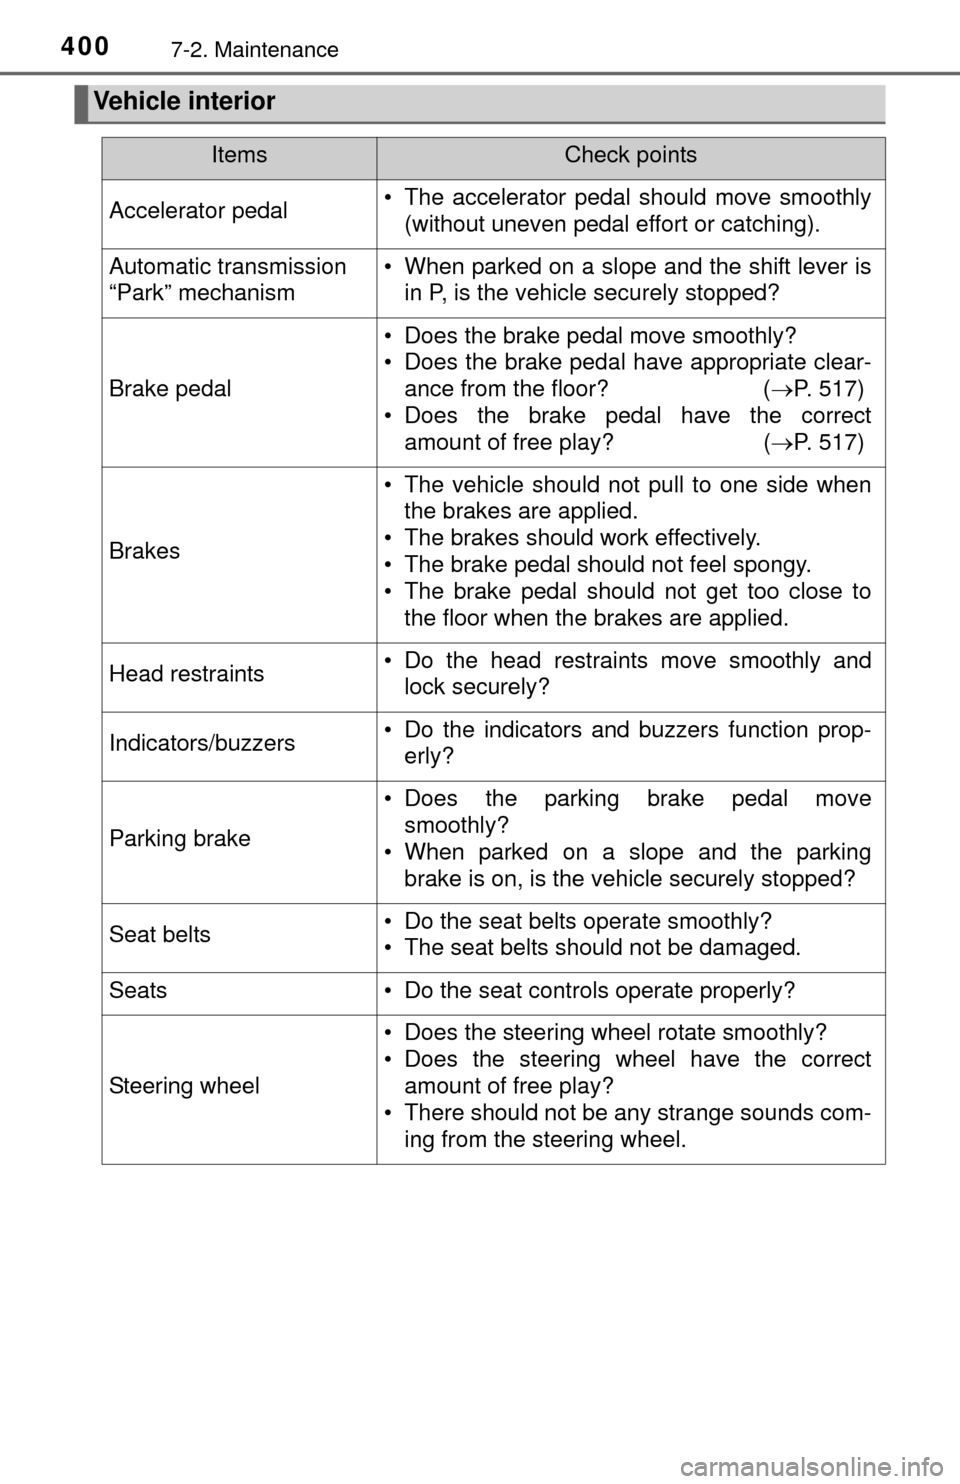
Vehicle interior
ItemsCheck points
Accelerator pedal• The accelerator pedal should move smoothly(without uneven pedal effort or catching).
Automatic transmission
“Park” mechanism• When parked on a slope and the shift lever isin P, is the vehicle securely stopped?
Brake pedal
• Does the brake pedal move smoothly?
• Does the brake pedal have appropriate clear-ance from the floor? ( P. 517)
• Does the brake pedal have the correct amount of free play? ( P. 517)
Brakes
• The vehicle should not pull to one side when
the brakes are applied.
• The brakes should work effectively.
• The brake pedal should not feel spongy.
• The brake pedal should not get too close to the floor when the brakes are applied.
Head restraints• Do the head restraints move smoothly andlock securely?
Indicators/buzzers• Do the indicators and buzzers function prop-erly?
Parking brake
• Does the parking brake pedal movesmoothly?
• When parked on a slope and the parking brake is on, is the vehicle securely stopped?
Seat belts• Do the seat belts operate smoothly?
• The seat belts should not be damaged.
Seats• Do the seat controls operate properly?
Steering wheel
• Does the steering wheel rotate smoothly?
• Does the steering wheel have the correctamount of free play?
• There should not be any strange sounds com-
ing from the steering wheel.
Page 452 of 576
4527-3. Do-it-yourself maintenance
■When installing the rubber cover of the headlight
Ensure the rubber cover is securely attached.
■ When replacing the light bulbs
Confirm that they are properly engaged with the bulb base and that there is
no light leakage.
■ LED Lights
The parking lights (LED type), daytime running light (LED type) and side turn
signal lights consist of a number of LEDs. If any of the LEDs burn out, take
your vehicle to your Toyota dealer to have the light replaced.
■ Condensation build-up on the inside of the lens
Temporary condensation build-up on the inside of the headlight lens does not
indicate a malfunction. Contact your Toyota dealer for more information in the
following situations:
●Large drops of water have built up on the inside of the lens.
● Water has built up inside the headlight.Fit the rubber cover outer circumfer-
ence in firmly.
Fit the rubber cover around the light
bulb in until the light bulb plug can be
seen.
1
2
Page 453 of 576

4537-3. Do-it-yourself maintenance
7
Maintenance and care
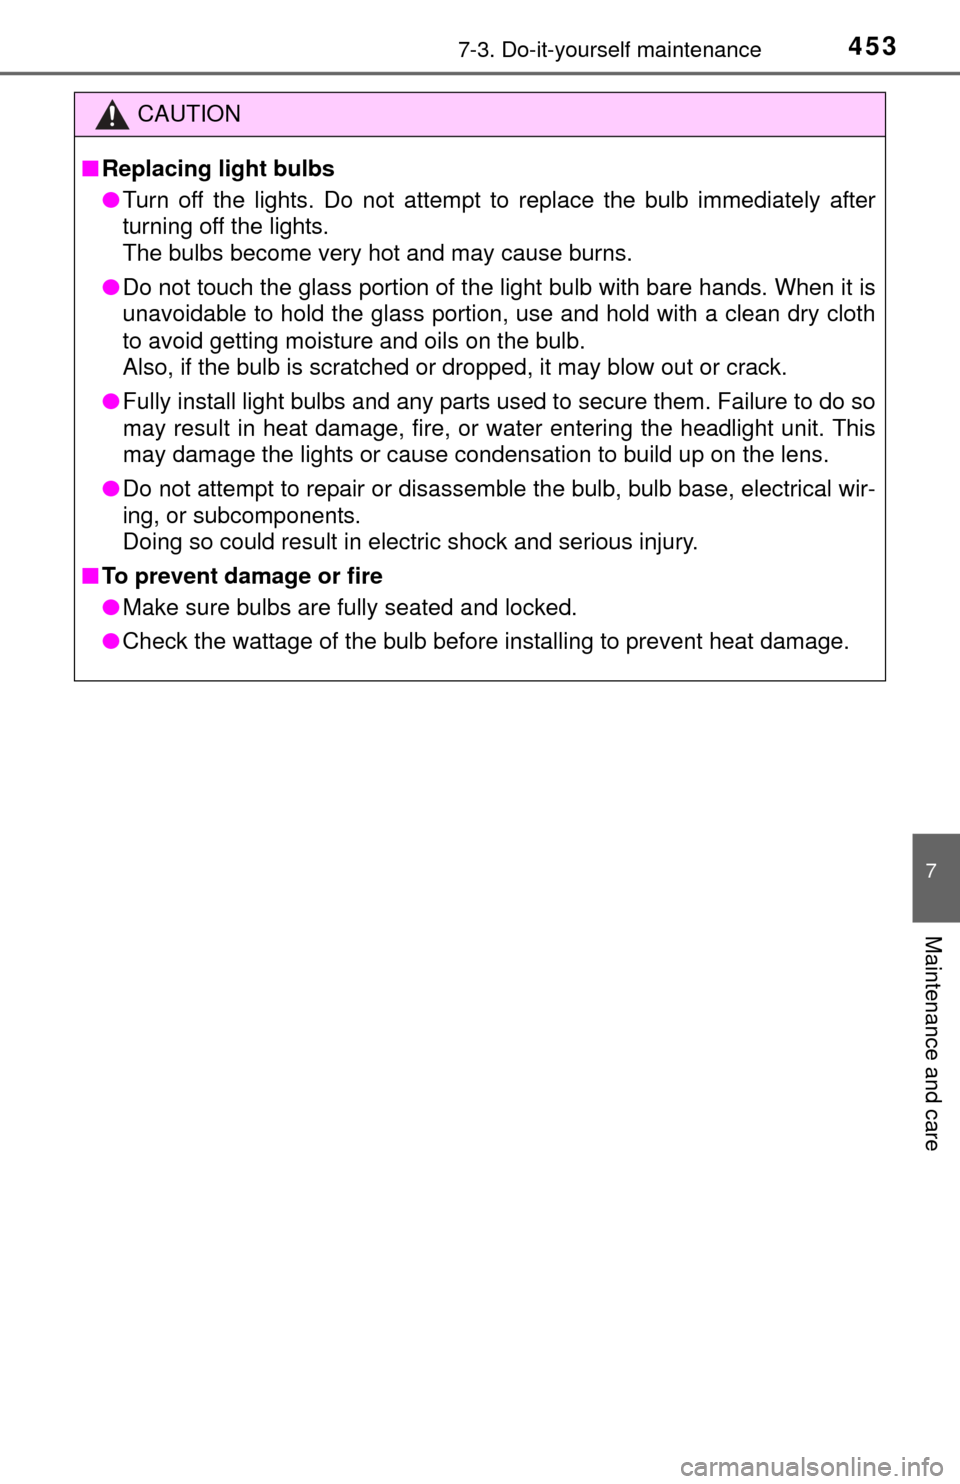
CAUTION
■Replacing light bulbs
● Turn off the lights. Do not attempt to replace the bulb immediately after
turning off the lights.
The bulbs become very hot and may cause burns.
● Do not touch the glass portion of the light bulb with bare hands. When it is
unavoidable to hold the glass portion, use and hold with a clean dry cloth
to avoid getting moisture and oils on the bulb.
Also, if the bulb is scratched or dropped, it may blow out or crack.
● Fully install light bulbs and any parts used to secure them. Failure to do so
may result in heat damage, fire, or water entering the headlight unit. This
may damage the lights or cause condensation to build up on the lens.
● Do not attempt to repair or disassemble the bulb, bulb base, electrical wir-
ing, or subcomponents.
Doing so could result in electric shock and serious injury.
■ To prevent damage or fire
● Make sure bulbs are fully seated and locked.
● Check the wattage of the bulb before installing to prevent heat damage.
Page 460 of 576
4608-2. Steps to take in an emergency
If a tow truck is not available in an emergency, your vehicle may be
temporarily towed using a cable or chain secured to the emergency
towing eyelets. This should only be attempted on hard surfaced roads
for short distances at low speeds.
A driver must be in the vehicle to steer and operate the brakes. The
vehicle’s wheels, drive train, axles, steering and brakes must be in
good condition.
Securely attach a cable or chain to the towing eyelet.
Take care not to damage the vehicle body.
Enter the vehicle being towed and start the engine.
If the engine does not start, turn the engine switch to the “ON” position.
4WD models: Put the front-wheel drive control switch in “2WD”.
Shift the shift lever to N and release the parking brake.
When the shift lever cannot be shifted: ( P. 492)
Emergency towing
Emergency towing procedure
1
2
3
4
Page 468 of 576

4688-2. Steps to take in an emergency
*3: Driver’s seat belt buzzer:The driver’s seat belt buzzer sounds to alert the driver that his or her seat
belt is not fastened. Once the engine switch is turned to the “ON” or
“START” position mode, the buzzer sounds for 6 seconds. If the vehicle
reaches a speed of 12 mph (20 km/h), the buzzer sounds once. If the seat
belt is still unfastened after 30 seconds, the buzzer will sound intermittently
for 10 seconds. Then, if the seat belt is still unfastened, the buzzer will
sound in a different tone for 20 more seconds.
Front passenger’s seat belt buzzer:
The front passenger’s seat belt buzzer sounds to alert the front passenger
that his or her seat belt is not fastened. The buzzer sounds once if the\
vehicle reaches a speed of 12 mph (20 km/h). If the seat belt is sill unfas-
tened after 30 seconds, the buzzer will sound intermittently for 10 seconds.
Then, if the seat belt is still unfastened, the buzzer will sound in a different
tone for 20 more seconds.
■ SRS warning light
This warning light system monitors the airbag sensor assembly, front impact
sensors, side impact sensors (front door), side impact sensors (front), side
impact sensors (rear), driver’s seat position sensor, driver’s seat belt buckle
switch, front passenger occupant cla ssification system (ECU and sensors),
“AIR BAG ON” indicator light, “AIR BAG OFF” indicator light, front passen-
ger’s seat belt buckle switch, seat belt pretensioners assemblies, airbags,
interconnecting wiring and power sources. ( P. 40)
■ Front passenger detection sensor, seat belt reminder and warning
buzzer
● If luggage is placed on the front passenger seat, the front passenger detec-
tion sensor may cause the warning light to flash and the warning buzzer to
sound even if a passenger is not sitting in the seat.
● If a cushion is placed on the seat, the sensor may not detect a passenger,
and the warning light may not operate properly.
■ If the malfunction indicator la mp comes on while driving
First check the following:
● Is the fuel tank empty?
If it is, fill the fuel tank immediately.
● Is the fuel tank cap loose?
If it is, tighten it securely.
The light will go off after several driving trips.
If the light does not go off even after several trips, contact your Toyota dealer
as soon as possible.
Page 475 of 576

4758-2. Steps to take in an emergency
8
When trouble arises
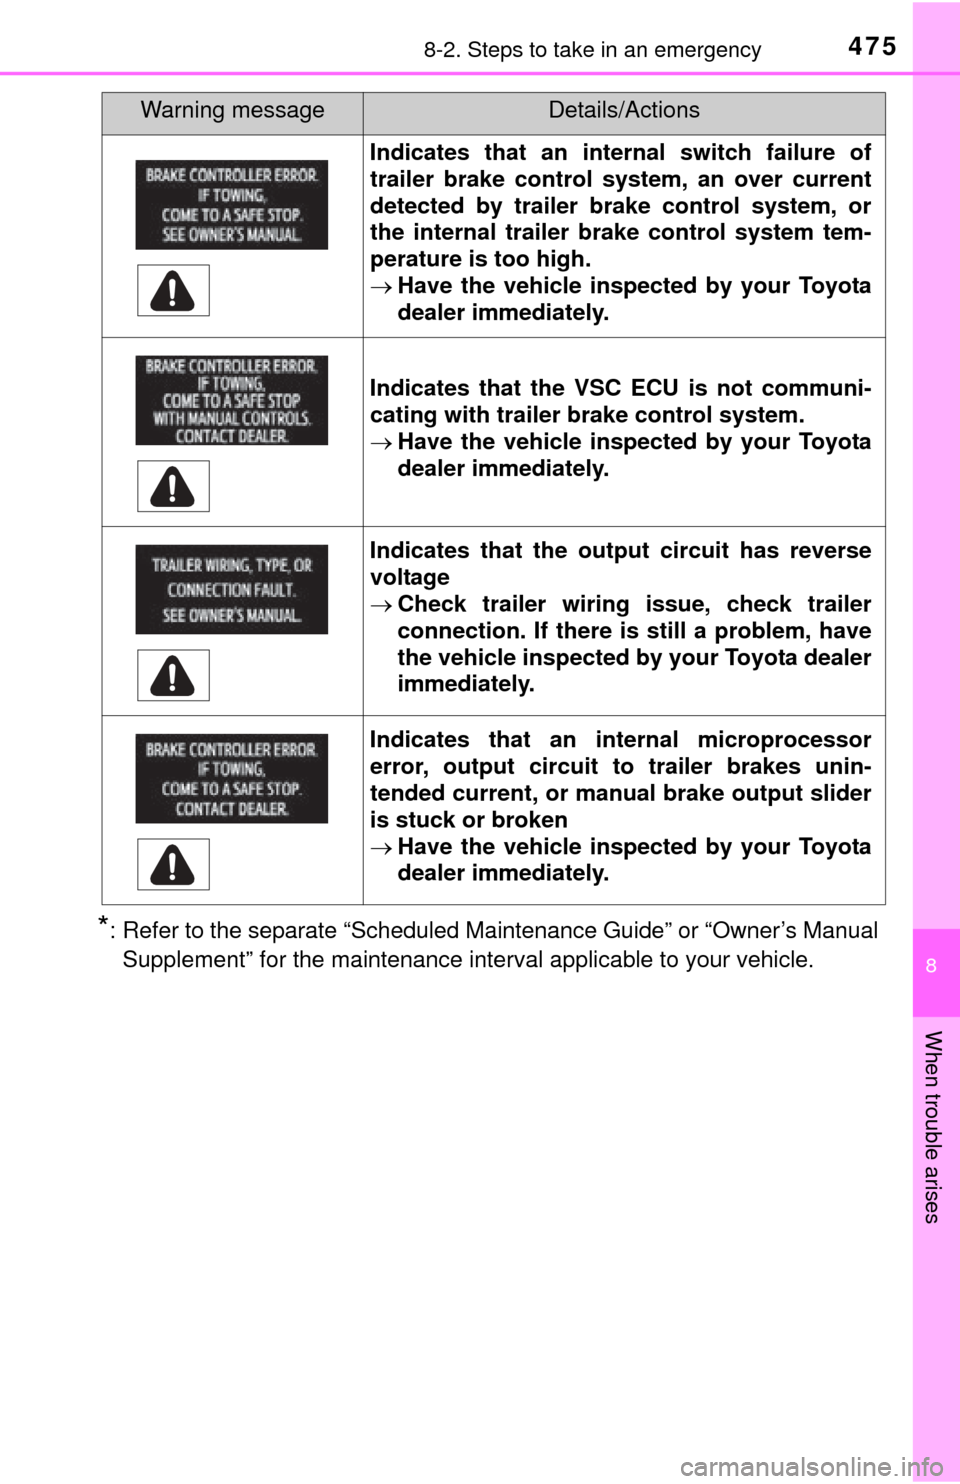
*: Refer to the separate “Scheduled Maintenance Guide” or “Owner’s ManualSupplement” for the maintenance interval applicable to your vehicle.
Indicates that an internal switch failure of
trailer brake control system, an over current
detected by trailer brake control system, or
the internal trailer brake control system tem-
perature is too high.
Have the vehicle inspected by your Toyota
dealer immediately.
Indicates that the VSC ECU is not communi-
cating with trailer brake control system.
Have the vehicle inspected by your Toyota
dealer immediately.
Indicates that the output circuit has reverse
voltage
Check trailer wiring issue, check trailer
connection. If there is still a problem, have
the vehicle inspected by your Toyota dealer
immediately.
Indicates that an internal microprocessor
error, output circuit to trailer brakes unin-
tended current, or ma nual brake output slider
is stuck or broken
Have the vehicle inspected by your Toyota
dealer immediately.
Warning messageDetails/Actions
Page 478 of 576

4788-2. Steps to take in an emergency
CAUTION
■Using the tire jack
Observe the following precautions.
Improper use of the tire jack may cause the vehicle to suddenly fall off
the jack, leading to death or serious injury.
●Do not use the tire jack for any purpose other than replacing tires or
installing and removing tire chains.
●Only use the tire jack that comes with this vehicle for replacing a flat
tire.
Do not use it on other vehicles, and do not use other tire jacks for
replacing tires on this vehicle.
●Put the jack properly in its jack point.
●Do not put any part of your body und er the vehicle while it is supported
by the jack.
●Do not start the engine or drive the vehicle while the vehicle is sup-
ported by the jack.
●Do not raise the vehicle while someone is inside.
●When raising the vehicle, do not put an object on or under the jack.
●Do not raise the vehicle to a height greater than that required to
replace the tire.
●Use a jack stand if it is necessary to get under the vehicle.
●When lowering the vehicle, make su re that there is no-one near the
vehicle. If there are people nearby, warn them vocally before lowering.
■Using the jack handle
Insert the square head securely until you hear a click to prevent the
extension parts from coming apart unexpectedly.
Page 487 of 576
4878-2. Steps to take in an emergency
8
When trouble arises
Vehicles with aluminum wheels: Remove the center wheel orna-
ment by pushing from the reverse side.
Lay down the tire with the valve
stem facing up and install the
holding bracket centered in the
wheel opening. Turn the jack
handle extension clockwise to
take up slack in the cable.
Check to ensure the holding
bracket is centered in the wheel
opening.
While raising, secu re the tire, tak-
ing care that the tire goes straight
up without catching on any sur-
rounding part to prevent it from
flying forward during a collision or
sudden braking.
CAUTION
■Stowing the flat tire
Failure to follow steps listed under st owing the tire may result in damage
to the spare tire carrier and loss of the tire, which could result in serious
injury or death.
Stowing the flat tire, jack and all tools
1
not centered
centered
2