Page 243 of 576
2434-6. Driving tips
4
Driving
NOTICE
■Repairing or replacing snow tires
Request repairs or replacement of snow tires from Toyota dealers or legiti-
mate tire retailers.
This is because the removal and attachment of snow tires affects the opera-
tion of the tire pressure warning valves and transmitters.
■ Fitting tire chains
The tire pressure warning valves and transmitters may not function correctly
when tire chains are fitted.
Page 285 of 576
2855-7. Connecting Bluetooth®
5
Multimedia
CAUTION
■FCC WARNING
Changes or modifications not expressly approved by the party responsible
for compliance could void the user’s authority to operate the equipment.
Radio frequency radiation exposure information:
This equipment complies with FCC radiation exposure limits set forth for an
uncontrolled environment.
This equipment should be installed and operated with minimum distance of
7.9 in. (20 cm) between the radiator and your body.
Co-location:
This transmitter must not be co-located or operating in conjuction with any
other antenna or transmitter.
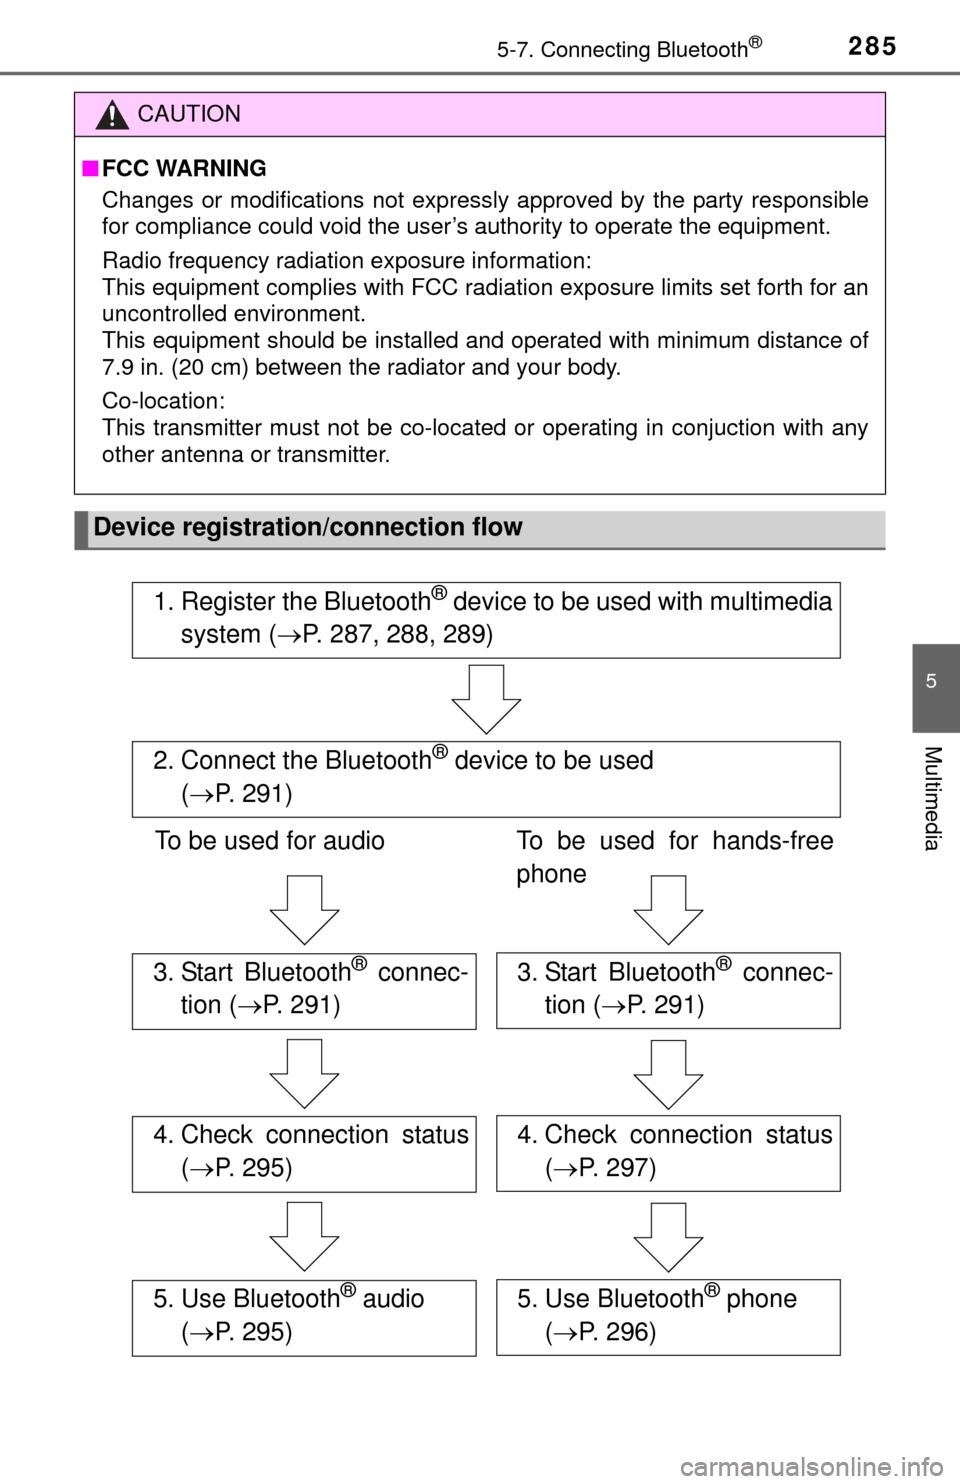
Device registration/connection flow
1. Register the Bluetooth® device to be used with multimedia
system ( P. 287, 288, 289)
2. Connect the Bluetooth® device to be used
( P. 291)
To be used for audio To be used for hands-free
phone
3. Start Bluetooth® connec-
tion ( P. 291)3. Start Bluetooth® connec-
tion ( P. 291)
4. Check connection status
( P. 295)4. Check connection status
( P. 297)
5. Use Bluetooth® audio
( P. 295)5. Use Bluetooth® phone
( P. 296)
Page 386 of 576
3866-4. Other interior features
■Before programming
●Install a new battery in the remote control transmitter.
● The battery side of the remote control transmitter must be pointed away
from the HomeLink
® button.
■ Certification for the garage door opener
For vehicles sold in the U.S.A.
FCC ID: NZLWZLHL4
NOTE:
This device complies with Part 15 of the FCC Rules. Operation is subject to
the following two conditions: (1) this device may not cause harmful interfer-
ence, and (2) this device must accept any interference received, including
interference that may cause undesired operation.
FCC WARNING:
Changes or modifications not expressly approved by the party responsible for
compliance could void the user’s authority to operate the equipment.
For vehicles sold in Canada
NOTE:
Operation is subject to the following two conditions: (1) this device may not
cause interference, and (2) this device must accept any interference, includ-
ing interference that may cause undesired operation of the device.
■ When support is necessary
Visit on the web at www.homelink.com
or call 1-800-355-3515.
CAUTION
■When programming a garage door or other remote control device
The garage door or other device may operate, so ensure people and
objects are out of danger to prevent potential harm.
■ Conforming to federal safety standards
Do not use the HomeLink
® compatible transceiver with any garage door
opener or device that lacks safety stop and reverse features as required by
federal safety standards.
This includes any garage door that cannot detect an interfering object. A
door or device without these features increases the risk of death or ser\
ious
injury.
Page 415 of 576
4157-3. Do-it-yourself maintenance
7
Maintenance and care
Add washer fluid in the following
situations:
●A washer does not work.
● The warning message appears
on the display.
NOTICE
■When recharging the battery
Never recharge the battery while the engine is running. Also, be sure all
accessories are turned off.
Washer fluid
CAUTION
■When adding washer fluid
Do not add washer fluid when the engine is hot or running as washer fluid
contains alcohol and may catch fire if spilled on the engine, etc.
NOTICE
■ Do not use any fluid other than washer fluid
Do not use soapy water or engine antifreeze instead of washer fluid.
Doing so may cause streaking on the vehicle’s painted surfaces.
■ Diluting washer fluid
Dilute washer fluid with water as necessary.
Refer to the freezing temperatures listed on the label of the washer fluid bot-
tle.
Page 416 of 576
4167-3. Do-it-yourself maintenance
Tires
New tread
Treadwear indicator
Worn tread
The location of treadwear indica-
tors is shown by the “TWI” or “”
marks, etc., molded on the side-
wall of each tire.
Check spare tire condition and
pressure if not rotated.
Rotate the tires in the order
shown.
To equalize tire wear and extend
tire life, Toyota recommends that
tire rotation is carried out at the
same interval as tire inspection.
Do not fail to initialize the tire
pressure warning system after
tire rotation.
Replace or rotate tires in acco rdance with maintenance sched-
ules and treadwear.
Checking tires
1
2
3
Tire rotation
Front
Page 417 of 576
4177-3. Do-it-yourself maintenance
7
Maintenance and care
Your vehicle is equipped with a tire pressure warning system that uses
tire pressure warning valves and tr ansmitters to detect low tire infla-
tion pressure before serious problems arise. ( P. 467)
◆Installing tire pressure warning valves and transmitters
When replacing tires or wheels, tire pressure warning valves and
transmitters must also be installed.
When new tire pressure warning valves and transmitters are
installed, new ID codes must be registered in the tire pressure
warning computer and the tire pr essure warning system must be
initialized. Have tire pressure warning valve and transmitter ID
codes registered by your Toyota dealer. ( P. 418)
◆Initializing the tire pressure warning system
■The tire pressure warning system must be initialized in the fol-
lowing circumstances:
● When rotating the tires.
● When changing the tire size.
When the tire pressure warning system is initialized, the current tire
inflation pressure is set as the benchmark pressure.
Tire pressure warning system
Page 418 of 576
4187-3. Do-it-yourself maintenance
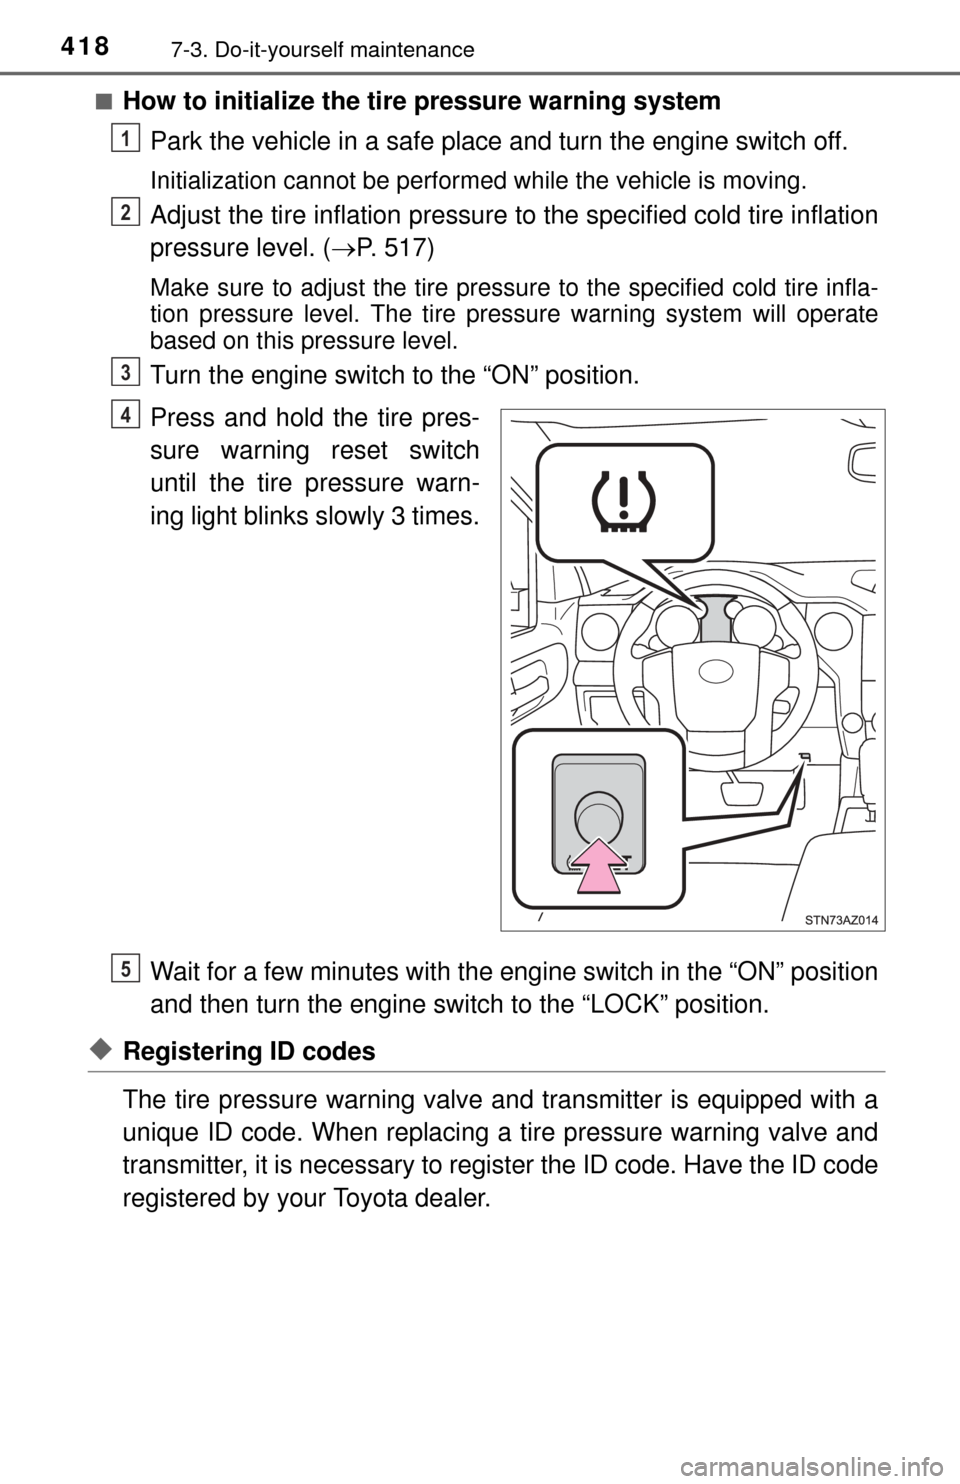
■How to initialize the tire pressure warning systemPark the vehicle in a safe place and turn the engine switch off.
Initialization cannot be performed while the vehicle is moving.
Adjust the tire inflation pressure to the specified cold tire inflation
pressure level. ( P. 517)
Make sure to adjust the tire pressu re to the specified cold tire infla-
tion pressure level. The tire pressure warning system will operate
based on this pressure level.
Turn the engine switch to the “ON” position.
Press and hold the tire pres-
sure warning reset switch
until the tire pressure warn-
ing light blinks slowly 3 times.
Wait for a few minutes with the eng ine switch in the “ON” position
and then turn the engine switch to the “LOCK” position.
◆Registering ID codes
The tire pressure warning valve and transmitter is equipped with a
unique ID code. When replacing a tire pressure warning valve and
transmitter, it is necessary to register the ID code. Have the ID code
registered by your Toyota dealer.
1
2
3
4
5
Page 419 of 576
4197-3. Do-it-yourself maintenance
7
Maintenance and care
■When to replace your vehicle’s tires
Tires should be replaced if:
●You have tire damage such as cuts, splits, cracks deep enough to
expose the fabric, and bulges indicating internal damage
●A tire goes flat repeatedly or cannot be properly repaired due to the size
or location of a cut or other damage
If you are not sure, consult with your Toyota dealer.
■Replacing tires and wheels
If the ID code of the tire pressure warning valve and transmitter is not reg-
istered, the tire pressure warning system will not work properly. After driv-
ing for about 20 minutes, the tire pressure warning light blinks for 1
minute and stays on to indicate a system malfunction.
■Tire life
Any tire over 6 years old must be checked by a qualified technician even
if it has seldom or never been used or damage is not obvious.
■Routine tire inflation pressure checks
The tire pressure warning system does not replace routine tire inflation
pressure checks. Make sure to check tire inflation pressure as part of
your routine of daily vehicle checks.
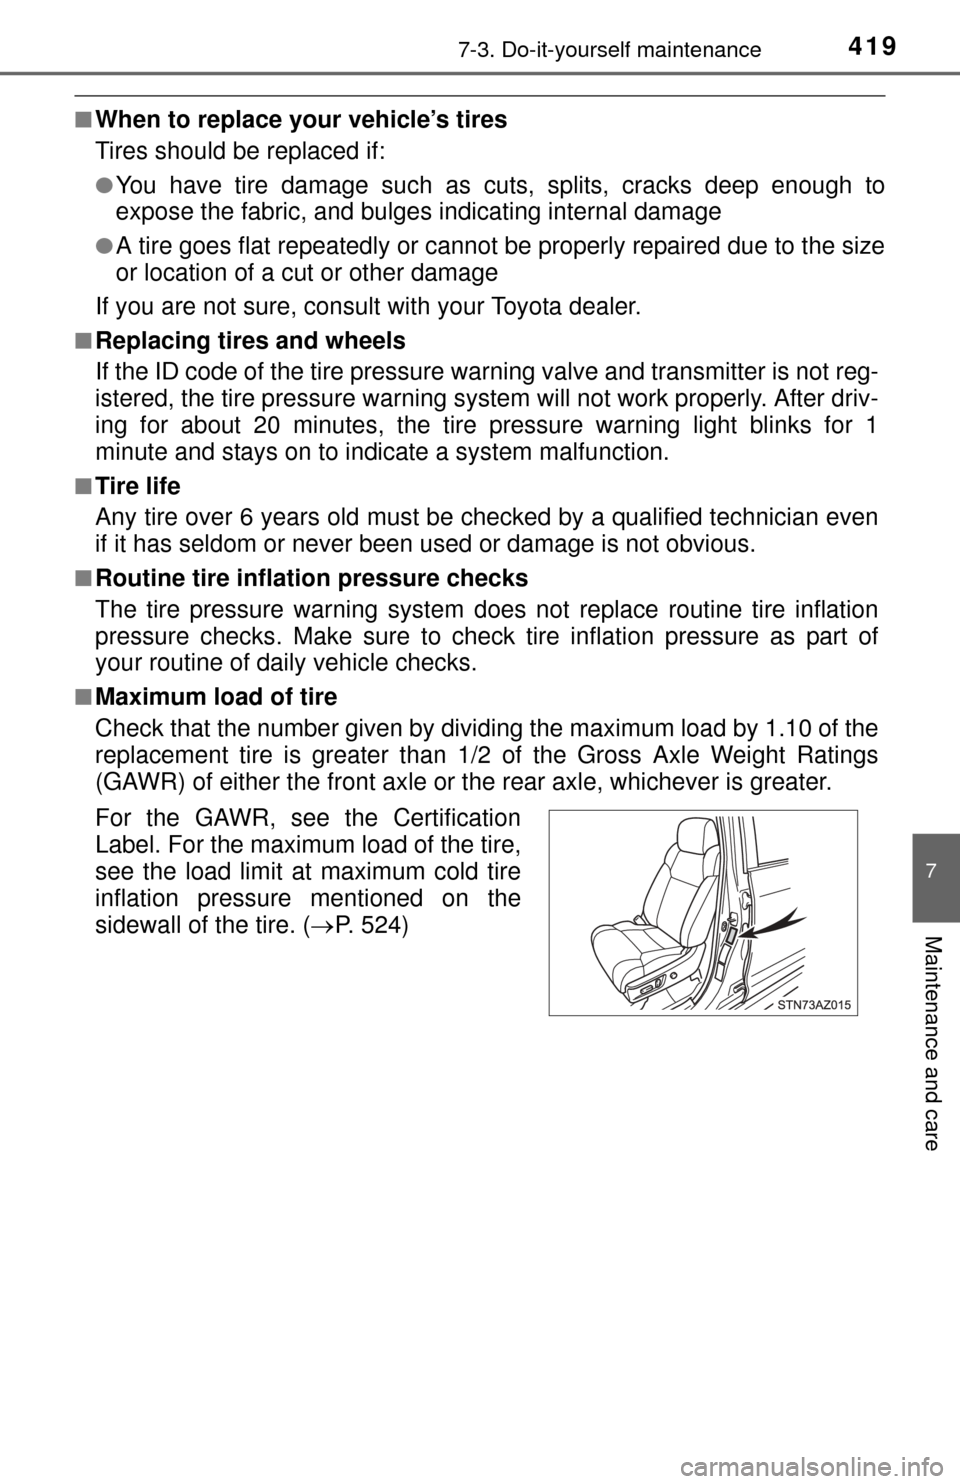
■Maximum load of tire
Check that the number given by dividing the maximum load by 1.10 of the
replacement tire is greater than 1/ 2 of the Gross Axle Weight Ratings
(GAWR) of either the front axle or the rear axle, whichever is greater.
For the GAWR, see the Certification
Label. For the maximum load of the tire,
see the load limit at maximum cold tire
inflation pressure mentioned on the
sidewall of the tire. ( P. 524)