Page 293 of 576
2935-7. Connecting Bluetooth®
5
Multimedia
Displaying a Bluetooth® device details
Display the “Bluetooth Setup” screen. (P. 286)
Select the device.
Select “Device Info”.
Following screen is displayed:
Device name
Change connection method
( P. 293)
Bluetooth
® address
Display your telephone num-
ber
The number may not be dis-
played depending on the model
of phone.
Compatibility profile of the
device
Restore default settings
Select “Connect Audio Player from”.
Select “Vehicle ” or “Device”.
“Vehicle”: Connect the multimedia system to the portable audio player.
“Device”: Connect the portable audio player to the multimedia system.
You can confirm and change the registered device details.
Bluetooth® device registration status
1
2
3
4
1
2
3
4
5
6
Changing connection method
1
2
Page 303 of 576
3035-9. Bluetooth® phone
5
Multimedia
■Release Tones
●A continuous tone signal is a character string that consists of numbers and
the characters “p” or “w”. (e.g.056133w0123p#1 )
● When the “p” pause tone is used, the tone data up until the next pause tone
will be automatically sent after 2 seconds have elapsed. When the “w”
pause tone is used, the tone data up until the next pause tone will be auto-
matically sent after a user operation is performed.
● Release tones can be used when automated operation of a phone based
service such as an answering machine or bank phone service is desired. A\
phone number with continuous tone signals can be registered in the contact
list.
● Tone data after a “w” pause tone can be operated on voice command during
a call.
Select “Handset Mode” to change from a hands-free call to a cellular
phone call.
Select “Handset Mode” to off from a cellular phone call to a hands-free
call.
Select “Transmit Volume”.
Select the desired level for the transmit volume.
Select “OK”.
Press the switch on the steering wheel or select .
To transfer a call
Transmit volume setting
To hang up
1
2
3
Page 317 of 576

3175-9. Bluetooth® phone
5
Multimedia
When 15 contacts have already been registered to the favorites listWhen 15 contacts have already been registered to the favorites
list, a registered contact needs to be replaced.
Select “Yes” when the confirmation screen appears to replace a
contact.
Select the contact to be replaced.
Check that a confirmation scr een is displayed when the opera-
tion is complete.
Registering contacts in the favorites list in a different way (from the
“Contacts” screen)
Display the phone screen. ( P. 296)
Select the “Contacts” tab.
Select at the beginning of the desired contact list name to be
registered in the favorites list.
When selected, is changed to , and the contact is registered in
the favorites list.
Registering contacts in the favorites list in a different way (from the
“Contact Details” screen)
Display the phone screen. ( P. 296)
Select the “Contacts” tab or the “Call History” tab and select the
desired contact.
Select “Add Favorite”.
Check that a confirmation scr een is displayed when the opera-
tion is complete.
1
2
3
1
2
3
1
2
3
4
Page 319 of 576
3195-9. Bluetooth® phone
5
Multimedia
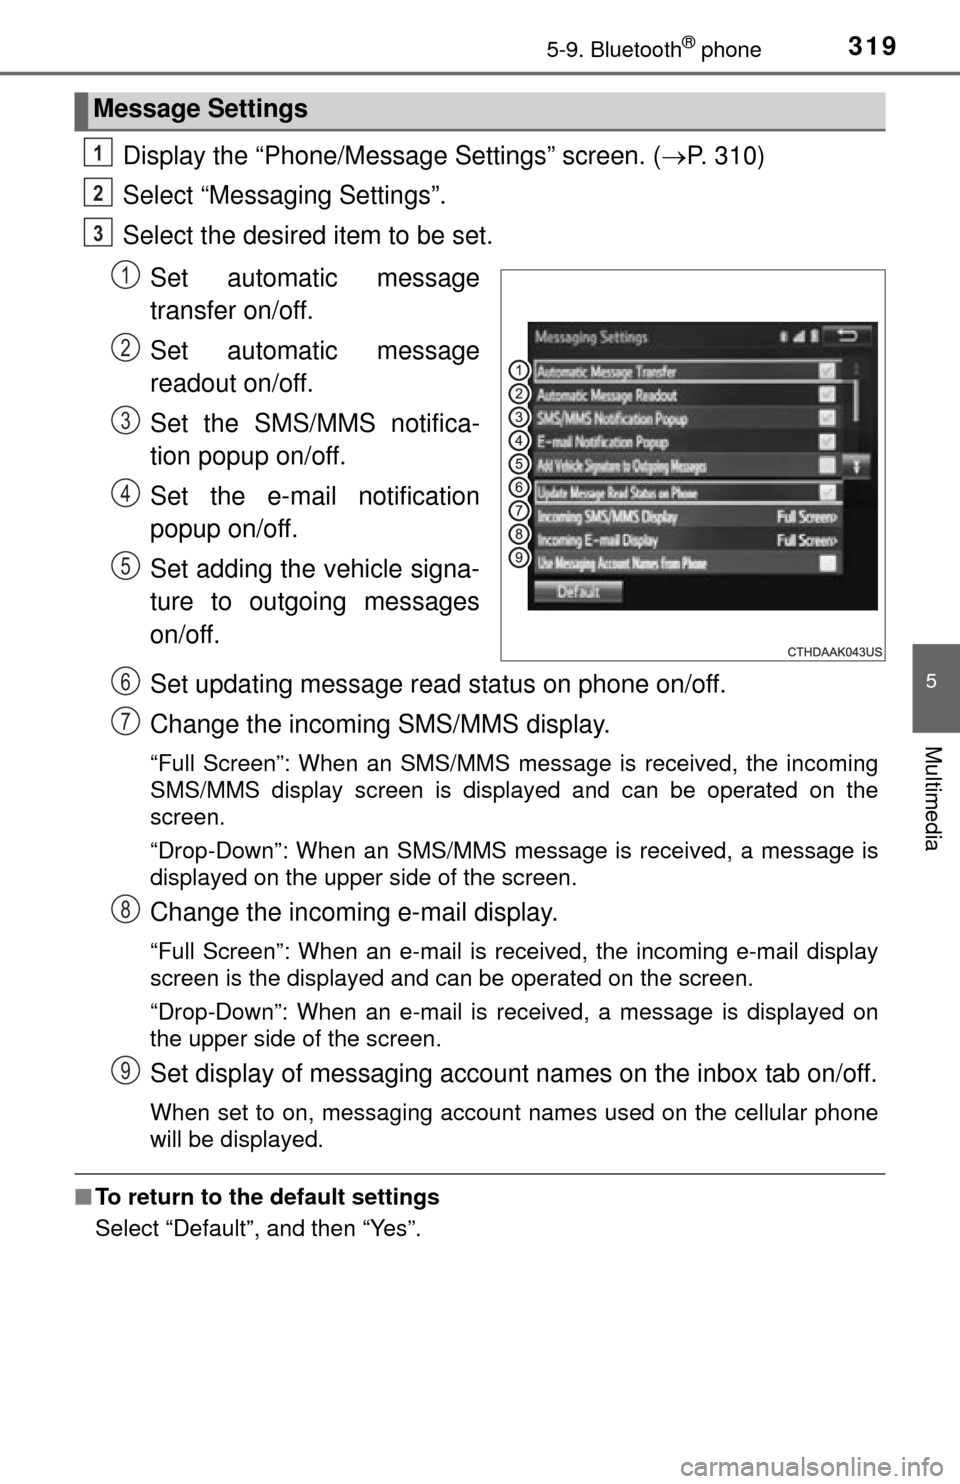
Display the “Phone/Message Settings” screen. (P. 310)
Select “Messaging Settings”.
Select the desired item to be set.
Set automatic message
transfer on/off.
Set automatic message
readout on/off.
Set the SMS/MMS notifica-
tion popup on/off.
Set the e-mail notification
popup on/off.
Set adding the vehicle signa-
ture to outgoing messages
on/off.
Set updating message read status on phone on/off.
Change the incoming SMS/MMS display.
“Full Screen”: When an SMS/MMS message is received, the incoming
SMS/MMS display screen is displayed and can be operated on the
screen.
“Drop-Down”: When an SMS/MMS message is received, a message is
displayed on the upper side of the screen.
Change the incoming e-mail display.
“Full Screen”: When an e-mail is received, the incoming e-mail display
screen is the displayed and can be operated on the screen.
“Drop-Down”: When an e-mail is received, a message is displayed on
the upper side of the screen.
Set display of messaging account names on the inbox tab on/off.
When set to on, messaging account names used on the cellular phone
will be displayed.
■To return to the default settings
Select “Default”, and then “Yes”.
Message Settings
1
2
3
1
2
3
4
5
6
7
8
9
Page 344 of 576
3446-1. Using the air conditioning system
■Change the airflow mode
To change the airflow, press .
Air outlets are adjusted each time the button is pressed.
■
Other functions
● Switching between outside air and recirculated air modes
( P. 345)
● Defogging the windshield ( P. 345)
● Defogging the back window (CrewMax models) ( P. 345)
● Defogging the outside rear view mirrors (if equipped) ( P. 345)
● Windshield wiper de-icer (if equipped) ( P. 346)
Press .
Adjust the temperature setting.
To stop the operation, press .
■Automatic mode indicator
If the fan speed setting or air fl ow modes are operated, the auto-
matic mode indicator goes off. However, automatic mode for func-
tions other than that operated are maintained.
■Adjusting the temperature for driver and passenger seats sep-
arately (“SYNC” mode)
The air conditioning system switches between individual and simul-
taneous mode each time is pressed.
Simultaneous mode (the indicator on is on):
The driver’s side temperature control dial can be used to adjust the
temperature for driver’s and front passenger’s side. At this time,
operate the front passenger’s side temperature control dial to enter
individual mode.
Individual mode (the indicator on is off):
The temperature for the driver’s and front passenger’s side can be
adjusted separately.
Using by automatic mode
1
2
3
Page 351 of 576
3516-1. Using the air conditioning system
6
Interior features
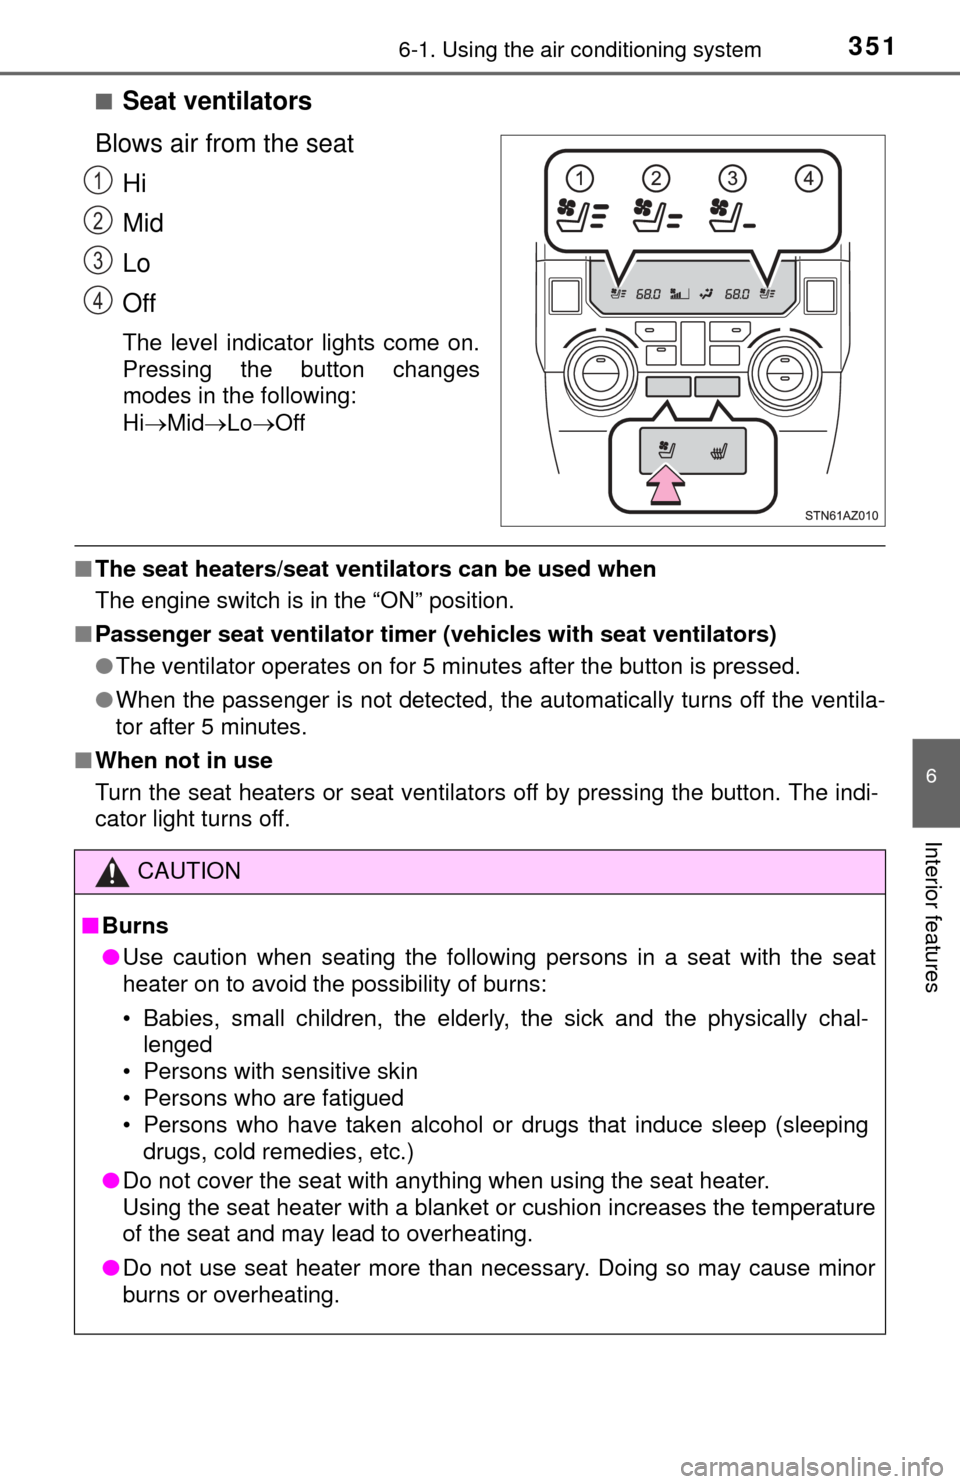
■Seat ventilators
Blows air from the seat Hi
Mid
Lo
Off
The level indicator lights come on.
Pressing the button changes
modes in the following:
HiMid LoOff
■The seat heaters/seat ventilators can be used when
The engine switch is in the “ON” position.
■ Passenger seat ventilator timer (vehicles with seat ventilators)
●The ventilator operates on for 5 minutes after the button is pressed.
● When the passenger is not detected, the automatically turns off the ventila-
tor after 5 minutes.
■ When not in use
Turn the seat heaters or seat ventilators off by pressing the button. The indi-
cator light turns off.
1
2
3
4
CAUTION
■Burns
● Use caution when seating the following persons in a seat with the seat
heater on to avoid the possibility of burns:
• Babies, small children, the elderly, the sick and the physically chal-
lenged
• Persons with sensitive skin
• Persons who are fatigued
• Persons who have taken alcohol or drugs that induce sleep (sleeping drugs, cold remedies, etc.)
● Do not cover the seat with anything when using the seat heater.
Using the seat heater with a blanket or cushion increases the temperature
of the seat and may lead to overheating.
● Do not use seat heater more than necessary. Doing so may cause minor
burns or overheating.
Page 355 of 576
3556-2. Using the interior lights
6
Interior features
Ty p e B
On/off
“OFF”
The cargo lamp can be individually
turned on or off.
“DOOR”
The cargo lamp comes on when a
door is opened. They turn off when
the doors are closed.
“ON”
The cargo lamp cannot be individually turned off.
■Illuminated entry system
The lights automatically turn on/off according to the engine switch position,
whether the doors are locked/unlocked, and whether the doors are opened/
closed.
■ To prevent battery discharge
If the following lights remain on when the door is not fully closed and the main
switch is in the “DOOR” position, the lights will go off automatically after 20
minutes:
●Personal lights
● Interior lights
● Cargo lamp
■ Customization that can be co nfigured at Toyota dealer
Settings (e.g. the time elapsed before lights turn off) can be changed.
(Customizable features: P. 534)
Cargo lamp main switch
1
2
3
Page 488 of 576
4888-2. Steps to take in an emergency
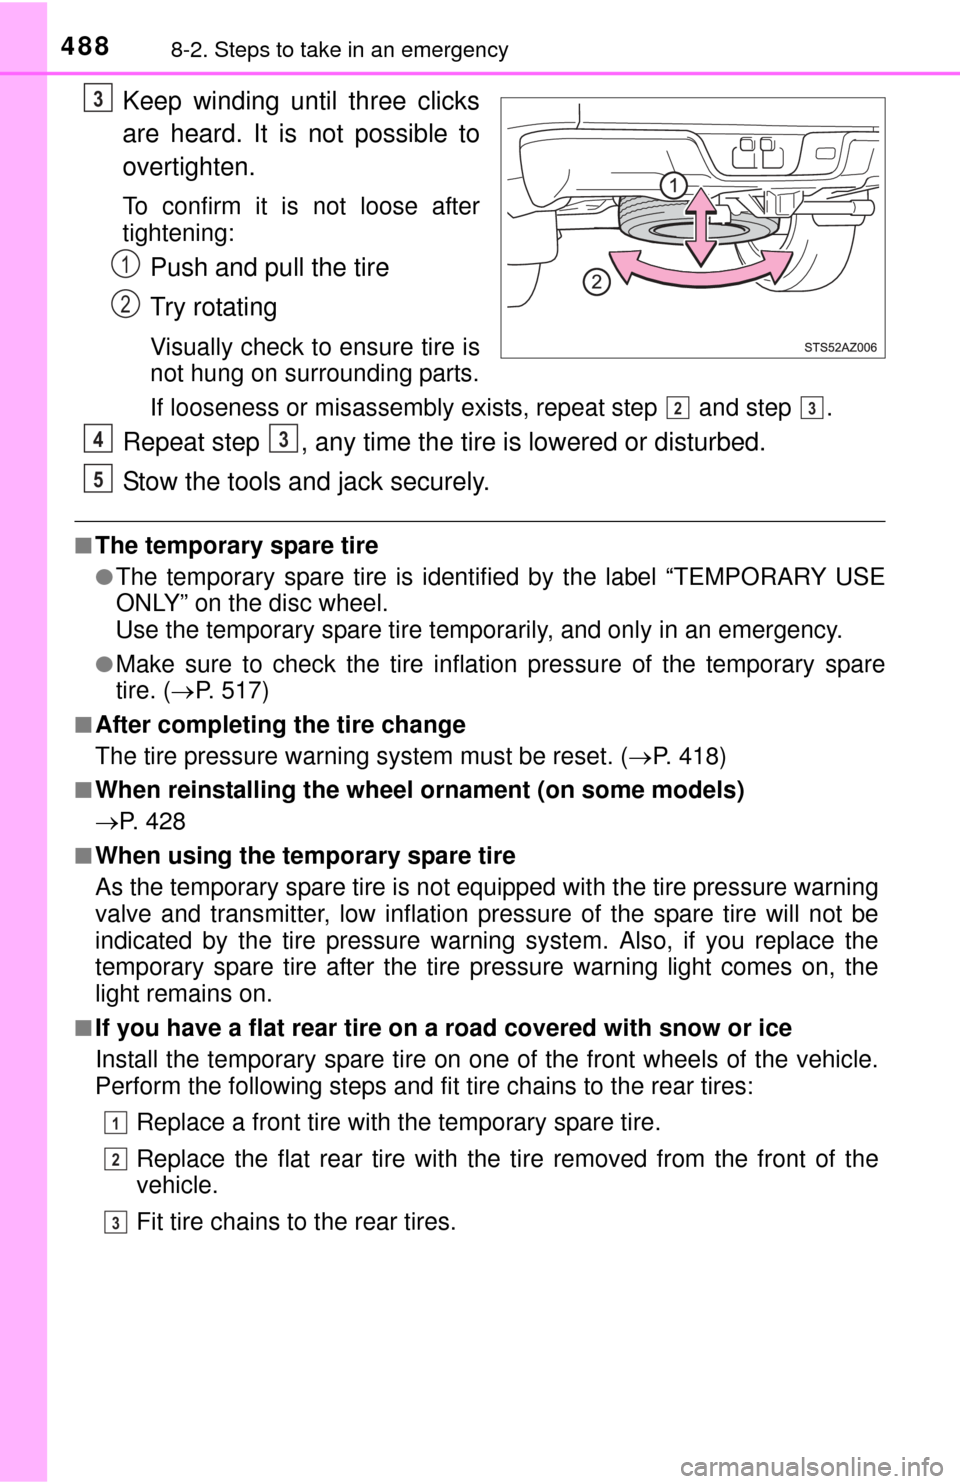
Keep winding until three clicks
are heard. It is not possible to
overtighten.
To confirm it is not loose after
tightening:
Push and pull the tire
Try rotating
Visually check to ensure tire is
not hung on surrounding parts.
If looseness or misassembly exists, repeat step and step .
Repeat step , any time the tire is lowered or disturbed.
Stow the tools and jack securely.
■The temporary spare tire
●The temporary spare tire is identified by the label “TEMPORARY USE
ONLY” on the disc wheel.
Use the temporary spare tire temporarily, and only in an emergency.
●Make sure to check the tire inflation pressure of the temporary spare
tire. ( P. 517)
■After completing the tire change
The tire pressure warning system must be reset. ( P. 418)
■When reinstalling the wheel ornament (on some models)
P. 4 2 8
■When using the temporary spare tire
As the temporary spare tire is not equipped with the tire pressure warning
valve and transmitter, lo w inflation pressure of the spare tire will not be
indicated by the tire pressure warning system. Also, if you replace the
temporary spare tire after the tire pressure warning light comes on, the
light remains on.
■If you have a flat rear tire on a road covered with snow or ice
Install the temporary spare tire on one of the front wheels of the vehicle.
Perform the following steps and fit tire chains to the rear tires:
Replace a front tire with the temporary spare tire.
Replace the flat rear tire with the tire removed from the front of the
vehicle.
Fit tire chains to the rear tires.
3
1
2
23
43
5
1
2
3