Page 229 of 664

SIENNA_OM_01999-08001_(U)
2294-2. Driving procedures
4
Driving
■Steering lock
After turning the engine switch off and opening and closing the doors, the
steering wheel will be locked due to the steering lock function.
Operating the engine switch again automatically cancels the steering lock.
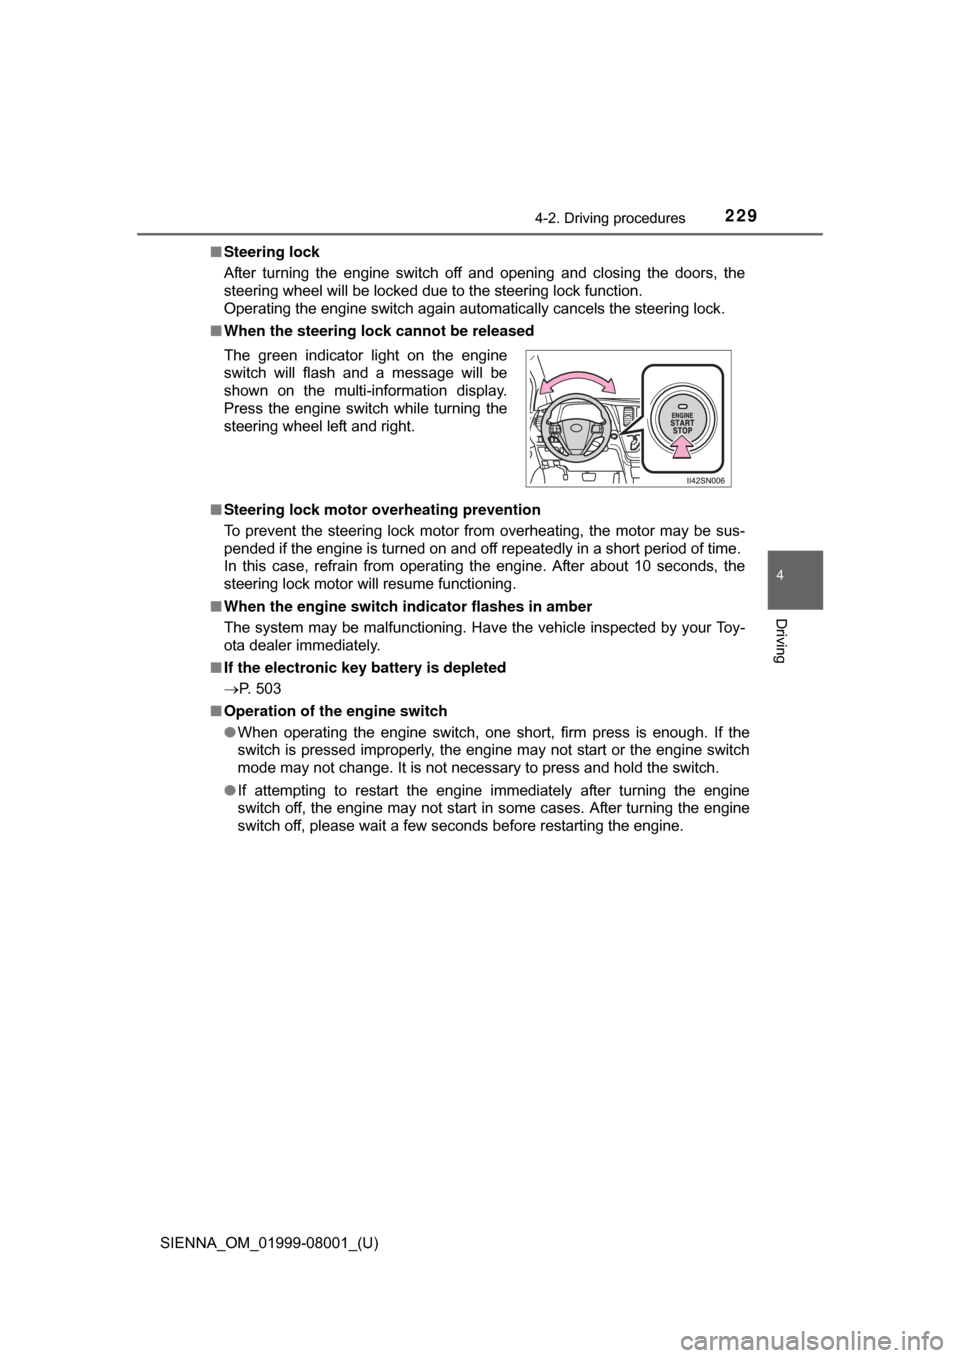
■ When the steering lock cannot be released
■ Steering lock motor overheating prevention
To prevent the steering lock motor from overheating, the motor may be sus-
pended if the engine is turned on and off repeatedly in a short period of time.
In this case, refrain from operating the engine. After about 10 seconds, the
steering lock motor will resume functioning.
■ When the engine switch indicator flashes in amber
The system may be malfunctioning. Have the vehicle inspected by your Toy-
ota dealer immediately.
■ If the electronic key battery is depleted
P. 503
■ Operation of the engine switch
●When operating the engine switch, one short, firm press is enough. If the
switch is pressed improperly, the engine may not start or the engine switch
mode may not change. It is not necessary to press and hold the switch.
● If attempting to restart the engine immediately after turning the engine
switch off, the engine may not start in some cases. After turning the engine
switch off, please wait a few seconds before restarting the engine.
The green indicator light on the engine
switch will flash and a message will be
shown on the multi-information display.
Press the engine switch while turning the
steering wheel left and right.
Page 232 of 664

232
SIENNA_OM_01999-08001_(U)
4-2. Driving procedures
*1: Shifting to the D position allows the system to select a gear suitable forthe driving conditions. Setting the shift lever to the D position is recom-
mended for normal driving.
*2: Selecting shift ranges using S mode restricts the upper limit of the possi-ble gear ranges, controls engine braking forces, and prevents unneces-
sary upshifting.
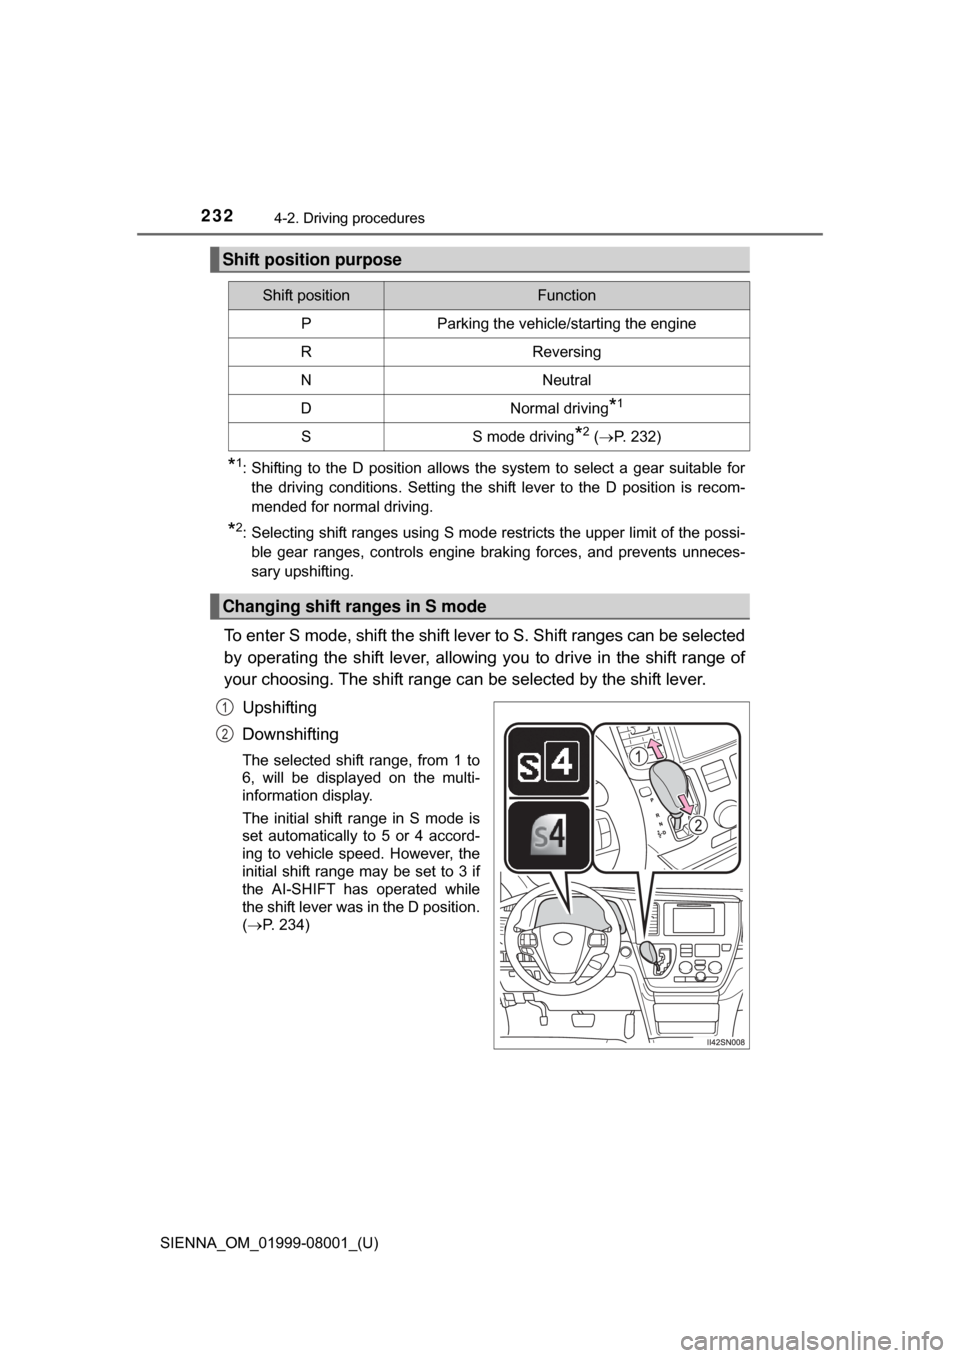
To enter S mode, shift the shift lever to S. Shift ranges can be selected
by operating the shift lever, allowing you to drive in the shift range of
your choosing. The shift range ca n be selected by the shift lever.
Upshifting
Downshifting
The selected shift range, from 1 to
6, will be displayed on the multi-
information display.
The initial shift range in S mode is
set automatically to 5 or 4 accord-
ing to vehicle speed. However, the
initial shift range may be set to 3 if
the AI-SHIFT has operated while
the shift lever was in the D position.
( P. 234)
Shift position purpose
Shift positionFunction
PParking the vehicle/starting the engine
RReversing
NNeutral
DNormal driving*1
SS mode driving*2 ( P. 232)
Changing shift ranges in S mode
1
2
Page 245 of 664

SIENNA_OM_01999-08001_(U)
2454-3. Operating the lights and wipers
4
Driving
●In the situations below, the system may not be able to correctly detect the
surrounding brightness levels, and may flash or expose nearby pedestrians
to the high beam. Therefore, you should consider turning the high beam on
or off manually rather than relying on the Automatic High Beam system.
• In bad weather (rain, snow, fog, sandstorms etc.)
• The windshield is obscured by fog, mist, ice, dirt etc.
• The windshield is cracked or damaged.
• The camera sensor is deformed or dirty.
• Surrounding brightness levels are equal to those of headlights, tail lights
or fog lights.
• Vehicles ahead have headlights that are either switched off, dirty, are changing color, or are not aimed properly.
• When driving through an area of in termittently changing brightness and
darkness
• When frequently and repeatedly driving ascending/descending roads, or roads with rough, bumpy or uneven surfaces (such as stone-paved
roads, gravel tracks etc.)
• When frequently and repeatedly taking curves or driving on a winding road
• There is a highly reflective object ahead of the vehicle, such as a sign or a mirror.
• The vehicle’s headlights are damaged or dirty.
• The vehicle is lifting or tilting, due to a flat tire, a trailer being towed etc.
• The high beam and low beam are repeatedly being switched between in an abnormal manner.
• The driver believes that the high beam may be causing problems or dis- tress to other drivers or pedestrians nearby.
■ When the warning message is show n on the multi-information display
P. 554
■ Temporary lowering sensor sensitivity
The sensitivity of the sensor can be temporarily lowered.
To lower the sensitivity, push and hold on the inside rear view mirror for
15 to 20 seconds, and release. The indicator light on the inside rear view mir-
ror will flash to indicate that the sensitivity has been lowered.
When the engine switch is turned to the “LOCK” position (vehicles without a
smart key system) or turned off (vehicles with a smart key system), the sensi-
tivity will be returned to its normal level.
■ Customization
The Automatic High Beam can be turned off.
(Customizable features: P. 625)
Page 257 of 664
257
SIENNA_OM_01999-08001_(U)
4-5. Using the driving support systems
4
Driving
Cruise control
Use cruise control to maintain a set speed without depressing the
accelerator pedal.
Indicators
Cruise control switch
Press the “ON-OFF” button to
activate the cruise control.
Cruise control indicator will come
on
*1 or will be displayed on the
multi-information display
*2.
Press the button again to deacti-
vate the cruise control.
Accelerate or decelerate the
vehicle to the desired speed,
and push the lever down to set
the speed.
“SET” indicator will come on*1 or
will be displayed on the multi-infor-
mation display
*2.
The vehicle speed at the moment
the lever is released becomes the
set speed.
*1: Vehicles with monochrome display
*2: Vehicles with color display
: If equipped
Summary of functions
1
2
Setting the vehicle speed
1
2
Page 259 of 664

SIENNA_OM_01999-08001_(U)
2594-5. Using the driving support systems
4
Driving
■Cruise control can be set when
●The shift lever is in D or the range 4, 5 or 6 of S has been selected.
● Vehicle speed is above approximately 25 mph (40 km/h).
■ Accelerating after setting the vehicle speed
●The vehicle can be accelerated normally. After acceleration, the set speed
resumes.
● Even without canceling the cruise control, the set speed can be increased
by first accelerating the vehicle to the desired speed and then pushing the
lever down to set the new speed.
■ Automatic cruise co ntrol cancelation
Cruise control will stop maintaining the vehicle speed in any of the following
situations.
● Actual vehicle speed falls more than approximately 10 mph (16 km/h) below
the preset vehicle speed.
At this time, the memorized set speed is not retained.
● Actual vehicle speed is below approximately 25 mph (40 km/h).
● VSC is activated.
■ Operation guide display (vehicles wi th a multi-information display [with
color display])
● When the cruise control switch is operated, a guidance display is shown on
the multi-information display for a few seconds as to how to operate the
cruise control switch or distance switch. ( P. 98)
● When selecting tab on the multi-information display: P. 9 3
■ If the warning message for the crui se control is shown on the multi-
information display
Press the “ON-OFF” button once to deactivate the system, and then press
the button again to reactivate the system.
If the cruise control speed cannot be set or if the cruise control cancels imme-
diately after being activated, there may be a malfunction in the cruise control
system. Have the vehicle inspected by your Toyota dealer.
Page 261 of 664
261
SIENNA_OM_01999-08001_(U)
4-5. Using the driving support systems
4
Driving
Dynamic radar cruise control
Dynamic radar cruise control supple ments conventional cruise control
with a vehicle-to-vehicle distance control. In vehicle-to-vehicle dis-
tance control mode, the vehicle automatically accelerates or deceler-
ates in order to maintain a set fo llowing distance from vehicles ahead.
Multi-information display
Indicators
The indicators are intended as an
example.
Vehicle-to-vehicle distance dis-
play ( P. 264)
Set speed
Vehicle-to-vehicle distance but-
ton
Cruise control switch
: If equipped
Summary of functions
1
2
3
4
5
6
Page 262 of 664
262
SIENNA_OM_01999-08001_(U)
4-5. Using the driving support systems
Press the “ON-OFF” button to
activate the cruise control.
Dynamic radar cruise control indi-
cator will be displayed.
Press the button again to deacti-
vate the cruise control.
Accelerate or decelerate the
vehicle to the desired speed,
and push the lever down to set
the speed.
“SET” indicator will be displayed.
The vehicle speed at the moment
the lever is released becomes the
set speed.
Setting the vehicle speed (vehicle-to-vehicle distance control
mode)
1
2
Page 263 of 664

SIENNA_OM_01999-08001_(U)
2634-5. Using the driving support systems
4
Driving
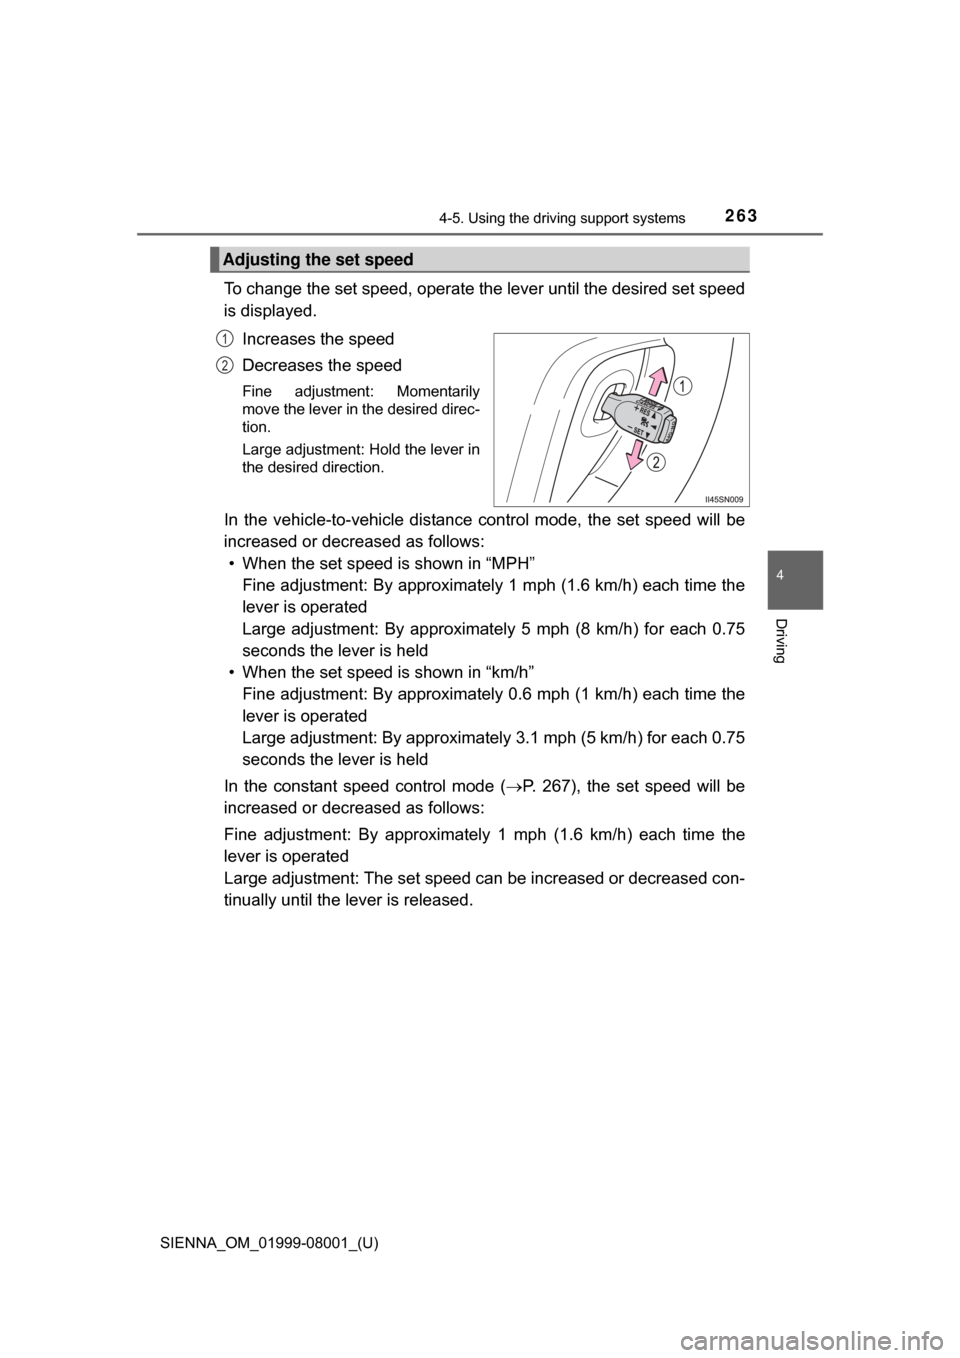
To change the set speed, operate the lever until the desired set speed
is displayed.
Increases the speed
Decreases the speed
Fine adjustment: Momentarily
move the lever in the desired direc-
tion.
Large adjustment: Hold the lever in
the desired direction.
In the vehicle-to-vehicle distance co ntrol mode, the set speed will be
increased or decreased as follows: • When the set speed is shown in “MPH”
Fine adjustment: By approximately 1 mph (1.6 km/h) each time the
lever is operated
Large adjustment: By approximat ely 5 mph (8 km/h) for each 0.75
seconds the lever is held
• When the set speed is shown in “km/h” Fine adjustment: By approximately 0.6 mph (1 km/h) each time the
lever is operated
Large adjustment: By approximately 3.1 mph (5 km/h) for each 0.75
seconds the lever is held
In the constant speed control mode ( P. 267), the set speed will be
increased or decreased as follows:
Fine adjustment: By approximately 1 mph (1.6 km/h) each time the
lever is operated
Large adjustment: The set speed can be increased or decreased con-
tinually until the lever is released.
Adjusting the set speed
1
2