Page 258 of 664
258
SIENNA_OM_01999-08001_(U)
4-5. Using the driving support systems
To change the set speed, operate the lever until the desired set speed
is obtained.
Increases the speed
Decreases the speed
Fine adjustment: Momentarily
move the lever in the desired direc-
tion.
Large adjustment: Hold the lever in
the desired direction.
The set speed will be increase d or decreased as follows:
Fine adjustment: By approximately 1 mph (1.6 km/h) each time the
lever is operated.
Large adjustment: The set speed can be increased or decreased con-
tinually until the lever is released.
Pulling the lever toward you
cancels the constant speed
control.
The speed setting is also canceled
when the brakes are applied.
Pushing the lever up resumes
the constant speed control.
Resuming is available when the
vehicle speed is more than approx-
imately 25 mph (40 km/h).
Adjusting the set speed
1
2
Canceling and resuming the constant speed control
1
2
Page 263 of 664

SIENNA_OM_01999-08001_(U)
2634-5. Using the driving support systems
4
Driving
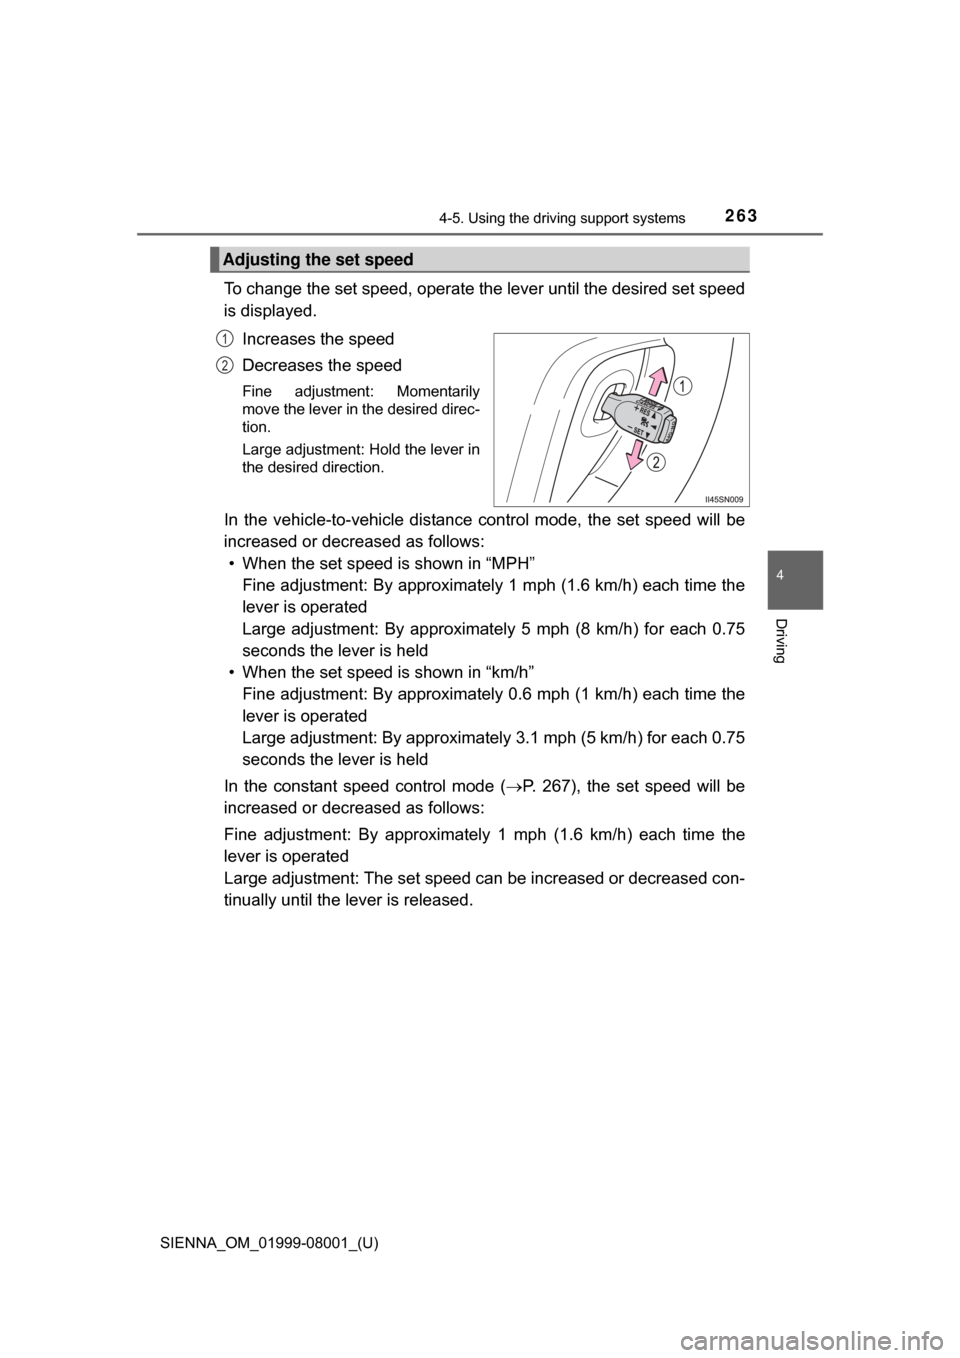
To change the set speed, operate the lever until the desired set speed
is displayed.
Increases the speed
Decreases the speed
Fine adjustment: Momentarily
move the lever in the desired direc-
tion.
Large adjustment: Hold the lever in
the desired direction.
In the vehicle-to-vehicle distance co ntrol mode, the set speed will be
increased or decreased as follows: • When the set speed is shown in “MPH”
Fine adjustment: By approximately 1 mph (1.6 km/h) each time the
lever is operated
Large adjustment: By approximat ely 5 mph (8 km/h) for each 0.75
seconds the lever is held
• When the set speed is shown in “km/h” Fine adjustment: By approximately 0.6 mph (1 km/h) each time the
lever is operated
Large adjustment: By approximately 3.1 mph (5 km/h) for each 0.75
seconds the lever is held
In the constant speed control mode ( P. 267), the set speed will be
increased or decreased as follows:
Fine adjustment: By approximately 1 mph (1.6 km/h) each time the
lever is operated
Large adjustment: The set speed can be increased or decreased con-
tinually until the lever is released.
Adjusting the set speed
1
2
Page 327 of 664
SIENNA_OM_01999-08001_(U)
3275-2. Setup
5
Audio system
Display the “General Settings” screen. (P. 326)
Operations up to this point can also be performed by select the clock dis-
play at the top of most screens.
Select the items to be set.
Manual clock setting
Set minutes to 00
The 24-hour time format can
be to on/off.
Select “OK”.
Select “Delete Personal Data” on the “General Settings” screen.
Select “Delete”.
Check carefully beforehand, as data cannot be retrieved once deleted.
A confirmation screen will be displayed. Select “Yes”.
The following personal data will be deleted or changed to its default
settings.
• General settings
• Audio settings
• Phone settings
Clock setting
1
2
1
2
3
Delete personal data
3
1
2
3
Page 331 of 664
331
SIENNA_OM_01999-08001_(U)
5-3. Using the Multimedia system
5
Audio system
Selecting the audio source
Press the “AUDIO” button to disp lay the audio source selection
screen.
If the audio source selection screen is not displayed, press the “AUDIO”
button again.
Select the desired audio
source.
Select the desired audio
source then or to
reorder.
The audio source changes as follows each time the “MODE/HOLD”
switch is pressed.
Switching between audio sources such as radio and CD are
explained in this section.
Changing audio source
1
2
1
Using the steering wheel switches to change audio source
Page 336 of 664
3365-4. Using the radio
SIENNA_OM_01999-08001_(U)
Search for desired stations by turning the “TUNE•SCROLL” knob or
pressing the “” or “” button on “SEEK•TRACK”.
Select “(add new)”.
To change the preset station to a different one, select and hold the preset
station.
Select “Yes”.
Select “OK” after setting the new preset station.
■Refreshing the station list Select “Refresh” on the “Station List” screen.
To cancel the refresh, select “Cancel Refresh”.
■Reception sensitivity
●Maintaining perfect radio reception at all times is difficult due to the continu-
ally changing position of the antenna, differences in signal strength and sur-
rounding objects, such as trains, transmitters, etc.
● The radio antenna is mounted inside the rear quarter window. To maintain
clear radio reception, do not attach metallic window tinting or other metallic
objects to the antenna wire mounted inside the rear quarter window.
Setting station presets
1
2
3
4
1
Page 344 of 664

3445-6. Using an external device
SIENNA_OM_01999-08001_(U)
■About iPod
●“Made for iPod” and “Made for iPhone” mean that an electronic accessory
has been designed to connect specifically to iPod or iPhone, respectively,
and has been certified by the developer to meet Apple performance stan-
dards.
● Apple is not responsible for the operation of this device or its compliance
with safety and regulatory standards. Please note that the use of this acces-
sory with iPod or iPhone may affect wireless performance.
● iPhone, iPod, iPod classic, iPod nano, and iPod touch are trademarks of
Apple Inc., registered in the U.S. and other countries. Lightning is a trade-
mark of Apple Inc.
■ iPod cover art
●Depending on the iPod and songs in the iPod, iPod cover art may be dis-
played.
● This function can be changed to on/off. (P. 328)
● It may take time to display iPod cover art, and the iPod may not be operated
while the cover art display is in process.
● Only iPod cover art that is saved in JPEG format can be displayed.
■ iPod functions
●When an iPod is connected and the audio source is changed to iPod mode,
the iPod will resume play from the same point in which it was last used.
● Depending on the iPod that is connected to the system, certain functions
may not be available. If a function is unavailable due to a malfunction (as
opposed to a system specification), disconnecting the device and recon-
necting it may resolve the problem.
● While connected to the system, the iPod cannot be operated with its own
controls. It is necessary to use the controls of the vehicle’s audio system
instead.
● When the battery level of an iPod is very low, the iPod may not operate. If
so, charge the iPod before use.
● Compatible models ( P. 346)
Page 405 of 664

SIENNA_OM_01999-08001_(U)
4056-1. Using the air conditioning system and defogger
6
Interior features
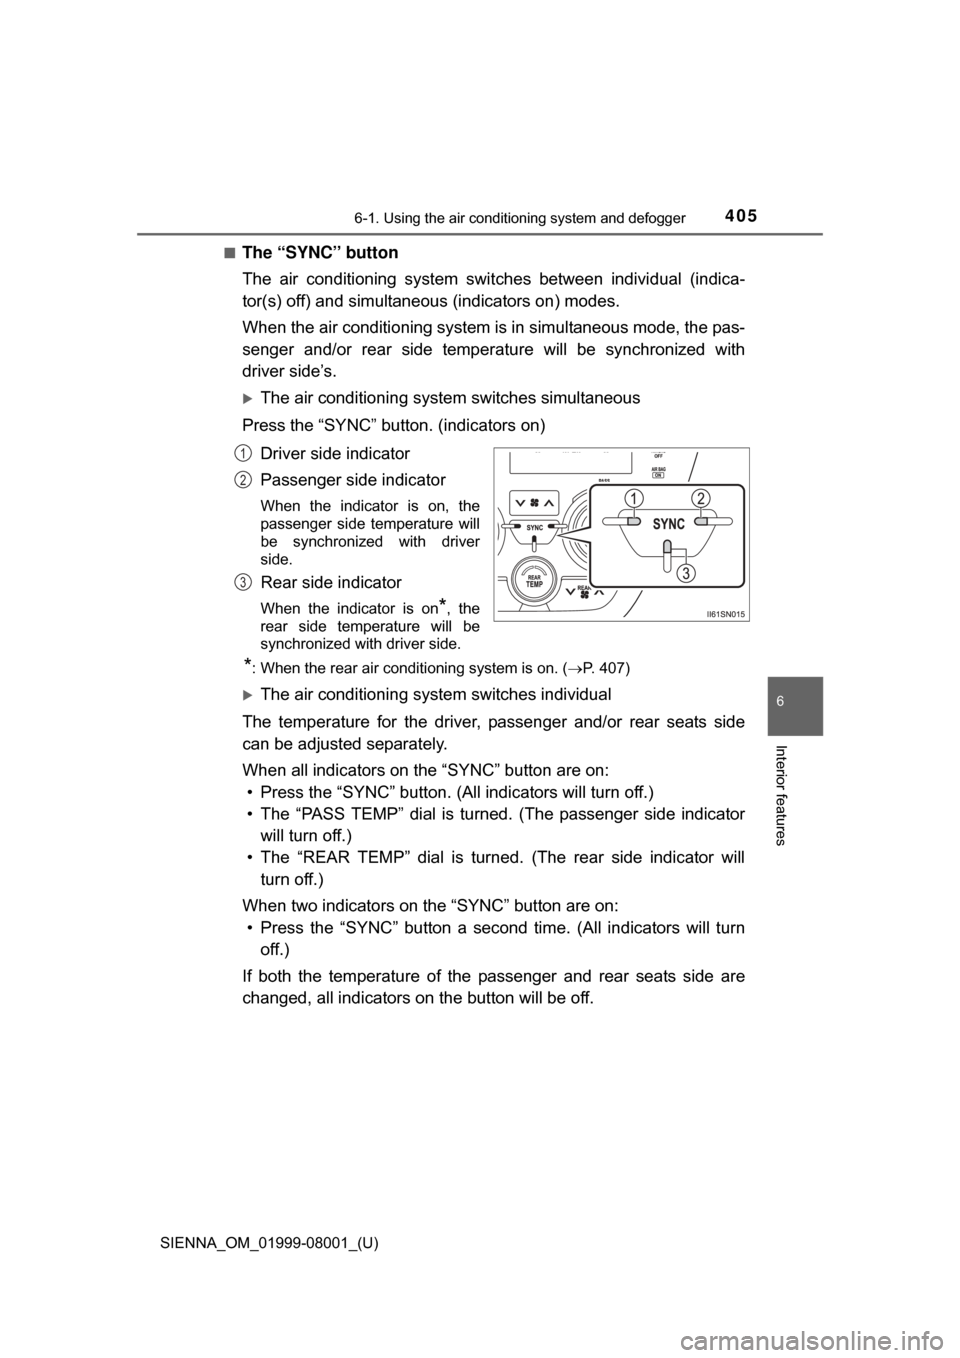
■The “SYNC” button
The air conditioning system swit ches between individual (indica-
tor(s) off) and simultaneous (indicators on) modes.
When the air conditioning system is in simultaneous mode, the pas-
senger and/or rear side temperat ure will be synchronized with
driver side’s.
The air conditioning system switches simultaneous
Press the “SYNC” bu tton. (indicators on)
Driver side indicator
Passenger side indicator
When the indicator is on, the
passenger side temperature will
be synchronized with driver
side.
Rear side indicator
When the indicator is on*, the
rear side temperature will be
synchronized with driver side.
*: When the rear air conditioning system is on. (P. 407)
The air conditioning system switches individual
The temperature for the driver, passenger and/or rear seats side
can be adjusted separately.
When all indicators on the “SYNC” button are on: • Press the “SYNC” button. (All indicators will turn off.)
• The “PASS TEMP” dial is turned. (The passenger side indicator will turn off.)
• The “REAR TEMP” dial is turned. (The rear side indicator will turn off.)
When two indicators on the “SYNC” button are on: • Press the “SYNC” button a second time. (All indicators will turn
off.)
If both the temperature of the passenger and rear seats side are
changed, all indicators on the button will be off.
1
2
3
Page 406 of 664
4066-1. Using the air conditioning system and defogger
SIENNA_OM_01999-08001_(U)■
Adjusting the fan speed setting
Press “
” on to increase the fan speed and “ ” to
decrease the fan speed.
Press to turn the fan off.
■
Change the airflow mode
To change the air outlets, press
the “MODE” button.
The air outlets used are
switched each time the button is
pressed.
Air flows to the upper
body.
Air flows to the upper body
and feet.
Air flows to the feet.
Air flows to the feet and
the windshield defogger
operates.1
2
3
4