2015 TOYOTA SIENNA engine
[x] Cancel search: enginePage 245 of 664

SIENNA_OM_01999-08001_(U)
2454-3. Operating the lights and wipers
4
Driving
●In the situations below, the system may not be able to correctly detect the
surrounding brightness levels, and may flash or expose nearby pedestrians
to the high beam. Therefore, you should consider turning the high beam on
or off manually rather than relying on the Automatic High Beam system.
• In bad weather (rain, snow, fog, sandstorms etc.)
• The windshield is obscured by fog, mist, ice, dirt etc.
• The windshield is cracked or damaged.
• The camera sensor is deformed or dirty.
• Surrounding brightness levels are equal to those of headlights, tail lights
or fog lights.
• Vehicles ahead have headlights that are either switched off, dirty, are changing color, or are not aimed properly.
• When driving through an area of in termittently changing brightness and
darkness
• When frequently and repeatedly driving ascending/descending roads, or roads with rough, bumpy or uneven surfaces (such as stone-paved
roads, gravel tracks etc.)
• When frequently and repeatedly taking curves or driving on a winding road
• There is a highly reflective object ahead of the vehicle, such as a sign or a mirror.
• The vehicle’s headlights are damaged or dirty.
• The vehicle is lifting or tilting, due to a flat tire, a trailer being towed etc.
• The high beam and low beam are repeatedly being switched between in an abnormal manner.
• The driver believes that the high beam may be causing problems or dis- tress to other drivers or pedestrians nearby.
■ When the warning message is show n on the multi-information display
P. 554
■ Temporary lowering sensor sensitivity
The sensitivity of the sensor can be temporarily lowered.
To lower the sensitivity, push and hold on the inside rear view mirror for
15 to 20 seconds, and release. The indicator light on the inside rear view mir-
ror will flash to indicate that the sensitivity has been lowered.
When the engine switch is turned to the “LOCK” position (vehicles without a
smart key system) or turned off (vehicles with a smart key system), the sensi-
tivity will be returned to its normal level.
■ Customization
The Automatic High Beam can be turned off.
(Customizable features: P. 625)
Page 250 of 664
250
SIENNA_OM_01999-08001_(U)
4-3. Operating the lights and wipers
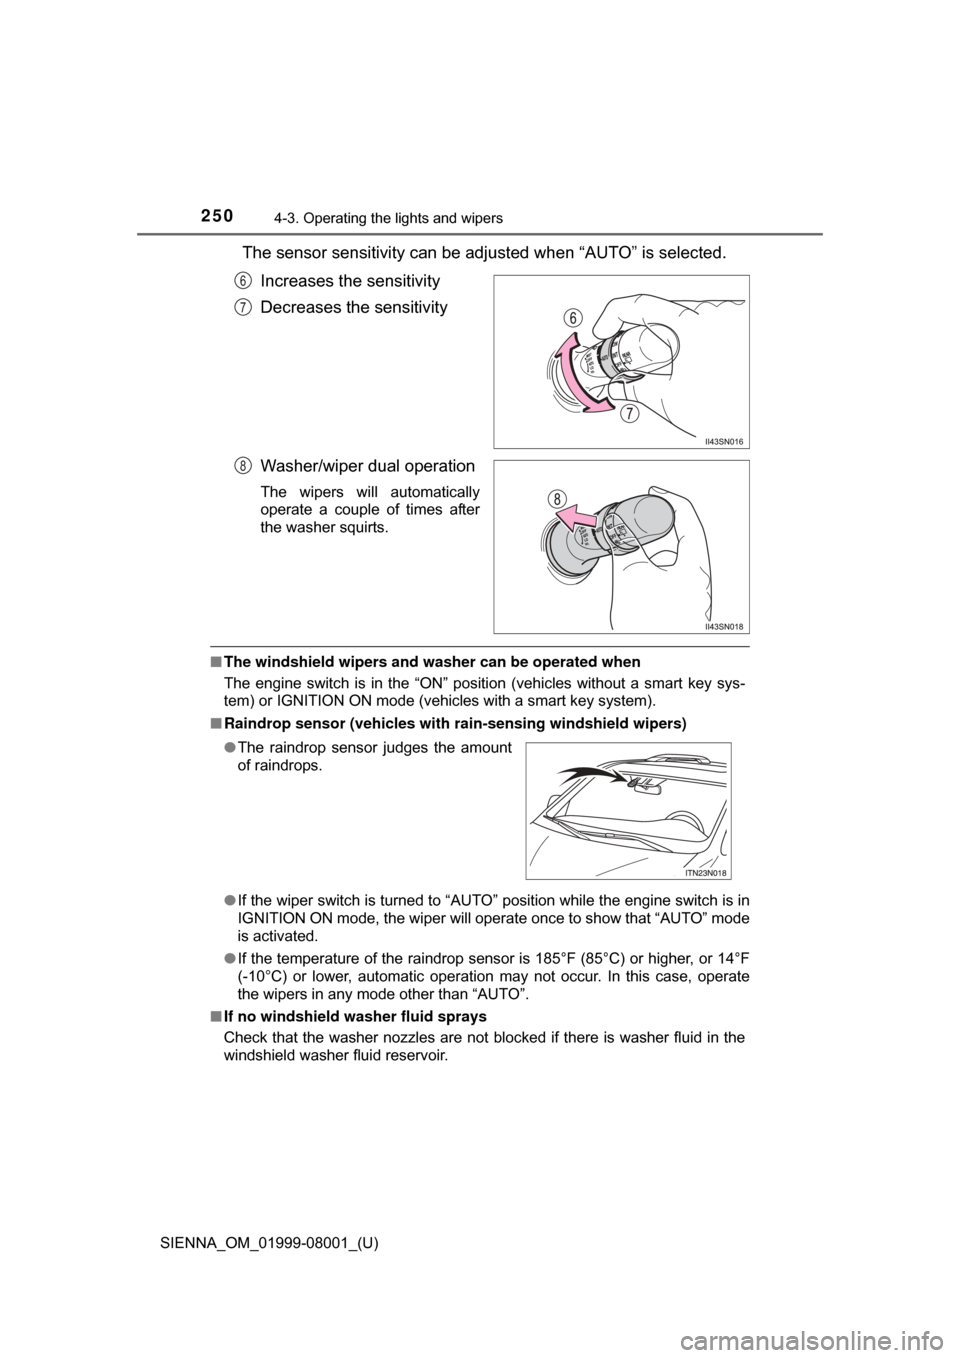
The sensor sensitivity can be adjusted when “AUTO” is selected.Increases the sensitivity
Decreases the sensitivity
Washer/wiper dual operation
The wipers will automatically
operate a couple of times after
the washer squirts.
■The windshield wipers and washer can be operated when
The engine switch is in the “ON” position (vehicles without a smart key sys-
tem) or IGNITION ON mode (vehicles with a smart key system).
■ Raindrop sensor (vehicles with ra in-sensing windshield wipers)
● If the wiper switch is turned to “AUTO” position while the engine switch is in
IGNITION ON mode, the wiper will operate once to show that “AUTO” mode
is activated.
● If the temperature of the raindrop sensor is 185°F (85°C) or higher, or 14°F
(-10°C) or lower, automatic operation may not occur. In this case, operate
the wipers in any mode other than “AUTO”.
■ If no windshield washer fluid sprays
Check that the washer nozzles are not blocked if there is washer fluid in the
windshield washer fluid reservoir.
6
7
8
●The raindrop sensor judges the amount
of raindrops.
Page 252 of 664
252
SIENNA_OM_01999-08001_(U)
4-3. Operating the lights and wipers
Rear window wiper and washer
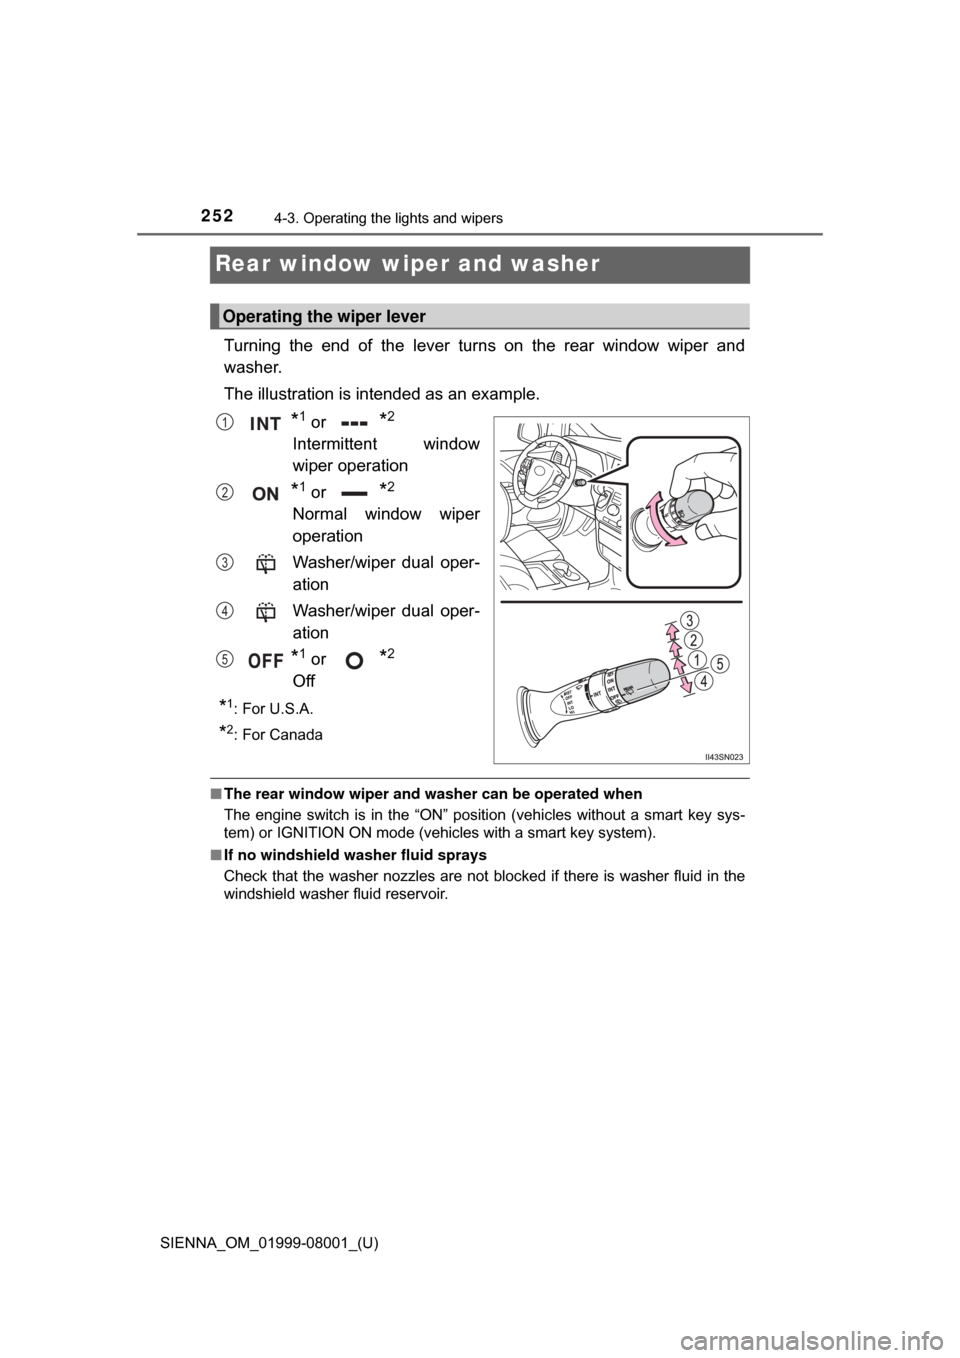
Turning the end of the lever turns on the rear window wiper and
washer.
The illustration is intended as an example.
*1 or *2
Intermittent window
wiper operation
*1 or *2
Normal window wiper
operation
Washer/wiper dual oper-
ation
Washer/wiper dual oper-
ation
*1 or *2
Off
*1:For U.S.A.
*2: For Canada
■ The rear window wiper and w asher can be operated when
The engine switch is in the “ON” position (vehicles without a smart key sys-
tem) or IGNITION ON mode (vehicles with a smart key system).
■ If no windshield washer fluid sprays
Check that the washer nozzles are not blocked if there is washer fluid in the
windshield washer fluid reservoir.
Operating the wiper lever
1
2
3
4
5
Page 254 of 664

254
SIENNA_OM_01999-08001_(U)
4-4. Refueling
Opening the fuel tank cap
●Close all the doors and windows, and turn the engine switch to the
“LOCK” position (vehicles without a smart key system) or off (vehi-
cles with a smart key system).
● Confirm the type of fuel.
■Fuel type
Unleaded gasoline (Octane rating 87 [Research Octane Number 91] or
higher)
Perform the following steps to open the fuel tank cap:
Before refueling the vehicle
WARNING
■When refueling the vehicle
Observe the following precautions while refueling the vehicle. Failure to do
so may result in death or serious injury.
● After exiting the vehicle and before opening the fuel door, touch an
unpainted metal surface to discharge any static electricity. It is important to
discharge static electricity before refueling because sparks resulting from
static electricity can cause fuel vapors to ignite while refueling.
● Always hold the grips on the fuel tank cap and turn it slowly to remove it.
A whooshing sound may be heard when the fuel tank cap is loosened.
Wait until the sound cannot be heard before fully removing the cap.
In hot weather, pressurized fuel may spray out of the filler neck and cause
injury.
● Do not allow anyone that has not discharged static electricity from their
body to come close to an open fuel tank.
● Do not inhale vaporized fuel.
Fuel contains substances that are harmful if inhaled.
● Do not smoke while refueling the vehicle.
Doing so may cause the fuel to ignite and cause a fire.
● Do not return to the vehicle or touch any person or object that is statically
charged.
This may cause static electricity to build up, resulting in a possible ignition
hazard.
Page 264 of 664
264
SIENNA_OM_01999-08001_(U)
4-5. Using the driving support systems
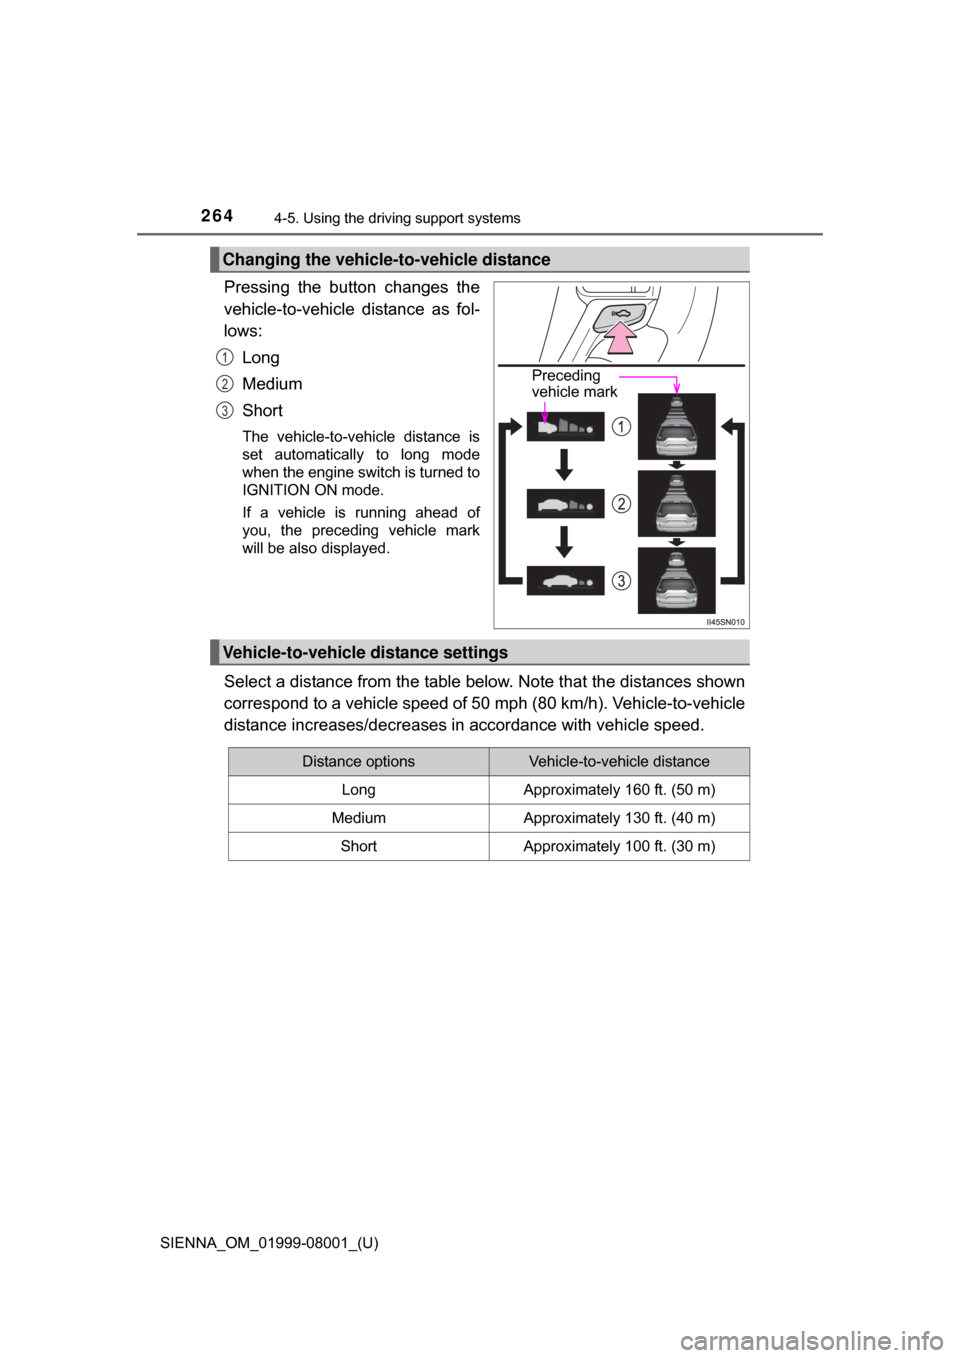
Pressing the button changes the
vehicle-to-vehicle distance as fol-
lows:
Long
Medium
Short
The vehicle-to-vehicle distance is
set automatically to long mode
when the engine switch is turned to
IGNITION ON mode.
If a vehicle is running ahead of
you, the preceding vehicle mark
will be also displayed.
Select a distance from the table below. Note that the distances shown
correspond to a vehicle speed of 50 mph (80 km/h). Vehicle-to-vehicle
distance increases/decreases in accordance with vehicle speed.
Changing the vehicle-to-vehicle distance
Preceding
vehicle mark
1
2
3
Vehicle-to-vehicle distance settings
Distance optionsVehicle-to-vehicle distance
LongApproximately 160 ft. (50 m)
MediumApproximately 130 ft. (40 m)
ShortApproximately 100 ft. (30 m)
Page 267 of 664
SIENNA_OM_01999-08001_(U)
2674-5. Using the driving support systems
4
Driving
Constant speed control mode differs from vehicle-to-vehicle distance
control mode. When cons tant speed control mode is selected, your
vehicle will maintain a set speed re gardless of whether or not there
are other vehicles in the lane ahead.
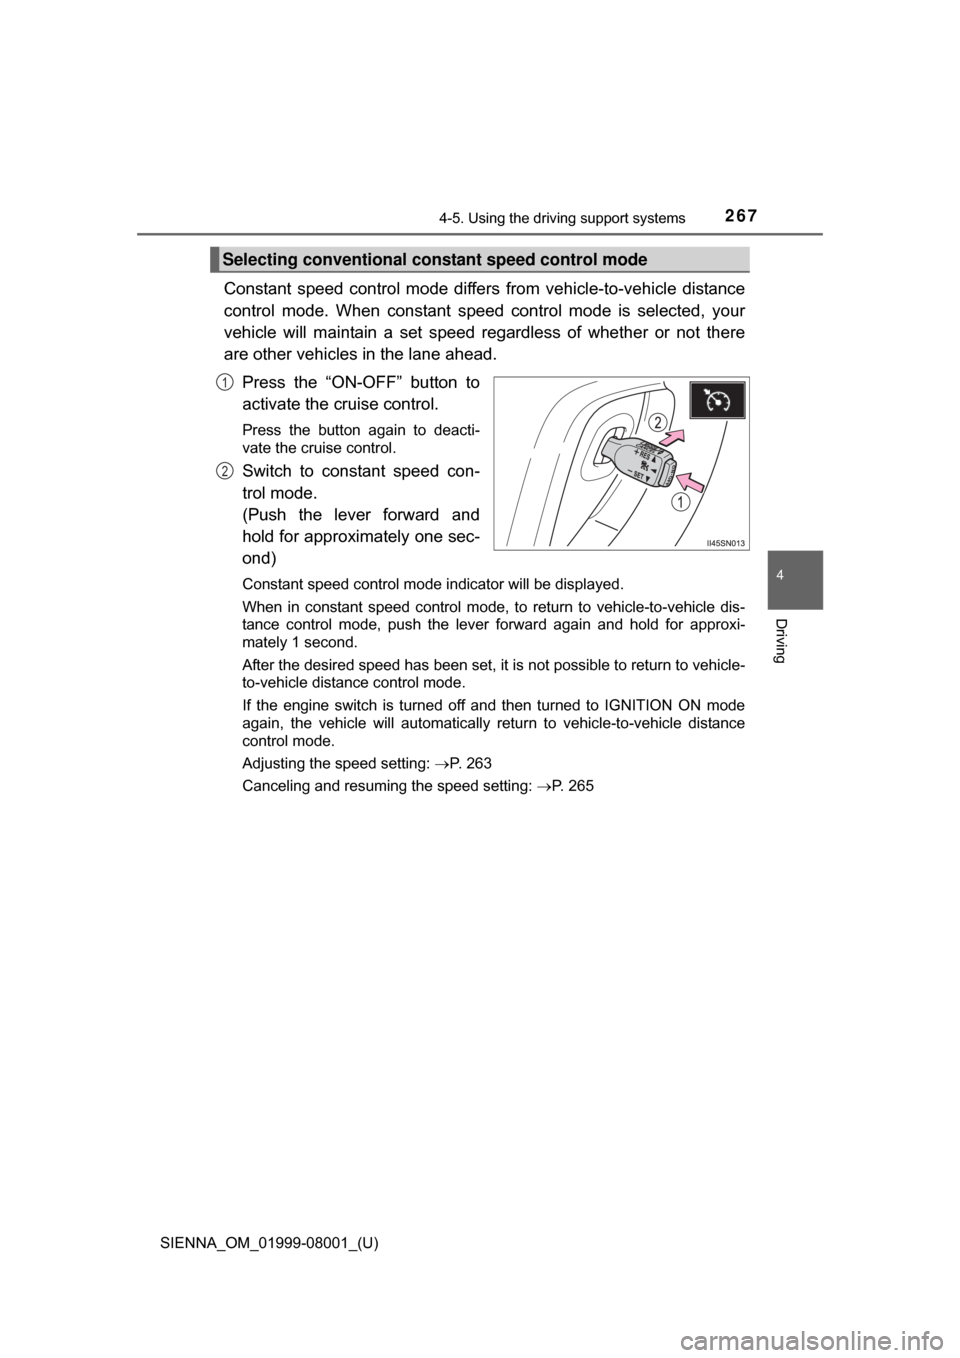
Press the “ON-OFF” button to
activate the cruise control.
Press the button again to deacti-
vate the cruise control.
Switch to constant speed con-
trol mode.
(Push the lever forward and
hold for approximately one sec-
ond)
Constant speed control mode indicator will be displayed.
When in constant speed control mode, to return to vehicle-to-vehicle dis-
tance control mode, push the leve r forward again and hold for approxi-
mately 1 second.
After the desired speed has been set, it is not possible to return to vehicle-
to-vehicle distance control mode.
If the engine switch is turned off and then turned to IGNITION ON mode
again, the vehicle will automatically return to vehicle-to-vehicle distance
control mode.
Adjusting the speed setting: P. 263
Canceling and resuming the speed setting: P. 265
Selecting conventional constant speed control mode
1
2
Page 278 of 664

278
SIENNA_OM_01999-08001_(U)
4-5. Using the driving support systems
■The intuitive parking assist can be operated when
●The engine switch is in the “ON” position (vehicles without a smart key sys-
tem) or IGNITION ON mode (vehicles with a smart key system).
● Front corner sensors:
• The shift lever is not in P.
• The vehicle speed is approximately 6 mph (10 km/h) or less.
● Rear corner and rear center sensors:
The shift lever is in R.
■ Intuitive parking assist display
When an obstacle is detected while the rear view monitor system is in use,
the warning indicator will appear in the upper corner of the screen even if the
display setting has been set to off.
■ Sensor detection information
●The sensor’s detection areas are limited to the areas around the vehicle’s
bumper.
● Certain vehicle conditions and the surrounding environment may affect the
ability of the sensor to correctly detect obstacles. Particular instances where
this may occur are listed below.
• There is dirt, snow or ice on the sensor. (Wiping the sensors will resolve
this problem.)
• The sensor is frozen. (Thawing the area will resolve this problem.)
In especially cold weather, if a sensor is frozen the screen may show an
abnormal display, or obstacles may not be detected.
• The sensor is covered in any way.
• The vehicle is leaning considerably to one side.
• On an extremely bumpy road, on an incline, on gravel, or on grass
• The vicinity of the vehicle is noisy due to vehicle horns, motorcycle
engines, air brakes of large vehicles, or other loud noises producing ultra-
sonic waves.
• There is another vehicle equipped with parking assist sensors in the
vicinity.
• The sensor is coated with a sheet of spray or heavy rain.
• The vehicle is equipped with a fender pole or wireless antenna.
• The bumper or sensor receives a strong impact.
• The vehicle is approaching a tall or curved curb.
• In harsh sunlight or intense cold weather
• The area directly under the bumpers is not detected.
• If obstacles draw too close to the sensor.
• A non-genuine Toyota suspension (lowered suspension etc.) is installed.
• People may not be detected if they are wearing certain types of clothing.
In addition to the examples above, there are instances in which, because of
their shapes, signs and other objects may be judged by the sensor to be
closer than they are.
Page 292 of 664
292
SIENNA_OM_01999-08001_(U)
4-5. Using the driving support systems
◆VDIM (Vehicle Dynamics Integr ated Management) (if equipped)
Provides integrated control of the ABS, brake assist, TRAC, VSC,
hill-start assist cont rol, and EPS systems
Helps to maintain vehicle stabilit y when swerving on slippery road
surfaces by controlling the brakes and engine output
◆PCS (Pre-Collision System) (if equipped)
P. 2 9 6
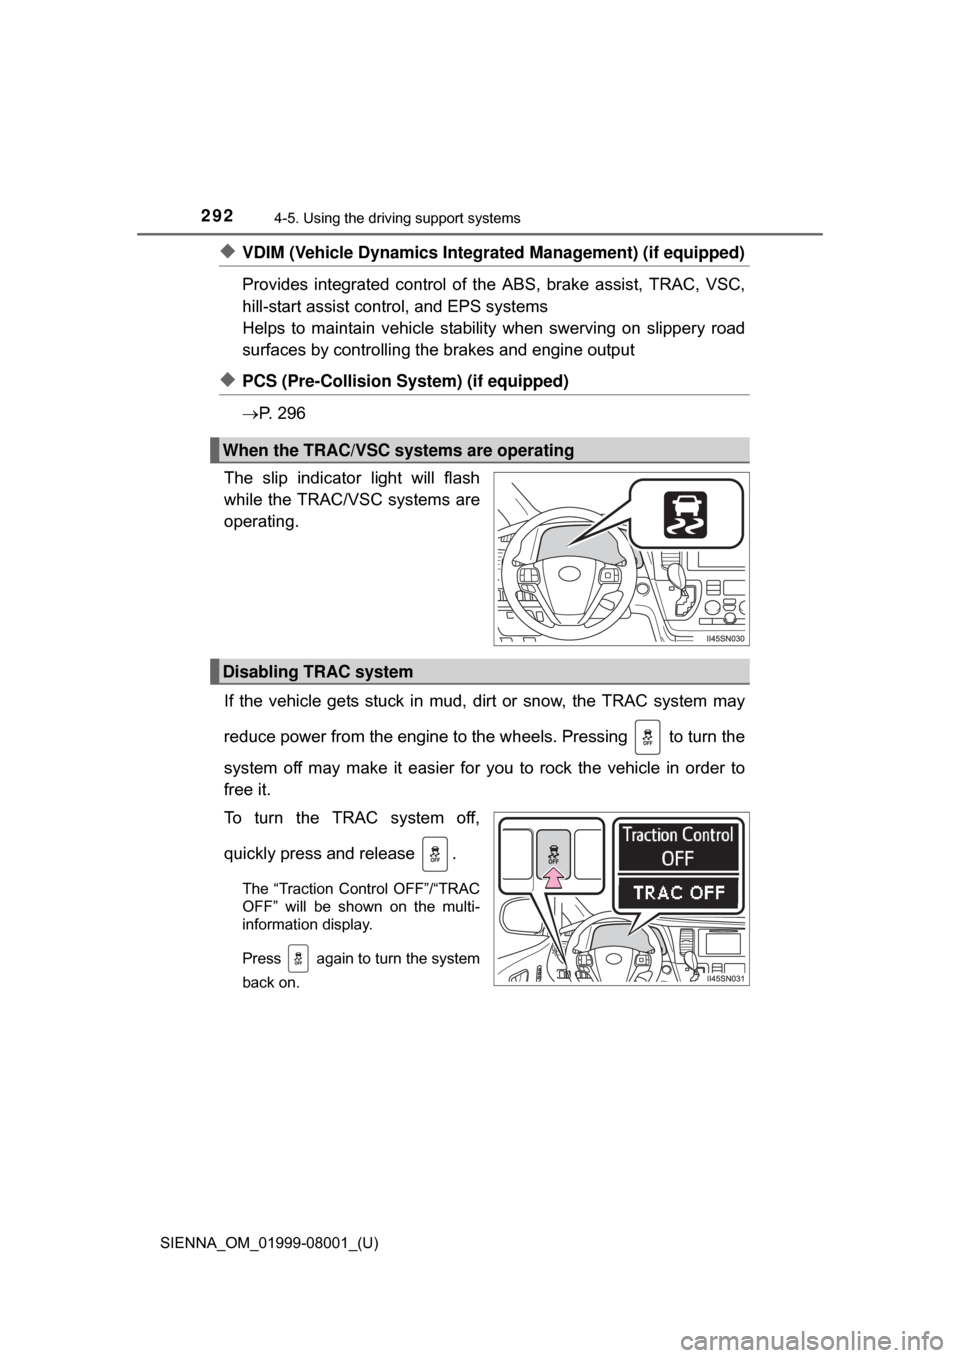
The slip indicator light will flash
while the TRAC/VSC systems are
operating.
If the vehicle gets stuck in mud, dirt or snow, the TRAC system may
reduce power from the engine to the wheels. Pressing to turn the
system off may make it easier for you to rock the vehicle in order to
free it.
To turn the TRAC system off,
quickly press and release .
The “Traction Control OFF”/“TRAC
OFF” will be shown on the multi-
information display.
Press again to turn the system
back on.
When the TRAC/VSC systems are operating
Disabling TRAC system