Page 206 of 664
206
SIENNA_OM_01999-08001_(U)
4-1. Before driving
WARNING
■Cross rail adjustment
Make sure the cross rails are locked securely by pushing forward and
rearward them.
Failure to do so may cause an unexpected accident.
■When loading cargo
To use the roof rails as a roof luggage carrier, you must fit the roof rails
with two or more genuine Toyota cross rails or their equivalent.
When you load cargo on the roof luggage carrier, observe the following:
●Place the cargo so that its weight is distributed evenly between the
front and rear axles.
●If loading long or wide cargo, never exceed the vehicle overall length
or width. ( P. 594)
●Before driving, make sure the cargo is securely fastened on the roof
luggage carrier.
●Loading cargo on the ro of luggage carrier will make the center of grav-
ity of the vehicle higher. Avoid high speeds, sudden starts, sharp turns,
sudden braking or abrupt maneuvers, otherwise it may result in loss of
control or vehicle rollover due to failu re to operate this vehicle correctly
and result in death or serious injury.
●If driving for a long distance, on rough roads, or at high speeds, stop
the vehicle now and then during the trip to make sure the cargo
remains in its place.
●Do not exceed 150 lb. (68 kg) cargo weight on the roof luggage carrier.
NOTICE
■When loading cargo (vehicles with moon roof)
Be careful not to scratch the surface of the moon roof.
Page 282 of 664
282
SIENNA_OM_01999-08001_(U)
4-5. Using the driving support systems
■Screen description
The rear view monitor system screen will be displayed if the shift
lever is shifted to R while the engi ne switch is in the “ON” position
(vehicles without a smart key syst em) or IGNITION ON mode (vehi-
cles with a smart key system).
Vehicle width guide line
The line indicates a guide path when the vehicle is being backed straight
up.
The displayed width is wider than the actual vehicle width.
Vehicle center guide line
These lines indicate the estimated vehicle center on the ground.
Distance guide line
The line shows distance behind the vehicle, a point approximately 1.5 ft.
(0.5 m) (red) from the edge of the bumper.
Distance guide line
The line shows distance behind the vehicle, a point approximately 3 ft.
(1 m) (blue) from the edge of the bumper.
Using the rear view monitor system
1
2
3
4
Page 284 of 664
284
SIENNA_OM_01999-08001_(U)
4-5. Using the driving support systems
■Rear view monitor system camera
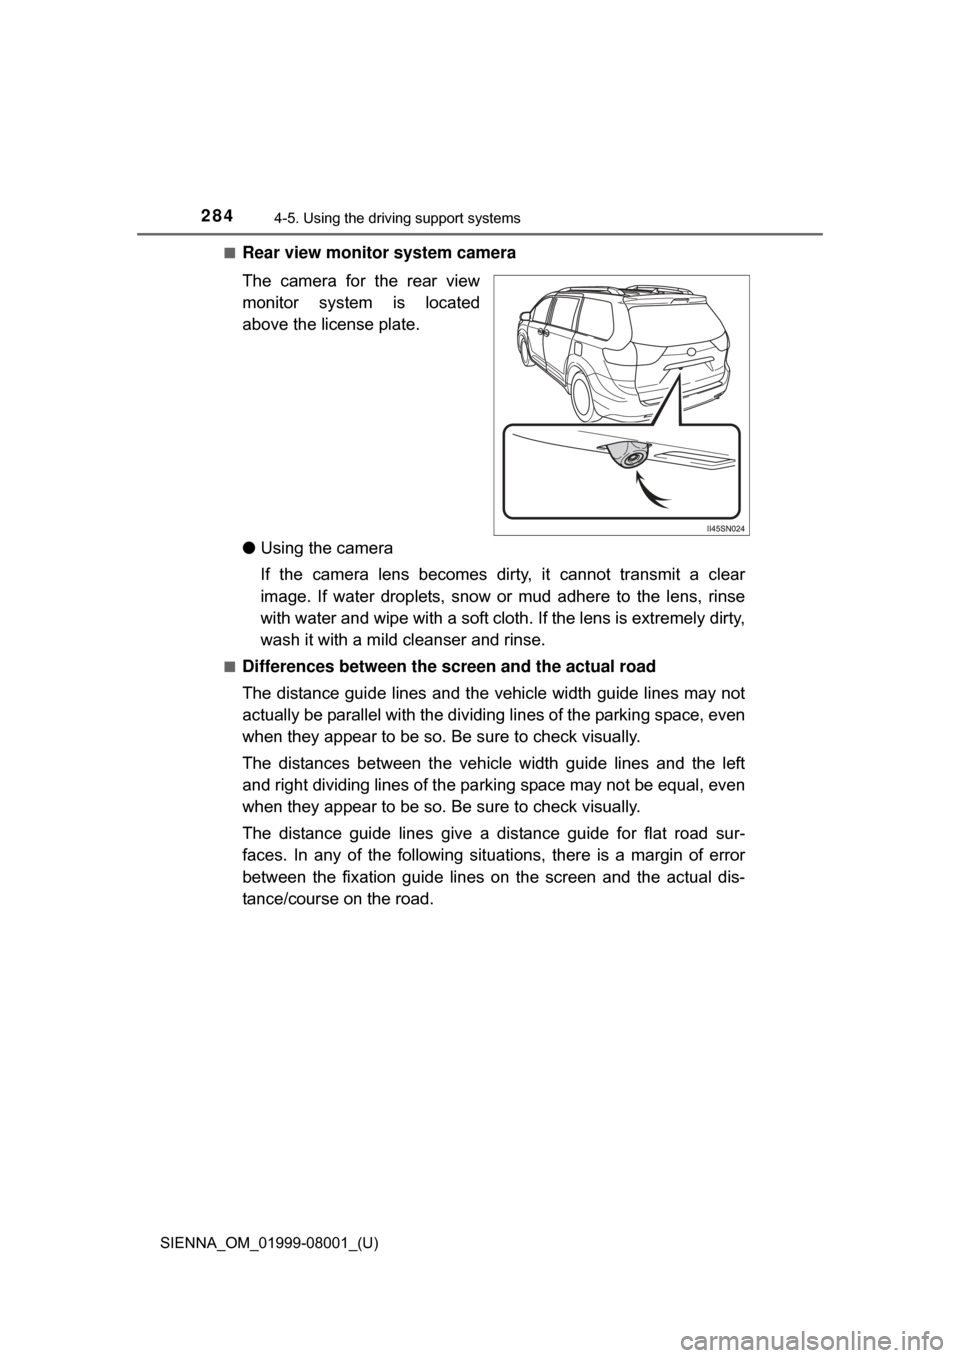
The camera for the rear view
monitor system is located
above the license plate.
●Using the camera
If the camera lens becomes dirt y, it cannot transmit a clear
image. If water droplets, snow or mud adhere to the lens, rinse
with water and wipe with a soft cloth. If the lens is extremely dirty,
wash it with a mild cleanser and rinse.
■Differences between the screen and the actual road
The distance guide lines and the vehicle width guide lines may not
actually be parallel with the dividing lines of the parking space, even
when they appear to be so. Be sure to check visually.
The distances between the vehicle width guide lines and the left
and right dividing lines of the pa rking space may not be equal, even
when they appear to be so. Be sure to check visually.
The distance guide lines give a distance guide for flat road sur-
faces. In any of the following situations, there is a margin of error
between the fixation guide lines on the screen and the actual dis-
tance/course on the road.
Page 286 of 664
286
SIENNA_OM_01999-08001_(U)
4-5. Using the driving support systems
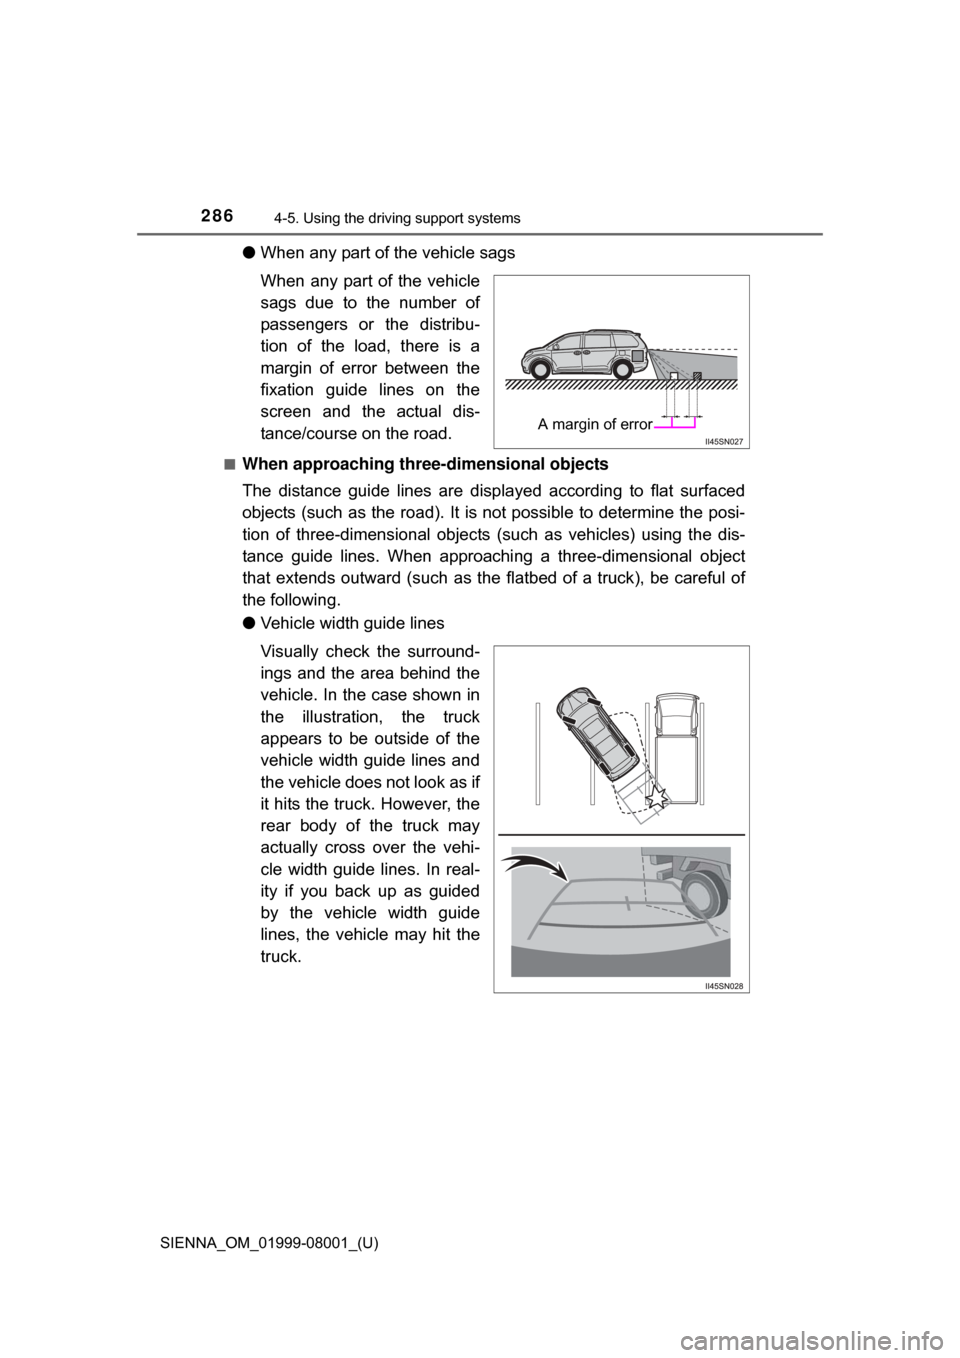
●When any part of the vehicle sags
When any part of the vehicle
sags due to the number of
passengers or the distribu-
tion of the load, there is a
margin of error between the
fixation guide lines on the
screen and the actual dis-
tance/course on the road.
■When approaching thre e-dimensional objects
The distance guide lines are displa yed according to flat surfaced
objects (such as the road). It is not possible to determine the posi-
tion of three-dimensional objects (such as vehicles) using the dis-
tance guide lines. When approachi ng a three-dimensional object
that extends outward (such as the flatbed of a truck), be careful of
the following.
● Vehicle width guide lines
Visually check the surround-
ings and the area behind the
vehicle. In the case shown in
the illustration , the truck
appears to be outside of the
vehicle width guide lines and
the vehicle does not look as if
it hits the truck. However, the
rear body of the truck may
actually cross over the vehi-
cle width guide lines. In real-
ity if you back up as guided
by the vehicle width guide
lines, the vehicle may hit the
truck.
A margin of error
Page 499 of 664
499
SIENNA_OM_01999-08001_(U)
7-3. Do-it-yourself maintenance
7
Maintenance and care
Wheels
When replacing wheels, care should be taken to ensure that they are
equivalent to those removed in load capacity, diameter, rim width and
inset
*.
Replacement wheels are available at your Toyota dealer.
*: Conventionally referred to as “offset”.
Toyota does not recommend using the following:
● Wheels of different sizes or types
● Used wheels
● Bent wheels that have been straightened
● Use only Toyota wheel nuts and wrenches designed for use with
your aluminum wheels.
● When rotating, repairing or changi ng your tires, check that the
wheel nuts are still tight after driving 1000 miles (1600 km).
● Be careful not to damage the aluminum wheels when using tire
chains.
● Use only Toyota genuine balance weights or equivalent and a plas-
tic or rubber hammer when balancing your wheels.
■When replacing wheels
The wheels of your vehicle are equipped with tire pressure warning
valves and transmitters that allow the tire pressure warning system to
provide advanced warning in the event of a loss in tire inflation pressure.
Whenever wheels are replaced, tire pressure warning valves and trans-
mitters must be installed. ( P. 489)
If a wheel is bent, cracked or heavily corroded, it should be
replaced.
Otherwise, the tire may separate from the wheel or cause a loss
of handling control.
Wheel selection
Aluminum wheel precautions
Page 594 of 664
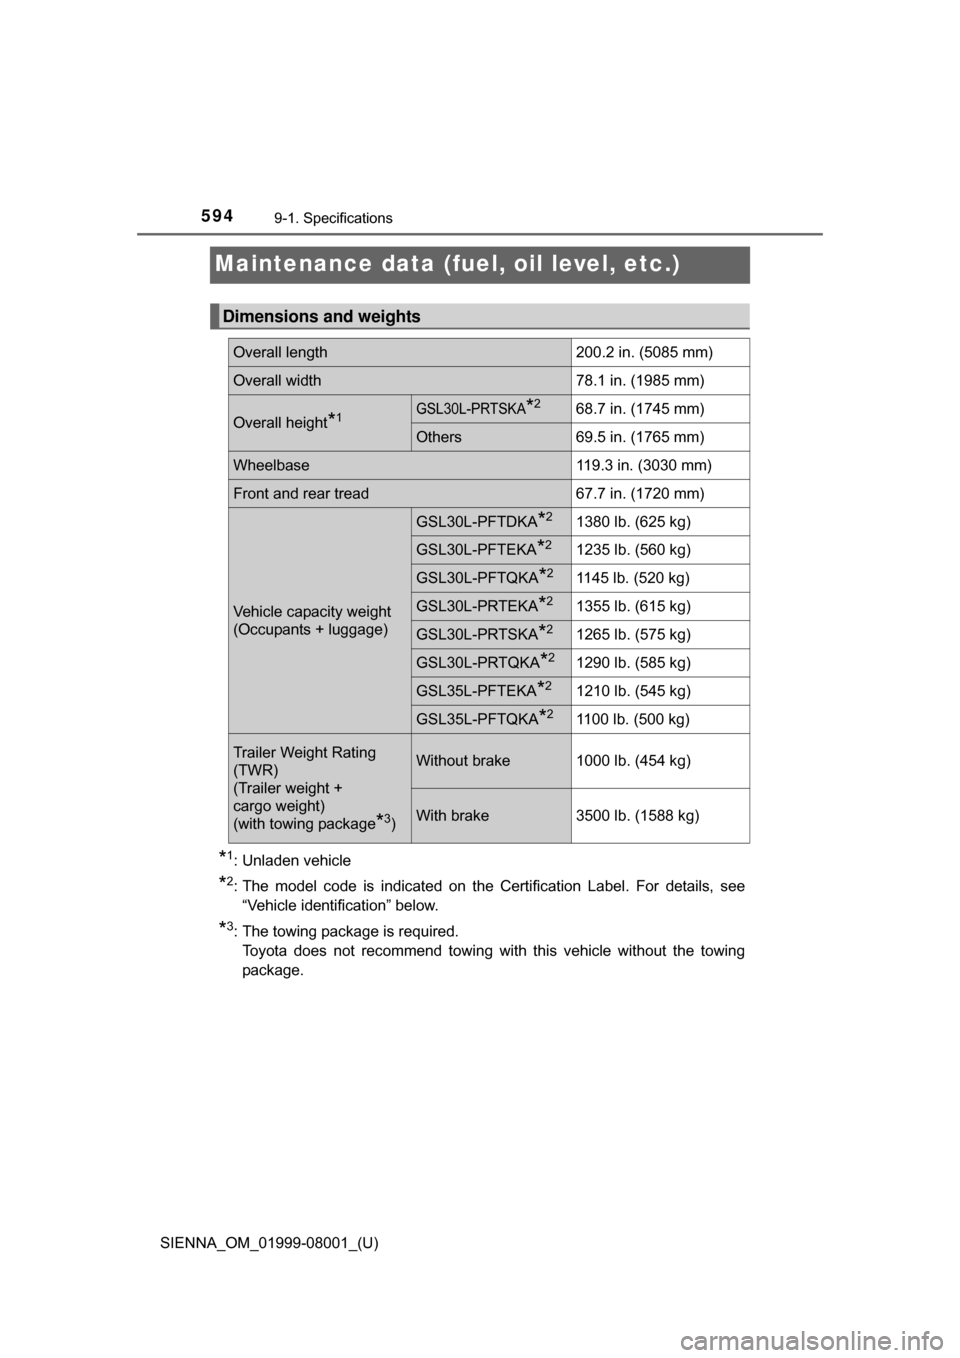
594
SIENNA_OM_01999-08001_(U)
9-1. Specifications
Maintenance data (fuel, oil level, etc.)
*1: Unladen vehicle
*2: The model code is indicated on the Certification Label. For details, see“Vehicle identification” below.
*3: The towing package is required.Toyota does not recommend towing with this vehicle without the towing
package.
Dimensions and weights
Overall length 200.2 in. (5085 mm)
Overall width 78.1 in. (1985 mm)
Overall height*1GSL30L-PRTSKA*268.7 in. (1745 mm)
Others69.5 in. (1765 mm)
Wheelbase 119.3 in. (3030 mm)
Front and rear tread 67.7 in. (1720 mm)
Vehicle capacity weight
(Occupants + luggage)
GSL30L-PFTDKA*21380 lb. (625 kg)
GSL30L-PFTEKA*21235 lb. (560 kg)
GSL30L-PFTQKA*21145 lb. (520 kg)
GSL30L-PRTEKA*21355 lb. (615 kg)
GSL30L-PRTSKA*21265 lb. (575 kg)
GSL30L-PRTQKA*21290 lb. (585 kg)
GSL35L-PFTEKA*21210 lb. (545 kg)
GSL35L-PFTQKA*21100 lb. (500 kg)
Trailer Weight Rating
(TWR)
(Trailer weight +
cargo weight)
(with towing package
*3)
Without brake 1000 lb. (454 kg)
With brake3500 lb. (1588 kg)
Page 608 of 664
608
SIENNA_OM_01999-08001_(U)
9-1. Specifications
DOT symbol*
Tire Identification Number (TIN)
Tire manufacturer’s identifica-
tion mark
Tire size code
Manufacturer’s optional tire
type code (3 or 4 letters)
Manufacturing week
Manufacturing year
*: The DOT symbol certifies that the tire conforms to applicable Federal
Motor Vehicle Safety Standards.
■Typical tire size information
The illustration indicates typical tire size.
Typical DOT and Tire Identification Number (TIN)
1
2
3
4
5
6
Tire size
7
Tire use
(P = Passenger car,
T = Temporary use)
Section width (millimeters)
Aspect ratio
(tire height to section width)
Tire construction code
(R = Radial, D = Diagonal)
Wheel diameter (inches)
Load index (2 digits or 3 dig-
its)
Speed symbol
(alphabet with one letter)
Run-flat tire code1
2
3
4
5
6
7
8
Page 609 of 664
SIENNA_OM_01999-08001_(U)
6099-1. Specifications
9
Vehicle specifications
■Tire dimensionsSection width
Tire height
Wheel diameter
Bead
Sidewall
Shoulder
Tread
Belt
Inner liner
Reinforcing rubber
Carcass
Rim lines
Bead wires
Chafer
1
2
3
Tire section names
1
2
3
4
5
6
7
8
9
10
11