Page 321 of 356
9
321
1
2
3
4
5
6
7
8
9
PRIUS_Navi_OM47A72U_(U)
14.06.11 16:10
1. REAR VIEW MONITOR SYSTEM OPERATION. ............. 322
AREA DISPLAYED ON SCREEN........ 324
THE REAR VIEW MONITOR
SYSTEM CAMERA ........................... 324
1REAR VIEW MONITOR
SYSTEM
PERIPHERAL MONITORING SYSTEM
Page 322 of 356

322
PRIUS_Navi_OM47A72U_(U)
14.06.11 16:10
1. REAR VIEW MONITOR SYSTEM
1. REAR VIEW MONITOR SYSTEM OPERATION
1To display the rear view image on the
screen, shift the shift position to “R”
when the “POWER” switch is in ON
mode and the back door is completely
closed.
The rear view monitor system assists
the driver by displaying an image of the
view behind the vehicle while backing
up. The image is displayed in reverse
on the screen. This reversed image is
a similar image to the one on the inside
rear view mirror.
If you move the shift position out of the
“R”, the screen returns to the previous
screen. Operating another function of
the navigation system will display
another screen.
The rear view monitor system is a sup-
plement device intended to assist back
up. When backing up, be sure to check
behind and all around the vehicle visu-
ally.
CAUTION
●Never depend on the rear view monitor
system entirely when backing up.
Always make sure your intended path is
clear.
Use caution, just as you would when
backing up any vehicle.
● Never back up while looking only at the
screen. The image on the screen is dif-
ferent from actual conditions. Depicted
distances between objects and flat sur-
faces will differ from actual distance. If
you back up while looking only at the
screen, you may hit a vehicle, a person
or an object. When backing up, be sure
to check behind and all around the vehi-
cle visually and with mirrors before pro-
ceeding.
● Do not use the system when the back
door is not completely closed.
● Use your own eyes to confirm the vehi-
cle’s surroundings, as the displayed
image may become faint or dark, and
moving images will be distorted, or not
entirely visible when the outside temper-
ature is low. When backing up, be sure
to check behind and all around the vehi-
cle visually and with mirror before pro-
ceeding.
Page 323 of 356

323
1. REAR VIEW MONITOR SYSTEM
9
PERIPHERAL MONITORING SYSTEM
PRIUS_Navi_OM47A72U_(U)
14.06.11 16:10
NOTICE
●If the back of the vehicle is hit, the posi-
tion and mounting angle of the camera
may change. Be sure to have the cam-
era’s position and mounting angle
checked at your Toyota dealer.
● As the camera has a water proof con-
struction, do not detach, disassemble or
modify it. This may cause incorrect oper-
ation.
● If the temperature changes rapidly, such
as when hot water is poured on the vehi-
cle in cold weather, the system may not
operate normally.
● Do not hit the camera or subject it to
strong impact as this may cause its posi-
tion and mounting angle to change.
● Do not strongly rub the camera lens. If
the camera lens is scratched, it cannot
transmit a clear image.
● Do not allow organic solvent, car wax,
window cleaner or glass coat to adhere
to the camera. If this happens, wipe it off
as soon as possible.
● When replacing the tires, please consult
your Toyota dealer. If you replace the
tires, the area displayed on the screen
may change.
● When washing the vehicle, do not apply
intensive bursts of water to the camera
or camera area. Doing so may result in
the camera malfunctioning.
INFORMATION
●If the camera lens becomes dirty, it can-
not transmit a clear image. If water drop-
lets, snow, or mud adhere to the lens,
rinse with water and wipe with a soft
cloth. If the lens is extremely dirty, wash
it with a mild cleanser and rinse.
Page 324 of 356

324
1. REAR VIEW MONITOR SYSTEM
PRIUS_Navi_OM47A72U_(U)
14.06.11 16:10
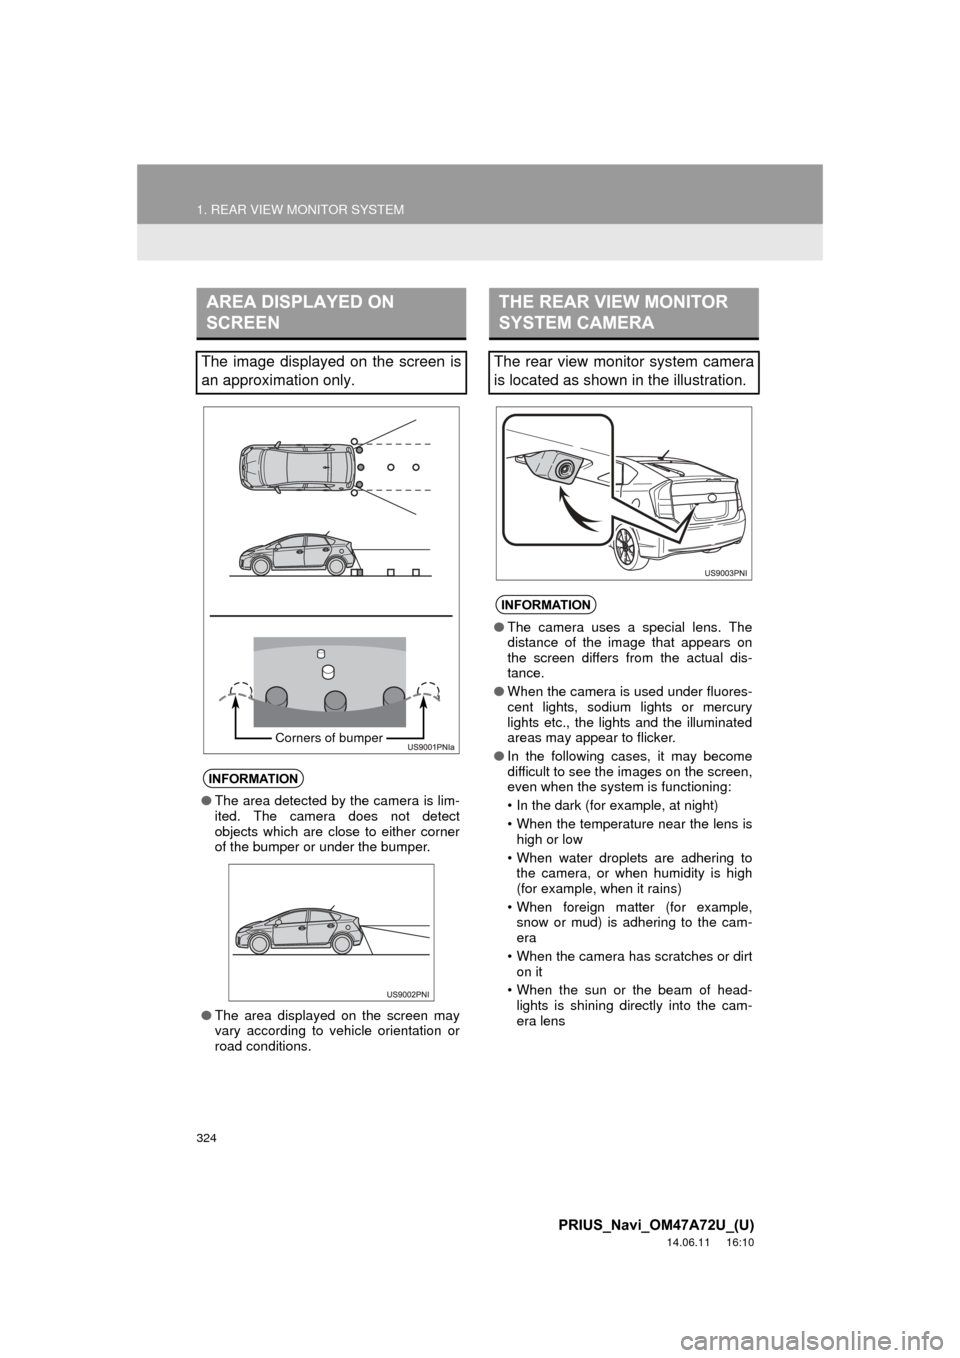
AREA DISPLAYED ON
SCREEN
The image displayed on the screen is
an approximation only.
INFORMATION
●The area detected by the camera is lim-
ited. The camera does not detect
objects which are close to either corner
of the bumper or under the bumper.
● The area displayed on the screen may
vary according to vehicle orientation or
road conditions.
Corners of bumper
THE REAR VIEW MONITOR
SYSTEM CAMERA
The rear view monitor system camera
is located as shown in the illustration.
INFORMATION
●The camera uses a special lens. The
distance of the image that appears on
the screen differs from the actual dis-
tance.
● When the camera is used under fluores-
cent lights, sodium lights or mercury
lights etc., the lights and the illuminated
areas may appear to flicker.
● In the following cases, it may become
difficult to see the images on the screen,
even when the system is functioning:
• In the dark (for example, at night)
• When the temperature near the lens is
high or low
• When water droplets are adhering to the camera, or when humidity is high
(for example, when it rains)
• When foreign matter (for example, snow or mud) is adhering to the cam-
era
• When the camera has scratches or dirt on it
• When the sun or the beam of head- lights is shining directly into the cam-
era lens
Page 325 of 356
325
1. REAR VIEW MONITOR SYSTEM
9
PERIPHERAL MONITORING SYSTEM
PRIUS_Navi_OM47A72U_(U)
14.06.11 16:10
INFORMATION
Page 326 of 356
326
1. REAR VIEW MONITOR SYSTEM
PRIUS_Navi_OM47A72U_(U)
14.06.11 16:10
Page 327 of 356
327
1
2
3
4
5
6
7
8
9
PRIUS_Navi_OM47A72U_(U)
14.06.11 16:10
INDEX
Page 328 of 356

328
ALPHABETICAL INDEX
PRIUS_Navi_OM47A72U_(U)
14.06.11 16:10
A
Adding destinations................................... 87
Address book .......................................... 103
Address book entries .............................. 103
AM........................................................... 203
AM button................................................ 194
Apps ........................................................ 310
Audio ....................................................... 194
AUDIO button.......................................... 194
Audio language code .............................. 233
Audio settings ......................................... 271HD Radio™ system sett ings ............... 271
iPod settings ........................................ 272
Audio/video remote controls (Steering switches) .............................. 259
Audio/video system ......... ..................... ... 194
Audio/video system operating hints ........ 261
Caring for your DVD player and disc ... 263
CD-R and CD-RW discs ...................... 267
iPod ..................................................... 262
MP3/WMA files .................................... 265
Radio reception ................................... 261
Terms .................................................. 267
USB memory ....................................... 263
Automatic Sound Levelizer (ASL) ........... 199
AUX port ................................................. 201
B
Basic function............................................ 26
Bluetooth®............................................... 132
Bluetooth® audio ..................................... 248
Connecting a Bluetooth®
audio player ..................................... 252
Playing Bluetooth
® audio .................... 253
Bluetooth® phone.................................... 139
Bluetooth® phone message function ...... 154
Checking messages ............................ 154
New message notification ................... 156
Replying (Quick reply) ......................... 155 Bluetooth
® settings .................................180
Detailed Bluetooth® settings................187
Registered devices ..............................180
Selecting a Bluetooth
® phone .............184
Selecting portable player .....................186
Brightness .........................................31, 229
C
Call on the Bluetooth® phone..................143
By call history ......................................145
By dial ..................................................143
By phonebook......................................143
By POI call ...........................................149
By speed dial .......................................145
By voice recognition ............................147
Calling using an SMS/MMS message ..........................................149
CD ...........................................................218
CLOSE button .........................................194
Color..................................................47, 229
Command list ..........................................283
Contrast.............................................31, 229
Current position calibration .....................119
Current position display.............................33
D
Deleting destinations .................................88
Deleting personal data ..............................52
Deleting previous destinations ................112
Deleting set destinations ...........................74
DEST button..............................................10
“Destination” screen ..................................20
Destination search ....................................58 By “Address” ..........................................60
By “Address Book”.................................70
By “Coordinates”....................................74
By “Emergency” .....................................70
By home ................................................59
By “Intersection & Freeway” ..................71
By “Map” ................................................73
ALPHABETICAL INDEX