Page 161 of 356

161
2. SETUP
4
PHONE
PRIUS_Navi_OM47A72U_(U)
14.06.16 20:56
■TRANSFERRING A PHONE NUM-
BER
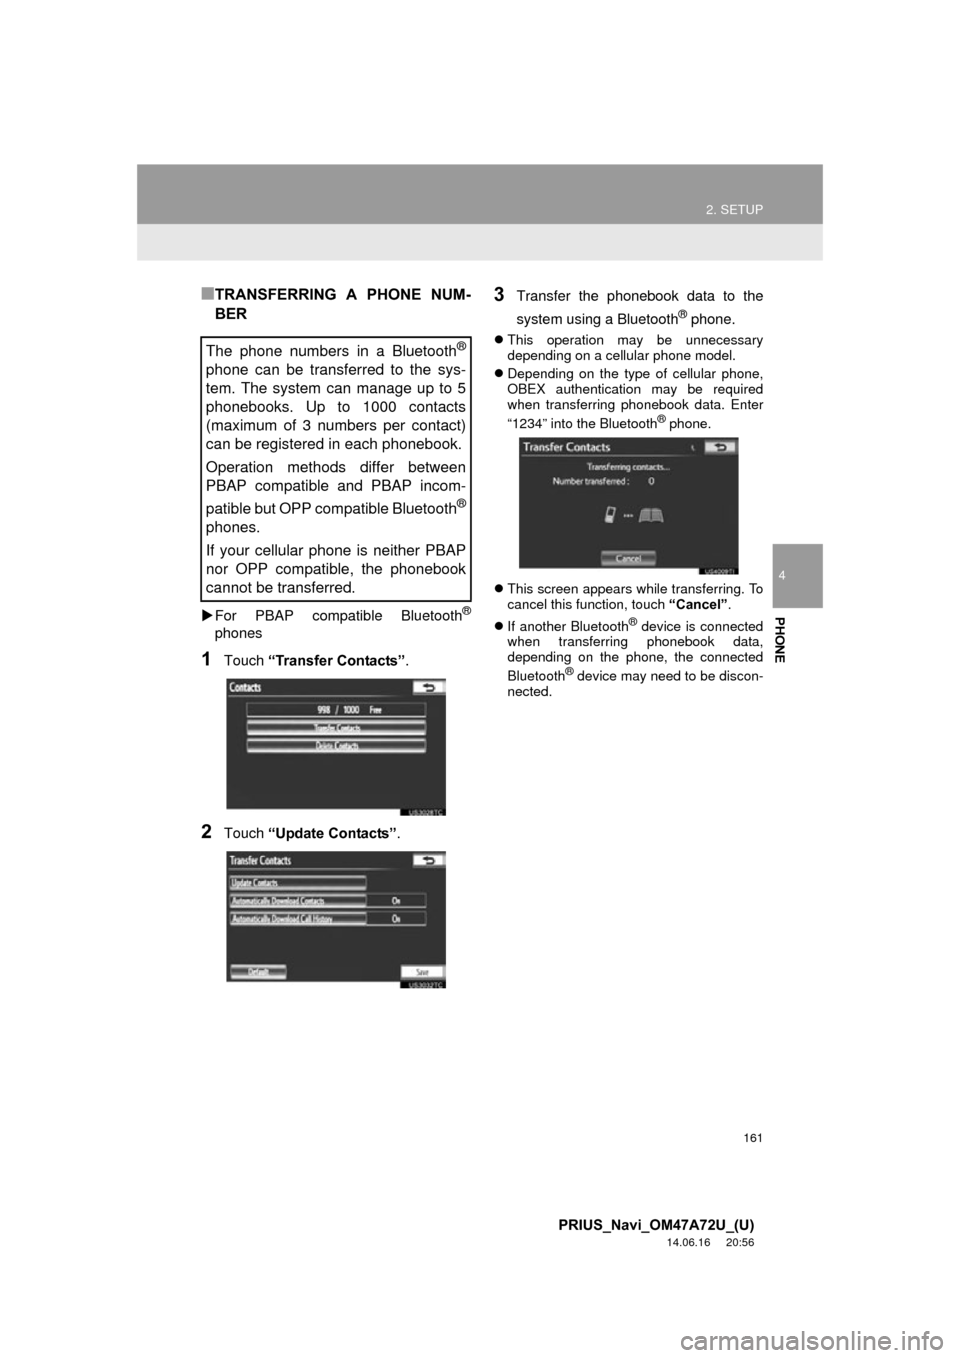
For PBAP compatible Bluetooth®
phones
1Touch “Transfer Contacts” .
2Touch “Update Contacts” .
3Transfer the phonebook data to the
system using a Bluetooth
® phone.
This operation may be unnecessary
depending on a cellular phone model.
Depending on the type of cellular phone,
OBEX authentication may be required
when transferring phonebook data. Enter
“1234” into the Bluetooth
® phone.
This screen appears while transferring. To
cancel this function, touch “Cancel”.
If another Bluetooth
® device is connected
when transferring phonebook data,
depending on the phone, the connected
Bluetooth
® device may need to be discon-
nected.
The phone numbers in a Bluetooth®
phone can be transferred to the sys-
tem. The system can manage up to 5
phonebooks. Up to 1000 contacts
(maximum of 3 numbers per contact)
can be registered in each phonebook.
Operation methods differ between
PBAP compatible and PBAP incom-
patible but OPP compatible Bluetooth
®
phones.
If your cellular phone is neither PBAP
nor OPP compatible, the phonebook
cannot be transferred.
Page 162 of 356
162
2. SETUP
PRIUS_Navi_OM47A72U_(U)
14.06.16 20:56
PBAP compatible models automatic
data transfer setting
1Touch “Transfer Contacts”.
2Touch “Automatically Download
Contacts” to transfer the phonebook
from a connected cellular phone.
Touch “Automatically Download
Call History” to transfer the call histo-
ry from a connected cellular phone.
3Touch “On”.
4Touch “Save” .
For PBAP incompatible but OPP com-
patible Bluetooth
® phones
1Touch “Transfer Contacts” .
2Touch “Replace Contacts” or “Add
Contacts” .
If the phonebook contains phonebook
data, this screen is displayed.
When a PBAP compatible phone is con-
nected, the phone’s phonebook data can
be automatically transferred.
INFORMATION
●Depending on the type of Bluetooth®
phone, the registered image on the
phonebook may not appear when
phonebook data is transferred.
Page 163 of 356

163
2. SETUP
4
PHONE
PRIUS_Navi_OM47A72U_(U)
14.06.16 20:56
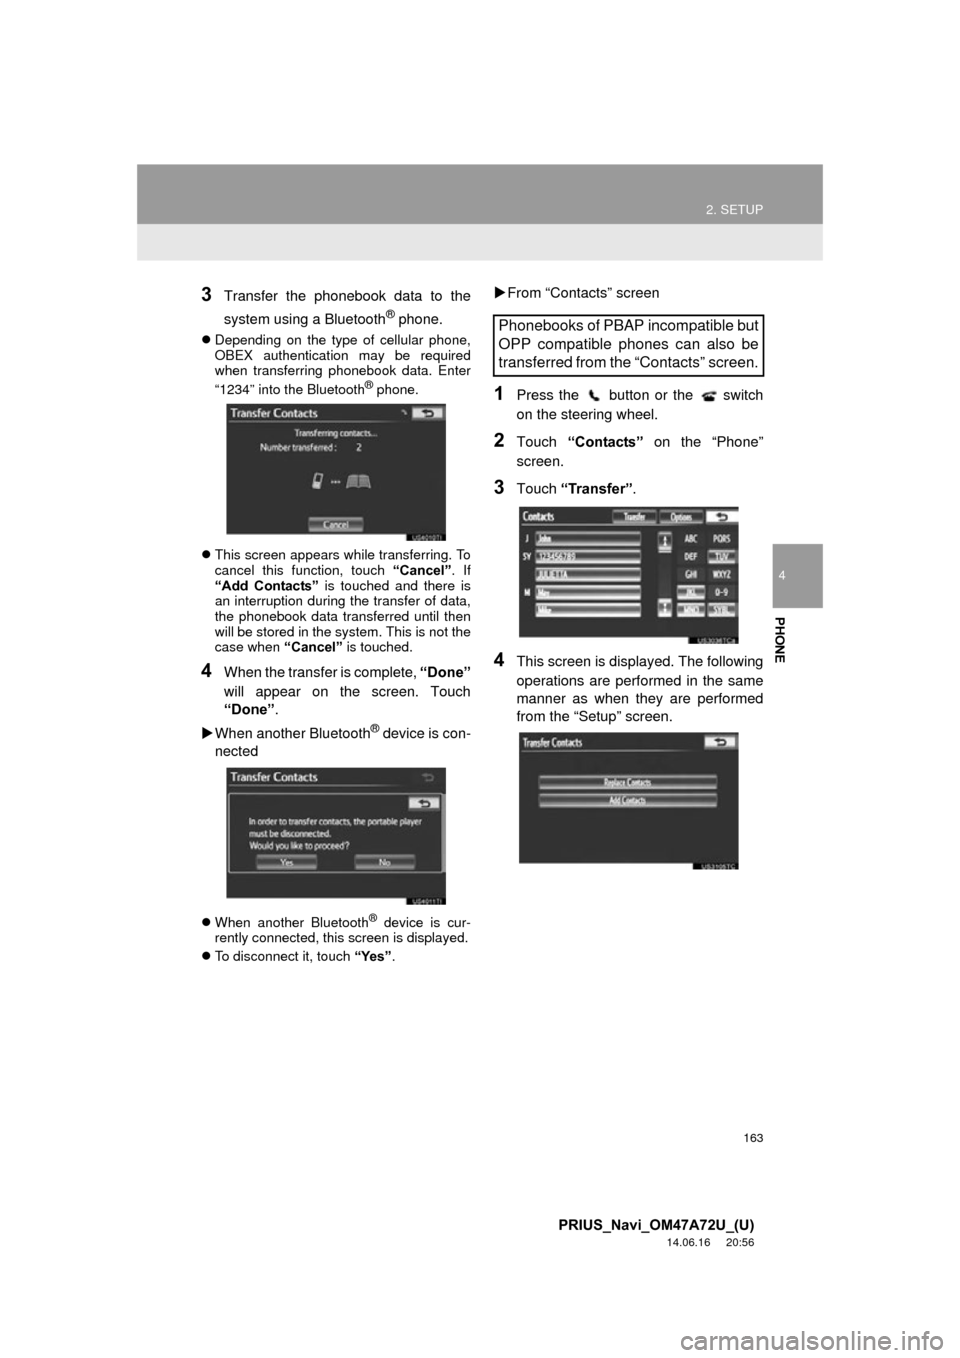
3Transfer the phonebook data to the
system using a Bluetooth
® phone.
Depending on the type of cellular phone,
OBEX authentication may be required
when transferring phonebook data. Enter
“1234” into the Bluetooth
® phone.
This screen appears while transferring. To
cancel this function, touch “Cancel” . If
“Add Contacts” is touched and there is
an interruption during the transfer of data,
the phonebook data transferred until then
will be stored in the system. This is not the
case when “Cancel” is touched.
4When the transfer is complete, “Done”
will appear on the screen. Touch
“Done” .
When another Bluetooth
® device is con-
nected
When another Bluetooth® device is cur-
rently connected, this screen is displayed.
To disconnect it, touch “Yes”.
From “Contacts” screen
1Press the button or the switch
on the steering wheel.
2Touch “Contacts” on the “Phone”
screen.
3Touch “Transfer”.
4This screen is displayed. The following
operations are performed in the same
manner as when they are performed
from the “Setup” screen.
Phonebooks of PBAP incompatible but
OPP compatible phones can also be
transferred from the “Contacts” screen.
Page 164 of 356
164
2. SETUP
PRIUS_Navi_OM47A72U_(U)
14.06.16 20:56
■REGISTERING THE PHONEBOOK
DATA
1Touch “New Contact” .
2Use the software keyboard to input the
name and touch “OK”.
3Input the phone number and touch
“OK”.
To use a tone signal after the phone num-
ber, input the tone signal too.
4Touch the phone type.
5When 2 or less numbers in total are
registered to this contact, this screen is
displayed.
To add a number to this contact, touch
“Yes”.
■EDITING THE PHONEBOOK DATA
The phonebook data can be regis-
tered.
Up to 3 numbers per person can be
registered. New phonebook data can-
not be added for PBAP compatible
Bluetooth
® phones.
The phone number can be registered
in
“Phone # 1” , “Phone # 2” and
“Phone # 3” separately. Phonebooks
cannot be edited for PBAP compatible
Bluetooth
® phones via the navigation
system.
Page 167 of 356
167
2. SETUP
4
PHONE
PRIUS_Navi_OM47A72U_(U)
14.06.16 20:56
■ALTERNATIVE PHONEBOOK
DATA DELETION METHOD
PBAP incompatible but OPP compatible
models
1Press the button or the switch
on the steering wheel.
2Touch “Contacts” on the “Phone”
screen.
3Touch the desired data from the list on
the “Contacts” screen.
4Touch “Options”.
5Touch “Delete” .
6Touch “Yes”.
1Press the “SETUP” button.
2Touch “Phone” on the “Setup” screen.
3Touch “Phonebook” on the “Phone
Settings” screen.
4Touch “Manage Speed Dials” .
5Perform each setting according to the
procedures outlined on the following
pages.
INFORMATION
●When a Bluetooth® phone is deleted,
the phonebook data will be deleted at
the same time.
SPEED DIALS SETTING
Speed dials can be registered and de-
leted.
Page 180 of 356
180
2. SETUP
PRIUS_Navi_OM47A72U_(U)
14.06.16 20:56
2. Bluetooth® SETTINGS
1Press the “SETUP” button.
2Touch “Bluetooth*” .
3Perform each setting according to the
procedures outlined on the following
pages.
1Press the “SETUP” button.
2Touch “Bluetooth*” on the “Setup”
screen.
3Touch “Registered Devices” .
4Perform each setting according to the
procedures outlined on the following
pages.
*: Bluetooth is a registered trademark of Bluetooth SIG, Inc.
A Bluetooth® device can be set up.REGISTERED DEVICES
A Bluetooth® device can be registered,
deleted or set up.
Page 181 of 356

181
2. SETUP
4
PHONE
PRIUS_Navi_OM47A72U_(U)
14.06.16 20:56
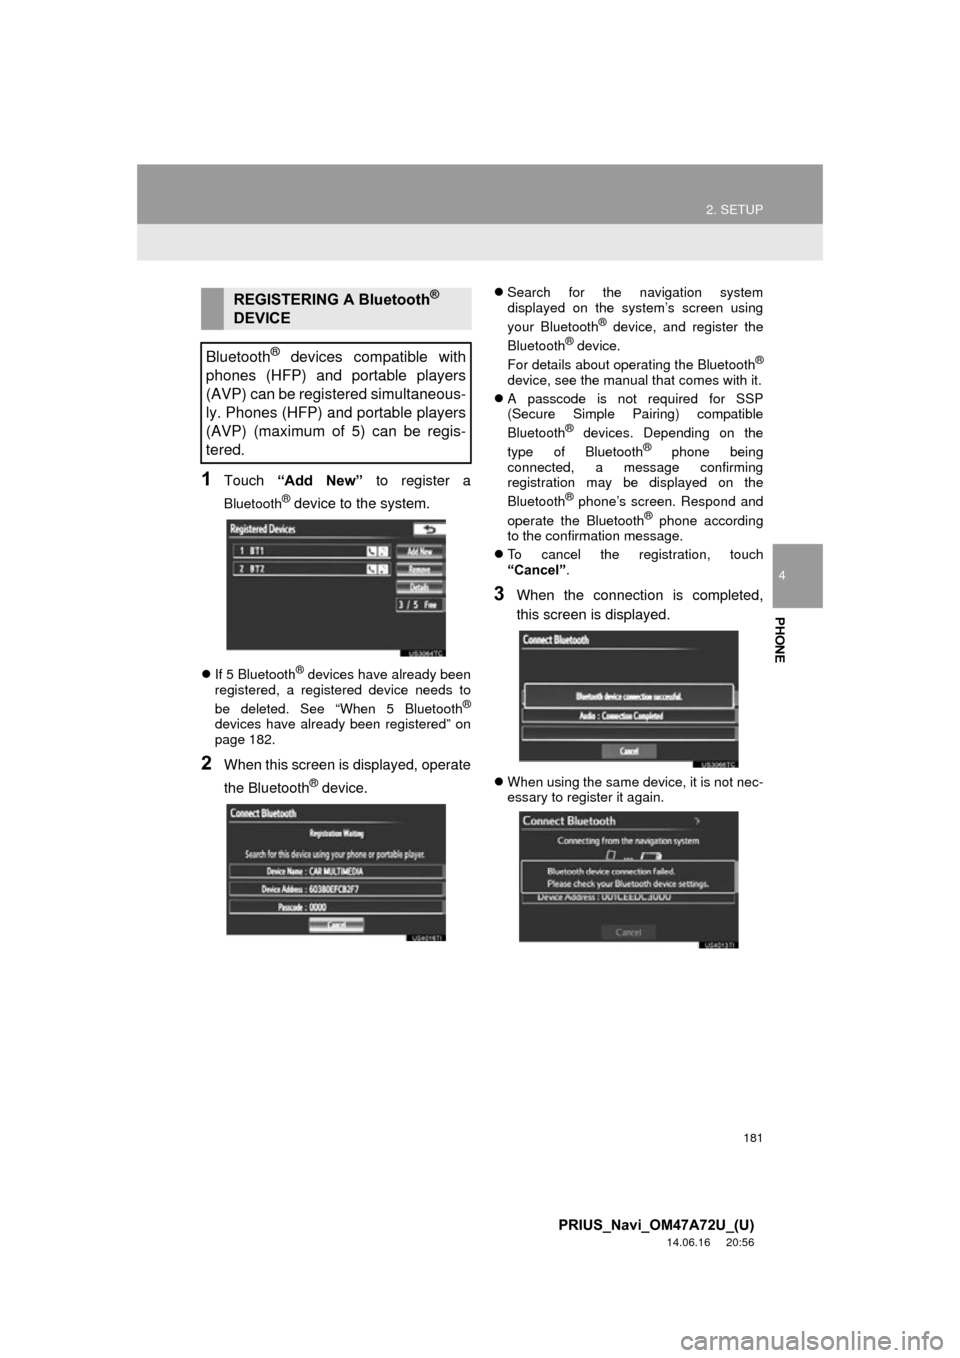
1Touch “Add New” to register a
Bluetooth® device to the system.
If 5 Bluetooth® devices have already been
registered, a registered device needs to
be deleted. See “When 5 Bluetooth
®
devices have already been registered” on
page 182.
2When this screen is displayed, operate
the Bluetooth
® device.
Search for the navigation system
displayed on the system’s screen using
your Bluetooth
® device, and register the
Bluetooth® device.
For details about operating the Bluetooth®
device, see the manual that comes with it.
A passcode is not required for SSP
(Secure Simple Pairing) compatible
Bluetooth
® devices. Depending on the
type of Bluetooth® phone being
connected, a message confirming
registration may be displayed on the
Bluetooth
® phone’s screen. Respond and
operate the Bluetooth® phone according
to the confirmation message.
To cancel the registration, touch
“Cancel” .
3When the connection is completed,
this screen is displayed.
When using the same device, it is not nec-
essary to register it again.
REGISTERING A Bluetooth®
DEVICE
Bluetooth
® devices compatible with
phones (HFP) and portable players
(AVP) can be registered simultaneous-
ly. Phones (HFP) and portable players
(AVP) (maximum of 5) can be regis-
tered.
Page 182 of 356
182
2. SETUP
PRIUS_Navi_OM47A72U_(U)
14.06.16 20:56
When this screen is displayed, follow the
guidance on the screen to try again.
When another Bluetooth
® device is cur-
rently connected, this screen is displayed.
To disconnect the Bluetooth
® device,
touch “Yes”.
When 5 Bluetooth® devices have al-
ready been registered
1When 5 Bluetooth® devices have al-
ready been registered, a registered de-
vice needs to be deleted. Touch “Yes”
to delete 1 or more.
2Touch the device to be deleted, then
touch “Remove” .
3Touch “Yes”.
1Touch “Remove” .
2Touch the desired device, or to delete
all the devices touch “Select All”, then
touch “Remove” .
Multiple devices can be selected and
deleted at the same time.
3Touch “Yes”.
DELETING A Bluetooth®
DEVICE
INFORMATION
● When deleting a Bluetooth® phone, the
phonebook data will be deleted at the
same time.