Page 137 of 356

137
7. REAR SEAT ENTERTAINMENT SYSTEM OPERATION
3
AUDIO/VISUAL SYSTEM
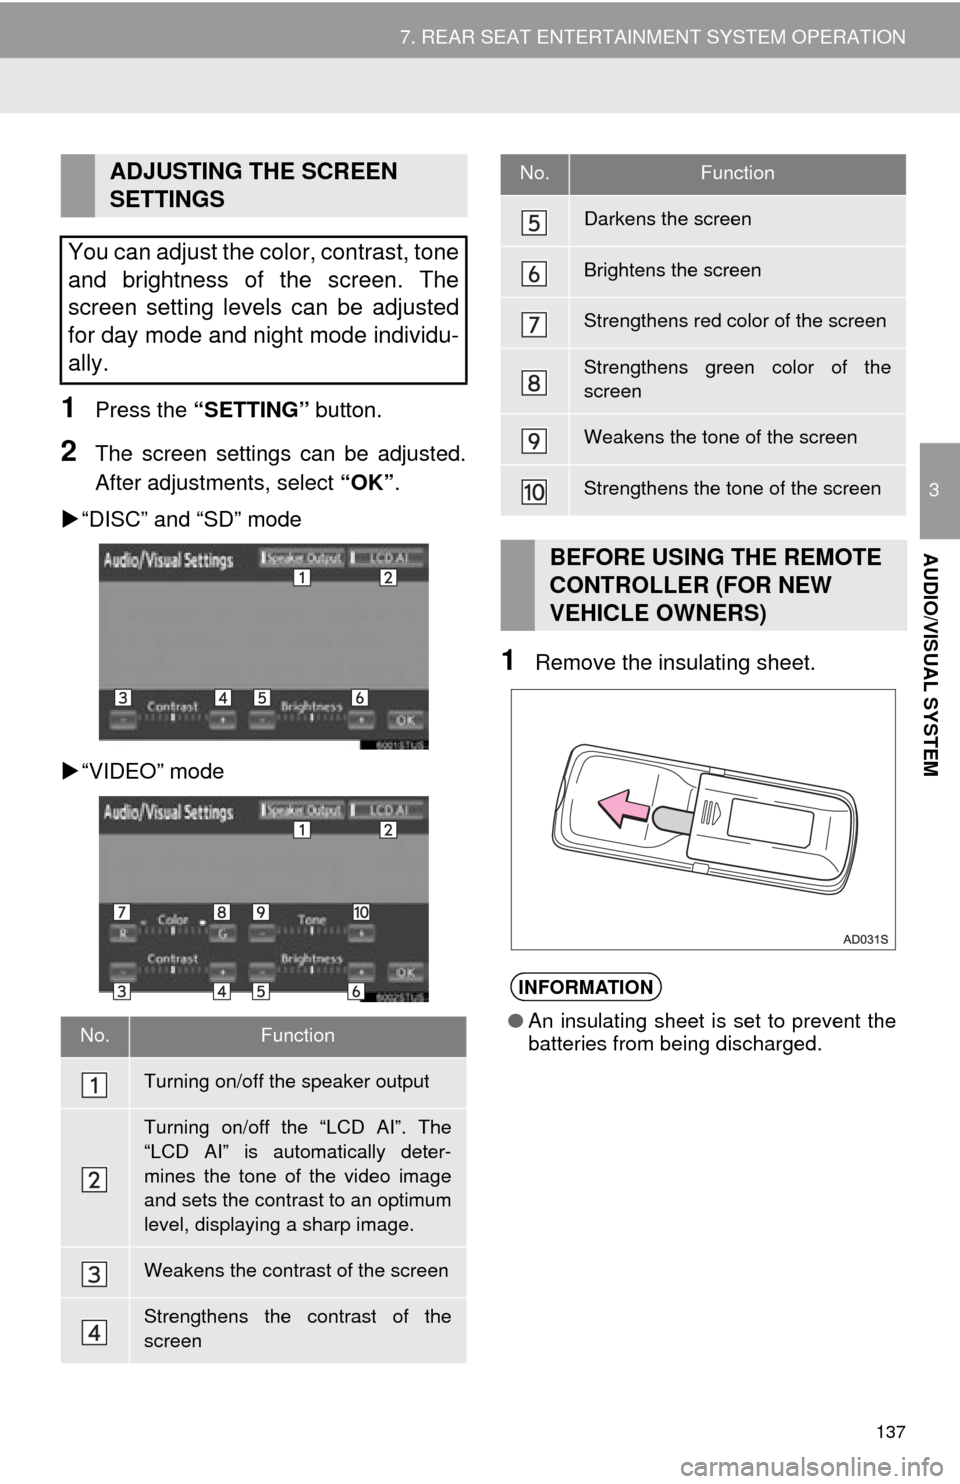
1Press the “SETTING” button.
2The screen settings can be adjusted.
After adjustments, select “OK”.
“DISC” and “SD” mode
“VIDEO” mode
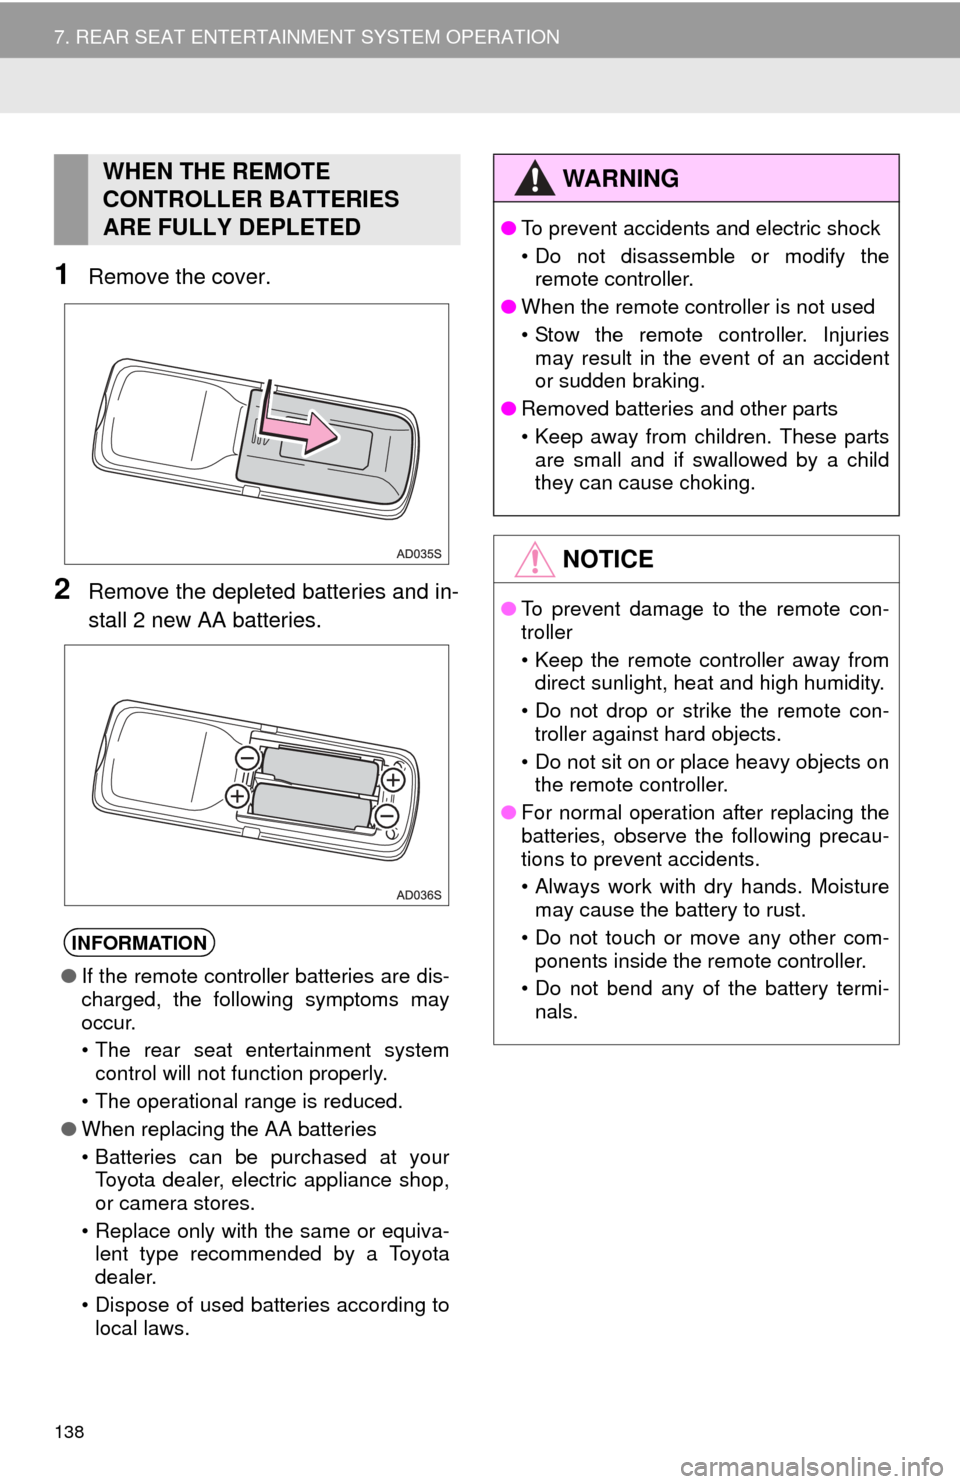
1Remove the insulating sheet.
ADJUSTING THE SCREEN
SETTINGS
You can adjust the color, contrast, tone
and brightness of the screen. The
screen setting levels can be adjusted
for day mode and night mode individu-
ally.
No.Function
Turning on/off the speaker output
Turning on/off the “LCD AI”. The
“LCD AI” is automatically deter-
mines the tone of the video image
and sets the contrast to an optimum
level, displaying a sharp image.
Weakens the contrast of the screen
Strengthens the contrast of the
screen
Darkens the screen
Brightens the screen
Strengthens red color of the screen
Strengthens green color of the
screen
Weakens the tone of the screen
Strengthens the tone of the screen
BEFORE USING THE REMOTE
CONTROLLER (FOR NEW
VEHICLE OWNERS)
INFORMATION
● An insulating sheet is set to prevent the
batteries from being discharged.
No.Function
Page 138 of 356

138
7. REAR SEAT ENTERTAINMENT SYSTEM OPERATION
1Remove the cover.
2Remove the depleted batteries and in-
stall 2 new AA batteries.
WHEN THE REMOTE
CONTROLLER BATTERIES
ARE FULLY DEPLETED
INFORMATION
●If the remote controller batteries are dis-
charged, the following symptoms may
occur.
• The rear seat entertainment system
control will not function properly.
• The operational range is reduced.
● When replacing the AA batteries
• Batteries can be purchased at your
Toyota dealer, electric appliance shop,
or camera stores.
• Replace only with the same or equiva- lent type recommended by a Toyota
dealer.
• Dispose of used batteries according to local laws.
WA R N I N G
● To prevent accidents and electric shock
• Do not disassemble or modify the
remote controller.
● When the remote controller is not used
• Stow the remote controller. Injuries
may result in the event of an accident
or sudden braking.
● Removed batteries and other parts
• Keep away from children. These parts
are small and if swallowed by a child
they can cause choking.
NOTICE
● To prevent damage to the remote con-
troller
• Keep the remote controller away from
direct sunlight, heat and high humidity.
• Do not drop or strike the remote con- troller against hard objects.
• Do not sit on or place heavy objects on the remote controller.
● For normal operation after replacing the
batteries, observe the following precau-
tions to prevent accidents.
• Always work with dry hands. Moisture
may cause the battery to rust.
• Do not touch or move any other com- ponents inside the remote controller.
• Do not bend any of the battery termi- nals.
Page 145 of 356

145
7. REAR SEAT ENTERTAINMENT SYSTEM OPERATION
3
AUDIO/VISUAL SYSTEM
2. PLAYING A Blu-ray Disc™ (BD) AND DVD DISCS*
This system can play Blu-ray Disc™
(BD) videos with digital sound. In addi-
tion to commercial BD and DVD titles,
AVCHD and BDAV videos can be
played on this system, so digital TV re-
corded by home digital video recorders
and BD/DVD home videos recorded by
home digital video cameras can also
be played on this system.
Press the “DISC” button if a disc has
already been loaded in the disc slot.
WA R N I N G
●BD/DVD video precaution
• Conversational speech on some BDs/
DVDs is recorded at a low volume to
emphasize the impact of sound effects.
If you adjust the volume assuming that
the conversations represent the maxi-
mum volume level that the BD/DVD
will play, you may be startled by louder
sound effects or startled when you
change to a different audio source.
Loud sounds may have a significant
impact on the human body or pose a
driving hazard. Keep this in mind when
you adjust the volume.
*: If equipped
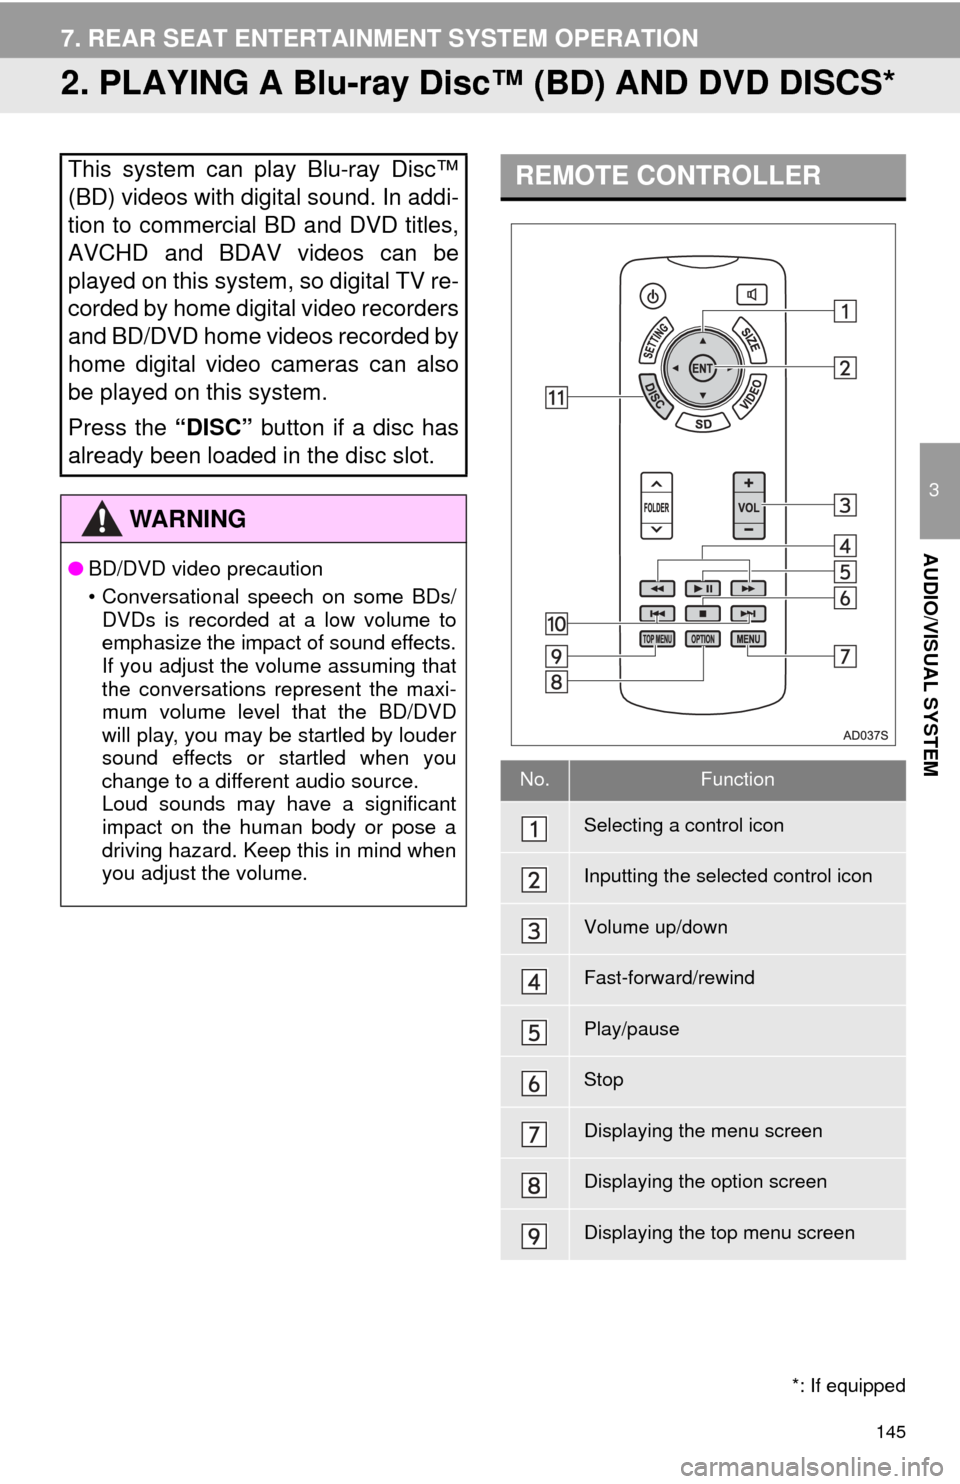
REMOTE CONTROLLER
No.Function
Selecting a control icon
Inputting the selected control icon
Volume up/down
Fast-forward/rewind
Play/pause
Stop
Displaying the menu screen
Displaying the option screen
Displaying the top menu screen
Page 160 of 356
160
7. REAR SEAT ENTERTAINMENT SYSTEM OPERATION
3. PLAYING AN AUDIO CD AND MP3/WMA DISCS*
1Insert a disc or press the “DISC” but-
ton.
The player will start to play the disc auto-
matically.
1Press or until the de-
sired track/file number appears.
1Press and hold or .
Press the “ DISC” button if a disc has
already been loaded in the disc slot.
The player will start to play the disc au-
tomatically.
REMOTE CONTROLLER
No.Function
Selecting a control icon
Inputting the selected control icon
Volume up/down
Fast-forward/rewind
Play/pause
Selecting a track/file
Selecting a folder
*: If equipped
Turning on the audio CD and MP3/
WMA mode
CONTROL SCREEN
No.Function
Repeat play
Random playback
TURNING ON THE AUDIO CD
AND MP3/WMA MODE
SELECTING A TRACK/FILE
FAST FORWARDING OR
REWINDING A TRACK/FILE
No.Function
Page 163 of 356
163
7. REAR SEAT ENTERTAINMENT SYSTEM OPERATION
3
AUDIO/VISUAL SYSTEM
4. PLAYING AN SD CARD*
This system can play still pictures and
AVCHD video that are stored in an SD
card. It does not support music play-
back.
Press the “SD” button if an SD card
has already been inserted in the SD
card slot.
REMOTE CONTROLLER
No.Function
Selecting a control icon
Inputting the selected control icon
Volume up/down
Fast-forward/rewind
Play/pause
Stop
*: If equipped
Displaying the option screen
Selecting a chapter
Turning on the SD card mode
MAIN MENU
No.FunctionPage
Playing still pictures164
Playing AVCHD video165
Formatting the SD card166
Deleting the BD history
data166
No.Function
Page 168 of 356

168
7. REAR SEAT ENTERTAINMENT SYSTEM OPERATION
5. USING THE VIDEO MODE*
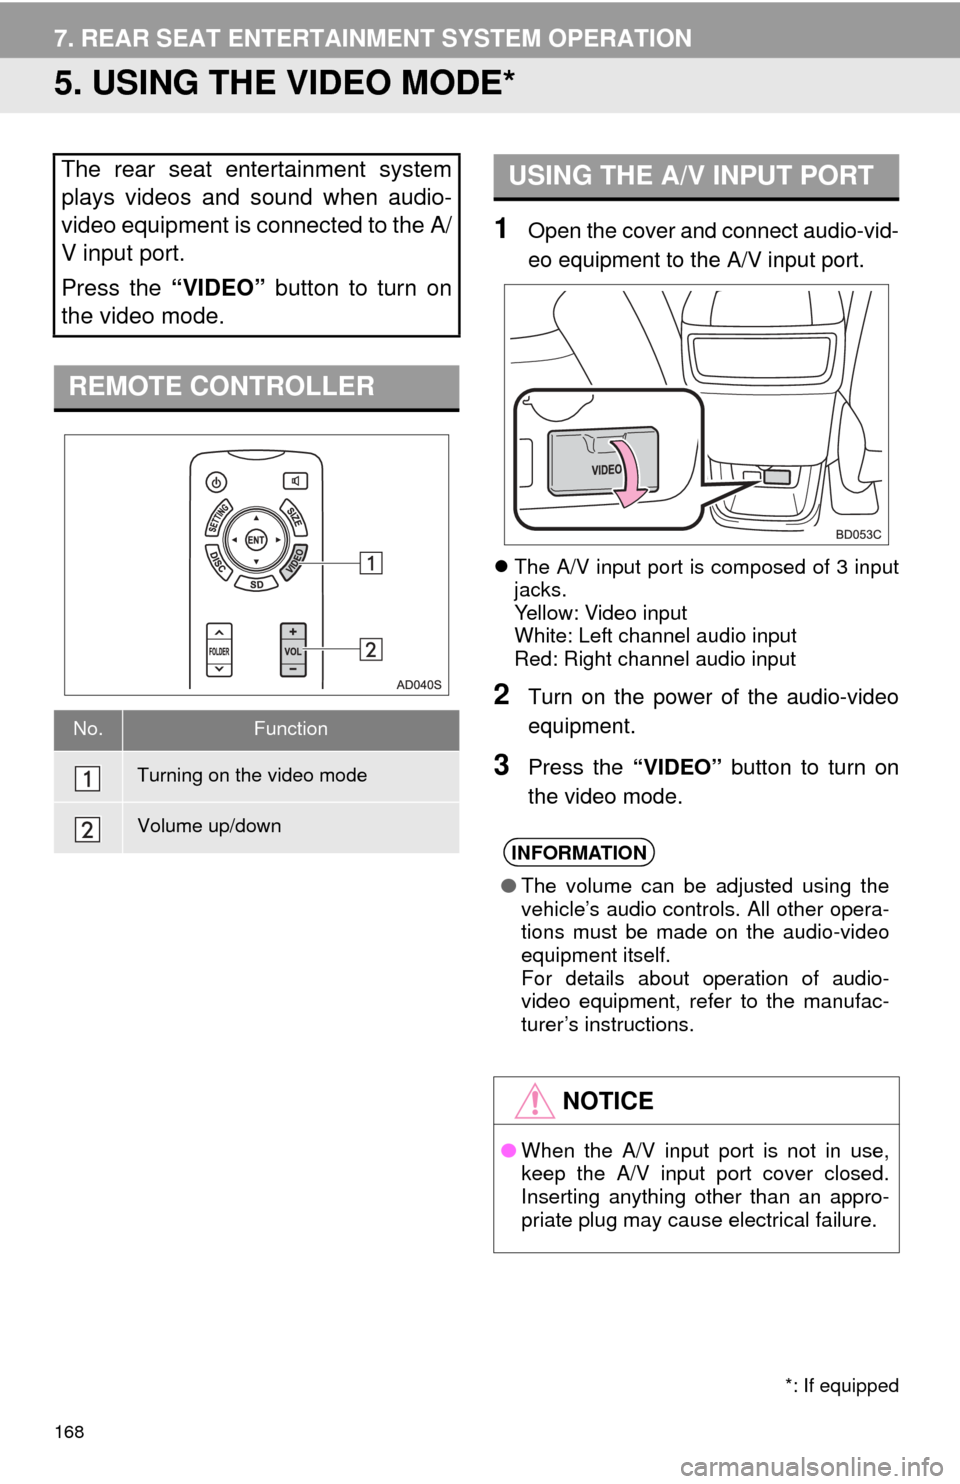
1Open the cover and connect audio-vid-
eo equipment to the A/V input port.
The A/V input port is composed of 3 input
jacks.
Yellow: Video input
White: Left channel audio input
Red: Right channel audio input
2Turn on the power of the audio-video
equipment.
3Press the “VIDEO” button to turn on
the video mode.
The rear seat entertainment system
plays videos and sound when audio-
video equipment is connected to the A/
V input port.
Press the “VIDEO” button to turn on
the video mode.
REMOTE CONTROLLER
No.Function
Turning on the video mode
Volume up/down
*: If equipped
USING THE A/V INPUT PORT
INFORMATION
● The volume can be adjusted using the
vehicle’s audio controls. All other opera-
tions must be made on the audio-video
equipment itself.
For details about operation of audio-
video equipment, refer to the manufac-
turer’s instructions.
NOTICE
●When the A/V input port is not in use,
keep the A/V input port cover closed.
Inserting anything other than an appro-
priate plug may cause electrical failure.
Page 344 of 356

344
ALPHABETICAL INDEX
N
Navigation .............................................. 259
O
Operating information ............................ 123CD player and disc ............................. 124
Error messages .................................. 131
File information ................................... 127
iPod .................................................... 126
Radio .................................................. 123
Terms ................................................. 130
Overview buttons ..................................... 12
P
Phonebook............................................. 226
Phone/message settings........................ 238
“Contact/Call History Settings” screen ............................................. 240
“Messaging Settings” screen .............. 248
“Phone Display Settings” screen ........ 249
Phone/message settings screen ........ 238
“Sound Settings” screen ..................... 239
PWR/VOL knob........................................ 12
R
Rear seat entertainment system .............132
Changing the source ...........................136
Playing a Blu-ray Disc™ (BD)/ DVD discs ........................................145
Playing an audio CD ............................160
Playing an SD card ..............................163
Playing MP3/WMA discs .....................160
Remote controller ................................135
Using the video mode ..........................168
Rear view monitor system ...................... 188
Receiving weather information ............... 180
Receiving on the Bluetooth
® phone ....... 229
Incoming calls ..................................... 229
Receiving traffic map information ........... 182
Registering home ..................................... 22
Registering preset destinations ................ 24
Registering/connecting Bluetooth
®
device ................................................... 43
Certification........................................... 46
Profiles.................................................. 45
Registering a Bluetooth
® audio player
for the first time ................................. 44
Registering a Bluetooth
® phone
for the first time ................................. 43
Route guidance screen .......................... 292
During freeway driving ........................ 294
Route overview ................................... 293
Screen for route guidance .................. 292
Turn list screen ................................... 296
Turn-by-turn arrow screen .................. 296
When approaching intersection .......... 295
Route trace............................................. 271