Page 278 of 440
2786-4. Other interior features
AYGO_EE_OM99J92E
�XVehicles with a multimedia system
Refer to the “Multimedia owner’s manual”.
�XVehicles without a multimedia system
“MENU” knob
“Back” button
Display can be returned to the
previous screen, by pressing the
“Back” button.
■Adjusting the clock
Press the “MENU” knob when the vehicle is stopped.
Select “Clock” on the menu
screen.
Turn the “MENU” knob to adjust the hours.
After adjusting the hours, press the “MENU” knob to input the hours.
Turn the “MENU” knob to adjust the minutes.
After adjusting the minutes, press the “MENU” knob to input the min-
utes.
■ The clock is displayed when
�XVehicles without a smart entry & start system
The engine switch is in the “ACC” or “ON” position.
�XVehicles with a smart entry & start system
The engine switch is in ACCESSORY or IGNITION ON mode.
■ When disconnecting and reconnecting battery terminals
The clock data will be reset.
Clock (if equipped)
1
2
1
2
3
4
Page 279 of 440

2796-4. Other interior features
6
Interior features
AYGO_EE_OM99J92E
The temperature display shows temperature within the range of -40°C
(-40°F) to 50°C (122°F).
■ The outside temperature is displayed when
�XVehicles without a smart entry & start system
The engine switch is in the “ON” position.
�XVehicles with a smart entry & start system
The engine switch is in IGNITION ON mode.
■ Outside temperature display
In the following situations, the correct outside temperature may not be dis-
played, or the display may take longer than normal to change.
● When stopped, or driving at low speeds (approximately 25 km/h [16 mph] or
less)
● When the outside temperature has changed suddenly (at the entrance/exit
of a garage, tunnel, etc.)
● When the time the vehicle runs is very short (approximately 2 minutes or
less)
■ When “– –” is displayed
The system may be malfunctioning. Take your vehicle to any authorized
Toyota dealer or repairer, or another duly qualified and equipped professional.
■ When the outside temperature is low
When the outside temperature becomes 3°C (37°F) or lower, the temperature
reading flashes 10 times to warn the driver that roads may be icy.
Type B only: The display automatically switches over to the outside tempera-
ture display. After flashing 10 times or one of the “DISP” buttons is pushing,
the display will return to the previous display.
Outside temperature display
�XTy pe A�XType B
Page 280 of 440
2806-4. Other interior features
AYGO_EE_OM99J92E
Please use as a power supply for electronic goods that use less than
12 VDC/10 A (power consumption of 120 W).
Open the lid.
■ The power outlet can be used when
�XVehicles without a smart entry & start system
The engine switch is in the “ACC” or “ON” position.
�XVehicles with a smart entry & start system
The engine switch is in ACCESSORY or IGNITION ON mode.
Power outlet
NOTICE
■ To avoid damaging the power outlet
Close the power outlet lid when the power outlet is not in use.
Foreign objects or liquids that enter the power outlet may cause a short cir-
cuit.
■ To prevent battery discharge
Do not use the power outlet longer than necessary when the engine is not
running.
Page 292 of 440

2927-3. Do-it-yourself maintenance
AYGO_EE_OM99J92E
WARNING
■ When working near the electric cooling fans or radiator grille
�XVehicles without a smart entry & start system
Be sure the engine switch is off. With the engine switch in the “ON” position,
the electric cooling fans may automatical ly start to run if the air conditioning
is on and/or the coolant temperature is high. ( →P. 303)
�XVehicles with a smart entry & start system
Be sure the engine switch is off. With the engine switch in IGNITION ON
mode, the electric cooling fans may automatically start to run if the air condi-
tioning is on and/or the coolant temperature is high. ( →P. 303)
■ Safety glasses
Wear safety glasses to prevent flying or falling material, fluid spray, etc.,
from getting in your eyes.
NOTICE
■ If you remove the air cleaner filter
Driving with the air cleaner filter removed may cause excessive engine wear
due to dirt in the air.
■ If the fluid level is low or high
It is normal for the brake fluid level to go down slightly as the brake pads
wear or when the fluid level in the accumulator is high.
If the reservoir needs frequent refilling, it may indicate a serious problem.
Page 310 of 440

3107-3. Do-it-yourself maintenance
AYGO_EE_OM99J92E
■How to initialize the tire pressure warning system
Park the vehicle in a safe place and turn the engine switch to the
“LOCK” position (vehicles without a smart entry & start system)
or off (vehicles with a smart entry & start system).
Initialization cannot be performed while the vehicle is moving.
Adjust the tire inflation pressure to the specified cold tire inflation
pressure level. ( →P. 416)
Make sure to adjust the tire pressure to the specified cold tire inflation
pressure level. The tire pressure warning system will operate based on
this pressure level.
Turn the engine switch to the “ON” position (vehicles without a
smart entry & start system) or IGNITION ON mode (vehicles with
a smart entry & start system).
Press and hold the tire pres-
sure warning reset switch
until the tire pressure warn-
ing light blinks slowly 3 times.
■ Situations in which the tire pressure warning system may not operate
properly (if equipped)
● This tire pressure warning system ensure a proper function when OE (Origi-
nal Equipment) tire is installed.
● In the following cases, the tire pressure warning system may not operate
properly.
• The vehicle uses non-standard size tires or tires made by other manufac-
turers.
• The vehicle uses tire of different size or manufacturers.
• The vehicle uses snow tires, comp act spare tire (if equipped) or tire
chains.
• The vehicle is being driven below approximately 40 km/h (25 mph).
• The vehicle is being driven on slippery or rough road surfaces.
● When tire inflation pressure declines rapidly for example when a tire has
burst, the warning may not function.
1
2
3
4
Page 348 of 440

3488-2. Steps to take in an emergency
AYGO_EE_OM99J92E
Securely attach a cable or chain to the towing eyelet.
Take care not to damage the vehicle body.
Vehicles without a smart entry & start system: Enter the vehicle
being towed and start the engine.
If the engine does not start, turn the engine switch to the “ON” position.
Vehicles with a smart entry & start system: Enter the vehicle being
towed and start the engine.
If the engine does not start, turn the engine switch to IGNITION ON mode.
Shift the shift lever to N and release the parking brake.
Vehicles with a multi-mode manual transmission: When the shift
lever cannot be shifted. ( →P. 390)
■While towing
If the engine is not running, the power assist for the brakes and steering will
not function, making steering and braking more difficult.
■ Wheel bolt wrench
● Vehicles with a wheel bolt wrench: Wheel bolt wrench is installed in luggage
compartment. ( →P. 362, 375)
● Vehicles without a wheel bolt wrench: Wheel bolt wrench can be purchased
at any authorized Toyota dealer or repairer, or another duly qualified and
equipped professional.
5
6
7
Page 392 of 440
3928-2. Steps to take in an emergency
AYGO_EE_OM99J92E
Ensure that the shift lever is in N and depress the brake pedal
(multi-mode manual transmission) or clutch pedal (manual trans-
mission).
Touch the corner of the elec-
tronic key with the indicator to
the engine switch.
When the electronic key is
detected, a buzzer sounds and the
engine switch will turn to IGNITION
ON mode.
When the smart entry & start sys-
tem is deactivated in customization
setting, the engine switch will turn
to ACCESSORY mode.
Firmly depress the brake pedal (multi-mode manual transmission)
or clutch pedal (manual transmission) and check that smart entry &
start system indicator light (green) turns on.
Press the engine switch.
In the event that the engine still cannot be started, contact any autho-
rized Toyota dealer or repairer, or another duly qualified and equipped
professional.
Starting the engine
1
2
3
4
Page 395 of 440

3958-2. Steps to take in an emergency
8
When trouble arises
AYGO_EE_OM99J92E
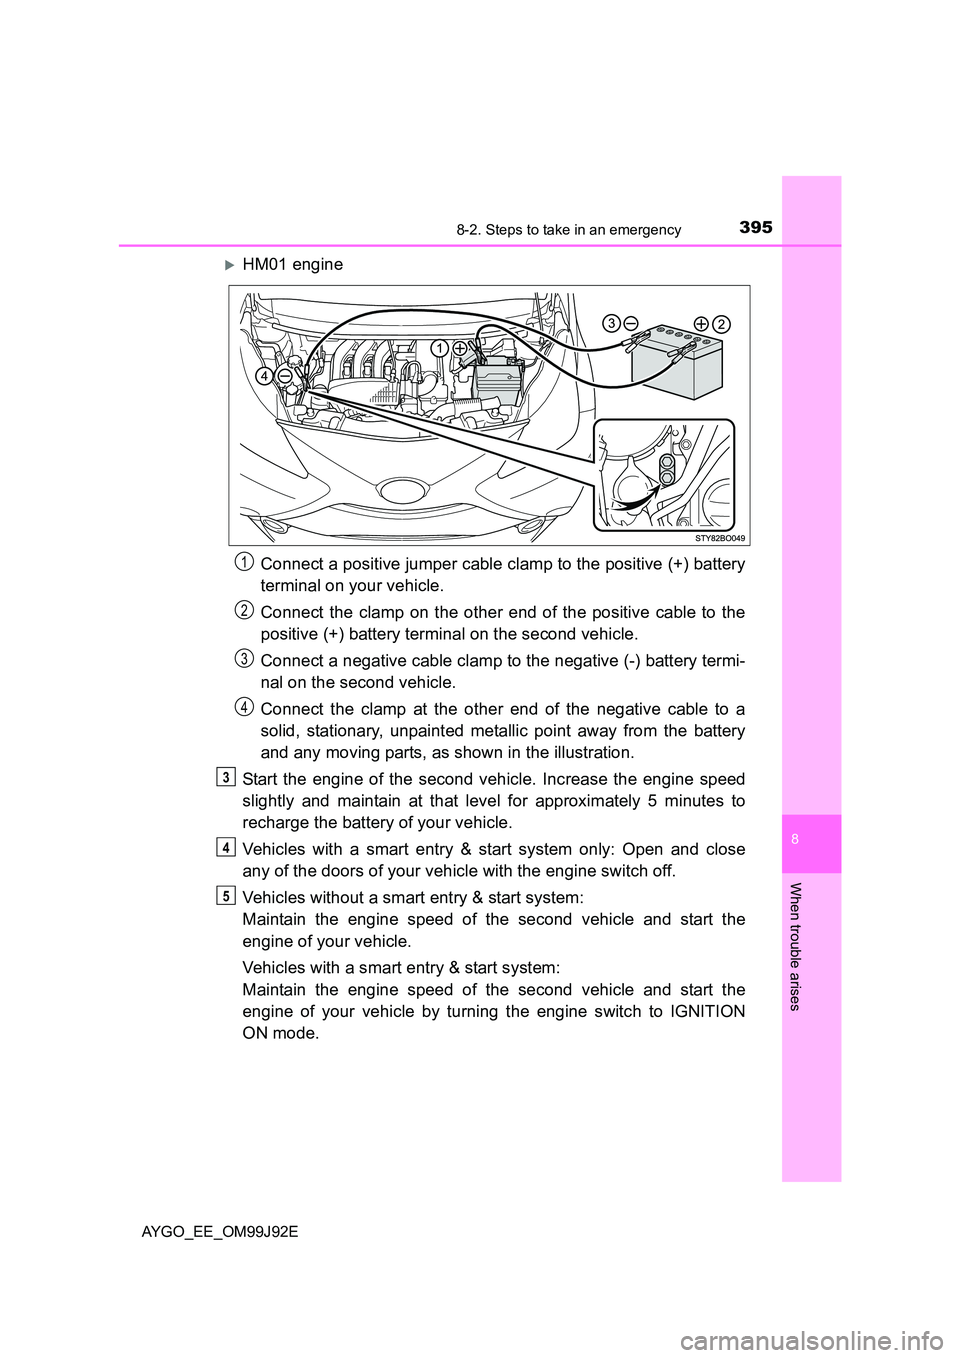
�XHM01 engine
Connect a positive jumper cable clamp to the positive (+) battery
terminal on your vehicle.
Connect the clamp on the other end of the positive cable to the
positive (+) battery terminal on the second vehicle.
Connect a negative cable clamp to the negative (-) battery termi-
nal on the second vehicle.
Connect the clamp at the other end of the negative cable to a
solid, stationary, unpainted metallic point away from the battery
and any moving parts, as shown in the illustration.
Start the engine of the second vehicle. Increase the engine speed
slightly and maintain at that level for approximately 5 minutes to
recharge the battery of your vehicle.
Vehicles with a smart entry & start system only: Open and close
any of the doors of your vehicle with the engine switch off.
Vehicles without a smart entry & start system:
Maintain the engine speed of the second vehicle and start the
engine of your vehicle.
Vehicles with a smart entry & start system:
Maintain the engine speed of the second vehicle and start the
engine of your vehicle by turning the engine switch to IGNITION
ON mode.
1
2
3
4
3
4
5