2015 TOYOTA AYGO ECO mode
[x] Cancel search: ECO modePage 114 of 440

1143-2. Opening, closing and locking the doors
AYGO_EE_OM99J92E
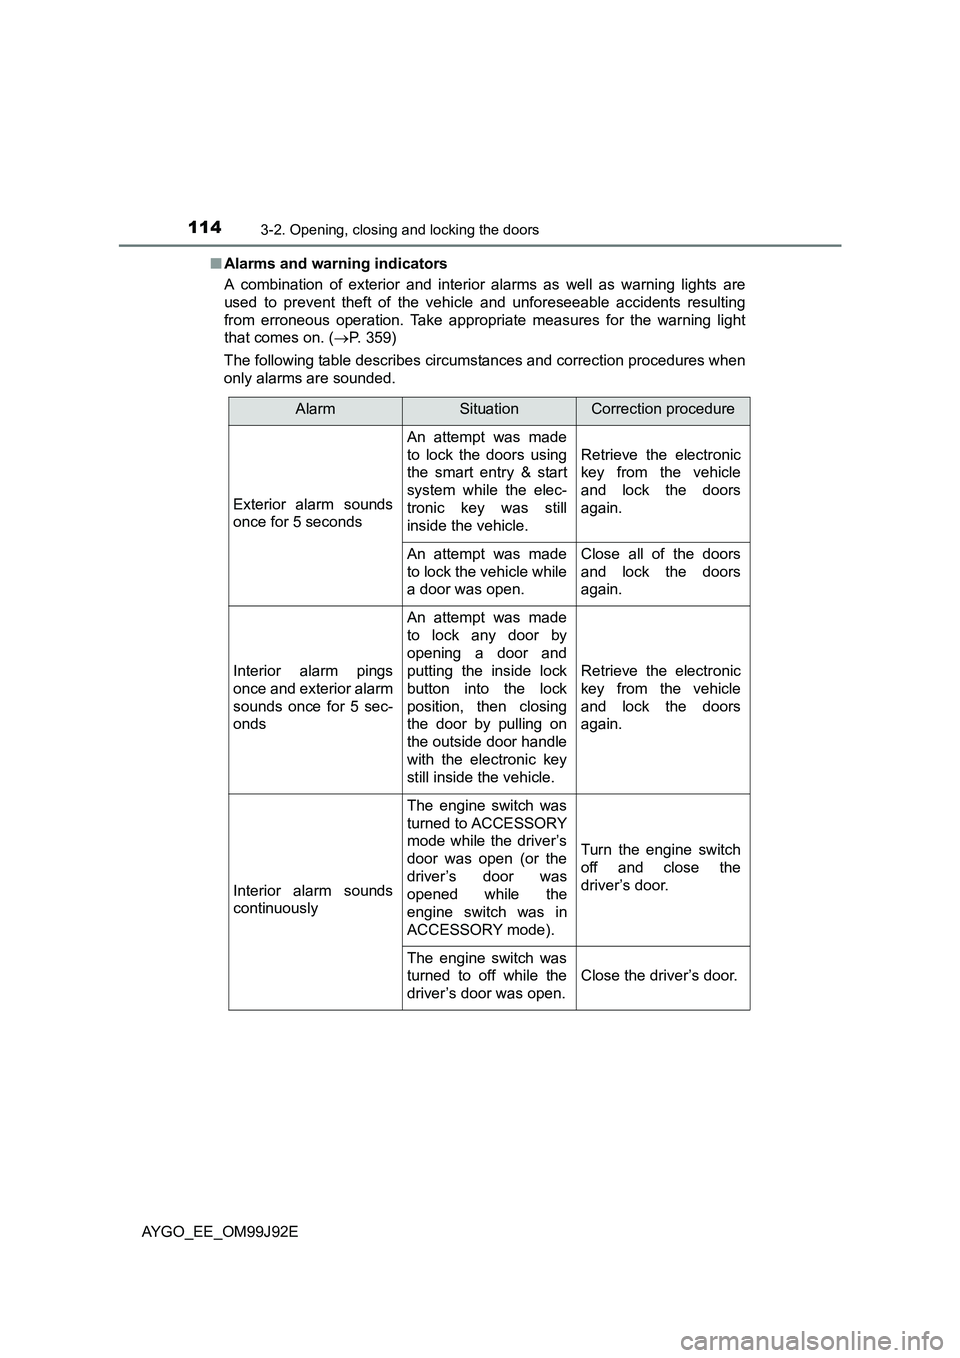
■ Alarms and warning indicators
A combination of exterior and interior alarms as well as warning lights are
used to prevent theft of the vehicle and unforeseeable accidents resulting
from erroneous operation. Take appropriate measures for the warning light
that comes on. ( →P. 359)
The following table describes circumstances and correction procedures when
only alarms are sounded.
AlarmSituationCorrection procedure
Exterior alarm sounds
once for 5 seconds
An attempt was made
to lock the doors using
the smart entry & start
system while the elec-
tronic key was still
inside the vehicle.
Retrieve the electronic
key from the vehicle
and lock the doors
again.
An attempt was made
to lock the vehicle while
a door was open.
Close all of the doors
and lock the doors
again.
Interior alarm pings
once and exterior alarm
sounds once for 5 sec-
onds
An attempt was made
to lock any door by
opening a door and
putting the inside lock
button into the lock
position, then closing
the door by pulling on
the outside door handle
with the electronic key
still inside the vehicle.
Retrieve the electronic
key from the vehicle
and lock the doors
again.
Interior alarm sounds
continuously
The engine switch was
turned to ACCESSORY
mode while the driver’s
door was open (or the
driver’s door was
opened while the
engine switch was in
ACCESSORY mode).
Turn the engine switch
off and close the
driver’s door.
The engine switch was
turned to off while the
driver’s door was open.
Close the driver’s door.
Page 117 of 440

1173-2. Opening, closing and locking the doors
3
Operation of each component
AYGO_EE_OM99J92E
■ Electronic key battery depletion
● The standard battery life is 1 to 2 years.
● If the battery becomes low, an alarm will sound in the cabin when the engine
stops. ( →P. 359)
● As the electronic key always receives radio waves, the battery will become
depleted even if the electronic key is not used. The following symptoms indi-
cate that the electronic key battery may be depleted. Replace the battery
when necessary. ( →P. 319)
• The smart entry & start system or the wireless remote control does not
operate.
• The detection area becomes smaller.
• The LED indicator on the key surface does not turn on.
● To avoid serious deterioration, do not leave the electronic key within 1 m (3
ft.) of the following electrical appl iances that produce a magnetic field:
•TVs
• Personal computers
• Cellular phones, cordless phones and battery chargers
• Recharging cellular phones or cordless phones
• Table lamps
• Induction cookers
■ Customization that can be configured at any authorized Toyota dealer or
repairer, or another duly quali fied and equipped professional
Settings (e. g. smart entry & start system) can be changed.
(Customizable features: →P. 421)
■ If the smart entry & start system has been deactivated in a customized
setting
● Locking and unlocking the doors:
Use the wireless remote control or mechanical key. ( →P. 93, 391)
● Starting the engine and changing engine switch modes: →P. 392
● Stopping the engine: →P. 155
Page 124 of 440

1243-3. Adjusting the seats
AYGO_EE_OM99J92E
■After passengers have entered the vehicle (3-door models)
Slide the seat backward and then lift the seatback. The seat will be set and
locked to its previous position automatically. If the seat cannot be slid back to
the previous position due to the rear passenger or luggage, the seat will be
locked in that position, disabling the seat position memory system.
To recall the previous position, lift the seatback lock release lever after remov-
ing the luggage, or after having the pass enger get out or sit properly so that
the seat can be slid back to the previous position. However, if you slide the
seat further backwards than previous position using the seat position adjust-
ment lever, the memory of previous position will be overwritten.
WARNING
■ When adjusting the seat position
● Take care when adjusting the seat position to ensure that other passen-
gers are not injured by the moving seat.
● Do not put your hands under the seat or near the moving parts to avoid
injury.
Fingers or hands may become jammed in the seat mechanism.
■ Seat adjustment
● To reduce the risk of sliding under the lap belt during a collision, do not
recline the seat more than necessary.
If the seat is too reclined, the lap belt may slide past the hips and apply
restraint forces directly to the abdomen, or your neck may contact the
shoulder belt, increasing the risk of death or serious injury in the event of
an accident.
Adjustments should not be made while driving as the seat may unexpect-
edly move and cause the driver to lose control of the vehicle.
● After adjusting the seat, make sure that the seat is locked in position.
● 3-door models: Never allow anyone to touch seatback lock release levers
while the vehicle is moving.
Page 132 of 440

1323-4. Adjusting the steering wheel and mirrors
AYGO_EE_OM99J92E
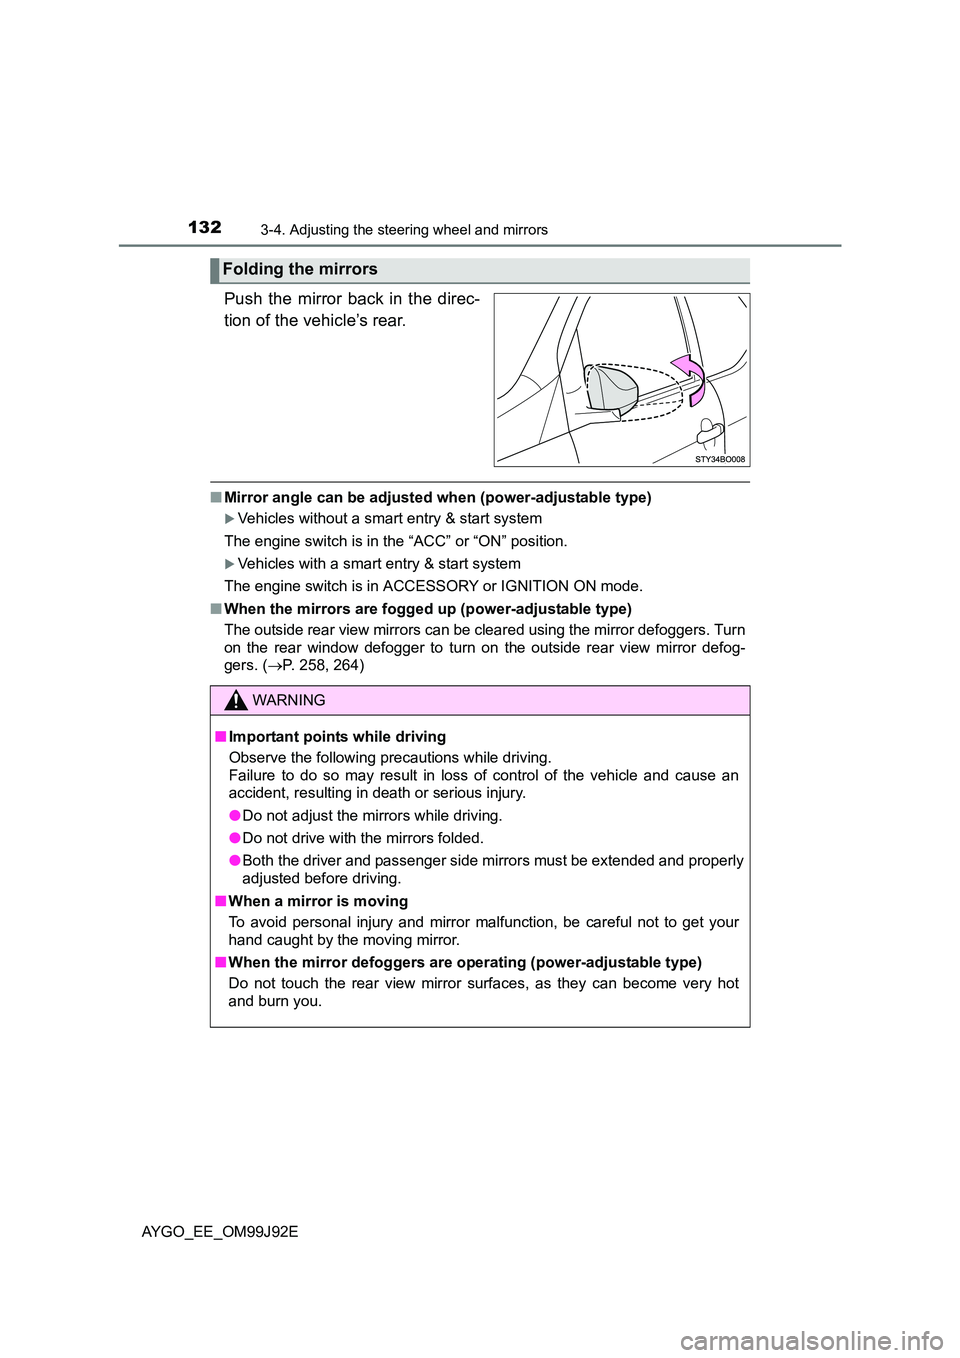
Push the mirror back in the direc-
tion of the vehicle’s rear.
■ Mirror angle can be adjusted when (power-adjustable type)
�XVehicles without a smart entry & start system
The engine switch is in the “ACC” or “ON” position.
�XVehicles with a smart entry & start system
The engine switch is in ACCESSORY or IGNITION ON mode.
■ When the mirrors are fogged up (power-adjustable type)
The outside rear view mirrors can be cleared using the mirror defoggers. Turn
on the rear window defogger to turn on the outside rear view mirror defog-
gers. ( →P. 258, 264)
Folding the mirrors
WARNING
■ Important points while driving
Observe the following precautions while driving.
Failure to do so may result in loss of control of the vehicle and cause an
accident, resulting in death or serious injury.
● Do not adjust the mirrors while driving.
● Do not drive with the mirrors folded.
● Both the driver and passenger side mirrors must be extended and properly
adjusted before driving.
■ When a mirror is moving
To avoid personal injury and mirror malfunction, be careful not to get your
hand caught by the moving mirror.
■ When the mirror defoggers are operating (power-adjustable type)
Do not touch the rear view mirror surfaces, as they can become very hot
and burn you.
Page 142 of 440

1424-1. Before driving
AYGO_EE_OM99J92E
�XMulti-mode manual transmission
With the brake pedal depressed, firmly set the parking brake and
shift the shift lever to E or M.
When shifting the shift lever to E: Make sure that the display of the gear
position indicator shows E.
When shifting the shift lever to M: Make sure that the display of the gear
position indicator shows 1.
Gently depress the accelerator pedal.
Release the parking brake.
�XManual transmission
With the parking brake firmly set and the clutch pedal fully
depressed, shift the shift lever to 1.
Lightly depress the accelerator pedal at the same time as gradually
releasing the clutch pedal.
Release the parking brake.
■ When starting off on a uphill (vehicles with a hill-start assist control)
The hill-start assist control will activate. ( →P. 191)
■ Driving in the rain
● Drive carefully when it is raining, because visibility will be reduced, the win-
dows may become fogged-up, and the road will be slippery.
● Drive carefully when it starts to rain, because the road surface will be espe-
cially slippery.
● Refrain from high speeds when driving on an expressway in the rain,
because there may be a layer of water between the tires and the road sur-
face, preventing the steering and brakes from operating properly.
■ Breaking in your new Toyota
To extend the life of the vehicle, observing the following precautions is recom-
mended:
● For the first 300 km (200 miles):
Avoid sudden stops.
● For the first 1000 km (600 miles):
• Do not drive at extremely high speeds.
• Avoid sudden acceleration.
• Do not drive continuously in low gears.
• Do not drive at a constant speed for extended periods.
Starting off on a steep uphill
1
2
3
1
2
3
Page 143 of 440

1434-1. Before driving
4
Driving
AYGO_EE_OM99J92E
■ Operating your vehicle in a foreign country
Comply with the relevant vehicle registration laws and confirm the availability
of the correct fuel. ( →P. 419)
WARNING
Observe the following precautions.
Failure to do so may result in death or serious injury.
■ When starting the vehicle
On vehicles with a multi-mode manual transmission, always keep your foot
on the brake pedal while stopped with the engine running. This prevents the
vehicle from moving unexpectedly.
■ When driving the vehicle
● Do not drive if you are unfamiliar with the location of the brake and accel-
erator pedals to avoid depressing the wrong pedal.
• Accidentally depressing the accelerator pedal instead of the brake
pedal will result in sudden acceleration that may lead to an accident.
• When backing up, you may twist your body around, leading to difficulty
in operating the pedals. Make su re to operate the pedals properly.
• Make sure to keep a correct driving posture even when moving the
vehicle only slightly. This allows you to depress the brake and accelera-
tor pedals properly.
• Depress the brake pedal using your right foot. Depressing the brake
pedal using your left foot may delay response in an emergency, result-
ing in an accident.
● Do not drive the vehicle over or stop the vehicle near flammable materials.
The exhaust system and exhaust gases can be extremely hot. These hot
parts may cause a fire if there is any flammable material nearby.
● During normal driving, do not turn off the engine. Turning the engine off
while driving will not cause loss of steering or braking control, but the
power assist to these systems will be lost. This will make it more difficult to
steer and brake, so you should pull over and stop the vehicle as soon as it
is safe to do so.
However, in the event of an emergency, such as if it becomes impossible
to stop the vehicle in the normal way: →P. 343
● Use engine braking (downshift) to maintain a safe speed when driving
down a steep hill.
Using the brakes continuously may cause the brakes to overheat and lose
effectiveness. ( →P. 159, 163)
● Do not adjust the positions of the steering wheel, the seat, or the inside or
outside rear view mirrors while driving.
Doing so may result in a loss of vehicle control.
● Always check that all passengers’ arms, heads or other parts of their body
are not outside the vehicle.
Page 154 of 440

1544-2. Driving procedures
AYGO_EE_OM99J92E
Engine (ignition) switch (vehicles with a
smar t entr y & start system)
�XMulti-mode manual transmission
Check that the parking brake is set.
Firmly depress the brake pedal, press the engine switch once and
shift the shift lever to N. ( →P. 159)
The smart entry & start system indicator light (green) will turn on. If the
indicator light does not turn on, the engine cannot be started.
Press the engine switch.
The engine will crank until it starts
or for up to 30 seconds, whichever
is less.
Continue depressing the brake
pedal until the engine is completely
started.
The engine can be started from
any engine switch mode.
Performing the following operations when carrying the elec-
tronic key on your person starts the engine or changes engine
switch modes.
Starting the engine
1
2
3
Page 155 of 440

1554-2. Driving procedures
4
Driving
AYGO_EE_OM99J92E
�XManual transmission
Check that the parking brake is set.
Check that the shift lever is set in N. ( →P. 163)
Firmly depress the clutch pedal.
The smart entry & start system indicator light (green) will turn on. If the
indicator light does not turn on, the engine cannot be started.
Press the engine switch.
The engine will crank until it starts
or for up to 30 seconds, whichever
is less.
Continue depressing the brake
pedal until the engine is completely
started.
The engine can be started from
any engine switch mode.
Stop the vehicle.
Shift the shift lever to E, M or R (multi-mode manual transmission)
or N (manual transmission).
Set the parking brake. ( →P. 166)
Press the engine switch.
Release the brake pedal (multi-mode manual transmission) or
clutch pedal (manual transmission) and check that the smart entry
& start system indicator light (green) is off.
1
2
3
4
Stopping the engine
1
2
3
4
5