Page 7 of 23

OVERVIEW
FEATURES/OPERATIONS
SAFETY AND EMERGENCY FEATURES
11
10
FEATURES/OPERATIONS
Automatic Transmission
* The “ENGINE START STOP” switch must be IGNITION ON mode and the brake
pedal depressed to shift from Park.
Shift the shift lever to “S” position from “D” position.
+: Upshifting
-: Downshifting
Downshifting increases power going uphill, or provides engine braking downhill.
For best fuel economy during normal driving conditions, always drive with the shift
lever in the “D” position.
“S” (Sequential) mode
Steering lock release
Turn
Push
Auto lock/unlock
Automatic door locks can be programmed to operate in four different modes, or
turned OFF.
-Doors lock when shifting from Park.
-Doors lock when the vehicle speed goes above approximately 12 mph.
-Doors unlock when shifting into Park.
-Doors unlock when the “ENGINE START STOP” switch is set to OFF and driver’s door is opened.
Refer to the Owner’s Manual for more details.
Hold wheel, push lever down, set angle and length, and return lever.
Lock release lever
NOTE: Do not attempt to adjust while the vehicle is in motion.
Tilt and telescopic steering wheel
Gently turn steering wheel while pressing the “ENGINE START STOP” switch. If
the lock does not release, a message informing the driver that the steering wheel
is locked will be displayed on the Multi-Information Display.
Angle
Length
N
Park*
Reverse
Neutral
Drive
“S” mode
+ (“S” mode)
- (“S” mode)
+ (“S” mode)- (“S” mode)
Paddle shift switches
(if equipped)
Shift lever
Driving mode select
Normal mode
Use for normal driving.
ECO drive mode
Use ECO drive mode to help achieve low fuel consumption during trips that
involve frequent accelerating.
SPORT mode
Use SPORT mode when increased acceleration response and precise handling is
desired, such as when driving on mountain roads.
Parking brake
Set: Depress
Release: Depress again
Page 9 of 23

OVERVIEW
FEATURES/OPERATIONS
SAFETY AND EMERGENCY FEATURES
1415
Power outlets-12V DC
Front console
The “ENGINE START STOP” switch must be in the ACCESSORY or IGNITION ON
mode for use.
Center console
Lights & turn signals
Turn signals
Headlights
High beam
Front fog lights (if equipped)
Headlights
-Daytime Running Light system (DRL) Automatically turns on the headlights to make vehicle more visible to other drivers. Not for use at night.
-Automatic light cut off system When the headlights are on: Automatically turns lights off after 30-second delay, or lock switch on remote may be pushed after locking.
When the tail lights are on: Automatically turns lights off when driver’s door is opened. Parking lights
Right turn
Lane change
1
Lane change2
Left turn High beam
flasher
Auto
DRL OFF
Turn
Windshield wipers & washers
Adjust sensor sensitivity2
Pull to wash and wipe
Single wipe
Auto wipe
Slow
Fast
Front fog lights come on only when the headlights are on low beam.
FEATURES/OPERATIONS
1 Intermittent windshield wiper frequency adjustment Rotate to increase/decrease wipe frequency.
2 Rain-sensing windshield wiper Rotate to increase/decrease sensor sensitivity.
With intermittent wiper
With AUTO rain-sensing wiper (if equipped)
Pull to wash and wipe
Single wipe
Interval wipe
Slow
Fast
Low beam
Automatic high beam (if equipped)
* Refer to the Owner’s Manual for details on activating the automatic high beams.
Adjust frequency1
DeactivateActivate*
1 The right hand signals will flash three times.2 The left hand signals will flash three times.
Page 13 of 23

OVERVIEW
FEATURES/OPERATIONS
SAFETY AND EMERGENCY FEATURES
23
22
Rear
FEATURES/OPERATIONS
Cup holders
Front
Door locks
Lock
Unlock
SAFETY AND EMERGENCY FEATURES
Moving the lever to the lock position will allow the door to be opened only from
the outside.
Rear door
Type AType B
Doors-Child safety locks
If belt is fully extended, then retracted even slightly, it cannot be re-extended
beyond that point, unless fully retracted again. This feature is used to help hold
child restraint systems securely.
To find more information about seat belts, and how to install a child restraint
system, refer to the Owner’s Manual.
Keep as low on
hips as possible
Take up slack
Too high
Seat belts
Lock
Unlock
Wireless charger (if equipped)
A mobile device with the “” logo can be charged wirelessly. Charging can only
be performed with the “ENGINE START STOP” switch in ACCESSORY or IGNITION ON
mode. Place a mobile device on the tray. One LED indicator is illuminated while
charging and two LED indicators are illuminated when the charging is complete.
Close
OpenSystem ON/OFF
Page 14 of 23

OVERVIEW
FEATURES/OPERATIONS
SAFETY AND EMERGENCY FEATURES
25
24
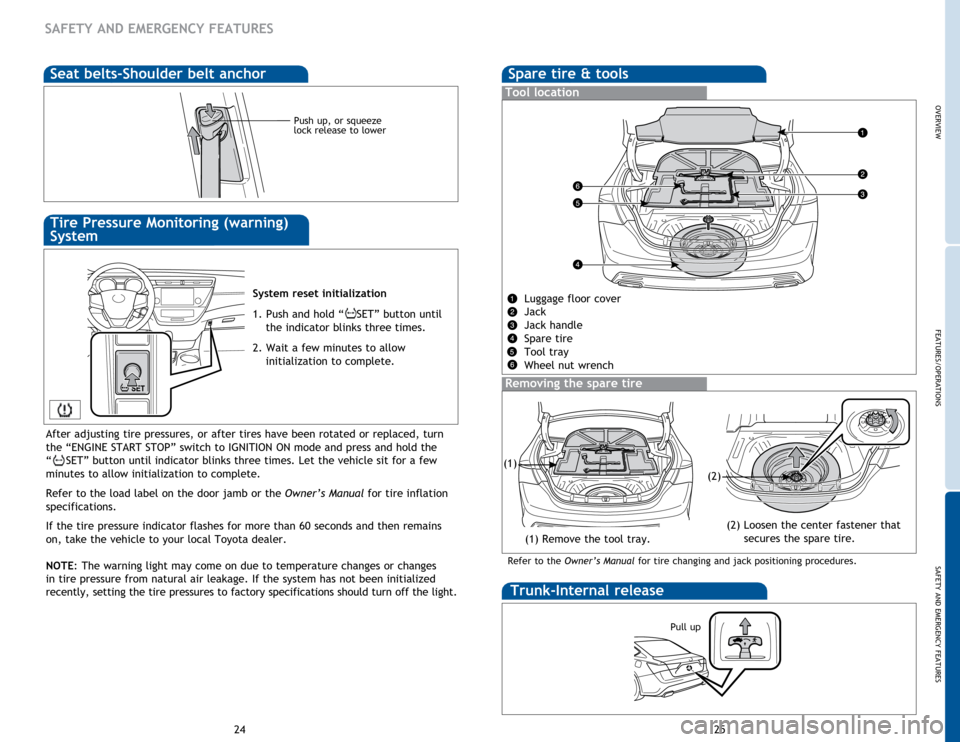
SAFETY AND EMERGENCY FEATURES
Push up, or squeeze
lock release to lower
System reset initialization
1. Push and hold “
SET” button until
the indicator blinks three times.
2. Wait a few minutes to allow initialization to complete.
Seat belts-Shoulder belt anchorSpare tire & tools
Tool location
Luggage floor cover
Jack
Jack handle
Spare tire
Tool tray
Wheel nut wrench
Removing the spare tire
Trunk-Internal release
Pull up
Tire Pressure Monitoring (warning)
System
After adjusting tire pressures, or after tires have been rotated or replaced, turn
the “ENGINE START STOP” switch to IGNITION ON mode and press and hold the
“
SET” button until indicator blinks three times. Let the vehicle sit for a few
minutes to allow initialization to complete.
Refer to the load label on the door jamb or the Owner’s Manual for tire inflation
specifications.
If the
tire pressure indicator flashes for more than 60 seconds and then remains
on, take the vehicle to your local Toyota dealer.
NOTE:
The
warning light may come on due to temperature changes or changes
in tire pressure from natural air leakage. If the system has not been initialized
recently, setting the tire pressures to factory specifications should tu\
rn off the light.
Refer to the Owner’s Manual for tire changing and jack positioning procedures.
(1)
(2)
(2) Loosen the center fastener that secures the spare tire.
(1) Remove the tool tray.