Page 327 of 524
3275-4. Other interior features
5
Interior features
4RUNNER (U)_(OM35B18U)■
System components
Microphone
“SOS” button
LED light indicators
Safety Connect
: If equipped
Safety Connect is a subscripti on-based telematics service that
uses Global Positioning System (GPS) data and embedded cel-
lular technology to provide safety and security features to sub-
scribers. Safety Connect is supported by Toyota’s designated
response center, which operates 24 hours per day, 7 days per
week.
Safety Connect service is avai lable by subscription on select,
telematics hardware-equipped vehicles.
By using the Safety Connect service, you are agreeing to be
bound by the Telematics Subscription Service Agreement and
its Terms and Conditions, as in ef fect and amended from time to
time, a current copy of which is available at Toyota.com. All use
of the Safety Connect service is subject to such then-applicable
Terms and Conditions.
1
2
3
Page 342 of 524

3426-2. Maintenance
4RUNNER (U)_(OM35B18U)
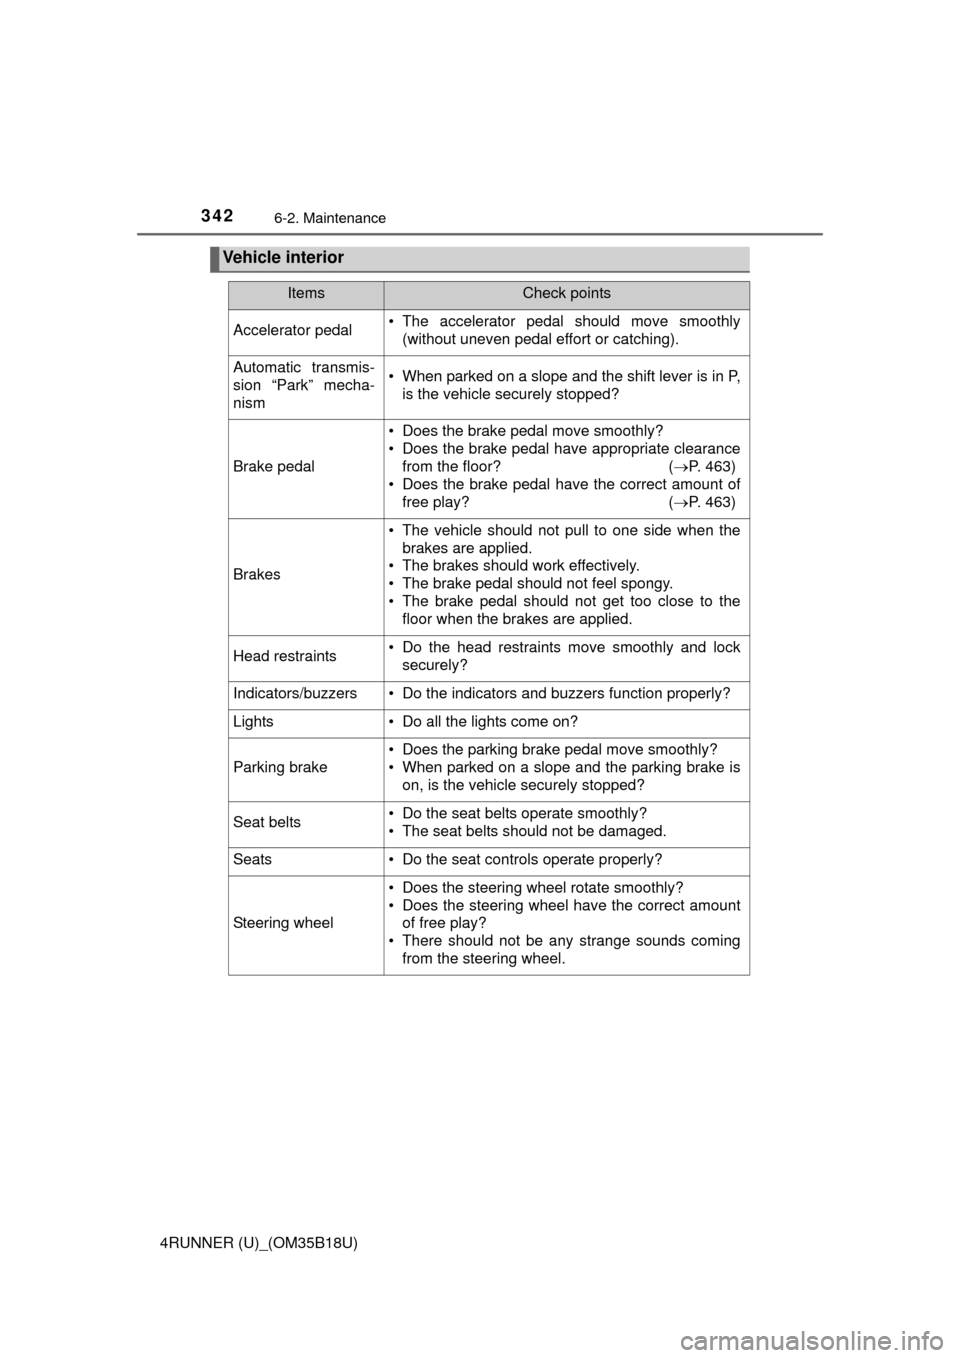
Vehicle interior
ItemsCheck points
Accelerator pedal• The accelerator pedal should move smoothly(without uneven pedal effort or catching).
Automatic transmis-
sion “Park” mecha-
nism• When parked on a slope and the shift lever is in P,is the vehicle securely stopped?
Brake pedal
• Does the brake pedal move smoothly?
• Does the brake pedal have appropriate clearancefrom the floor? ( P. 463)
• Does the brake pedal have the correct amount of
free play? ( P. 463)
Brakes
• The vehicle should not pull to one side when the
brakes are applied.
• The brakes should work effectively.
• The brake pedal should not feel spongy.
• The brake pedal should not get too close to the floor when the brakes are applied.
Head restraints• Do the head restraints move smoothly and locksecurely?
Indicators/buzzers• Do the indicators and buzzers function properly?
Lights • Do all the lights come on?
Parking brake
• Does the parking brake pedal move smoothly?
• When parked on a slope and the parking brake is on, is the vehicle securely stopped?
Seat belts• Do the seat belts operate smoothly?
• The seat belts should not be damaged.
Seats• Do the seat controls operate properly?
Steering wheel
• Does the steering wheel rotate smoothly?
• Does the steering wheel have the correct amountof free play?
• There should not be any strange sounds coming
from the steering wheel.
Page 350 of 524
3506-3. Do-it-yourself maintenance
4RUNNER (U)_(OM35B18U)■
Removing the engine compartment cover
■Installing the clips
Push up center portion
Insert
Press
Engine compartment cover
1
2
3
NOTICE
■After installing an engine compartment cover
Make sure that the cover is securely installed in its original position.
Page 386 of 524
3866-3. Do-it-yourself maintenance
4RUNNER (U)_(OM35B18U)
Replace the light bulb, and
install the bulb base.
Align the 3 tabs on the light bulb
with the mounting and insert.
Turn and secure the bulb
base.
Shake the bulb base gently to
check that it is not loose, turn
the headlights on once and visu-
ally confirm that no light is leak-
ing through the mounting.
Install the cover.
4
5
6
Page 387 of 524
3876-3. Do-it-yourself maintenance
6
Maintenance and care
4RUNNER (U)_(OM35B18U)■
Headlight high beam/daytime running lights
Turn the bulb base counter-
clockwise.
Pull the bulb out while press-
ing the lock release of the
connector.
Replace the light bulb, and
install the bulb base.
Align the 3 tabs on the light bulb
with the mounting and insert.
Turn and secure the bulb
base.
Shake the bulb base gently to
check that it is not loose, turn
the headlights on once and visu-
ally confirm that no light is leak-
ing through the mounting.
1
2
3
4
Page 393 of 524
3936-3. Do-it-yourself maintenance
6
Maintenance and care
4RUNNER (U)_(OM35B18U)
Turn the bulb base counter-
clockwise.
Install a new light bulb.
Align the 3 tabs on the light bulb
with the mounting and insert.
Turn clockwise and secure
the bulb base.
Install the connector.
Shake the connector gently to
check that it is not loose, turn
the front fog lights on once and
visually confirm that no light is
leaking through the mounting.
When installing the fender liner, install by conducting and with the
directions reversed.
5
6
7
8
9
Page 397 of 524

3976-3. Do-it-yourself maintenance
6
Maintenance and care
4RUNNER (U)_(OM35B18U)■
Replacing the following bulbs
If any of the lights listed below
has burnt out, have it replaced by
your Toyota dealer.
● Fog light (right side)
● Side turn signal lights
● Stop/tail lights
● Rear side marker lights
● High mounted stoplight
● Outer foot lights (if equipped)
■LED light bulbs
The side turn signal lights, stop/tail lights, rear side marker lights, high
mounted stoplight and outer foot lights consist of a number of LEDs. If any
LEDs burn out, take your vehicle to your Toyota dealer to have the light
replaced.
■ Condensation build-up on the inside of the lens
Temporary condensation build-up on the inside of the lens does not indicate a
malfunction. Contact your Toyota dealer for more information in the following
situations:
●Large drops of water have built up on the inside of the lens.
● Water has built up inside the lens.
CAUTION
■Replacing light bulbs
● Turn off the lights. Do not attempt to replace the bulb immediately after
turning off the lights.
The bulbs become very hot and may cause burns.
● Do not touch the glass portion of the light bulb with bare hands. When it is
unavoidable to hold the glass portion, use and hold with a clean dry cloth
to avoid getting moisture and oils on the bulb.
Also, if the bulb is scratched or dropped, it may blow out or crack.
● Fully install light bulbs and any parts used to secure them. Failure to do so
may result in heat damage, fire, or water entering the headlight unit. This
may damage the headlights or cause condensation to build up on the lens.
■ To prevent damage or fire
● Make sure bulbs are fully seated and locked.
● Check the wattage of the bulb before installing to prevent heat damage.
Page 401 of 524

4017-1. Essential information
7
When trouble arises
4RUNNER (U)_(OM35B18U)
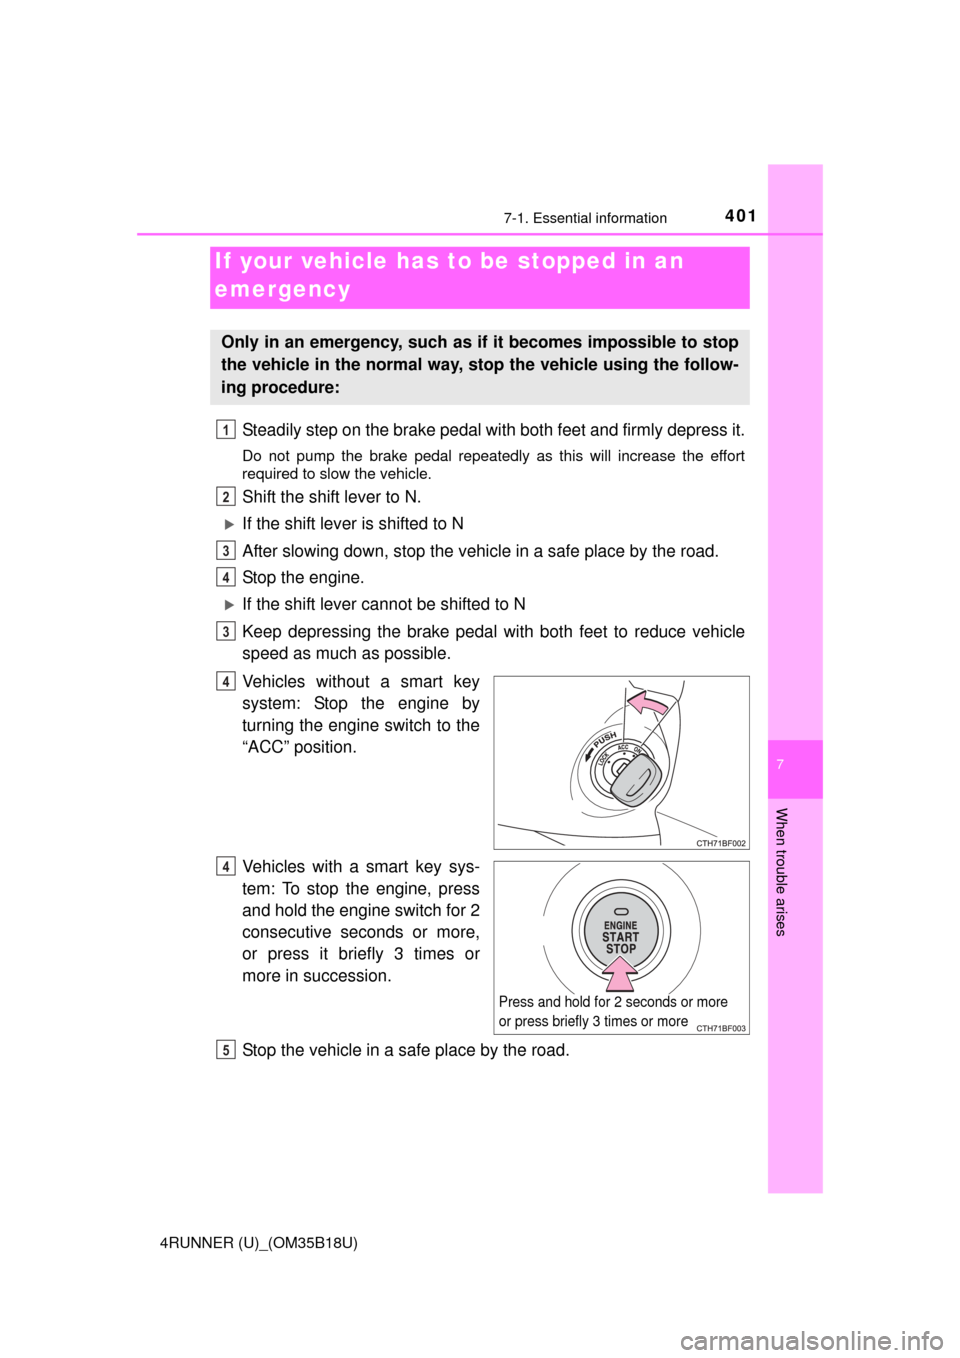
Steadily step on the brake pedal with both feet and firmly depress it.
Do not pump the brake pedal repeatedly as this will increase the effort
required to slow the vehicle.
Shift the shift lever to N.
If the shift lever is shifted to N
After slowing down, stop the vehicle in a safe place by the road.
Stop the engine.
If the shift lever cannot be shifted to N
Keep depressing the brake pedal with both feet to reduce vehicle
speed as much as possible.
Vehicles without a smart key
system: Stop the engine by
turning the engine switch to the
“ACC” position.
Vehicles with a smart key sys-
tem: To stop the engine, press
and hold the engine switch for 2
consecutive seconds or more,
or press it briefly 3 times or
more in succession.
Stop the vehicle in a safe place by the road.
If your vehicle has to be stopped in an
emergency
Only in an emergency, such as if it becomes impossible to stop
the vehicle in the normal way, st op the vehicle using the follow-
ing procedure:
1
2
3
4
3
4
Press and hold for 2 seconds or more
or press briefly 3 times or more
4
5