Page 114 of 161
114
Head Lamp Bulb Replacement Head Lamp Bulb ReplacementHead Lamp Bulb Replacement Head Lamp Bulb Replacement
Head Lamp Bulb Replacement
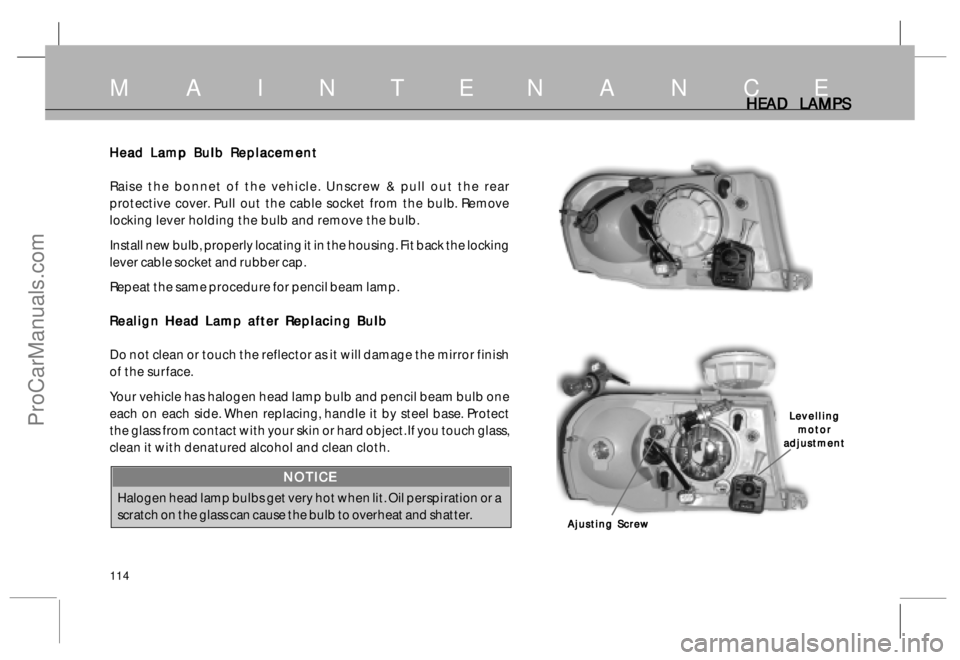
Raise the bonnet of the vehicle. Unscrew & pull out the rear
protective cover. Pull out the cable socket from the bulb. Remove
locking lever holding the bulb and remove the bulb.
Install new bulb, properly locating it in the housing. Fit back the locking
lever cable socket and rubber cap.
Repeat the same procedure for pencil beam lamp.
Realign Head Lamp after Replacing Bulb Realign Head Lamp after Replacing BulbRealign Head Lamp after Replacing Bulb Realign Head Lamp after Replacing Bulb
Realign Head Lamp after Replacing Bulb
Do not clean or touch the reflector as it will damage the mirror finish
of the surface.
Your vehicle has halogen head lamp bulb and pencil beam bulb one
each on each side. When replacing, handle it by steel base. Protect
the glass from contact with your skin or hard object. If you touch glass,
clean it with denatured alcohol and clean cloth.
NOTICE NOTICENOTICE NOTICE
NOTICE
Halogen head lamp bulbs get very hot when lit. Oil perspiration or a
scratch on the glass can cause the bulb to overheat and shatter.
HEAD L HEAD LHEAD L HEAD L
HEAD L
AMPS AMPSAMPS AMPS
AMPSM A I N T E N A N C E
Ajusting Screw Ajusting ScrewAjusting Screw Ajusting Screw
Ajusting ScrewLevelling LevellingLevelling Levelling
Levelling
motor motormotor motor
motor
adjustment adjustmentadjustment adjustment
adjustment
ProCarManuals.com
Page 116 of 161

116
POWER STEERING POWER STEERINGPOWER STEERING POWER STEERING
POWER STEERING
Procedure for Oil Filling and Bleeding of Power Procedure for Oil Filling and Bleeding of PowerProcedure for Oil Filling and Bleeding of Power Procedure for Oil Filling and Bleeding of Power
Procedure for Oil Filling and Bleeding of Power
Steering SteeringSteering Steering
Steering (Ensure that Power Steering fluid reservoir is totally
clean before starting the work)
1 . Fill the reservoir nearly full. Crank the engine for 10
seconds without allowing it to start (if possible). If engine
does start, shut the engine immediately. Check & refill
the reservoir repeat atleast three times, each time
checking & refilling the reservoir.
2 . Check for leakage in the system and if noticed take
corrective action.
3 . Start the engine and steer the vehicle from full left to full
right turns 3-4 times.
4 . Add fluid if necessary to maintain the level upto filter top.
NOTICE NOTICENOTICE NOTICE
NOTICE
Do not force the wheel against lock position either
extreme left or right. The power steering pump may get
damaged. Hold it lightly.
5 . When the engine is at steady speed, check for bubble
or foaming in the oil. If present it indicates that air is
getting sucked into the systems. Check the suction
line/fittings and correct if necessary.
6 . Once the system is bled properly and free from foaming
there should not be any appreciable change in oil level
in the reservoir, when the engine is started or stopped
repeatedly.
7 . Now the system is ready for driving.
Final oil level should be at ‘H’ mark on dip stick.
NOTICE NOTICENOTICE NOTICE
NOTICE
* Do not allow fluid level to drop significantly or run out
of the reservoir during the above operation. This may
induce air to the system.
* Do not start the engine without oil in the power steering
system. This will result in serious damage to the
pump. In case of emergency disconnect the pump belt
and then start the engine.
* Always use recommended oil from closed containers.
Any dirty oil poured in the system will result in damage
to pump and gear box.
M A I N T E N A N C E
ProCarManuals.com
Page 136 of 161
136
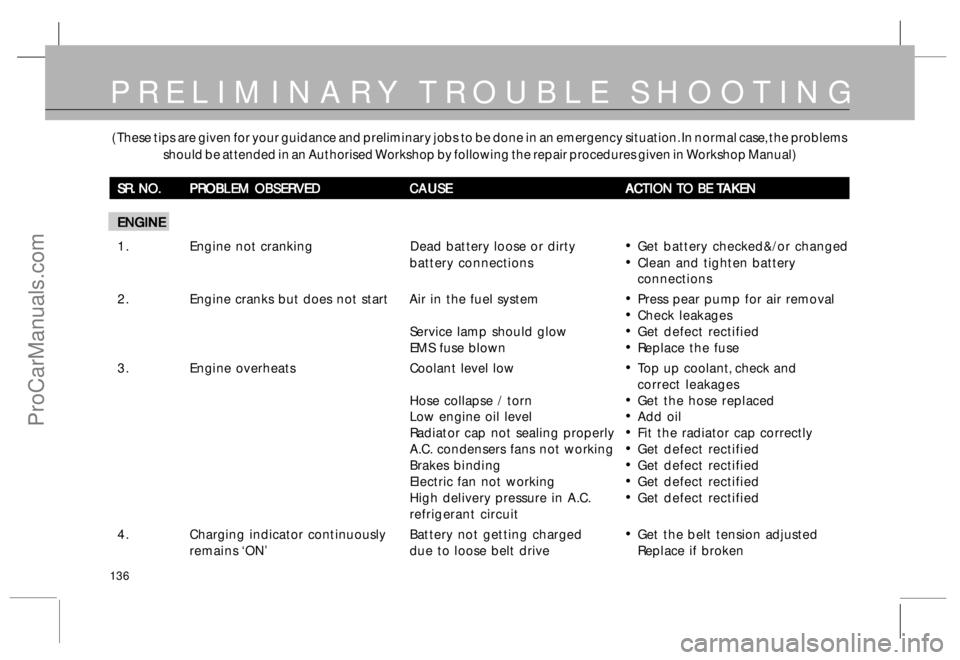
( These tips are given for your guidance and preliminary jobs to be done in an emergency situation. In normal case, the problems
should be attended in an Authorised Workshop by following the repair procedures given in Workshop Manual)
SR. NO. SR. NO.SR. NO. SR. NO.
SR. NO.
PROBLEM OBSERVED PROBLEM OBSERVEDPROBLEM OBSERVED PROBLEM OBSERVED
PROBLEM OBSERVED
CAUSE CAUSECAUSE CAUSE
CAUSE
A AA A
A
CTION CTION CTION CTION
CTION
T TT T
T
O BE O BE O BE O BE
O BE
T TT T
T
AKEN AKENAKEN AKEN
AKEN
ENGINE ENGINEENGINE ENGINE
ENGINE
1 . Engine not cranking Dead battery loose or dirty
•Get battery checked&/or changed
battery connections
•Clean and tighten battery
connections
2 . Engine cranks but does not start Air in the fuel system
•Press pear pump for air removal
•Check leakages
Service lamp should glow
•Get defect rectified
EMS fuse blown
•Replace the fuse
3. Engine overheatsCoolant level low
•Top up coolant, check and
correct leakages
Hose collapse / torn
•Get the hose replaced
Low engine oil level
•Add oil
Radiator cap not sealing properly
•Fit the radiator cap correctly
A.C. condensers fans not working
•Get defect rectified
Brakes binding
•Get defect rectified
Electric fan not working
•Get defect rectified
High delivery pressure in A.C.
•Get defect rectified
refrigerant circuit
4 . Charging indicator continuouslyBattery not getting charged
•Get the belt tension adjusted
remains ‘ON’due to loose belt drive Replace if broken
PRELIMINARY TROUBLE SHOOTING
ProCarManuals.com
Page 155 of 161

155
A L P H A B E T I C A L I N D E X ALPHABETIC INDEX ALPHABETIC INDEX ALPHABETIC INDEX ALPHABETIC INDEX
ALPHABETIC INDEX
A AA A
A
Air Bags 2 2
Aggregate Numbers-Location 1 2
Air Conditioning52, 134
Air Filter & Filter Element 105
Analog Clock 66
Anti Lock Brake System 7 9
Ashtray 6 1
Audio Warning 2 1
Automatic Hub Lock 8 2
B BB B
B
Battery 118
Belt Tension 135
Bonnet Opening / Closing 7 0
Brake Fluid 115
Brakes 7 9
Branded Lubricants 9 5
C CC C
C
Catalytic Converter 132
Central Locking System 13
Child Lock 20
Cigarette Lighter 60
Clutch Fluid 115
Collapsible Steering column 2 1
Combi-Switch 33
Coolants 9 4
D DD D
D
Door Locks 20
Driving Controls 28
Driving in adverse conditions 85
Driving Safety 89
E
ECU 1 1 7
EGR System 132
Engine Compartment 104
Engine Coolant 73
Engine Cooling System 106
Engine oil 72
Engine Oil & Oil Filter 108
Environment Protection 8
F FF F
F
Flat tyre replacement 120
Follow Me Home Headlamp 64
Front & Rear Fog Lights 38
Front / Rear Axle Oil 112
Front Seat 56
Front Windshield / Door Glass Demister 5 4
Fuel 92
Fuel Economy 84
Fuel Gauge 50
Fuel level 72
Fuel Tank Flap Switch 38
Fuel Tank Flap 61
Fuses 130
G GG G
G
Gauges 4 7
Gear Box 78
Gear Box Oil 1 1 0
Gear Shift Lever 32
Glove Box 62
H HH H
H
Hazard Warning 39
Head Lamps & Headlamp Adjustment 113
Headlamp Leveling Switch 40
Headrest 57
Headrest adjustment 1 8
High mounted stop lamp 67
I II I
I
Ignition Switch 29
Immobiliser- Anti Theft Security System 31
Important Information 6,7
Indicators 43
Instrument Cluster 42
J JJ J
J
Jack & Tools 59
Jump Seats 59
ProCarManuals.com