2015 SUZUKI ALTO Headlight
[x] Cancel search: HeadlightPage 7 of 139

759K,76G,844-74E
2
WARRANTY POLICYMaruti Suzuki India Limited (hereinafter called “Maruti Suzuki”)\
,
warrants that each new Maruti Suzuki vehicle distributed in India
by Maruti Suzuki and sold by an authorised Maruti Suzuki dealer
will be free, under normal use and service, from any defects in
material and workmanship at the time of manufacture SUBJECT
TO THE FOLLOWING TERMS AND CONDITIONS:
(1) Qualification:To qualify for this warranty:
(a) The Maruti Suzuki vehicle must be delivered by Maruti Suzuki authorised dealer and set-up, serviced by Maruti
Suzuki authorised dealer/service station.
(b) The warranty registration card in respect of each vehicle must be completed by the dealer at the time of delivery
of the vehicle and dealer should retain the same.
(2) Term: The term of the warranty shall be twenty four (24) monthsor 40,000 kilometers (whichever occurs first) from the date
of delivery to the first owner.
(3) Maruti Suzuki Warranty Obligation: If any defect(s) should be found in a Maruti Suzuki vehiclewithin the term stipulated above, Maruti Suzuki only obligation
is to repair or replace at its sole discretion any part shown
to be defective, with a new part or the equivalent at no cost
to the owner for parts or labour, when Maruti Suzuki
acknowledges that such a defect is attributable to faulty material
or workmanship at the time of manufacture. The owner is
responsible for any repair or replacements which are not covered by this warranty.
(4) Limitation:
This warranty shall not apply to:
(a) normal maintenance service required other than the three free services, including without limitation, oil and fluid
changes, headlight aiming, fastener retightening, wheel
balancing, wheel alignment and tyre rotation, cleaning of
injectors, adjustments of carburettor, ignition timing, clutch
and valve clearance.
(b) the replacement of normal wear parts including without limitation, bulbs, battery, tyres and tubes, spark plugs, belts,
hoses, filters, wiper blades, brushes, contact points, fuses,
clutch disc, brake shoes, brake pads, cable and all rubber
parts (except oil seal and glass run).
(c) any vehicle which has been used for competition or racing.
(d) any repairs or replacement required as a result of accidents or collision.
(e) any defects caused by misuse, negligence, abnormal use or insufficient care.
(f) any vehicle which has been modified or altered, including without limitation, the installation of performance
accessories.
(g) any vehicle on which parts or accessories not approved by Maruti Suzuki have been used.
(h) any vehicle which has not been operated in accordance
with the operating instructions in the Maruti Suzuki Owner’s
Manual.
(i) any vehicle which has not received, during the warranty term, the service inspections prescribed in the Maruti
Suzuki Owner’s Manual.
(j) any vehicle which has been assembled, disassembled,
WARRANTY POLICY
2-1
Page 31 of 139

32
76G-74E
STEERING COLUMN CONTROLS4-3
76G-04-005B
With the headlights on, push the lever
forward to switch to the high beams (main
beams) or pull the lever toward you to
switch to the low beams. When the high
beams (main beams) are on, a light on the
instrument panel will come on. To flash the
high beams (main beams) pull the lever
slightly towards you and release it.
76G-04-006
ALTO K10 TYPE-2
76G-04-006A
76G-04-006B
ALTO K10 TYPE-1ALTO K10 TYPE-2
ALTO
This control lever is located on the outboard
side of the steering column. Operate the
lever as described below.
Lighting Operation
To turn the lights on or off, twist the knob
on the end of the lever. There are three
positions: in the “OFF” position all lights are
off; in the middle position the front parking
lights, tail-lights, registration plate light, and
instrument lights are on, but the headlights
are off; in the third position the headlights
come on in addition to the other lights.
Page 43 of 139

44
76G-74E
INSTRUMENT PANEL5-7
76G-05-013A76G-05-013B
SPEEDOMETER
The speedometer (1) indicates vehicle
speed in km/h.
76G-05-013
ALTO K10 TYPE-1
ALTO K10 TYPE-2
ALTO
Turn Signal Indicators
When you turn on the left or right turn
signals, the corresponding green arrow on
the instrument panel will flash along with the
respective turn signal lights. When you turn
on the hazard warning switch, both arrows
will flash along with all of the turn signal
lights.
Main Beam (High Beam) Indicator Light
This indicator comes on when headlight
main beams (high beams) are turned on.
76G-05-011
76G-05-012
Page 46 of 139

4776G-74E
INSTRUMENT PANEL
5-10
Vehicle load Switch PositionCondition
Driver only 0
Driver + 1 passenger 0 (in front seat)
Driver + 3 passenger 1 No cargo
Driver + 3 passenger 2 Cargo added
Driver + full cargo 3 Dummy 4
Level the headlight beam according to the
load condition of your vehicle by turning this
switch. The chart shows the appropriate
switch position for different vehicle-load
conditions.HEADLIGHT LEVELING SWITCH
76G-05-023
To open the glove box, pull the latch lever.
To close it, push the lid until it latches
securely.
Never drive with the glove box lid
open. It could cause injury if an
accident occurs.
ww ww
w WARNING
76G-05-022
GLOVE BOX
Page 81 of 139

82
76G-74E
Night time driving
1. Drive more slowly at night than in thedaytime, for the visual range is restricted
at night.
2. Don’t overtake other vehicles at night. Darkness bothers your sense of speed
and hinders your judgement on the
vehicle-to-vehicle distance.
3. Don’t use the high headlight beam unless its use is inevitable. Its dazzle
may blitz the driver of the oncoming
vehicle, thus causing an accident.
4. Always keep the window glasses clean. Don’t operate the windshield wiper when
the windshield glass is dry or the wiper
blade and glass may get damaged.8-5DRIVING TIPS AND SAFE DRIVING
MARGIN FOR SAFETY
It is important to allow yourself a margin for
safety during driving so that you can cope
with erroneous or unexpected driving of
other drivers. For that, observe the
following.
Drive at a safe speed.
Maintain a sufficient distance between
your vehicle and the vehicle ahead.
Don’t force yourself to overtake other vehicles.
Don’t make quick start, hard steering or sudden stops.
Allow an ample time in the driving
schedule.
Observe traffic rules and regulations.
CONCLUSION
A perfect driver does not exist. The
endeavour of every motorist should be to
strive for perfection. Safety consciousness
not only ensures your safety and the safety
of other road users, it also helps reduce the
wear and tear on your vehicle, prolongs its
life, gives more mileage and ensures a
comfortable driving experience.
Follow the do’s and don’ts listed, and
driving will never be the same again.
76G-08-007 76G-08-008
76G-08-009
Page 111 of 139

112
76G-74E
INSPECTION AND MAINTENANCE9-29To avoid harm to yourself or damage
to your vehicle or battery, follow the
jump starting instructions in the
EMERGENCY SERVICE section of this
manual if it is necessary to jump start
your vehicle.
The level of the battery solution must be
kept between the “MAX” and the “MIN” level
lines at all times. If the level is found to be
below the “MIN” level line, add distilled
water to the “MAX” level line. You should
periodically check the battery, battery
terminals, and battery hold-down bracket for
corrosion. Remove corrosion using a stiff
brush and ammonia mixed with water, or
baking soda mixed with water. After
removing corrosion, rinse with clean water.
If your vehicle is not going to be driven for
a month or longer, disconnect the cable from
the negative terminal of the battery to help
prevent discharge.
ww ww
w WARNING
FUSES
1 . Main fuse
2 . Primary fuse (IG)
3 . Primary fuse (Not under ignition switch)
4 . Empty
5 . Empty
6 . Headlight (R)
7 . Headlight (L)
8 . Empty
9 . Radiator fan motor fuse
0 . Fuel injection system fuse
c . Air conditioner (If equipped)
76G-09-039
1. Main fuse
2 . Primary fuse (IG)
3 . Primary fuse (Not under ignition switch)
4 . Empty
5 . Empty
6 . Headlight (R)
7 . Headlight (L)
8 . Blower
9 . Radiator fan motor fuse
0 . Fuel injection system fuse
c . Air conditioner (If equipped)
76G-09-039
ALTO ALTO K10
Page 114 of 139

11576G-74E
INSPECTION AND MAINTENANCE
9-32
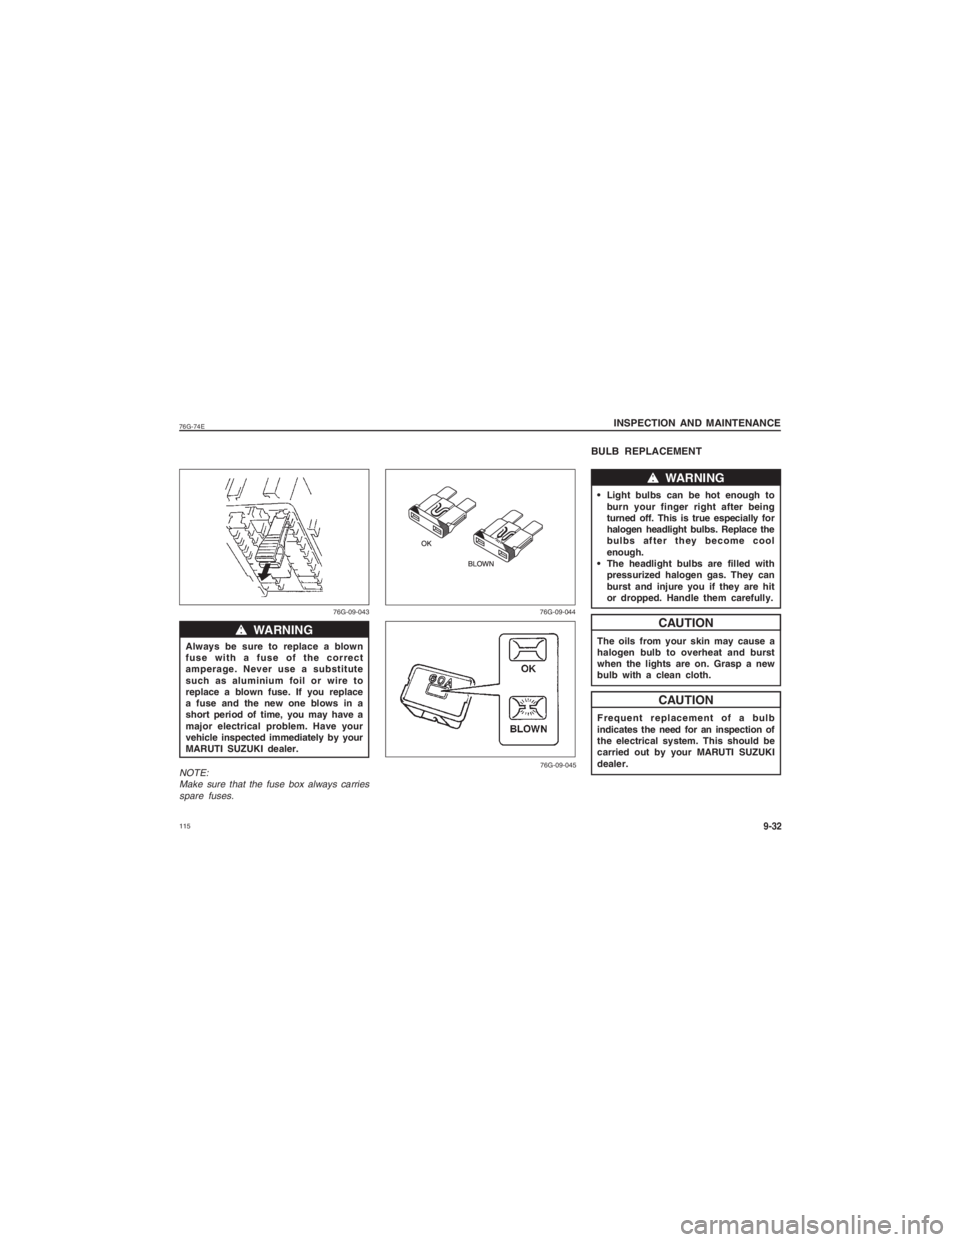
Always be sure to replace a blown
fuse with a fuse of the correct
amperage. Never use a substitute
such as aluminium foil or wire to
replace a blown fuse. If you replace
a fuse and the new one blows in a
short period of time, you may have a
major electrical problem. Have your
vehicle inspected immediately by your
MARUTI SUZUKI dealer.NOTE:Make sure that the fuse box always carriesspare fuses.
ww ww
w WARNING
76G-09-043
BULB REPLACEMENT Light bulbs can be hot enough to
burn your finger right after being
turned off. This is true especially for
halogen headlight bulbs. Replace the
bulbs after they become cool
enough.
The headlight bulbs are filled with pressurized halogen gas. They can
burst and injure you if they are hit
or dropped. Handle them carefully.
The oils from your skin may cause a
halogen bulb to overheat and burst
when the lights are on. Grasp a new
bulb with a clean cloth.
Frequent replacement of a bulb
indicates the need for an inspection of
the electrical system. This should be
carried out by your MARUTI SUZUKI
dealer.
CAUTIONCAUTIONww ww
w WARNING
76G-09-044
76G-09-045
Page 115 of 139

116
76G-74E
INSPECTION AND MAINTENANCE9-33Front Interior Light
Press the front part of the lens toward you
and pull down the lens. To install it, simply
push it back in.
The bulb can be removed by simply pulling
it out. When replacing the bulb, make sure
that the contact springs are holding the bulb
securely.
76G-09-046
Front Clearance/Turn Signal Light, Side
Turn Signal Light, rear Combination
Light, Registration Plate Light.
To remove a bulb holder from a light
housing, turn the holder counterclockwise
and pull it out. To install the holder, push
the holder in and turn it clockwise.
Two types (small oval and round) of bulb
are used for these lights. To remove and
install a small oval bulb, simply pull out or
push in the bulb.
76G-09-048
Headlights
Open the bonnet. Disconnect the coupler.
Remove the sealing rubber.
Push the retaining spring forward and
unhook it. Then remove the bulb. Install a
new bulb in the reverse order of removal.Note:Your vehicle is provided with two spareheadlight bulbs for replacement in
emegency.
76G-09-047