2015 SMART FORTWO COUPE park assist
[x] Cancel search: park assistPage 149 of 222

For safety reasons, smart recommends
that you only use snow chains that have
been approved by smart.
Information on this is available from any
smart center.
Please refer to the separate operating
instructions for detailed information on mounting the snow chains.
Snow chains should only be driven on
snow-covered roads at speeds not to
exceed 30 mph (50 km/h). Remove chains
as soon as possible when driving on roads
without snow.
Please observe the following guidelines
when using snow chains: R Using snow chains is not permissible
with all wheel/tire combinations
(Y page 216).
R Use snow chains in pairs and on rear
wheels only. Follow the manufacturer’s
mounting instructions.
R Use of snow chains may be prohibited
depending on location. Always check
local and state laws before mounting
snow chains. G
WARNING
When mounting or removing snow chains,
always park your vehicle on level ground,
engage the parking brake, and switch off
the drive system. The vehicle could other-
wise move and injure yourself or other road users. G
WARNING
When mounting and removing snow chains,
ensure that you and your vehicle are at a
safe distance from moving traffic. Not
doing so could endanger other road users or even lead to you being injured by the vehi-cles behind you. G
WARNING
The vehicle’s handling changes when driv-
ing with snow chains on any kind of road
surface. This means that you should always adapt your driving style to suit the current
road and weather conditions.
! If snow chains that do not meet require-
ments are mounted, they may scrape
against the body or axle components when the vehicle is in motion. This could
result in damage to the rim/tire or vehi-
cle. Driving instructions
Drinking and driving
G
WARNING
Do not drink alcohol or take drugs and drive or allow anyone to drive who has been
drinking alcohol or taking drugs. Even a
small amount of alcohol or drugs can affect
your reflexes, perceptions and judgment.
The possibility of a serious or even fatal
accident are greatly increased when you
drink or take drugs and drive. Pedals
G
WARNING
Make sure absolutely no objects are
obstructing the pedals’ range of motion.
Keep the driver’s footwell clear of all
obstacles. If there are any floormats* or
carpets in the footwell, make sure the ped- als still have sufficient clearance.
During sudden acceleration or braking
maneuvers, the objects could get caught
between or beneath the pedals and restrictyour ability to brake or accelerate. This
could lead to accidents and/or injury. Power assistance
G
WARNING
With the drive system inactive, there is no power assistance for the brake and steering
systems. In this case, it is important to Driving instructions
147>> Operation.
* optional Z
Page 150 of 222

keep in mind that a considerably higher
degree of effort is necessary to brake and
steer the vehicle. Adapt your driving
accordingly. Brakes
G
WARNING
Make sure not to endanger any other road
users when carrying out braking maneu-
vers.
Refer to the description of the hydraulic
brake assistant (Y page 47).
! Because the ESP ®
operates automati-
cally, the ignition must be switched off
when the parking brake is being tested
on a brake test dynamometer. Active
braking action through the ESP ®
may oth-
erwise seriously damage the brake sys-
tem which is not covered by the smart
Limited Warranty.
Brake pad wear or a leak in the brake system may be the reason for low brake fluid level
in the brake fluid reservoir.
The brake fluid level in the brake fluid
reservoir may be too low if the brake warn- ing lamp in the instrument cluster comes on
(Y page 23) although the parking brake is
released.
Have the brake system inspected immedi-
ately. Contact an authorized electric drive
smart center.
All checks and service work on the brake
system should be carried out by qualified
technicians only. Contact an authorized
electric drive smart center.
Only install brake pads and use brake fluid
recommended by smart. Inclines G
WARNING
Resting your foot on the brake pedal will
cause excessive and premature wear of the
brake pads.
It can also result in the brakes overheat-
ing, thereby significantly reducing their
effectiveness and your ability to stop the
vehicle in sufficient time to avoid an acci- dent.
Please observe the following guidelines to
avoid that the permitted maximum speed is
exceeded when driving on downhill grades:
R Do not move the gear selector lever to N.
R Recuperation is limited, if:
- the high-voltage battery is fully
charged or too cold
- the power electronics or the electric
motor is overheated.
When driving down long and steep grades, do not depress the brake pedal perma-
nently. Depress it in intervals instead to
reduce the vehicle speed.
High and low stresses After hard braking, it is advisable to drive
on for some time, rather than immediately
park, so that the air stream will cool down
the brakes faster.
If your brake system is normally only sub-
jected to moderate loads, you should occa- sionally test the effectiveness of the
brakes by applying above-normal braking
pressure at higher speeds. This will also
enhance the grip of the brake pads. G
WARNING
Make sure not to endanger any other road
users when carrying out these braking
maneuvers. 148
Driving instructions>> Operation.
Page 153 of 222
imately
1
/ 6 in (4 mm) on all four wheels for
the winter season to ensure normal bal-
anced handling characteristics. On packed
snow, they can reduce your stopping dis-
tance compared to summer tires.
Stopping distance, however, is still con-
siderably greater than when the road is not covered with snow or ice. Exercise appro-
priate caution.
! Avoid spinning of a drive wheel for an
extended period when driving off on
slippery road surfaces. Otherwise, the
drivetrain could be damaged, which is
not covered by the smart Limited War-
ranty. Tire speed rating
Regardless of the tire speed rating, local
speed limits should be obeyed. Use prudent
driving speeds appropriate to prevailing
conditions. G
WARNING
Even when permitted by law, never operate a
vehicle at speeds greater than the maximum speed rating of the tires.
Exceeding the maximum speed for which
tires are rated can lead to sudden tire fail-
ure, causing loss of vehicle control and
possibly resulting in an accident and/or
personal injury and possible death, for you and for others.
Make sure your tires have the required tire speed rating as specified for your vehicle
in the “Technical data section”
(Y page 216), for example when purchasing
new tires.
For information on how to identify the tire
speed rating on a tire’s sidewall, see “Tire size designation, load and speed rating”
(Y page 140).
If you are uncertain about the correct read-
ing of the information given on a tire’s sidewall, any authorized electric drive
smart center will be glad to assist you.
i For information on speed ratings for
winter tires, see “All-season and winter
tires” (Y page 141). Winter driving instructions
The most important rule for slippery or icy roads is to drive sensibly and to avoid
abrupt acceleration, braking and steering
maneuvers.
For information on driving with snow
chains*, see “Snow chains*” (Y page 146).
Road salts and chemicals can adversely
affect braking efficiency. Increased pedal force may become necessary to produce the
normal braking effect.
Depressing the brake pedal periodically
when traveling at length on salt-strewn
roads can bring road-salt-impaired brak- ing efficiency back to normal.
If the vehicle is parked after being driven
on salt-treated roads, the braking effi-
ciency should be tested as soon as possible after driving is resumed. G
WARNING
Make sure not to endanger any other road
users when carrying out these braking
maneuvers. G
WARNING
The outside temperature display is not
designed to serve as an ice-warning device and is therefore unsuitable for that pur-
pose. Indicated temperatures just above
the freezing point do not guarantee that the
road surface is free of ice.
For more information, see “Winter driving”
(Y page 146). Driving instructions
151>> Operation.
* optional Z
Page 169 of 222

Brake
Problem Possible causes/consequences and
M
MSolutions ò
(USA only)
! (Canada only)
The ABS indicator
lamp illuminates
while the drive system is running. There is a malfunction in the ABS system.
X Have the ABS system checked at an authorized electric drive
smart center immediately. ò
(USA only)
! (Canada only)
The ABS indicator
lamp illuminates
together with the
brake warning lamp
$ (USA only) or
J (Canada only)
while the drive system is running. The ABS system fails.
X Stop the vehicle immediately in a safe location.
X Do not continue to drive.
X Switch off the drive system.
X Engage the parking brake when leaving the vehicle.
X Contact Roadside Assistance or an authorized electric drive
smart center. G
WARNING
When the ABS system is malfunctioning, the wheels may lock during hard braking, reducing steering capability and extending the braking distance.
When the ABS is switched off due to a malfunction, the ESP ®
is also switched off. The basic
driving and braking functions are still available.
The risk of your vehicle skidding is then increased in certain situations. You should
therefore always adapt your speed and driving style to the prevailing road and weather
conditions. Problem Possible causes/consequences and
M MSolutions $
(USA only)
J (Canada only)
The brake warning
lamp illuminates
while the drive system is running. You are driving with the parking brake engaged.
X Release the parking brake. The brake circuit fails or the brake fluid level in the brake
fluid reservoir is too low.
X Stop the vehicle immediately in a safe location.
X Do not continue to drive.
X Switch off the drive system.
X Do not add brake fluid as this will not solve the problem.
X Engage the parking brake when leaving the vehicle.
X Contact Roadside Assistance or an authorized electric drive
smart center. What to do if ...
167>> Practical hints. Z
Page 173 of 222

Vehicle
Problem Possible causes/consequences and
M
MSolutions #
The red 12-V-
battery indica-
tor lamp illu-
minates while
driving or does
not go out after
the drive sys-
tem is started. The 12-V-battery is not being charged.
X
Stop the vehicle immediately in a safe location.
X Do not continue to drive.
X Switch off the drive system.
X Engage the parking brake when leaving the vehicle.
X Contact Roadside Assistance or an authorized electric drive
smart center. N
The yellow
high-voltage
battery warn-
ing lamp comes
on while driv-
ing. There may be a malfunction in the high-voltage system.
Contact an authorized electric drive smart center immediately
and have the high-voltage system checked. K
The high‑beam
headlamp indi-
cator lamp does
not illuminate
when the
high‑beam
headlamps are
switched on or
when using the
high‑beam
flasher. The high‑beam headlamp indicator lamp has failed.
X Have the high‑beam headlamp indicator lamp checked at an
authorized electric drive smart center. M
The low‑beam
headlamp indi-
cator lamp does
not illuminate
when the
low‑beam head-
lamps are
switched on. The low‑beam headlamp indicator lamp has failed.
X Have the low‑beam headlamp indicator lamp checked at an
authorized electric drive smart center. What to do if ...
171>> Practical hints. Z
Page 174 of 222
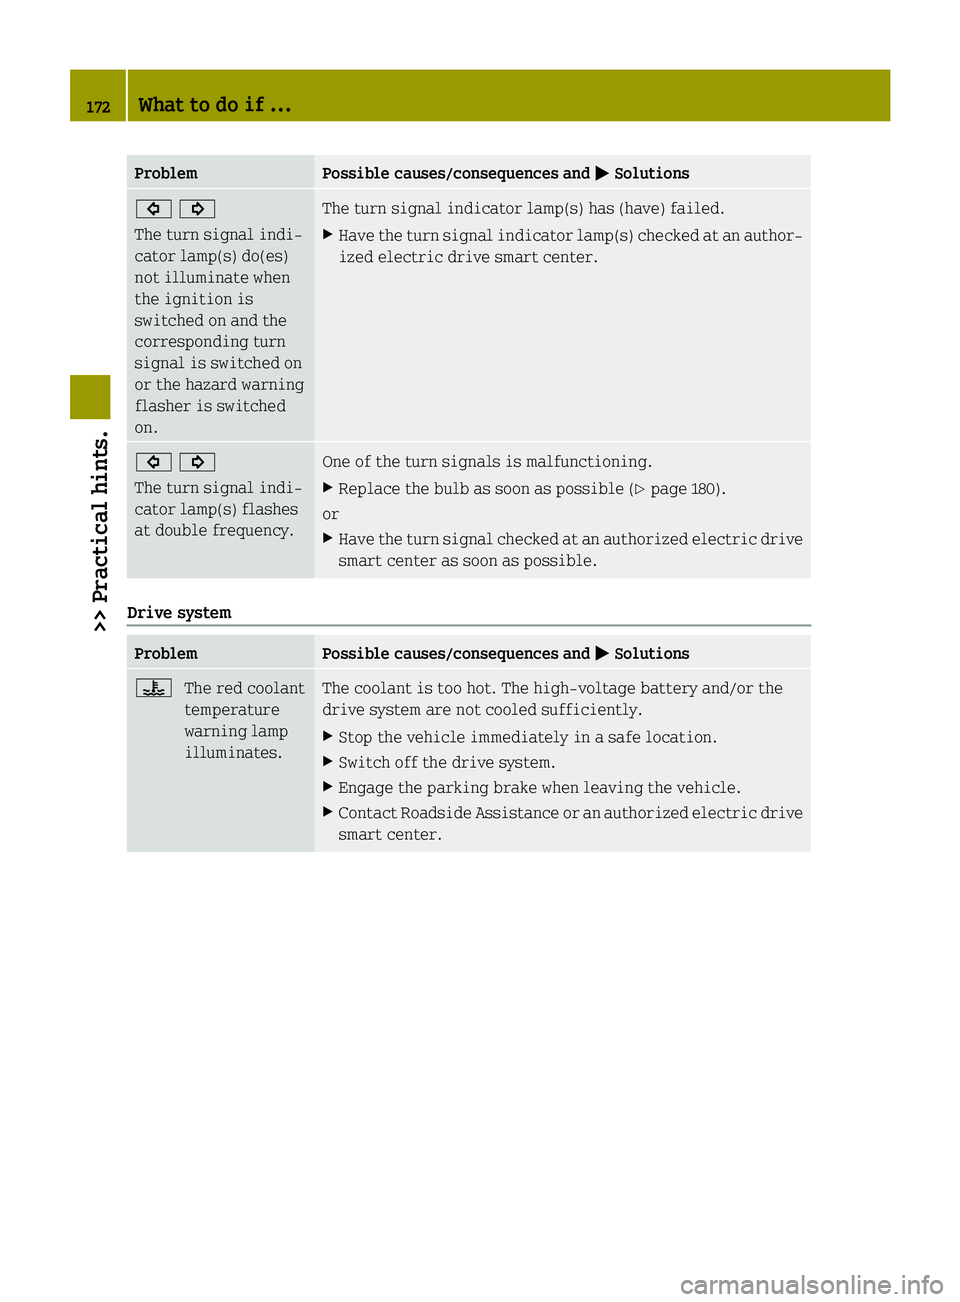
Problem Possible causes/consequences and
M
MSolutions #!
The turn signal indi-
cator lamp(s) do(es)
not illuminate when
the ignition is
switched on and the
corresponding turn
signal is switched on
or the hazard warning
flasher is switched
on. The turn signal indicator lamp(s) has (have) failed.
X Have the turn signal indicator lamp(s) checked at an author-
ized electric drive smart center. #!
The turn signal indi-
cator lamp(s) flashes
at double frequency. One of the turn signals is malfunctioning.
X Replace the bulb as soon as possible (Y page 180).
or
X Have the turn signal checked at an authorized electric drive
smart center as soon as possible. Drive system
Problem Possible causes/consequences and
M MSolutions ?
The red coolant
temperature
warning lamp
illuminates. The coolant is too hot. The high-voltage battery and/or the
drive system are not cooled sufficiently.
X Stop the vehicle immediately in a safe location.
X Switch off the drive system.
X Engage the parking brake when leaving the vehicle.
X Contact Roadside Assistance or an authorized electric drive
smart center. 172
What to do if ...>> Practical hints.
Page 175 of 222

Problem Possible causes/consequences and
M
MSolutions þ
The yellow
drive diagnos-
tics indicator
lamp comes on
while driving. There may be a malfunction in the drive system.
X Have the vehicle checked at an authorized electric drive
smart center immediately. þ
The red drive
diagnostics
warning lamp
comes on while
driving. There may be a malfunction in the drive system.
X Stop the vehicle immediately in a safe location.
X Do not continue to drive.
X Switch off the drive system.
X Engage the parking brake when leaving the vehicle.
X Contact Roadside Assistance or an authorized electric drive
smart center. Tire Pressure Monitoring System (TPMS)*
Problem Possible causes/consequences and
M MSolutions h
The yellow com-
bination low
tire pressure/
TPMS malfunc-
tion telltale
illuminates
continuously. The TPMS detects a loss of pressure in at least one tire.
X Carefully bring the vehicle to a halt, avoiding abrupt steer-
ing and braking maneuvers. Observe the traffic situation
around you.
X Check and correct tire inflation pressure as required
(Y page 129).
If the tire inflation pressure in the respective tire(s) has
(have) been corrected, the combination low tire pressure/TPMS
malfunction telltale goes out after a few minutes of driving.
See also “Restarting the TPMS” (Y page 132).h
The combina-
tion low tire
pressure/TPMS
malfunction
telltale flashes
60 seconds and
then stays illu-
minated. There is a malfunction in the TPMS.
X Have the TPMS checked at an authorized electric drive smart
center.
After the malfunction has been remedied the combination low
tire pressure/TPMS malfunction telltale goes out after a few
minutes of driving. G
WARNING
Each tire should be checked monthly when cold and inflated to the inflation pressure rec-
ommended by the vehicle manufacturer on the Tire and Loading Information placard. If your vehicle has tires of a different size than the size indicated on the Tire and Loading Infor- mation placard, you should determine the proper tire inflation pressure for those tires. What to do if ...
173>> Practical hints.
* optional Z
Page 193 of 222

X
Place the tire repair kit securely in the
vehicle.
X Drive off immediately.
The tire sealant will distribute itself
evenly inside the tire. G
WARNING
Do not exceed vehicle speed of 50 mph
(80 km/h). A tire sealant repair is not
designed to operate at higher speeds.
The sticker must be attached on the instru- ment cluster where it will be easily seen by
the driver.
Vehicle handling characteristics of a tire
sealant repaired tire may change. Adapt
your driving accordingly.
X After driving for about 1.8 miles (3 km) or
ten minutes, stop and exit the vehicle
taking all of the appropriate safety pre- cautions.
X Take the tire repair kit from the vehicle.
X Screw the end of filler hose ?onto tire
valve G.
X Check the tire inflation pressure using
pressure gauge ;. G
WARNING
If tire inflation pressure has fallen below
130 kPa (1.3 bar, 19 psi) do not continue to
drive the vehicle.
Park your vehicle safely away from the
roadway and contact the nearest authorized electric drive smart center or call Road-
side Assistance.
Have the damaged tire replaced.
X If the tire inflation pressure is at least
130 kPa (1.3 bar, 19 psi), inflate or deflate
the tire to correct tire inflation pres-
sure (see Tire and Loading Information
placard located on the driver’s door
B‑pillar). R
To increase the tire inflation pres-
sure: Switch on the electric air pump.
R To decrease the tire inflation pres-
sure: Open vent screw =. Recheck the
tire inflation pressure with the elec-
tric air pump’s pressure gauge.
X After checking the tire inflation pres-
sure, unscrew the end of filler hose ?
from tire valve G.
X Screw the valve cap onto the tire valve.
X Plug filler hose with the stopper.
X Place the tire repair kit securely in the
vehicle.
! The manufacturer is unable to guaran-
tee that all tire punctures can be
repaired with the tire repair kit, in par-
ticular cuts or perforations larger than
approximately 0.16 in (4 mm) or away from
the tire’s tread. The manufacturer is not liable for damage sustained through
improper use of the tire repair kit. G
WARNING
Follow recommended tire inflation pres-
sures.
Do not underinflate tires. Underinflated
tires wear excessively and/or unevenly,
adversely affect handling and energy con-
sumption of the vehicle, and are more
likely to fail from being overheated.
Do not overinflate tires. Overinflated
tires can adversely affect handling and
ride comfort, wear unevenly, increase
stopping distance, and result in sudden
deflation (blowout) because they are more
likely to become punctured or damaged by
road debris, potholes etc.
Do not overload the tires by exceeding the
specified load limit as indicated on the
Tire and Loading Information placard on
the driver’s door B‑pillar. Overloading the tires can overheat them, possibly causing a
blowout. Overloading the tires can also
result in handling or steering problems, or brake failure. Flat tire
191>> Practical hints. Z