2015 SKODA RAPID ad blue
[x] Cancel search: ad bluePage 33 of 84

Telephone
Introductory information
Introduction
This chapter contains information on the following subjects:
Telephone
30
Settings
30
Function problems
31
This chapter covers the operation of a Bluetooth ®
device connected to the tel-
ephone.
Depending on the Bluetooth ®
-profile used it is possible to connect to a tele-
phone or two phones simultaneously to the device.
If telephones are connected to the device with multiple SIM cards, then calls
can be accepted by all SIM cards of the connected telephones.
For outgoing calls, it depends on the type of connected telephone, either only
the primary SIM card or one of the other SIM cards can be selected.
The device allows you to work with text messages from the main telephone, if
supported by the telephone.
WARNINGThe national regulations for using a mobile phone in a vehicle must be ob-
served.
Telephone
Fig. 18
Telephone: Main menu
Read and observe on page 30 first.›
Press the key .
Main Menu - Information and function keys » Fig. 18
Name of the telephone service provider (with active roaming, the symbol
appears before the name
)
Function keys of preferred contacts
Choice of storage group for the preferred contact
Display the list of paired telephones (in the button the name of the main
tel. appears)
Change the main phone for the auxiliary telephone (the name of the auxili-
ary telephone appears in the button)
Enter the telephone number
Display the telephone contact list
Display a collection of text messages (SMS) (with new messages the num-
ber of messages appears next to the function key)
Display the call list (missed calls, in addition to the function key, the num-
ber of calls displayed in when absent)
Menu settings for the Telephone
Information in the status line Signal strength of the telephone service network
Charge status of the telephone battery
Missed call
Current call
Incoming SMS
Settings
Read and observe
on page 30 first.
›
Press the key
→
.
■ Hands-free phone - Switching a call to the telephone / back to the device
(the menu item is displayed during a call)
■ Select telephone - Search for available telephones/list of paired tele-
phones/select telephone
■ Find telephone - Search for available telephones
■ Bluetooth - Bluetooth ®
settings » page 16
ABC30Telephone
Page 34 of 84

■User profile - User profile settings
■ Manage favourites - Setting the function keys for your favourite contacts
■ Mailbox number: Enter here - Enter the telephone number of the mailbox
■ Prefix: - Enable / disable the option to assign the prefix to a phone number
(after turning this function on, in some menus the function key
for add-
ing a prefix to a phone number is displayed)
■ Enter here - Pre-selection for a telephone number (if the function Prefix: is
on)
■ Sort by: - Arrangement of telephone contact list
■ Surname - Sort by contact name
■ Forename - Sort by contact's first name
■ Import contacts - Import phone contacts
■ Delete other user profiles - Deletion of other user profiles
■ Select ring tone - Selecting the ring tone
■ Reminder: Remember your mobile - Turn on/off the warning mode before
forgetting the phone in the vehicle (if the phone was connected to the de-
vice)
■ Show pictures for contacts - Switch on/off the display of the image as-
signed to the contact
Function problems
Read and observe
on page 30 first.
If there are problems with the availability of the mobile network or with theBluetooth ®
function, one of the following messages may appear on the device
screen.
MessageMeaningNetw. search…The telephone searches for available
mobile networks.
No network
The telephone has no connection to a
mobile network, it may not support
sending information on the network
state.To use the Bluetooth function,
please switch the ignition on.Switch on the ignition.Please switch on Bluetooth.Switch on the Bluetooth ®
function on
the device.MessageMeaningTelephone not available.A problem with the Bluetooth ®
unit in
the device, consult a specialist.Telephone is currently not available.
Bluetooth update in progress...
Pair and connect
Introduction
This chapter contains information on the following subjects:
conditions for coupling
31
Telephone Search
32
Coupling - no telephone connected
32
Coupling - connected telephone
32
Coupling - two telephones connected
32
Coupling from the telephone
33
Pairing confirmation
33
Administering paired devices
33
To connect a telephone with the device, the two devices must be paired via
Bluetooth ®
.
The coupling procedure depends on the number of telephones already associ-
ated.
A connection with a telephone that is already paired does not require coupling.
It is enough to find the telephone that has been coupled in the list of coupled
phones and make the connection.
If a device is connected to the device using Apple CarPlay, then a connection
using Bluetooth ®
is possible.
Note
■ The range of the connection to the hands-free system is limited to the pas-
senger compartment.■
The maximum number of paired telephones is 20. Pairing a new telephone
after reaching the maximum number causes the telephone that has not been
paired for the longest time to be automatically replaced.
conditions for coupling
The telephone can be coupled with the device under the following conditions.
31Telephone
Page 35 of 84

The ignition is switched on.
The Bluetooth ®
function of the device » page 16 and the telephone is
switched on.
The visibility of the device » page 16 and the telephone is switched on.
The telephone is within range of the Bluetooth ®
signal of the device.
The telephone is compatible with the device.
There is no device connected to the device using Apple CarPlay.
The pairing can be initiated from the device or from the telephone.
During the coupling and connecting process the device can demand the confir-
mation by the Bluetooth ®
profile (e.g., enable contact import, enable the test
messaging or the connection of an audio player or similar). The telephone dis-
play should be monitored to acknowledge any possible request.
Please refer to the compatibility of telephones as well as updates which are available for the Bluetooth ®
device, and are available on the ŠKODA Internet
pages.
http://infotainment.skoda-auto.com
Telephone Search
The telephone is not in the list of paired devices
The telephone can be searched for in one of the following ways.
›
If there is no connected telephone to the device, then press the button →
Find telephone .
›
If there is no telephone connected to the device, then press the button →
→ Find telephone .
A search for available devices starts. After about 30 seconds a list of found de-
vices appears, which is updated up to 1 minute after the start of the search ap-
pears.
›
If you do not want to wait for the display of the list press the function key
Results .
›
Select the desired telephone.
The telephone is in the list of coupled devices
If a telephone is connected with the device then proceed in one of the follow- ing ways.
›
Press the key
→
and select the desired phone.
or
›
Press the key
→ Select telephone and select the desired telephone.
or›
Press the key
→
→ Bluetooth → Paired devices and select the tele-
phone and a Bluetooth ®
connection profile » page 33.
Coupling - no telephone connected
›
Press the key
→ Find telephone .
A search for available Bluetooth ®
devices takes place.
›
Select the desired telephone.
›
Confirm the coupling.
After pairing confirmation the telephone is connected to the device as the
main telephone.
Coupling - connected telephone
›
Press the key
→
→ Find telephone .
A search for available Bluetooth ®
devices takes place.
›
Select the desired telephone.
The following menu appears in the screen.
■ Cancel - Cancel the coupling
■ Replace - Coupling and replacement of the main telephone
■ Add - Coupling as an additional telephone
› Select the desired connection type.
› Confirm the coupling.
After pairing confirmation the telephone connects to the device.
Coupling - two telephones connected
›
Press the key
→
→ Find telephone .
A search for available Bluetooth ®
devices takes place.
›
Select the desired telephone.
The following menu appears in the screen.
32Telephone
Page 36 of 84

■Cancel - Cancel the coupling
■ Main tel. - Changing the main telephone
■ Addition. tel. - Changing the auxiliary telephone
› Select the desired connection type.
› Confirm the coupling.
After pairing confirmation the telephone connects to the device.
Coupling from the telephone
When coupling from the telephone, follow the instructions in the telephone
owner's manual.
›
Search available Bluetooth ®
devices in your telephone.
›
Select the Bluetooth ®
device unit.
The device is displayed in the telephone to be connected to as SKODA BT .....
... is replaced with the last four symbols of the vehicle identification number
(VIN) of your vehicle.
›
Confirm the pairing request.
›
Confirm the pairing » page 33, Pairing confirmation .
After coupling confirmation the telephone is connected to the device as fol-
lows.
No telephone connected - The telephone connects as main telephone .
Telephone connected - The telephone connects as an auxiliary telephone.
Two connected phones - The phone is paired and connected only as an audio
player (with free audio profile).
Note
You can change the name of the Bluetooth ®
device » page 16 .
Pairing confirmation
Depending on the type of telephone, the coupling confirmation takes place in
one of the following ways.
Confirmation with the pairing from the device
Version 1
› Confirm the 6-digit PIN code displayed on the device screen and the tele-
phone display within 30 seconds on both the device and the telephone.
Version 2
› Confirm the coupling request in the telephone.
› Enter the 4 digit PIN code shown on the unit display into the telephone with-
in 30 seconds 1)
.
Confirmation with the pairing from the telephone
Version 1
› Confirm the coupling request on the device.
› Confirm the 6-digit PIN code displayed on the device screen and the tele-
phone display within 30 seconds on both the device and the telephone.
Version 2 › Enter the 4 - 16 digit PIN code into the telephone.
› Confirm the coupling request on the device.
› Enter the same PIN code into the device that is in the telephone and con-
firm 1)
.
Version 3
› Confirm the coupling request on the device.
› The device generates a 4-digit PIN code.
› Enter into the telephone the PIN generated by the device and confirm 1)
.
Administering paired devices
Fig. 19
List of paired devices / Bluetooth ® profiles
1)
Entering and confirmation of the PIN code is not possible while driving.
33Telephone
Page 37 of 84

Display list of blocked coupled devices›Press in the menu Telephone the function key → Bluetooth → Paired de-
vices .
In the list displayed the following symbol of the Bluetooth ®
profile » Fig. 19 -
may appear with some devices.SymbolIcon col- ourOperation
greyA device that supports the connection via the hands-
free profile (HFP).greenA device that is connected via the handsfree profile
(HFP).
greyA device that supports the connection via the audio
profile.whiteA device that is connected via the audio profile.
Connection set-up
› Select the device you want from the list of paired devices.
› Select the desired profile from the list of available Bluetooth ®
profiles
» Fig. 19 -
.
The subsequent connection is affected by whether another device is connec- ted or not connected by means of the desired profile.
Disconnection
› Select the device you want from the list of paired devices.
› Select the desired profile from the list of available Bluetooth ®
profiles
» Fig. 19 -
.
› Press the function key
Disconnect .
Delete the coupled device
› Select the device you want from the list of paired devices.
- Delete all device
- Delete the desired device
› Confirm the deletion by pressing the function key
Delete.
Note
The audio Bluetooth ®
profile can be turned off/on by pressing the button →
→ Bluetooth → Bluetooth audio (A2DP/AVRCP) . Delete allTelephone functions
Introduction
This chapter contains information on the following subjects:
Enter a telephone number and dial
34
List of telephone contacts
35
Manage preferred contacts
36
Call list
36
Telephone conversation
37
Conference
37
Enter a telephone number and dial
Fig. 20
Numeric keypad / editing the telephone number
Enter a telephone number and dial
›
Press in the menu Telephone the function key
.
›
Enter the telephone number using the numeric keypad
» Fig. 20 -
.
›
Select the entered number by pressing the function key
, or select the en-
tered number with the prefix by pressing the function key .
Function keys of the numerical keyboard Input line
Enter the last dialled number / dial the telephone number entered
Enter the last dialled number / dial the telephone number entered with
the prefix
Dial the breakdown number in case of breakdown
Dial the info number (for information regarding the products and serv-
ices of the brand ŠKODA )
A34Telephone
Page 44 of 84
The change of the preferred connection type takes affect only after reconnect-
ing the external device.
Disconnection
The following procedure for the disconnection does not apply for MirrorLink ™
.
› Press the function key in the main menu SmartLink
.
› In the list of connected devices press the function key
Disconnect.
Settings
Read and observe
on page 40 first.
›
Press the key
→
→
.
■ Select device - Display a list of connected devices
■ Pref. connection type: - Select the preferred connection type (if different
connection types are supported by the device)
■ Android Auto - Connection using the Android Auto ™
function
■ MirrorLink™ - Connection using the MirrorLink ™
function
■ Activate data transfer for ŠKODA apps - Activation / deactivation of the data
transfer for the connected device for ŠKODA applications
■ MirrorLink™ - Setting the display MirrorLink ™
- connection
■ Screen orientation: - Screen display
■ Landscape - Width display
■ Portrait - Height display
■ Rotated 180 degrees - Image reversed by 180°
■ Infotainment system keyboard prioritised - Turn on / off the device key-
board
Android Auto ™
Introduction
This chapter contains information on the following subjects:
Home Page
41
Function problems
42
The Android Auto ™
connection can be set up under the following conditions.
The ignition is switched on.
The unit is switched on.
The device to be connected is switched on.
Some applications require that the data connection in the connected device is
turned on.
By establishing the Android Auto ™
connection all existing Bluetooth ®
connec-
tions are terminated to the device and a Bluetooth ®
connection using the
Android Auto ™
is established to the device.
A device connected using Android Auto ™
cannot be used as an audio source in
the menu Media.
If route guidance is active at this moment in the device, then this is terminated
by starting the route guidance in the Android Auto ™
application. This is also
true reciprocally.
A list of devices and applications that the Android Aut ™
connection supports
can be found on the Google website.
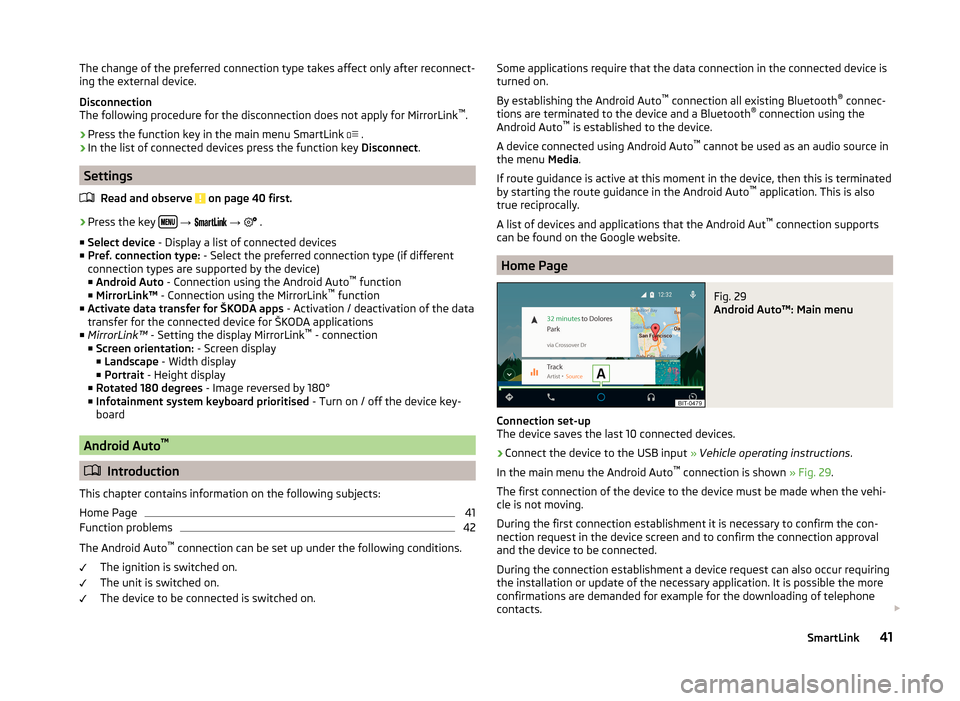
Home Page
Fig. 29
Android Auto™: Main menu
Connection set-up
The device saves the last 10 connected devices.
›
Connect the device to the USB input » Vehicle operating instructions .
In the main menu the Android Auto ™
connection is shown » Fig. 29.
The first connection of the device to the device must be made when the vehi- cle is not moving.
During the first connection establishment it is necessary to confirm the con-
nection request in the device screen and to confirm the connection approval
and the device to be connected.
During the connection establishment a device request can also occur requiring
the installation or update of the necessary application. It is possible the more
confirmations are demanded for example for the downloading of telephone
contacts.
41SmartLink
Page 45 of 84

Main menu - function keys and informationNavigation applications
Telephone applications
Overview regarding current applications, telephone calls, accepted text
messages, tasks in the working directory, weather or similar
Music applications
List of ŠKODA applications
If the application symbol appears next to the function key
, then by pressing
the application function key again a list of additional applications is shown.
Return to the main menu of the Android Auto ™
connection from another
device menu
› To return to the main menu of the Android Auto ™
connection (e.g. from the
menu Radio), press the key
→ Android Auto .
Start the application
› In the main menu of the Android Auto ™
connection select the desired appli-
cation in the field A
» Fig. 29 .
Disconnection
› Disconnect the device from the USB input.
or
› In the main menu of the Android Auto ™
connection press the function key
→
→
.Function problems
If problems occur with the Android Auto ™
connection, then one of the follow-
ing messages may occur in the display.MessageMeaning… Unable to connect to mobile device. … is already connected via Android Au-
to. ...The device allows only one active connection.Check the setting on the mobile device and the connection.Stop the vehicle, “unlock” the display of the connected device and follow the
instructions displayed on the connected device.Apple CarPlay
Introduction
This chapter contains information on the following subjects:
Home menu
43
Function problems
43
The Apple CarPlay connection can be set up under the following conditions. The ignition is switched on.
The unit is switched on.
The device to be connected is switched on.
The data connection is turned on in the device to be connected.
The Siri voice control is switched on in the device to be connected.
By establishing an Apple CarPlay connection all existing Bluetooth ®
connec-
tions to the device are terminated and a connection using Apple CarPlay to the
connected device is established. During the Apple CarPlay connection the use
of the menu Telephone is not possible.
A device connected with Apple CarPlay cannot be used as an audio source in
the menu Media.
If at this moment the route guidance is active by means of the menu Naviga-
tion , then the guidance by the device is terminated by the start of the route
guidance in the Apple CarPlay application. This is also true reciprocally.
42SmartLink
Page 47 of 84

MirrorLink
Introduction
This chapter contains information on the following subjects:
Home menu
44
Operation
45
Function problems
45
The MirrorLink ™
connection can be set up under the following conditions.
The ignition is switched on.
The unit is switched on.
The device to be connected is switched on.
Some applications require that the data connection in the connected device is turned on.
If you want to use the device menu Telephone, then before establishing the
MirrorLink ™
connection with the device then connect the device first via Blue-
tooth ®
.
A device connected using MirrorLink ™
cannot be used as an audio source in the
menu Media.
If route guidance is active at this moment in the device, then this is not termi-
nated by starting the route guidance in the MirrorLink ™
application.
The list of available applications and devices, which support the MirrorLink ™
function, can be seed in the ŠKODA Internet pages www.infotainment.skoda-
auto.com.
Home menu
Fig. 31
MirrorLink ™: Main menu
Connection set-up
The device saves the last 10 connected devices.›
Connect the device to the USB input » Vehicle operating instructions .
›
Press the key
→ MirrorLink™ .
In the main menu the MirrorLink ™
connection is shown » Fig. 31.
During the first connection set-up proceed as follows.
›
Connect the device to the USB input.
›
Press the key
→ MirrorLink™ .
›
Press the function key in the displayed main menu SmartLink
.
›
Select the desired device.
›
Confirm the message concerning the connection in the device screen.
In the main menu the MirrorLink ™
connection is shown » Fig. 31.
Main menu - function keys and information Disconnection and return to the main menu SmartLink
Displays a list of running applications with the ability to terminate them
Displays the screen contents of the connected device (while an application
is running)
Settings of the MirrorLink ™
function
List of certified applications
Other pages with applications (by running your finger sideways across the
screen or by turning the dial, the next page can be displayed )
Return to the main menu of the MirrorLink ™
connection from another device
menu
› To return to the main menu of the MirrorLink ™
connection (e.g. from the
menu Radio), press the key
→ MirrorLink™ .
Disconnection
› Disconnect the device from the USB input.
or
› In the main menu of the MirrorLink ™
connection press the function key .
The connection will be terminated and the main menu SmartLink is displayed
» Fig. 27 on page 40 -
.
AB44SmartLink