2015 Seat Leon SC radio
[x] Cancel search: radioPage 15 of 52
Radio
in the RADIO m ain menu and in the
list of
FM stations .
The FM s
tations send different contents un-
der one name (for example, Radio 3) in vari-
ous regional frequencies, provisionally or
permanently ››› Fig. 6.
When driving, the automatic station tracking
automatically changes to the frequency that
provides the best reception of the currently-
selected station. However, this can interrupt
the regional station currently tuned.
The automatic change of frequencies and au-
tomatic station tracking can be linked
through the FM setup ››› page 15.
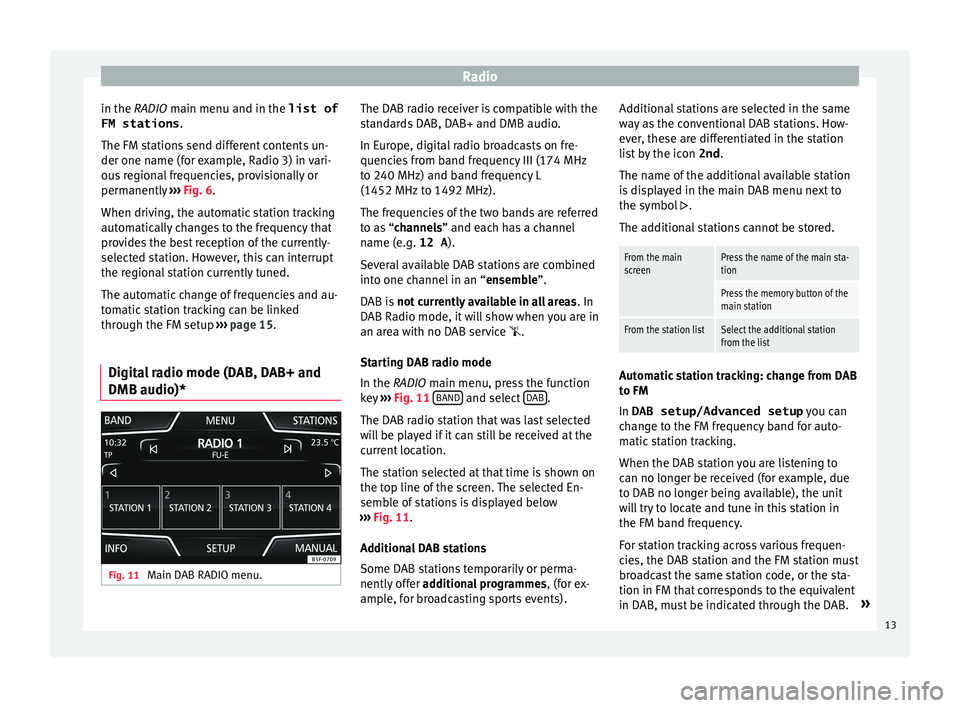
Digital radio mode (DAB, DAB+ and
DMB audio)* Fig. 11
Main DAB RADIO menu. The DAB radio receiver is compatible with the
s
t
and
ards DAB, DAB+ and DMB audio.
In Europe, digital radio broadcasts on fre-
quencies from band frequency III (174 MHz
to 240 MHz) and band frequency L
(1452 MHz to 1492 MHz).
The frequencies of the two bands are referred
to as “channels” and each has a channel
name (e.g. 12 A ).
Several available DAB stations are combined
into one channel in an “ensemble”.
DAB is not currently available in all areas . In
DAB Radio mode, it will show when you are in
an area with no DAB service .
Starting DAB radio mode
In the RADIO main menu, press the function
key ››› Fig. 11 BAND and select
D
AB .
The D AB r
a
dio station that was last selected
will be played if it can still be received at the
current location.
The station selected at that time is shown on
the top line of the screen. The selected En-
semble of stations is displayed below
››› Fig. 11.
Additional DAB stations
Some DAB stations temporarily or perma-
nently offer additional programmes , (for ex-
ample, for broadcasting sports events). Additional stations are selected in the same
way
as the conventional DAB stations. How-
ever, these are differentiated in the station
list by the icon 2nd.
The name of the additional available station
is displayed in the main DAB menu next to
the symbol .
The additional stations cannot be stored.
From the main
screenPress the name of the main sta-
tion
Press the memory button of the
main station
From the station listSelect the additional station
from the list Automatic station tracking: change from DAB
t
o FM
In DAB setup/Advanced setup y
ou c
an
change to the FM frequency band for auto-
matic station tracking.
When the DAB station you are listening to
can no longer be received (for example, due
to DAB no longer being available), the unit
will try to locate and tune in this station in
the FM band frequency.
For station tracking across various frequen-
cies, the DAB station and the FM station must
broadcast the same station code, or the sta-
tion in FM that corresponds to the equivalent
in DAB, must be indicated through the DAB. »
13
Page 16 of 52
Radio
Once the corresponding FM station has been
f ou
nd,
(FM) is displayed after the station
name. When reception for the corresponding
DAB station returns, the unit will switch back
to DAB mode after a short time. The (FM)
display is hidden.
If the reception of the selected DAB station is
too weak and the station can no longer be
found on the FM frequency band, the radio
will be muted. Note
The radio stations are responsible for the
cont ent
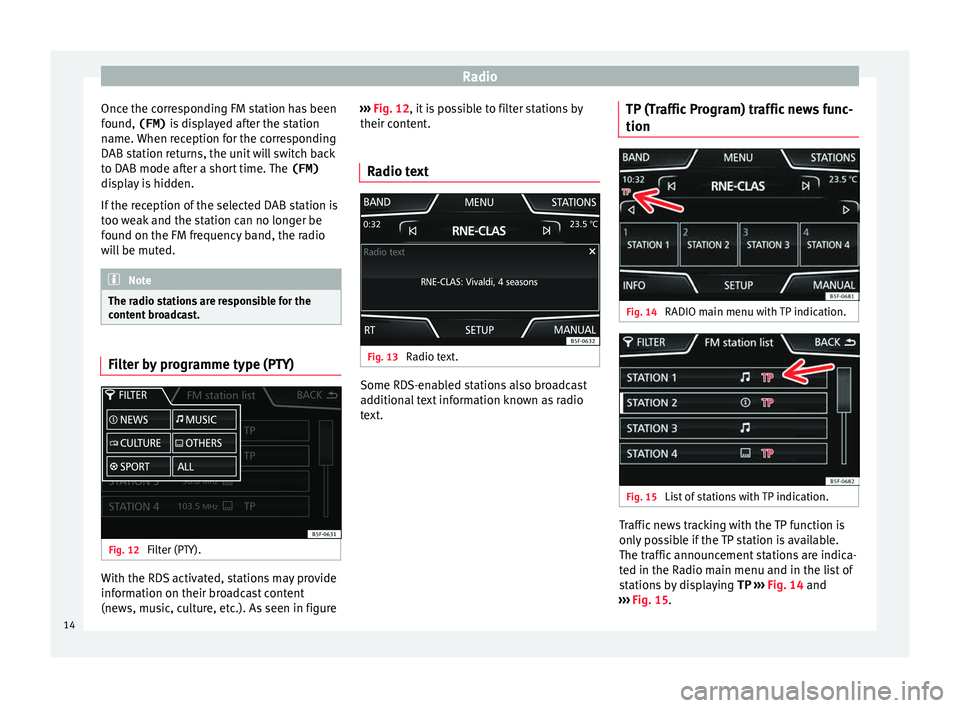
broadcast. Filter by programme type (PTY)
Fig. 12
Filter (PTY). With the RDS activated, stations may provide
inf
orm
ation on their br
oadcast content
(news, music, culture, etc.). As seen in figure ›››
Fig. 12, it is
possible to filter stations by
their content.
Radio text Fig. 13
Radio text. Some RDS-enabled stations also broadcast
a
d
dition
al text information known as radio
text. TP (Traffic Program) traffic news func-
tion Fig. 14
RADIO main menu with TP indication. Fig. 15
List of stations with TP indication. Traffic news tracking with the TP function is
on
ly
po
ssible if the TP station is available.
The traffic announcement stations are indica-
ted in the Radio main menu and in the list of
stations by displaying TP ››› Fig. 14 and
››› Fig. 15.
14
Page 17 of 52
Radio
Some stations that do not have their own
tr affic
new
s support the TP function by broad-
casting traffic announcements from other
stations (EON).
Switching the TP function on and off
● In the menu Setup (FM, AM and
DAB), pres
s the function button
Traffic Program (TP) to activate or de
activ
at
e
this function ››› page 15.
If the station you are listening to at that time
does not support the TP function,
will be
displayed halfway up the left of the screen.
Active TP function and station selection
While the traffic news tracking is operative, in
audio mode TP will be displayed half-way up
the screen on the left ››› Fig. 14. In this case,
the traffic announcements of the current sta-
tion or of the station that broadcasts the cor-
responding traffic information will be played.
In FM mode, the station tuned in must have
the TP function. If, after activating the TP
function, you manually select or use the stor-
ed station buttons to select a station that
does not support the TP function, it will not
check for traffic announcements (display:
).
When the traffic announcement station that
is tuned in stops being received, the symbol
wi
l
l also be displayed, and you must
search for a station manually.
During operation in AM or Media mode, a
traffic announcement station is always set
automatically in the background, provided
there is one that can be tuned in. Depending
on your location, this process can take some
time.
Incoming traffic alert In active Audio mode, an incoming traffic an-
nou
nc
ement
will play automatically.
During the traffic announcement, a pop-up
window is displayed and the radio changes,
depending on the case, to the traffic news
station (EON).
The media mode is paused and the volume is
adjusted to the preset level ››› page 41.
The volume of the traffic announcement can
be adjusted with the volume control. The ad-
justed volume setting will be applied to sub-
sequent announcements.
● Press the function button Cancel to end the
c urr
ent
traffic announcement. The TP function
remains activated.
● OR: Press the function button De
activate to
end the c urrent
traffic announcement and
permanently deactivate the TP function. This
can be reactivated in the setup menu. Setup (FM, AM, DAB) FM setup
● Select the frequency band FM by pr
essing
the infotainment button RADIO .
● Press the function button Setup to open the
menu FM setup .
Function button: function
SCAN: Scan function. When the scan function is active,
all available stations on the current frequency band are
played in sequence for approximately 5 seconds each
››› page 12.
Traffic news station (TP)*: The TP function (traffic news
station tracking) is active ››› page 14 a)
.
Seek mode: determines the setup of the buttons with ar-
rows and . This setting applies to all frequency
bands (FM, AM and DAB).
Preset list: All stored stations on the selected frequen-
cy band can be selected with the arrow buttons.
Station list: All available stations on the selected fre-
quency band can be selected with the arrow buttons.
Sort by*: to choose the mode in which the stations will
be arranged a)
.
Group: sort by station group.
Alphabet: sort by alphabetical order.
Delete presets: to delete all or some of the stored sta-
tions.
Advanced settings*:» 15
Page 18 of 52
RadioFunction button: function
Radio data system (RDS): radio data system (RDS) acti-
vated ››› page 12. With the checkbox deselected ,
the functions depending on the RDS system will not
be available. The function buttons depending on the
RDS system will remain inactive (in grey).
Alternative frequency (AF): the automatic station track-
ing is active. With the checkbox deselected the
function button RDS Regional remains inactive (grey). a)
Regional RDS: determines the setup for the regional au-
tomatic station tracking via the RDS ››› page 12 a)
.
Fixed: the unit only switches to alternative frequen-
cies for the selected station if the same regional
service is being broadcast.
Automatic: the unit always switches to the station's
frequency that currently offers the best reception. As
a result, regional programmes may be interrupted.
a) This depends on the country and unit in question.
AM setup
● Select the AM frequency b
and by pressing
the RADIO infotainment button.
● Press the function button Set
up to open the
menu AM setup .
Function button: function
SCAN: Scan function. When the scan function is active,
all available stations on the current frequency band are
played in sequence for approximately 5 seconds each
››› page 12.
Function button: function
Traffic news station (TP): the TP function (traffic news sta-
tion tracking) is active ››› page 14.
Seek mode: determines the setup of the buttons with ar-
rows and . This setting applies to all frequency
bands (FM, AM and DAB).
Preset list: all stored stations on the selected frequen-
cy band can be selected with the arrow buttons.
Station list: all available stations on the selected fre-
quency band can be selected with the arrow buttons.
Delete presets: to delete all or some of the stored sta-
tions. DAB setup
● Select the DAB
fr
equency band by pressing
the RADIO infotainment button.
● Press the function button Set
up to open the
menu DAB setup .
Function button: function
SCAN: Scan function. When the scan function is active,
all available stations on the current frequency band are
played in sequence for approximately 5 seconds each
››› page 12.
Seek mode: determines the setup of the buttons with ar-
rows and . This setting applies to all frequency
bands (FM, AM and DAB).
Preset list: all stored stations on the selected frequen-
cy band can be selected with the arrow buttons.
Function button: function
Station list: all available stations on the selected fre-
quency band can be selected with the arrow buttons.
VIEW: to select the type of view of the DAB station list.
Ensemble: hierarchical view of stations and ensembles
in alphabetical order.
Station list: overall view of stations in alphabetical or-
der.
Traffic news station (TP): the TP function (traffic news sta-
tion tracking) is active ››› page 14.
Delete presets: to delete all or some of the stored sta-
tions.
Advanced settings: DAB services setup.
DAB traffic announcements: DAB traffic announcements
are played in the same way as TP traffic announce-
ments in all operating modes.
Other DAB alerts: DAB announcements (news, sport,
weather, warnings etc.) will interrupt the current DAB
radio mode.
DAB-DAB station tracking: automatic station tracking
within the DAB frequency band has been activated.
DAB-FM Automatic switching: switching to FM frequency
band is allowed for automatic station tracking. 16
Page 21 of 52
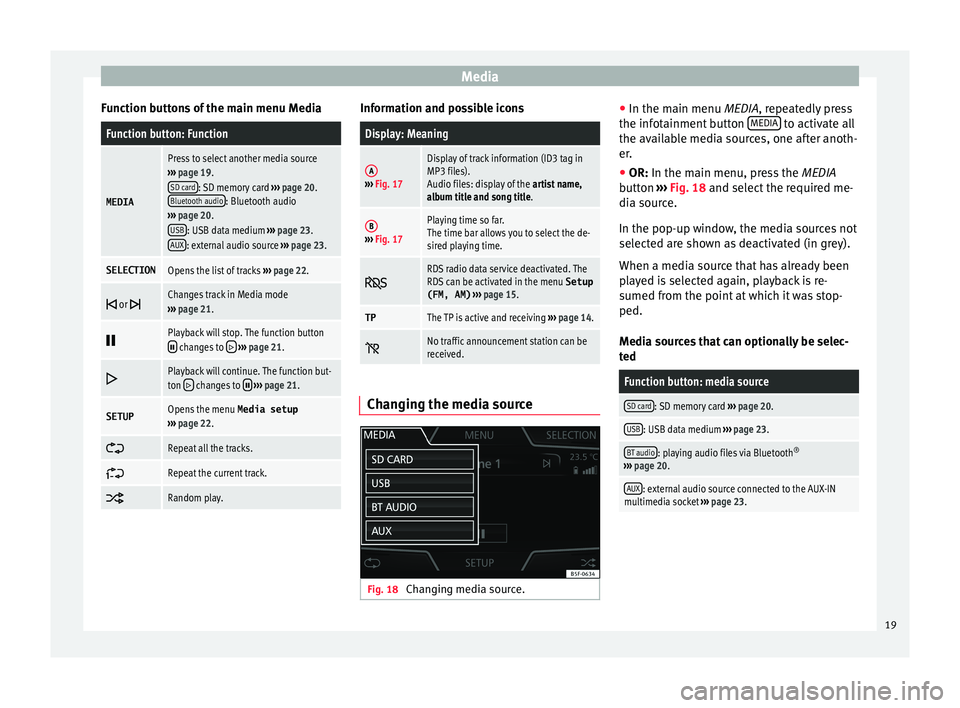
Media
Function buttons of the main menu MediaFunction button: Function
MEDIA
Press to select another media source
››› page 19.
SD card
: SD memory card ››› page 20.
Bluetooth audio: Bluetooth audio
››› page 20.
USB
: USB data medium ››› page 23.
AUX: external audio source ››› page 23.
SELECTIONOpens the list of tracks ››› page 22.
or Changes track in Media mode
››› page 21.
Playback will stop. The function button changes to
››› page 21.
Playback will continue. The function but-
ton changes to
››› page 21.
SETUPOpens the menu Media setup
››› page 22.
Repeat all the tracks.
Repeat the current track.
Random play. Information and possible icons
Display: Meaning
A›››
Fig. 17
Display of track information (ID3 tag in
MP3 files).
Audio files: display of the artist name,
album title and song title.
B››› Fig. 17
Playing time so far.
The time bar allows you to select the de-
sired playing time.
RDS radio data service deactivated. The
RDS can be activated in the menu
Setup
(FM, AM) ››› page 15.
TPThe TP is active and receiving ››› page 14.
No traffic announcement station can be
received.
Changing the media source
Fig. 18
Changing media source. ●
In the m ain menu
MEDIA
, repeatedly press
the infotainment button MEDIA to activate all
the av ai
l
able media sources, one after anoth-
er.
● OR: In the main menu, pre
ss the MEDIA
button ››› Fig. 18 and select the required me-
dia source.
In the pop-up window, the media sources not
selected are shown as deactivated (in grey).
When a media source that has already been
played is selected again, playback is re-
sumed from the point at which it was stop-
ped.
Media sources that can optionally be selec-
ted
Function button: media source
SD card: SD memory card ››› page 20.
USB: USB data medium ››› page 23.
BT audio: playing audio files via Bluetooth ®
››› page 20.
AUX: external audio source connected to the AUX-IN
multimedia socket ››› page 23. 19
Page 24 of 52
Media
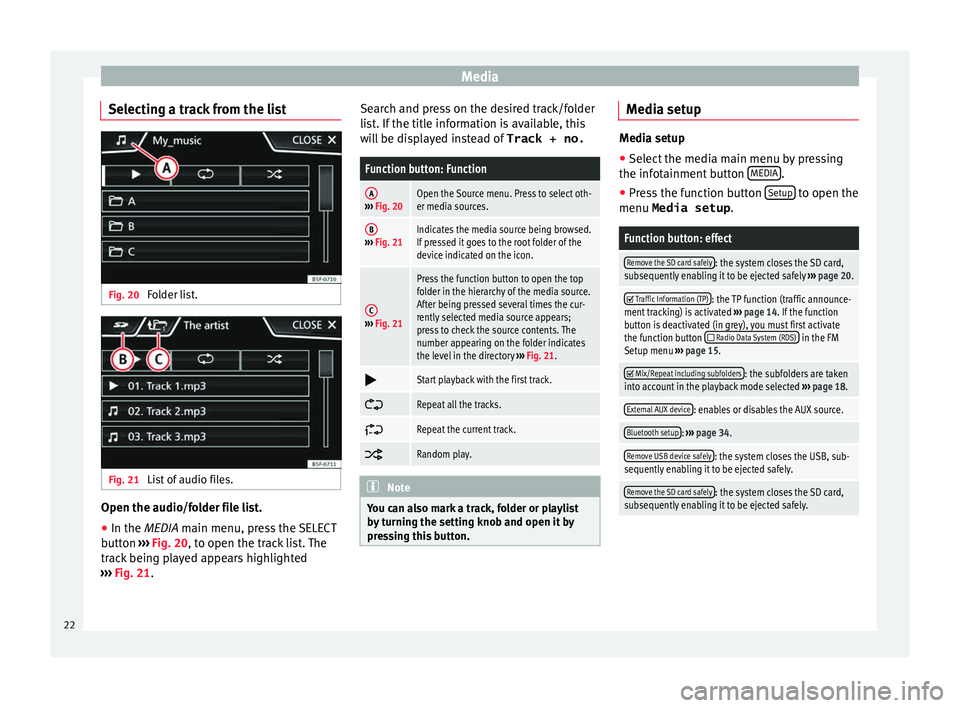
Selecting a track from the list Fig. 20
Folder list. Fig. 21
List of audio files. Open the audio/folder file list.
● In the MEDIA m ain menu, pr
e ss the SELECT
button ››› Fig. 20, to open the track list. The
track being played appears highlighted
››› Fig. 21. Search and press on the desired track/folder
list
. If the title information is available, this
will be displayed instead of Track + no.
Function button: Function
A››› Fig. 20Open the Source menu. Press to select oth-
er media sources.
B››› Fig. 21Indicates the media source being browsed.
If pressed it goes to the root folder of the
device indicated on the icon.
C››› Fig. 21
Press the function button to open the top
folder in the hierarchy of the media source.
After being pressed several times the cur-
rently selected media source appears;
press to check the source contents. The
number appearing on the folder indicates
the level in the directory ››› Fig. 21.
Start playback with the first track.
Repeat all the tracks.
Repeat the current track.
Random play.
Note
You can also mark a track, folder or playlist
by t
urning the setting knob and open it by
pressing this button. Media setup
Media setup
● Select the media main menu by pressing
the infot ainment
button MEDIA .
● Press the function button Setup to open the
menu Media setup .
Function button: effect
Remove the SD card safely: the system closes the SD card,
subsequently enabling it to be ejected safely ››› page 20.
Traffic Information (TP): the TP function (traffic announce-
ment tracking) is activated ››› page 14. If the function
button is deactivated (in grey), you must first activate
the function button
Radio Data System (RDS) in the FM
Setup menu ››› page 15.
Mix/Repeat including subfolders: the subfolders are taken
into account in the playback mode selected ››› page 18.
External AUX device: enables or disables the AUX source.
Bluetooth setup: ››› page 34.
Remove USB device safely: the system closes the USB, sub-
sequently enabling it to be ejected safely.
Remove the SD card safely: the system closes the SD card,
subsequently enabling it to be ejected safely. 22
Page 38 of 52

CAR menu
CAR menu Intr oduction t
o m
anaging the
CAR menu
CAR menu Fig. 31
View menu By pressing the
CAR infotainment button you
w i
l
l access its main menu with the following
options:
● VIEW
● MINIPLAYER, in the top right corner (Radio
or Media f
unction if the HDC* descent control
is not active).
● PREVIOUS-NEXT (to change screen)
● SETUP ›››
Booklet Instruction Manual,
chapter System setup (CAR) Press the
CAR Infotainment button and the
VIEW fu
nction b
utton to access the following
options, described below:
● CONSUMERS
● DRIVING DATA
● ECOTRAINER
● VEHICLE STATUS
● TYRES
Consumers Fig. 32
Consumers menu Press the button, Convenience consumers
(ECO) to ac
c
ess the information on the sta-
tus of the main convenience consumers of
the vehicle. It is shown via a consumption in-
dicator bar in l/h (gal/h). Note
The values that appear in the figure are indi-
cativ e and m
ay vary depending on the fea-
tures. Driving data
Fig. 33
Driving data menu The onboard computer is equipped with 3
memorie
s
th
at work automatically. In these
memories you can see the distance travelled,
average speed, time passed, average con-
sumption and autonomy of the vehicle.
Since start
Indicates and stores the values of the journey
completed and the consumption from when
the ignition is switched on to when it is
switched off.
36
Page 41 of 52

Setup
Setup
S y
s
tem setup Menu (SETUP)
Introduction Fig. 38
Main menu Activate the setup main menu (SETUP)
● Press the Infotainment button MENU to
open the System setup main menu.
● Pr e
ss the function button corresponding to
the setup y
ou wish to carry out.
System setup main menu (SETUP) ●
Press the Infotainment button Set
up , to
open the S
y
stem setup main menu.
● Press the function button corresponding to
the setup y
ou wish to carry out.
Function button: effect
Display switched off: with this function activated, if there is
no activity in the infotainment system after a period of
time has elapsed the screen will switch off. When you
touch the screen or press an infotainment button, the
screen will light up again ››› page 39.
Screen setup: change screen setup ››› page 39.
Sound setup: adjust volume and sound setup
››› page 41.
Idioma/Language: adjusting the language for text.
Additional keypad languages: to select the additional key-
pad languages.
Date and time: adjust time and date setup ››› page 40.
Units: adjust units of measurement ››› page 40.
Bluetooth setup*: adjust Bluetooth setup
Factory settings: ››› page 40.
System information: indication of the system information
(device number, hardware and software version).
Copyright: message with radio software licensing infor-
mation. Note
For all the infotainment systems to work
properly , it
is important to set the correct
time and date in the vehicle. Screen setup
Fig. 39
Display in Standby mode ●
Press the Infotainment button, Set
up to
open the System setup main menu.
● Pr e
ss the Screen function button. When you
c lo
se a menu, the c
hanges will take effect au-
tomatically.
Summary of the indications and function
buttons
Function button: effect
Brightness: select the brightness level of the screen.
Show clock in standby mode: in standby mode the current
time and date are shown on the display of the Infotain-
ment system ››› Fig. 39.
Acoustic touchscreen feedback: the feedback when you press
a function button on the screen is activated. 39