2015 Seat Altea XL key
[x] Cancel search: keyPage 83 of 236

Lights and visibility
correct use of lights in all situations. “Auto-
matic headlight control” is merely a system
to support the driver. Where necessary,
switch on the lights manually using the light
switch.
Fog lights with cornering function*
3 Applies to the model: ALTEA / ALTEA XL
When the t urn s
ignal is switched on to turn or
on very tight bends, the right or left fog light
automatically comes on to function as a cor-
nering light. The cornering light only oper-
at e
s if the dipped beam lights are on. WARNING
Read and observe the relevant warnings ››› in Adaptive headlights* (for driving round
bends) on page 80 Hazard warning lights
Fig. 63
Dash panel: switch for hazard warn-
ing lights. The hazard warning lights are used to draw
the attention of other road users to your vehi-
cle in emergencies.
If your vehicle breaks down:
1. Park your vehicle at a safe distance from
moving traffic.
2. Press the button to switch on the hazard warning lights ››› .
3. Switch the ignition off.
4. Apply the handbrake.
5. For a manual gearbox, engage 1st gear; for an automatic gearbox, move the gear
lever to P
.
6.
Use the warning triangle to draw the atten-
tion of other road users to your vehicle. 7. Always take the vehicle key with you when
you leave the vehicle.
Switch on the hazard warning lights to warn
other road users, for example:
● reaching the tail end of a traffic jam,
● there is an emergency
● your vehicle breaks down due to a techni-
cal fault,
● you are towing another vehicle or your vehi-
cle is being towed.
All turn signals flash simultaneously when
the hazard warning lights are switched on.
The two turn signal turn signal lamps
and the turn signal lamp in the switch will
flash at the same time. The hazard warning
lights also work when the ignition is switch-
ed off.
Emergency braking warning
If the vehicle brakes suddenly and continu-
ously at a speed of more than 80 km/h (50
mph), the brake light flashes several times
per second to warn the vehicles driving be-
hind. If you continue braking, the hazard
warning lights will come on automatically
when the vehicle comes to a standstill. They
switch off automatically when the vehicle
starts to move again. »
81
Technical specifications
Advice
Operation
Safety
Page 84 of 236

Operation
WARNING
● The risk of an accident increases if your ve-
hicle breaks down. Always use the hazard
warning lights and a warning triangle to draw
the attention of other road users to your sta-
tionary vehicle.
● Never park where the catalytic converter
could come into contact with inflammable
materials under the vehicle, for example dry
grass or spilt petrol. This could start a fire! Note
● The battery will run down if the hazard
warning lights are left on for a long time,
even if the ignition is switched off.
● The use of the hazard warning lights de-
scribed here is subject to the relevant statu-
tory requirements. Interior lights
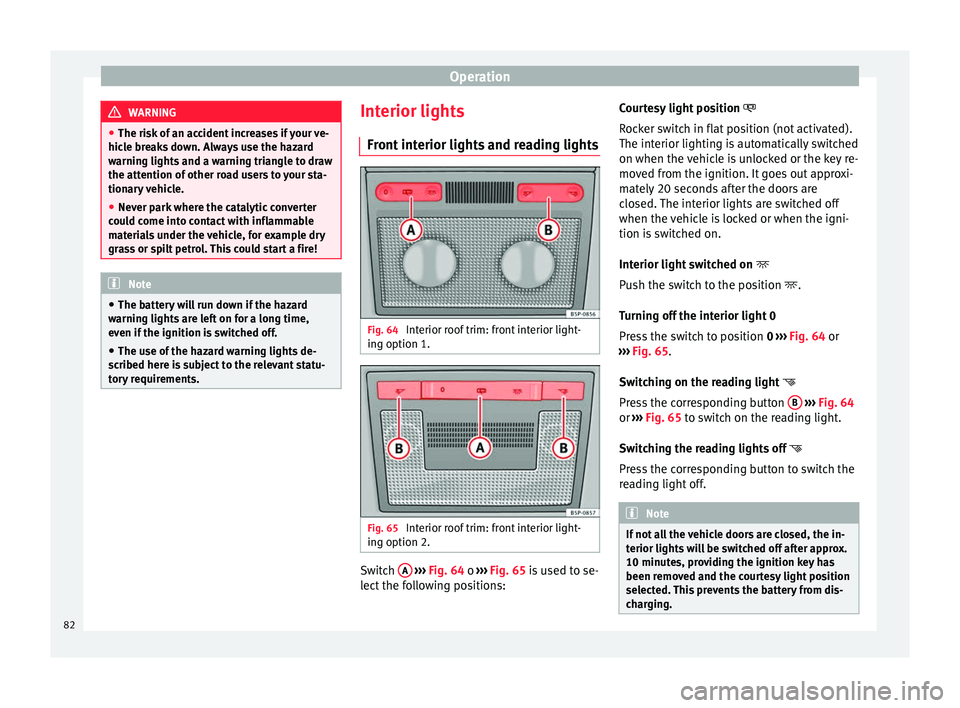
Front interior lights and reading lights Fig. 64
Interior roof trim: front interior light-
ing option 1. Fig. 65
Interior roof trim: front interior light-
ing option 2. Switch
A
››› Fig. 64 o
›
›› Fig. 65 is used to se-
lect the following positions: Courtesy light position
Rocker switch in flat position (not activated).
The interior lighting is automatically switched
on when the vehicle is unlocked or the key re-
moved from the ignition. It goes out approxi-
mately 20 seconds after the doors are
closed. The interior lights are switched off
when the vehicle is locked or when the igni-
tion is switched on.
Interior light switched on
Push the switch to the position
.
Turning off the interior light 0
Press the switch to position 0
››› Fig. 64 or
››› Fig. 65.
Swit
ching on the reading light
Press the corresponding button B
››› Fig. 64
or ››› Fig. 65 to switch on the reading light.
Sw it
ching the reading lights off
Press the corresponding button to switch the
reading light off. Note
If not all the vehicle doors are closed, the in-
terior lights will be switched off after approx.
10 minutes, providing the ignition key has
been removed and the courtesy light position
selected. This prevents the battery from dis-
charging. 82
Page 85 of 236

Lights and visibility
Rear interior lights and reading
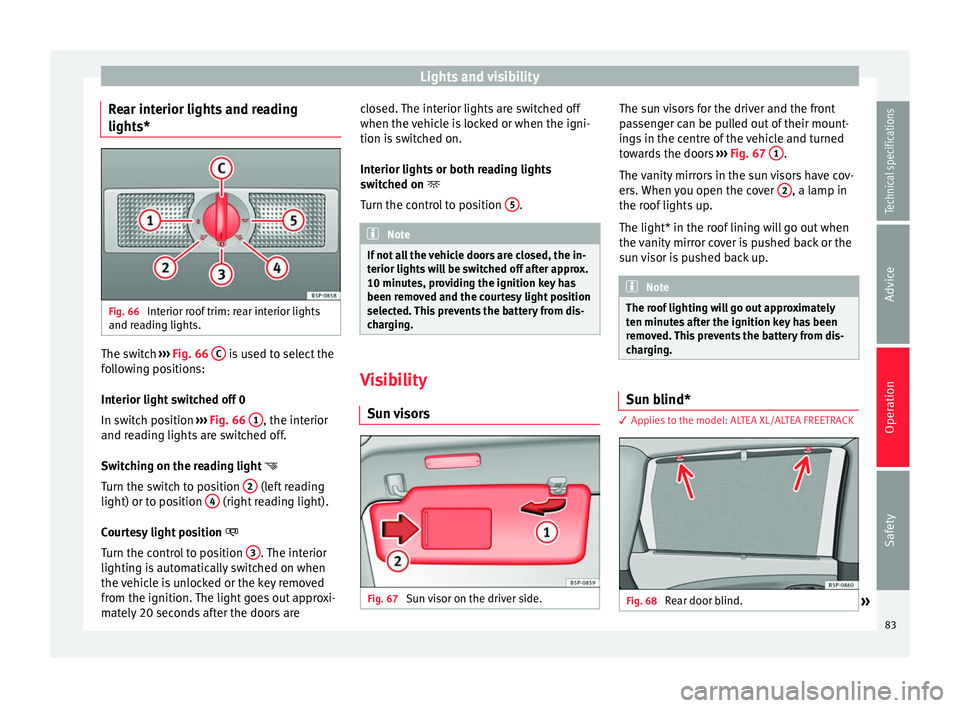
lights* Fig. 66
Interior roof trim: rear interior lights
and reading lights. The switch
››› Fig. 66 C is used to select the
following positions:
Interior light switched off 0
In switch position ››› Fig. 66 1 , the interior
and reading lights are switched off.
Switching on the reading light
Turn the switch to position 2 (left reading
light) or to position 4 (right reading light).
Courtesy light position
Turn the control to position 3 . The interior
lighting is automatically switched on when
the vehicle is unlocked or the key removed
from the ignition. The light goes out approxi-
mately 20 seconds after the doors are closed. The interior lights are switched off
when the vehicle is locked or when the igni-
tion is switched on.
Interior lights or both reading lights
switched on
T urn the c
ontrol to position 5 .
Note
If not all the vehicle doors are closed, the in-
terior lights will be switched off after approx.
10 minutes, providing the ignition key has
been removed and the courtesy light position
selected. This prevents the battery from dis-
charging. Visibility
Sun visors Fig. 67
Sun visor on the driver side. The sun visors for the driver and the front
passenger can be pulled out of their mount-
ings in the centre of the vehicle and turned
towards the doors
››› Fig. 67 1 .
The vanity mirrors in the sun visors have cov-
ers. When you open the cover 2 , a lamp in
the roof lights up.
The light* in the roof lining will go out when
the vanity mirror cover is pushed back or the
sun visor is pushed back up. Note
The roof lighting will go out approximately
ten minutes after the ignition key has been
removed. This prevents the battery from dis-
charging. Sun blind*
3 Applies to the model: ALTEA XL/ALTEA FREETRACK
Fig. 68
Rear door blind.
» 83
Technical specifications
Advice
Operation
Safety
Page 86 of 236

Operation
Rear window sun blind* – Pull out the visor and hook it onto the
hooks at the top of the door frame
››› Fig. 68 .
W ind
screen wiper and rear
window wiper systems
Windscreen wipers Fig. 69
Windscreen wiper lever. Fig. 70
Rain sensor on the windscreen seen
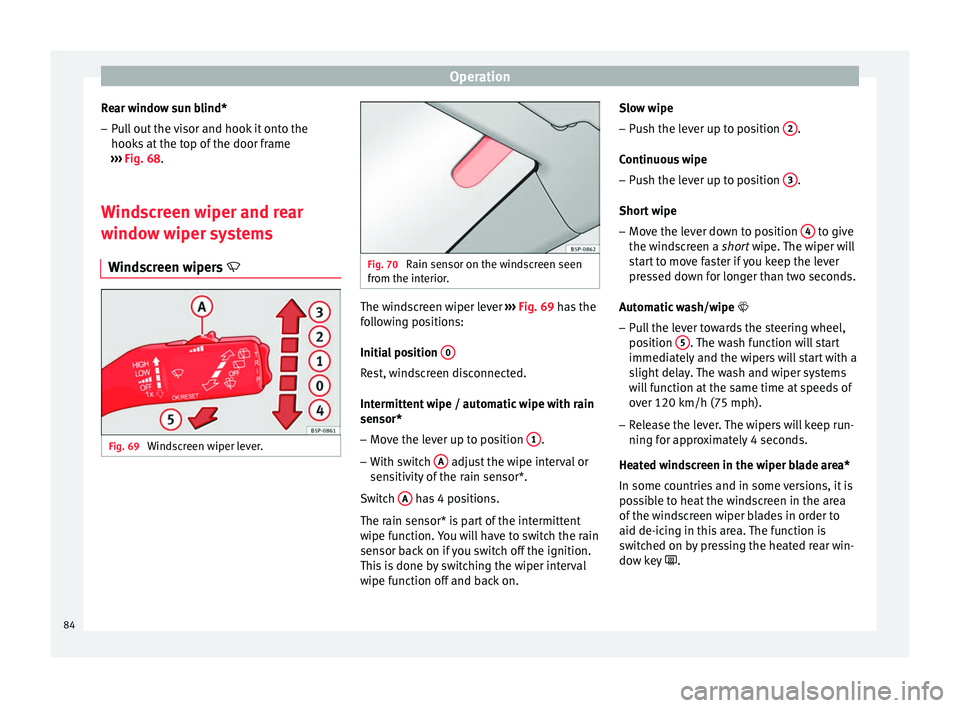
from the interior. The windscreen wiper lever
››› Fig. 69 has the
f o
llowing positions:
Initial position 0 Rest, windscreen disconnected.
Intermittent wipe / automatic wipe with rain
sensor*
– Move the lever up to position 1 .
– With switch A adjust the wipe interval or
sensitivity of the rain sensor*.
Switch A has 4 positions.
The rain sensor* is part of the intermittent
wipe function. You will have to switch the rain
sensor back on if you switch off the ignition.
This is done by switching the wiper interval
wipe function off and back on. Slow wipe
–
Push the lever up to position 2 .
Continuous wipe – Push the lever up to position 3 .
Short wipe – Move the lever down to position 4 to give
the windscreen a short wipe. The wiper will
s t
art to move faster if you keep the lever
pressed down for longer than two seconds.
Automatic wash/wipe
– Pull the lever towards the steering wheel,
position 5 . The wash function will start
immediately and the wipers will start with a
slight delay. The wash and wiper systems
will function at the same time at speeds of
over 120 km/h (75 mph).
– Release the lever. The wipers will keep run-
ning for approximately 4 seconds.
Heated windscreen in the wiper blade area*
In some countries and in some versions, it is
possible to heat the windscreen in the area
of the windscreen wiper blades in order to
aid de-icing in this area. The function is
switched on by pressing the heated rear win-
dow key .
84
Page 89 of 236

Lights and visibility
Switching off the anti-dazzle function
– Press button A
››› Fig. 72. Control lamp Bgoes off.
Switching on the anti-dazzle function
– Press button A
››› Fig. 72. The control
lamp lights up.
Anti-dazzle function
The anti-dazzle function is activated every
time the ignition is switched on. The green
warning lamp lights up in the rear vision mir-
ror housing.
When the anti-dazzle function is enabled, the
interior rear vision mirror will darken auto-
matically according to the amount of light it
r ec
eives. The anti-dazzle function is cancel-
led if reverse gear is engaged. Note
● The automatic anti-dazzle function will only
work properly if the sun blind* for the rear
window is retracted and there are no other
objects preventing light from reaching the in-
terior rear vision mirror.
● If you have to stick any type of sticker on
the windscreen, do not do so in front of the
sensors. Doing so could prevent the anti-daz-
zle function from working well or even from
working at all. Exterior mirrors
Fig. 73
Exterior mirror controls. The exterior mirrors can be adjusted using
the rotary knob in the centre console.
Basic setting of exterior mirrors
1. Turn knob
››› Fig. 73 to position L (left ex-
t erior mirr
or).
2. Turn the rotary knob to position the exteri- or mirror so that you have a good view to
the rear of the vehicle.
3. Turn the knob to position R (right exterior mirror
).
4. Swivel the rotary knob to position the ex- terior mirror so that you have a good view
to the rear of the vehicle ››› .
Heating the exterior mirrors* – Turn the knob forward ››› Fig. 73 so that the
he at
ed rear vision mirrors warm up and the heated windscreen* in the wiper blade rest
area is activated
››› page 84.
– Exterior mirror heating is not activated in
temperatures above approximately +20 °C
(+68 °F).
Folding in exterior mirrors*
– Turn the control ››› Fig. 73 to position to
fold in the exterior mirrors. You should al-
ways fold in the exterior mirrors if you are
driving through an automatic car wash.
This will help prevent damage.
Folding exterior mirrors with convenience
closing* – The exterior mirror will fold back automati-
cally with convenience closing (with the re-
mote or the key).
– To unfold it again, open the door and
switch on the ignition.
Folding exterior mirrors back out to the
extended position* – Turn the knob to another position to fold
the exterior mirrors back out ››› .
Synchronised mirror adjustment
1. Turn the control to the position L (
left ex-
t
erior mirror).
2. Turn the rotary knob to position the exteri- or mirror so that you have a good view to »
87
Technical specifications
Advice
Operation
Safety
Page 122 of 236

Operation
button while driving slowly and with low ac-
celeration. This procedure can be repeated
several times while driving carefully until all
the LPG left in the tank has been used up.
● Vehicles that display information or warn-
ing messages on the dash panel may show
information related to LPG operation.
● The notification LPG mode not possible may
be displayed. Journeys abroad
To drive abroad, the following must be taken
into consideration:
● For vehicles fitted with a catalytic converter
ensure that unleaded petrol is available for
the journey. See the chapter “Refuelling”. Au-
tomobile organisations will have information
about service station networks selling unlea-
ded fuel.
● In some countries, your vehicle model may
not be available, and therefore some spare
parts may not available or technical services
can only carry out limited repairs.
SEAT importers and distributors will gladly
provide information about the technical prep-
aration that your vehicle requires and also
about necessary maintenance and repair
possibilities. Adhesive strips for headlights
If you have to drive a right-hand drive vehicle
in a left-hand drive country, or vice versa, the
asymmetric dipped beam headlights will daz-
zle oncoming traffic.
To prevent dazzling, you must apply stickers
to certain parts of the headlight lenses. Fur-
ther information is available at any Technical
Service.
In vehicles with adaptive headlights, the ro-
tation system must previously be disconnec-
ted. To do this, please go to a specialised
workshop.
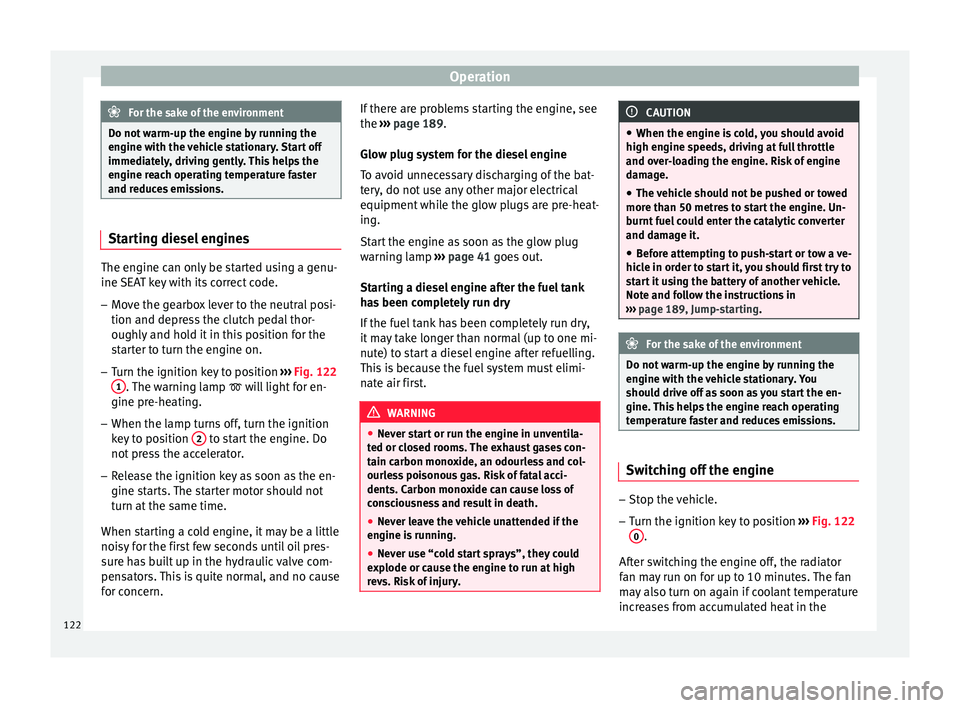
Ignition lock
Ignition key positions Fig. 122
Ignition key positions. Ignition switched off, steering lock
0 In this position
››› Fig. 122, the ignition and
the engine are OFF and the steering may be
locked.
For the Steering lock
to operate without the
ignition k
ey, turn the steering wheel until it
locks with an audible sound. You should al-
ways lock the steering wheel when you leave
your vehicle. This will help prevent vehicle
theft ››› .
Switching the ignition or the glow plug
system on 1 Turn the ignition key to this position and re-
lease it. If the key cannot be turned or it is
difficult to turn from position
0 to position
1 , move the steering wheel from one side to
the other to release it.
Starting 2 The engine is started when the key is in this
position. Electrical devices with high power
consumption are switched off temporarily at
the same time.
Each time that the vehicle is restarted, the ig-
nition key must be turned to position
0 . The
repetitive start prevention lock of the igni-
tion prevents possible damage to the starter
motor if the engine is already running.
120
Page 123 of 236

Driving
WARNING
● The ignition key must NOT be removed from
the lock until the vehicle comes to a stand-
still. Otherwise, the steering could be imme-
diately blocked- Risk of accident!
● Always remove the key from the ignition
when leaving the vehicle, even if only for a
short period. This is especially important if
children or disabled people are left alone in
the vehicle. They could accidentally start the
engine or work electrical equipment such as
the electric windows, resulting in an acci-
dent.
● Unsupervised use of the key could start the
engine or any electrical system, such as the
electric windows. This could result in serious
injury. CAUTION
The starter motor will only work when the en-
gine is stopped (ignition key position 2 ).
Electronic immobiliser
The electronic immobiliser prevents unau-
thorised persons from driving the vehicle.
Inside the key there is a chip that deactivates
the electronic immobiliser automatically
when the key is inserted into the ignition. The electronic immobiliser will be activated
again automatically as soon as you pull the
key out of the ignition lock.
The engine can only be started using a genu-
ine SEAT key with its correct code.
Note
A perfect operation of the vehicle is ensured
if genuine SEAT keys are used. Starting petrol engines
The engine can only be started using a genu-
ine SEAT key with its correct code.
– Move the gearbox lever to the neutral posi-
tion and depress the clutch pedal thor-
oughly and hold it in this position for the
starter to turn the engine on.
– Turn the ignition key to the starting posi-
tion ›››
page 120 .
– Let
go of the ignition key as soon as the en-
gine starts; the starter motor must not run
on with the engine.
After starting a very hot engine, you may
need to slightly press down the accelerator.
When starting a cold engine, it may be a little
noisy for the first few seconds until oil pres-
sure has built up in the hydraulic valve com-
pensators. This is quite normal, and no cause
for concern. If the engine does not start immediately,
switch the starter off after 10 seconds and try
again after half a minute. If the engine still
does not start, the fuel pump fuse should be
checked
››› page 196, Fuses. WARNING
● Never start or run the engine in unventila-
ted or closed rooms. The exhaust gases con-
tain carbon monoxide, an odourless and col-
ourless poisonous gas. Risk of fatal acci-
dents. Carbon monoxide can cause loss of
consciousness and result in death.
● Never leave the vehicle unattended if the
engine is running.
● Never use “cold start sprays”, they could
explode or cause the engine to run at high
revs. Risk of injury. CAUTION
● When the engine is cold, you should avoid
high engine speeds, driving at full throttle
and over-loading the engine. Risk of engine
damage.
● The vehicle should not be pushed or towed
more than 50 metres to start the engine. Un-
burnt fuel could enter the catalytic converter
and damage it.
● Before attempting to push-start or tow a ve-
hicle in order to start it, you should first try to
start it using the battery of another vehicle.
Note and follow the instructions in
››› page 189, Jump-starting.
» 121
Technical specifications
Advice
Operation
Safety
Page 124 of 236

Operation
For the sake of the environment
Do not warm-up the engine by running the
engine with the vehicle stationary. Start off
immediately, driving gently. This helps the
engine reach operating temperature faster
and reduces emissions. Starting diesel engines
The engine can only be started using a genu-
ine SEAT key with its correct code.
– Move the gearbox lever to the neutral posi-
tion and depress the clutch pedal thor-
oughly and hold it in this position for the
starter to turn the engine on.
– Turn the ignition key to position ›››
Fig. 122
1 . The warning lamp
will light for en-
gine pre-heating.
– When the lamp turns off, turn the ignition
key to position 2 to start the engine. Do
not press the accelerator.
– Release the ignition key as soon as the en-
gine starts. The starter motor should not
turn at the same time.
When starting a cold engine, it may be a little
noisy for the first few seconds until oil pres-
sure has built up in the hydraulic valve com-
pensators. This is quite normal, and no cause
for concern. If there are problems starting the engine, see
the
››› page 189 .
Glo w p
lug system for the diesel engine
To avoid unnecessary discharging of the bat-
tery, do not use any other major electrical
equipment while the glow plugs are pre-heat-
ing.
Start the engine as soon as the glow plug
warning lamp ››› page 41 goes out.
Starting a diesel engine after the fuel tank
has been completely run dry
If the fuel tank has been completely run dry,
it may take longer than normal (up to one mi-
nute) to start a diesel engine after refuelling.
This is because the fuel system must elimi-
nate air first. WARNING
● Never start or run the engine in unventila-
ted or closed rooms. The exhaust gases con-
tain carbon monoxide, an odourless and col-
ourless poisonous gas. Risk of fatal acci-
dents. Carbon monoxide can cause loss of
consciousness and result in death.
● Never leave the vehicle unattended if the
engine is running.
● Never use “cold start sprays”, they could
explode or cause the engine to run at high
revs. Risk of injury. CAUTION
● When the engine is cold, you should avoid
high engine speeds, driving at full throttle
and over-loading the engine. Risk of engine
damage.
● The vehicle should not be pushed or towed
more than 50 metres to start the engine. Un-
burnt fuel could enter the catalytic converter
and damage it.
● Before attempting to push-start or tow a ve-
hicle in order to start it, you should first try to
start it using the battery of another vehicle.
Note and follow the instructions in
››› page 189, Jump-starting. For the sake of the environment
Do not warm-up the engine by running the
engine with the vehicle stationary. You
should drive off as soon as you start the en-
gine. This helps the engine reach operating
temperature faster and reduces emissions. Switching off the engine
–
Stop the vehicle.
– Turn the ignition key to position ›››
Fig. 122
0 .
After switching the engine off, the radiator
fan may run on for up to 10 minutes. The fan
may also turn on again if coolant temperature
increases from accumulated heat in the
122