2015 RENAULT TRAFIC service
[x] Cancel search: servicePage 141 of 292

2.17
ENVIRONMENT
Emissions
Your vehicle has been designed to
emit fewer greenhouse gases (CO2)
while in use, and therefore to consume
less fuel (e.g. 170 g/km, equivalent to
6.4 l/100 km for a diesel vehicle).
Vehicles are also fitted with anti-pollu-
tion systems such as a catalytic con-
verter, an oxygen sensor, and more.
For certain diesel vehicles, this system
also has a particle filter to reduce the
volume of soot particles emitted.
Please make your own
contribution towards
protecting the environment
too
– Worn parts replaced in the course of routine vehicle maintenance (vehi-
cle battery, oil filter, air filter, batter-
ies, etc.) and oil containers (empty or
filled with used oil) must be disposed
of through specialist organisations. – At the end of the vehicle’s service
life, it should be sent to approved
centres to ensure that it is recycled.
– In all cases, comply with local legis- lation.
Recycling
Your vehicle is 85% recyclable and
95% recoverable.
To achieve these objectives, many of
the vehicle components have been de-
signed to enable them to be recycled.
The materials and structures have
been carefully designed to allow these
components to be easily removed and
reprocessed by specialist companies.
In order to preserve raw material re-
sources, this vehicle incorporates nu-
merous parts made from recycled plas-
tics or renewable materials (vegetable
or animal-derived materials such as
cotton or wool).
Your vehicle has been designed with
respect for the environment in mind for
its entire service life: during production,
use and at the end of its life.
This commitment is illustrated by the of
the manufacturer eco² signature.Manufacture
Your vehicle has been manufactured at
a factory which complies with a policy
to reduce the environmental impact
on the surrounding areas (reduction of
water and energy consumption, visual
and noise pollution, atmospheric emis-
sions and waste water; sorting and re-
using waste).
Page 210 of 292

4.6
ENGINE OIL LEVEL: topping up, filling (2/2)OIL CHANGE
Oil change
Service interval: refer to the
Maintenance Service Booklet for your
vehicle.
Oil change capacity
Please refer to the maintenance docu-
ment for your vehicle, or contact an au-
thorised dealer.
Always check the engine oil level using
the dipstick, as explained previously (it
should never fall below the minimum
level, or be over the maximum level on
the dipstick).
Engine oil grade
Refer to the Maintenance Service
Booklet for your vehicle.
Consult your approved dealer at
once if you notice an abnormal or
repeated drop in any of the fluid
levels.
1
2
Topping up/filling
The vehicle must be parked on level
ground and the engine should be cold
(for instance, before the engine is
started up for the first time in the day).– Unscrew cap
1;
– top up the level (as a guide, the ca- pacity between the minimum and
maximum reading on the dipstick 2
is between 1.5 and 2 litres, depend-
ing on the engine);
– wait for approximately 10 minutes to allow the oil to flow into the engine;
– check the level using the dipstick 2
(as described above).
Once the operation has been com-
pleted, ensure that the dipstick is
pushed in as far as it will go and that
the cap is completely screwed in.
In order to prevent splashback, it is
recommended that a funnel be used
when topping up/filling with oil.
Do not exceed the max level and
do not forget to refit cap 1 and dip-
stick 2.
Page 216 of 292

4.12
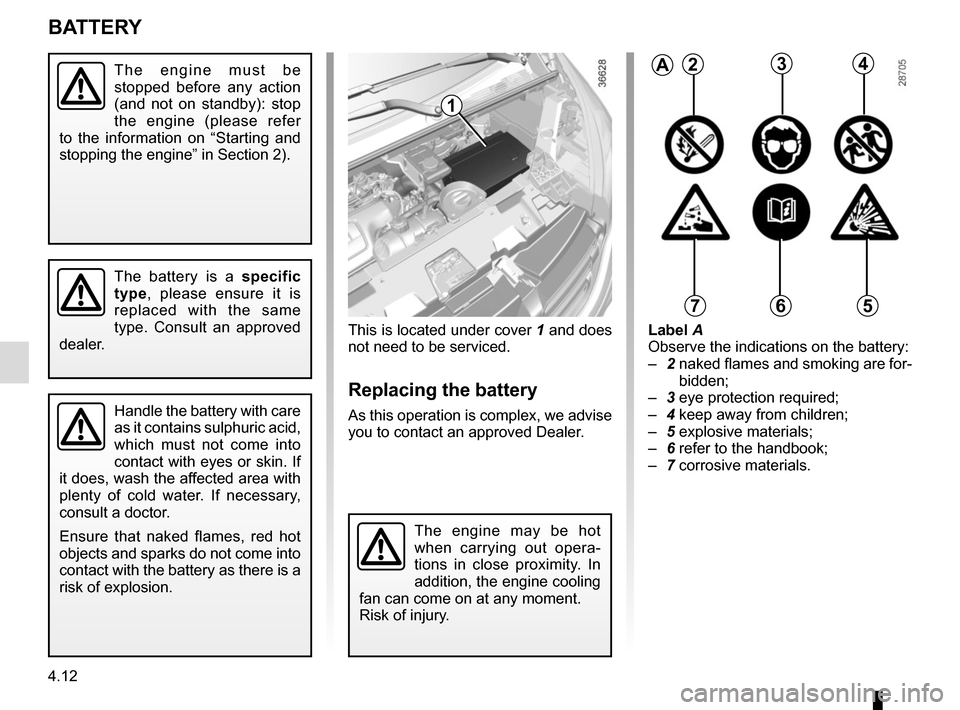
This is located under cover 1 and does
not need to be serviced.
Replacing the battery
As this operation is complex, we advise
you to contact an approved Dealer.
Label A
Observe the indications on the battery:
– 2 naked flames and smoking are for-
bidden;
– 3 eye protection required;
– 4 keep away from children;
– 5 explosive materials;
– 6 refer to the handbook;
– 7 corrosive materials.
BATTERY
1
2
Handle the battery with care
as it contains sulphuric acid,
which must not come into
contact with eyes or skin. If
it does, wash the affected area with
plenty of cold water. If necessary,
consult a doctor.
Ensure that naked flames, red hot
objects and sparks do not come into
contact with the battery as there is a
risk of explosion.
The battery is a specific
type, please ensure it is
replaced with the same
type. Consult an approved
dealer.
A234
567
The engine may be hot
when carrying out opera-
tions in close proximity. In
addition, the engine cooling
fan can come on at any moment.
Risk of injury.
The engine must be
stopped before any action
(and not on standby): stop
the engine (please refer
to the information on “Starting and
stopping the engine” in Section 2).
Page 224 of 292

5.4
TYRE PRESSURE KIT (1/3)
The kit is only approved for
inflating the tyres of the ve-
hicle originally equipped
with the kit.
It must never be used to inflate
the tyres of another vehicle, or any
other inflatable object (rubber ring,
rubber boat, etc.).
Avoid spillage on skin when hand-
ling the repair liquid bottle. If drop-
lets do leak out, rinse them off with
plenty of water.
Keep the repair kit away from chil-
dren.
Do not dispose of the empty bottle
in the countryside. Return it to your
approved dealer or to a recycling or-
ganisation.
The bottle has a limited service
life which is indicated on its label.
Check the expiry date.
Contact an approved dealer to re-
place the inflation tube and repair
product bottle.
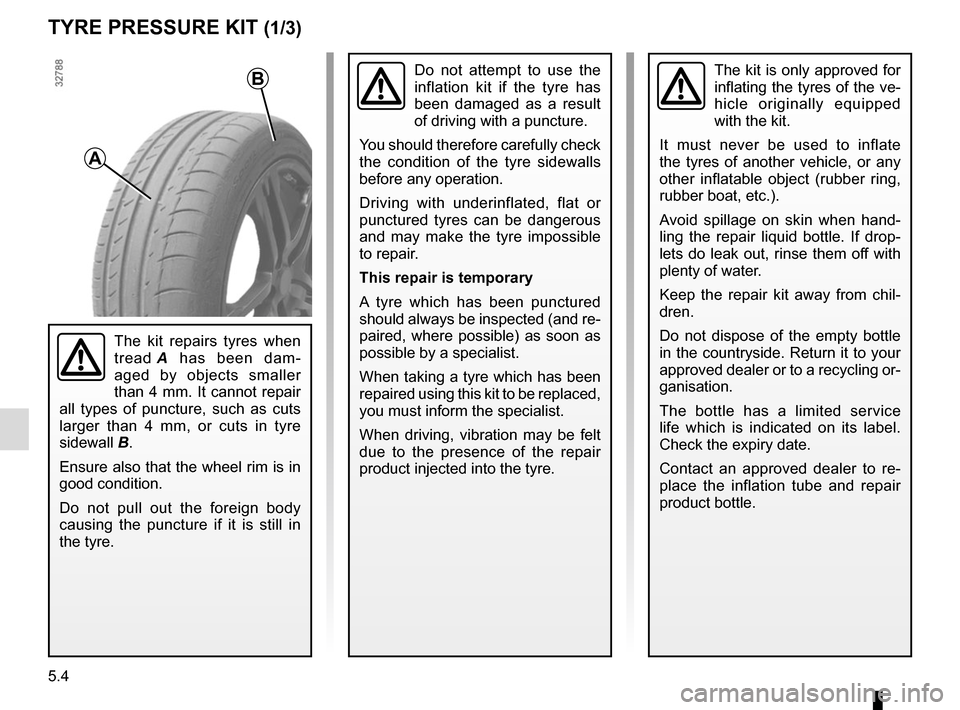
A
B
The kit repairs tyres when
tread A has been dam-
aged by objects smaller
than 4 mm. It cannot repair
all types of puncture, such as cuts
larger than 4 mm, or cuts in tyre
sidewall B.
Ensure also that the wheel rim is in
good condition.
Do not pull out the foreign body
causing the puncture if it is still in
the tyre.
Do not attempt to use the
inflation kit if the tyre has
been damaged as a result
of driving with a puncture.
You should therefore carefully check
the condition of the tyre sidewalls
before any operation.
Driving with underinflated, flat or
punctured tyres can be dangerous
and may make the tyre impossible
to repair.
This repair is temporary
A tyre which has been punctured
should always be inspected (and re-
paired, where possible) as soon as
possible by a specialist.
When taking a tyre which has been
repaired using this kit to be replaced,
you must inform the specialist.
When driving, vibration may be felt
due to the presence of the repair
product injected into the tyre.
Page 242 of 292

5.22
RADIO FREQUENCY REMOTE CONTROL: battery
Do not dispose of your used
batteries in the countryside.
Give them to an organisa-
tion that collects and recy-
cles used batteries.
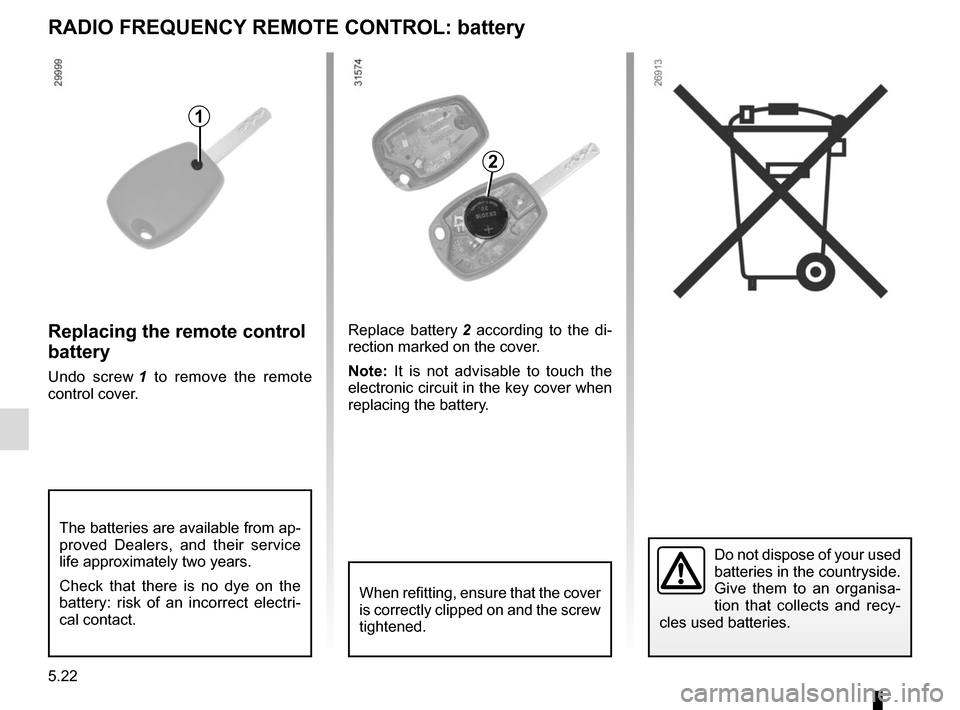
1
Replacing the remote control
battery
Undo screw 1 to remove the remote
control cover. Replace battery
2 according to the di-
rection marked on the cover.
Note: It is not advisable to touch the
electronic circuit in the key cover when
replacing the battery.
When refitting, ensure that the cover
is correctly clipped on and the screw
tightened.
The batteries are available from ap-
proved Dealers, and their service
life approximately two years.
Check that there is no dye on the
battery: risk of an incorrect electri-
cal contact.
2
Page 243 of 292

5.23
Operating faultsIf the battery is too weak to ensure cor-
rect operation, you may start (insert the
RENAULT card in the card reader) and
lock/unlock the vehicle (refer to the in-
formation on “Locking/unlocking the
doors” in Section 1).
RENAULT CARD: battery
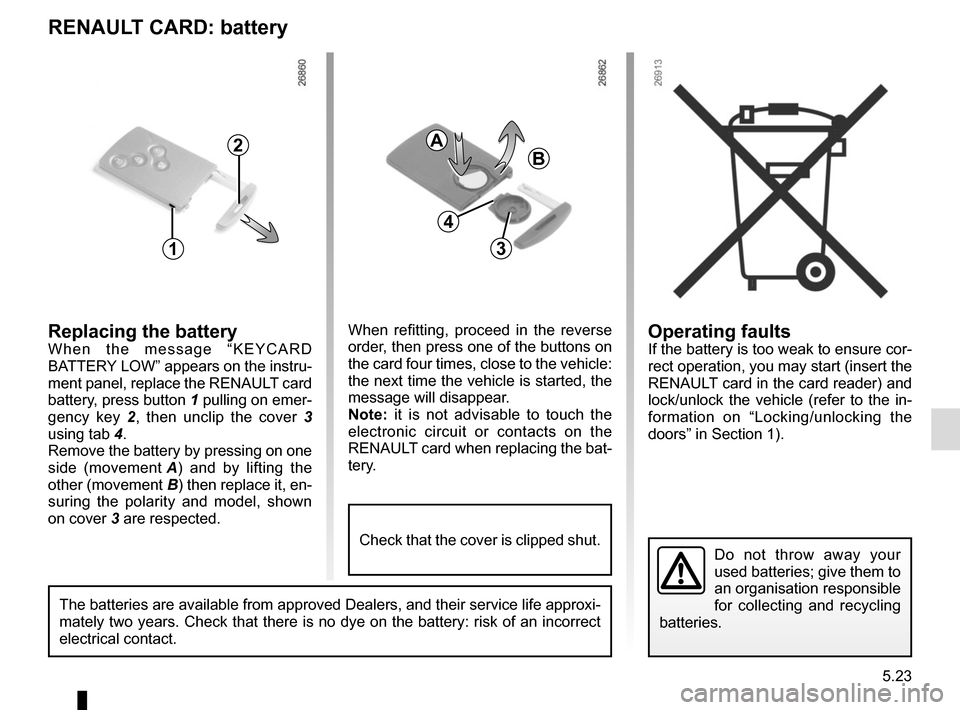
Replacing the batteryWhen the message “KEYCARD
BATTERY LOW” appears on the instru-
ment panel, replace the RENAULT card
battery, press button 1 pulling on emer-
gency key 2, then unclip the cover 3
using tab 4.
Remove the battery by pressing on one
side (movement A) and by lifting the
other (movement B) then replace it, en-
suring the polarity and model, shown
on cover 3 are respected.
Do not throw away your
used batteries; give them to
an organisation responsible
for collecting and recycling
batteries.
1
2
When refitting, proceed in the reverse
order, then press one of the buttons on
the card four times, close to the vehicle:
the next time the vehicle is started, the
message will disappear.
Note: it is not advisable to touch the
electronic circuit or contacts on the
RENAULT card when replacing the bat-
tery.
A
B
3
The batteries are available from approved Dealers, and their service lif\
e approxi-
mately two years. Check that there is no dye on the battery: risk of an \
incorrect
electrical contact.
4
Check that the cover is clipped shut.
Page 249 of 292

5.29
No.Allocation
1 + battery urea injection
2 + battery for vehicles with
RENAULT card
3 APC load for vehicle with
RENAULT card
4 Heater
5 Adjustment
6 Adjustment
7 Heater
8 Additional heating and air
conditioning
9 Supplementary passenger
compartment heating
10 Electric door mirrors,
supplementary central unit
adjustment
11 Heated door mirror
12 Radio, multimedia, rear-view
mirror, diagnostic socket
13 Pre-equipment, towbar socket
14 Timed battery, passenger
compartment unit
15 Passenger compartment
central unit, tyre pressure loss
notification, hands-free access
FUSES (3/3)
No.
Allocation
16 Hazard warning lights, direction
indicator lights
17 Central locking of opening
elements
18 Left-hand daytime running light,
rear side light, left-hand main
beam headlight, right-hand
dipped beam headlight
19 Registration plate lighting, front
and rear fog lights
20 Alarm, horn, lighting and wiper
stalks
21 Instrument panel
22 Light stalk
23 Rear screen wiper, screenwash
pump, horn
24 General APC load
25 Reversing lights
26 Brake switch
27 Injection, starting
28 Airbag, steering column lock
29 Passenger side window control
30 Power-assisted steering
31 Brake lightsNo. Allocation
32 APC load for vehicle with
RENAULT card
33 General service
34 Cigarette lighter, accessories
socket
35 Right-hand daytime running
light, front side lights, right-hand
main beam headlight, left-hand
dipped beam headlight
36 Brake light, ABS, transponder
37 Interior lighting, air-conditioning
38 Starting for vehicles with
RENAULT card
39 Rear windscreen wiper
40 Electromagnetic notification
41 Accessories socket in the
loading area
42 Driver’s side window control
motor
43 Rear accessories socket
44 BCM starting
45 Heated seats
46 Heating, air conditioning system
47 Front windscreen wiper
48 Tachograph
Page 251 of 292

5.31
WINDSCREEN WIPER BLADES (1/2)
– In frosty weather, make
sure that the wiper blades
are not stuck by ice (to
avoid the risk of the motor
overheating).
– Check the condition of the wiper
blades.
Replace the wiper blades as soon
as they begin to lose efficiency
(approximately once a year).
Whilst changing the blade, take care
not to drop the arm onto the window
after it has been removed as this
may break the window.
Check the condition of the wiper
blades. You are responsible for their
service life:
– clean the blades, windscreen and rear screen regularly with soapy
water;
– do not use them when the wind- screen or rear screen are dry;
– free them from the windscreen or rear screen when they have not
been used for a long time.
To refit
To refit the wiper blade, proceed in re-
verse order to removal. Make sure that
the blade is correctly locked in position.
Raise the windscreen wiper stalk fully:
the front windscreen wiper blades will
settle down onto the bonnet.
Replacing windscreen wiper
blades
With the ignition on and the engine stopped:
– lower the windscreen wiper stalk fully: they stop slightly away from the
bonnet;
– lift the wiper arms 1 and 2;
– pull the tab 4 (movement A) and
push the blade 3 upwards.
3
4
A
1
2