Page 119 of 270

Traction control
This system helps to limit wheelspin of
the drive wheels and to control the ve-
hicle when pulling away accelerating or
decelerating.
O")
2.27
DRIVER CORRECTION DEVICES AND AIDS (3/5)
Traction control
This system helps to limit wheelspin of
the drive wheels and to control the ve-
hicle when pulling away accelerating or
decelerating.
Operating principle
Using the wheel sensors, the system
measures and compares the speed of
the drive wheels at all times and slows
down their over-rotation. If a wheel is
starting to slip, the system brakes au-
tomatically until the drive supplied be-
comes compatible with the level of grip
under the wheel again.
The system also adjusts the engine
speed to the grip available under the
wheels, independently of the pressure
exerted on the accelerator pedal.Operating faults
When the system detects an operat-
ing fault the message “Check ESC” and
warning light
© and � appear
on the instrument panel. In this case,
the ESC and traction control system
are deactivated.
Consult an approved dealer.
Disabling the traction control
system
If the vehicle is fitted with this function,
in some situations (driving on very wet
ground: snow, mud, etc. or driving with
snow chains fitted), the system may
reduce the engine output to limit wheel-
spin. If this is not required, it is possible
to deactivate the function by pressing
switch 1.
The message “Traction control off” is
displayed on the instrument panel to
inform you. The traction control system offers ad-
ditional safety. It is recommended that
you do not drive with the function di-
sabled. Correct this as soon as pos-
sible by pressing the switch
1 again.
Note: the function is reactivated auto-
matically when the ignition is switched
on or when a speed of approximately
24 mph (40 km/h) is exceeded.
1
Page 120 of 270

Grip control
If fitted on the vehicle, grip control
makes it easier to control the vehicle on
low grip surfaces (soft ground, etc.).
Tyres
When they nee")
2.28
DRIVER CORRECTION DEVICES AND AIDS (4/5)
Grip control
If fitted on the vehicle, grip control
makes it easier to control the vehicle on
low grip surfaces (soft ground, etc.).
Tyres
When they need to be re-
placed, only tyres of the
same make, size, type and
profile should be used.
Tyres fitted to the vehicle should
either be identical to those fitted
originally or conform to those
recommended by your approved
dealer.
2
“Soft ground” mode
Turn the button 2: the integrated warn-
ing light
\b comes on, along with
the instrument panel message “Non
grip road mode on”.
This position enables optimal usage on
soft ground (mud, sand, dead leaves,
etc.). “Soft ground” mode uses traction
control functions. The system automa-
tically switches to “Road” mode after
around 25 mph (40 km/h), and the inte-
grated warning light
on button 2
comes on.
“Expert” mode
Turn the button 2: the integrated warn-
ing light
comes on, along with
the instrument panel message “Expert
mode on”.
In this position, engine speed is left
under the driver’s control. The system
automatically switches to “Road” mode
after around 25 mph (40 km/h), and
the integrated warning light
on
button 2 comes on.
“Road” mode
When the vehicle is started up, the
warning light
on button 2 comes
on, along with the instrument panel
message “Standard road mode on”.
This position enables optimal usage
under normal driving conditions (dry-
ness, humidity, light snow, etc.).
“Road” mode uses traction control func-
tions.
Page 121 of 270

Hill start assistance
This device assists the driver when
starting on hills (ascending or descend-
ing), and the warning light
� may
be displayed on th")
2.29
DRIVER CORRECTION DEVICES AND AIDS (5/5)
Hill start assistance
This device assists the driver when
starting on hills (ascending or descend-
ing), and the warning light
� may
be displayed on the instrument panel. It
prevents the vehicle from rolling back-
wards by automatically applying the
brakes when the driver lifts his/her foot
off the brake pedal to depress the ac-
celerator pedal.
System operation
It only operates when the gear lever is
in a position other than neutral (other
than N or P for automatic transmis-
sions) and the vehicle is completely
stationary (brake pedal depressed)
The system holds the vehicle for ap-
proximately 2 seconds. The brakes are
then released (the vehicle will move ac-
cording to the slope).The hill start assistance
system cannot completely
prevent the vehicle from
rolling backwards in all sit-
uations (extremely steep gradients,
etc.).
In all cases, the driver may depress
the brake pedal to prevent the ve-
hicle from rolling forwards or back-
wards.
The hill start assistance function
should not be used for prolonged
stops: use the brake pedal.
This function is not designed to im-
mobilise the vehicle permanently.
If necessary, use the brake pedal to
stop the vehicle.
The driver must remain particularly
vigilant when driving on slippery or
low-grip surfaces and/or on hills.
Risk of serious injury.
Page 122 of 270

This system notifies the driver when
they accidentally cross a continuous or
broken line.
This function uses a camera attached
to the windscreen, behind the rear-v")
2.30
LANE DEPARTURE WARNING (1/2)
This system notifies the driver when
they accidentally cross a continuous or
broken line.
This function uses a camera attached
to the windscreen, behind the rear-view
mirror.
This function is a driving aid in the event of the accidental crossing o\
f
a continuous or broken line in the road. However, the function is not in-
tended to replace the driver. The function can be disrupted under certain
conditions, including:
– poor visibility (rain, snow, fog, dirty windscreen, glare of the sun, partially obs- cured road lines, etc.);
– roads with tight bends;
– closely following a vehicle in the same lane;
– worn road markings, difficult to distinguish or spaced very widely apart;
– narrow roads;
– ...
In this case, warning light
\f on the instrument panel goes out to indicate that
the function will not operate (lines not detected).
Under no circumstances should this function replace the driver’s care or res-
ponsibility whilst performing manoeuvres.
Page 123 of 270
Adjustment
From the vehicle settings customisation
menu (please refer to the information
on the “Vehicle settings customisation
menu” in Section 1), you can:
�")
2.31
LANE DEPARTURE WARNING (2/2)Adjustment
From the vehicle settings customisation
menu (please refer to the information
on the “Vehicle settings customisation
menu” in Section 1), you can:
– adjust the alert audio volume. To do this, select “lane departure alert:
volume” (five levels);
– adjust the alert sensitivity. To do this, select “lane departure alert: sensiti-
vity” (three levels).
Deactivation
Press button 1 on the central rear-view
mirror.
The warning light on button 1 goes out,
accompanied by a message on the ins-
trument panel “Lane departure warning
de-activated”.
Operating faults
In the event of a malfunction, a mes-
sage “Lane departure warning check” is
displayed on the instrument panel, and
the warning light on button 1 stays off.
Consult an approved dealer.
The function sounds the alarm if:
a line is crossed without activating the
indicator lights. The function alerts the
driver through warning light
on
the instrument panel, along with a beep.
Conditions for non-activation
of alerts
– Indicators activated or having been activated less than approximately
four seconds prior to departing from
the lane;
– Very fast lane departure;
– Driving continuously on a line;
– On bends, the function allows for slightly cutting the bend;
– ...
1
ActivationPress button 1 : the warning light on
the 1 button lights up, accompanied by
the message “Lane departure warning
activated” and a beep.
The function is set to notify the
driver if:
– the warning light on the 1 button
lights up;
and
– the vehicle speed is greater than ap- proximately 45 mph (70 km/h);
and
– lines are detected.
Warning light
\f comes on on the
instrument panel to notify the driver.
Page 124 of 270
2.32
CRUISE CONTROL/SPEED LIMITER: speed limiter function (1/3)
The speed limiter function helps you
stay within the driving speed limit that
you choose, known as the limit speed.Controls
1 or 2 Main “On/Off” switch.
3 Speed limiter activation, memory
and increase (+).
4 Lowers the limited speed (-).
5 Speed limiter function standby (with limited speed memory) (O).
6 Activation and recall of memorised limited speed (R).
Switching on
Press switch 1 or 2 on the side �.
Warning light
� comes on, lit orange,
and the message “Speed limiter” ap-
pears on the instrument panel A, ac-
companied by dashes to indicate that
the speed limiter function is activated
and waiting to store a limited speed.
To store the current speed, press
switch 3 (+): the limited speed replaces
the dashes and, depending on the vehi-
cle, the activation of the speed limiter is
confirmed by the message area being
lit orange. The minimum stored speed
is 20 mph (30 km/h).
5
A
3465
12
Page 126 of 270

Putting the function on
standby
The speed limiter function is deacti-
vated when you press switch 5 (O). In
this case, the limited spe")
2.34
CRUISE CONTROL/SPEED LIMITER: speed limiter function (3/3)
Putting the function on
standby
The speed limiter function is deacti-
vated when you press switch 5 (O). In
this case, the limited speed remains
stored and the message “Memorised”
accompanied by this speed appears on
the instrument panel A.
Depending on the vehicle, when the
function is on standby, this is confirmed
by the message area no longer being
lit orange.
Recalling the limit speed
If a speed has been stored, it can be re-
called by pressing switch 6 (R).
When the speed limiter is put on
standby, pressing switch 3 (+) re-
activates the function without taking
into account the stored speed: it is
the speed at which the vehicle is
moving that is taken into account.
Switching off the function
The speed limiter function is deacti-
vated if you press switch 1 or 2: in this
case a speed is no longer stored. The
orange warning light
� on the instru-
ment panel A goes out, confirming that
the function has stopped.
5
A
3465
12
Page 128 of 270
2.36
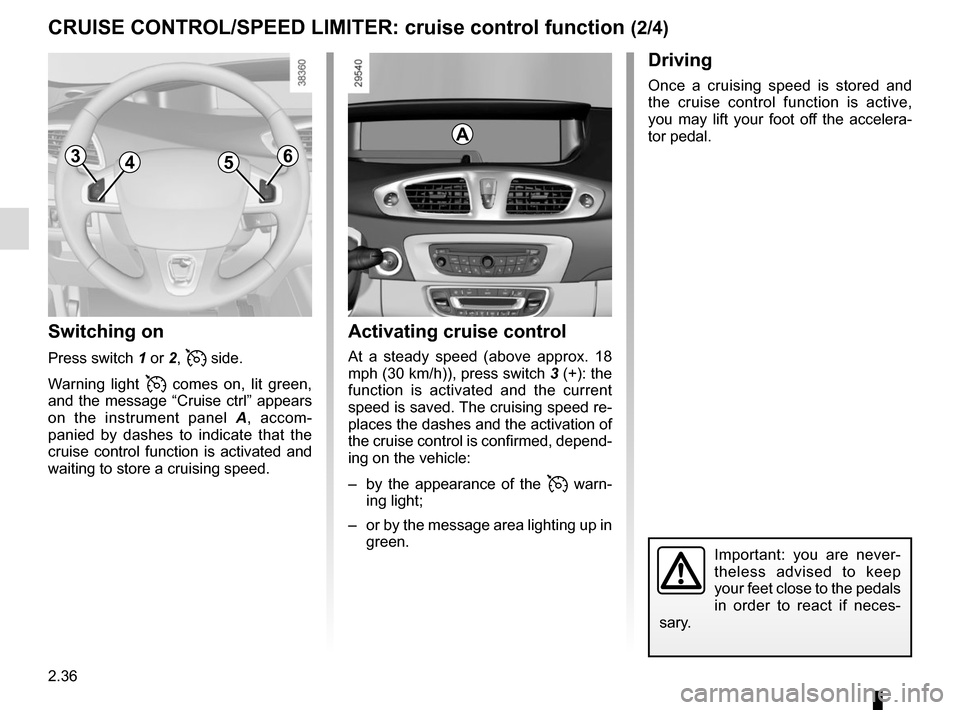
CRUISE CONTROL/SPEED LIMITER: cruise control function (2/4)
Switching on
Press switch 1 or 2, � side.
Warning light
� comes on, lit green,
and the message “Cruise ctrl” appears
on the instrument panel A, accom-
panied by dashes to indicate that the
cruise control function is activated and
waiting to store a cruising speed.
Activating cruise control
At a steady speed (above approx. 18
mph (30 km/h)), press switch 3 (+): the
function is activated and the current
speed is saved. The cruising speed re-
places the dashes and the activation of
the cruise control is confirmed, depend-
ing on the vehicle:
– by the appearance of the
� warn-
ing light;
– or by the message area lighting up in green.
Driving
Once a cruising speed is stored and
the cruise control function is active,
you may lift your foot off the accelera-
tor pedal.
Important: you are never-
theless advised to keep
your feet close to the pedals
in order to react if neces-
sary.
A
3465

The speed limiter function helps you
stay within the driving speed limit that
you choose, known as the limit speed.Controls
1 or 2 Mai")