Page 62 of 270

1.56
WARNING LIGHTS (3/5)
åAirbag warning light
This lights up when the engine
is started and goes out after approxi-
mately three seconds. If it does not
come on when the ignition is switched
on or if it remains lit, there is a fault in
the system.
Contact your approved Dealer as soon
as possible.
¹Passenger airbag OFF
Please refer to the information
on “Child safety: deactivating/activating
the front passenger airbag” in Section 1.
›Passenger airbag ON
Please refer to the information
on “Child safety: deactivating/activating
the front passenger airbag” in Section 1.
Rear seat belt reminder
(depending
on vehicle)
Warning light
ß comes on, ac-
companied (depending on the vehicle)
by a message indicating the number
of fastened seat belts on the instru-
ment panel for approximately 30 sec-
onds, each time the vehicle is started,
a door is opened or a seat belt is fas-
tened/unfastened. Check that the rear
passengers are wearing seat belts and
that the number of seat belts shown as
fastened corresponds to the number of
rear seat places occupied.
xAnti-lock braking warning
light
This lights up when the ignition is
switched on and goes out after approxi-
mately three seconds. If it does not go
out after the ignition is switched on, or
lights up when driving, there is a fault
with the ABS. The braking system then
operates as it would on a vehicle with-
out the system ABS.
Contact an approved Dealer as soon as
possible. The presence and operation of the warning lights DEPEND ON THE EQUIPMENT\
AND COUNTRY.
�Hill start assistance warning
light
Please refer to the information on the
“Driver correction devices and aids” in
Section 2.
�Warning light for electronic
stability program ( ESC ) and
traction control system
Refer to information on “Driver correc-
tion devices and aids” in Section 2.
Page 75 of 270

1.69
TRIP COMPUTER AND WARNING SYSTEM: operating fault messages
These appear with the © warning light and mean that you should drive very carefully to an author\
ised dealer as
soon as possible. If you fail to follow this recommendation, you risk da\
maging your vehicle.
They disappear when the display selection key is pressed or after severa\
l seconds and are stored in the computer log. The
© warning light stays on. Examples of operating fault messages are given \
in the following pages.
Examples of messages Interpreting the display selected
« Clean diesel filter » Indicates the presence of water in the diesel filter; contact an approve\
d Dealer
as soon as possible.
« Check lighting » Indicates a fault in the directional headlights.
« Check vehicle » Indicates a fault in one of the pedal sensors, battery management system\
or oil
level sensor.
« Check airbag » Indicates a fault in the restraint system in addition to the seat belts.\
In the event
of an accident, it is possible that they may not be triggered.
« Check antipollution system » Indicates a fault in the vehicle’s particle filter system.
Page 100 of 270

2.8
FUNCTION STOP AND START (3/4)
Conditions preventing the
standby of the engine
Certain conditions prevent the system
from using the engine standby function,
including when:
– reverse gear is engaged;
– the bonnet is not locked;
– the driver’s door is not closed;
– the driver’s seatbelt is not fastened;
– the outdoor temperature is too low or too high (less than around 0 °C or
higher than around 30 °C);
– the battery is not sufficiently charged;
– the difference between the vehicle interior temperature and the auto-
matic climate control instruction is
too high; – for vehicles with automatic gear-
boxes, the gradient is steeper than
approximately 12%;
– the “Clear View” function is activated (please see “Automatic Climate
Control” in Section 3);
– the engine coolant temperature is too low;
– Interruption due to the emission con- trol system;
or
– ...
Warning light
� is displayed on the
instrument panel. This notifies you that
the engine is on standby.
To fill up with fuel, the engine must
be stopped (and not on standby):
you must stop the engine by press-
ing the engine stop button (please
refer to “Starting and Stopping the
engine” in Section 2).
Special conditions
With the engine on standby (traffic jam,
traffic lights, etc.), if the driver unfas-
tens the seat belt and opens the driv-
er’s door, or gets out of the seat, the
ignition is switched off.
To restart and reactivate the Stop and
Start system, press the start button
(please refer to “Starting, stopping the
engine” in Section 2).
Page 168 of 270

3.28
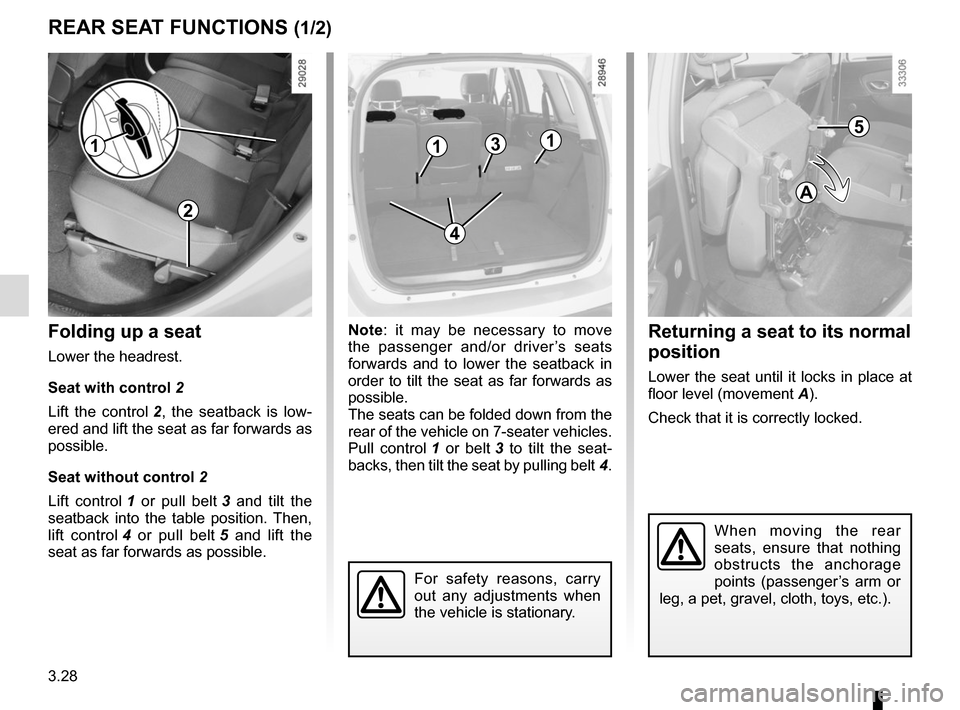
Folding up a seat
Lower the headrest.
Seat with control 2
Lift the control 2, the seatback is low-
ered and lift the seat as far forwards as
possible.
Seat without control 2
Lift control 1 or pull belt 3 and tilt the
seatback into the table position. Then,
lift control 4 or pull belt 5 and lift the
seat as far forwards as possible.
REAR SEAT FUNCTIONS (1/2)
Returning a seat to its normal
position
Lower the seat until it locks in place at
floor level (movement A).
Check that it is correctly locked.
When moving the rear
seats, ensure that nothing
obstructs the anchorage
points (passenger’s arm or
leg, a pet, gravel, cloth, toys, etc.).
2
13
4
Note: it may be necessary to move
the passenger and/or driver’s seats
forwards and to lower the seatback in
order to tilt the seat as far forwards as
possible.
The seats can be folded down from the
rear of the vehicle on 7-seater vehicles.
Pull control 1 or belt 3 to tilt the seat-
backs, then tilt the seat by pulling belt 4.
11
For safety reasons, carry
out any adjustments when
the vehicle is stationary.
A
5
Page 169 of 270

3.29
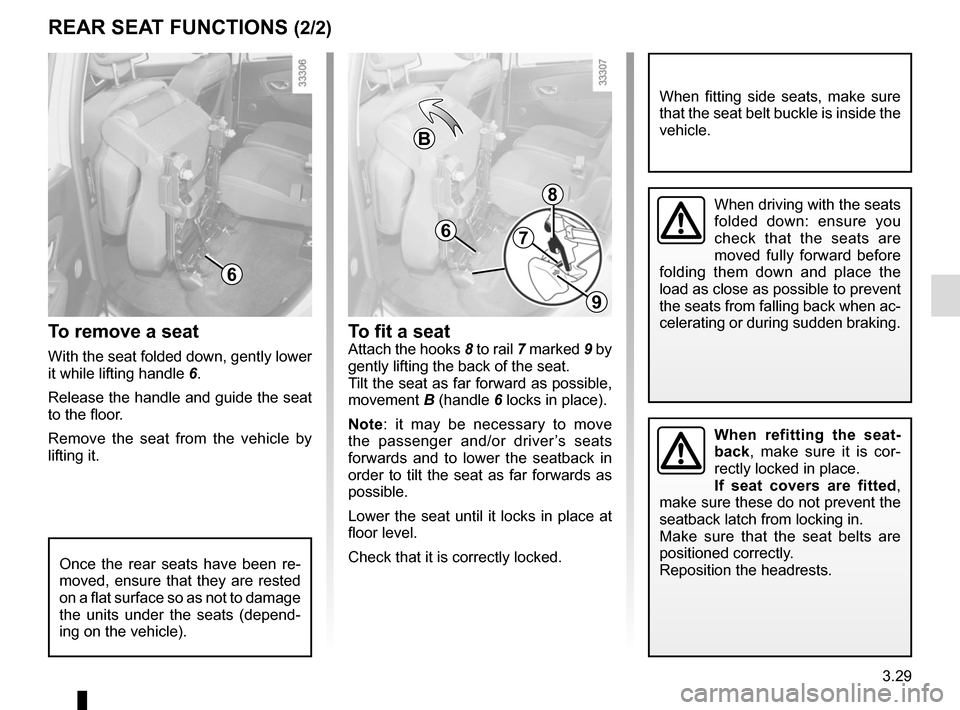
REAR SEAT FUNCTIONS (2/2)To fit a seat
Attach the hooks 8 to rail 7 marked 9 by
gently lifting the back of the seat.
Tilt the seat as far forward as possible,
movement B (handle 6 locks in place).
Note: it may be necessary to move
the passenger and/or driver’s seats
forwards and to lower the seatback in
order to tilt the seat as far forwards as
possible.
Lower the seat until it locks in place at
floor level.
Check that it is correctly locked.
When fitting side seats, make sure
that the seat belt buckle is inside the
vehicle.
To remove a seat
With the seat folded down, gently lower
it while lifting handle 6.
Release the handle and guide the seat
to the floor.
Remove the seat from the vehicle by
lifting it.
Once the rear seats have been re-
moved, ensure that they are rested
on a flat surface so as not to damage
the units under the seats (depend-
ing on the vehicle).
When refitting the seat-
back, make sure it is cor-
rectly locked in place.
If seat covers are fitted ,
make sure these do not prevent the
seatback latch from locking in.
Make sure that the seat belts are
positioned correctly.
Reposition the headrests.
When driving with the seats
folded down: ensure you
check that the seats are
moved fully forward before
folding them down and place the
load as close as possible to prevent
the seats from falling back when ac-
celerating or during sudden braking.
6
B
6
8
7
9
Page 170 of 270
3.30
To unfold a seat
– From the luggage compartment, remove the luggage cover and store
it (refer to the information on the “lug-
gage cover: long chassis versions” in
Section 3);
– pull strap 2, lock the seat by pull-
ing on the top of the seatback and
ensure that it is correctly locked in
place;
– fit the headrest.Third row rear seats
Folding up a seat
– From the luggage compartment, lower the headrest;
– pull strap 2;
– push the seatback (areas A) to lock
the seat, ensuring that it is correctly
locked.
Note: the hooks 1 secure the seat belt
buckles.
REAR SEAT OPERATION: 7-seater version (1/2)
When moving third row rear
seats:
– check that no one is near
to any of the moving parts;
– check that there is sufficient space around the seat;
– check that nothing obstructs the section of the luggage compart-
ment reserved for storing the
seat.
For safety reasons, carry out any
adjustments when the vehicle is sta-
tionary.
2
AA
1
2
AA
1
Page 177 of 270
3.37
Always place the objects to be trans-
ported so that their largest side rests
against the back of the rear bench seat,
for normal loads (example A) or against
the back of the front seats B when the
rear bench seatbacks are folded down.
If you have to place objects on the
folded seat back, it is vital that you
remove the headrests before folding
the seat back so that it can be folded as
flat as possible against the seat.
TRANSPORTING OBJECTS IN THE BOOT (1/2)
A
Always position the heavi-
est items directly on the
floor. Use the lashing points
on the floor of the luggage
compartment, if these are fitted to
the vehicle. The luggage should be
loaded in such a way that no items
will be thrown forward and strike the
occupants if the driver has to brake
suddenly. Fasten the rear seat belts,
even if the seats are not occupied.
B
Page 180 of 270
3.40
LUGGAGE NET (2/2)
11
6
Depending on the vehicle, remove the
anchoring rings 11 before installing a
luggage net.
– attach net strap hook
8 to the lower
ring;
– adjust net strap 9 so that it is taut.
– adjust the position of the second row seats: ensure that the seatbacks do
not touch the luggage net.
Note: recess 10 should be on the side
of the centre seat belt feed.Fitting the luggage net
behind the rear seats
(behind the second row rear seats on
the 7-seater version)
Inside the vehicle on each side:
– push the second row seats fully for- ward;
– lift cover 6 to access the luggage net
upper mounting rail;
– insert upper rod 7 for the net into the
rail;
9
8
10
76