2015 RENAULT KADJAR display
[x] Cancel search: displayPage 176 of 298

2.72
AUTOMATIC TRANSMISSION (2/3)
Special cases
In certain driving conditions (for exam-
ple, engine protection, operation of the
Electronic Stability Programme: the au-
tomatic system may change gear auto-
matically.
Likewise, to prevent incorrect manoeu-
vres, a gear change may be refused by
the automatic system: in this case the
gear display flashes for a few seconds
as a warning.
Special circumstances
– If the bends and road surface do
not allow you to stay in automatic
mode (e.g. in the mountains), we
recommend that you change to
manual mode. This will prevent the
automatic gearbox from changing
gear repeatedly when climbing, and
permit engine braking on long de-
scents.
– In cold weather , start the engine
and wait a few seconds before
moving the selector lever from posi-
tion P or N and engaging it in D or R
to prevent the engine stalling.
Driving in manual mode
With the selection lever 1 in position D,
move the lever to the left.
Shifting the lever repeatedly allows you
to change gears manually:
– to move down through the gears, push the lever forwards;
– to move up through the gears, push the lever backwards.
The gear selected is displayed on the
instrument panel.
1
When facing uphill, to remain
stopped, do not keep your foot on
the accelerator.
Risk of overheating the automatic
gearbox.
Page 183 of 298

3.5
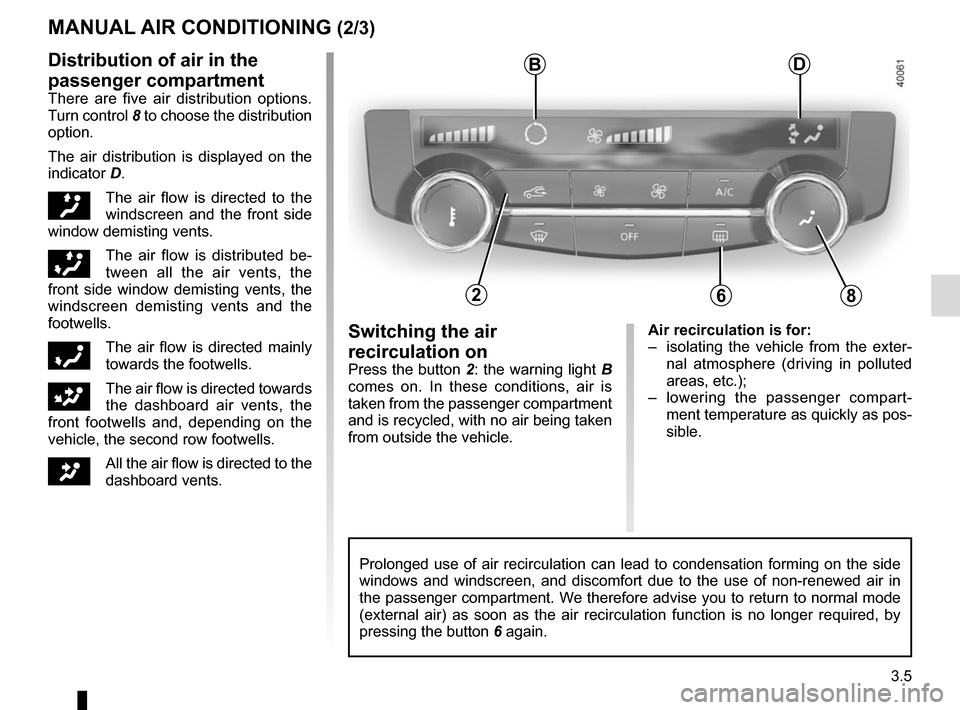
Air recirculation is for:
– isolating the vehicle from the exter-nal atmosphere (driving in polluted
areas, etc.);
– lowering the passenger compart- ment temperature as quickly as pos-
sible.Switching the air
recirculation on
Press the button 2: the warning light B
comes on. In these conditions, air is
taken from the passenger compartment
and is recycled, with no air being taken
from outside the vehicle.
MANUAL AIR CONDITIONING (2/3)
Prolonged use of air recirculation can lead to condensation forming on t\
he side
windows and windscreen, and discomfort due to the use of non-renewed air\
in
the passenger compartment. We therefore advise you to return to normal mode
(external air) as soon as the air recirculation function is no longer \
required, by
pressing the button 6 again.
Distribution of air in the
passenger compartment
There are five air distribution options.
Turn control 8 to choose the distribution
option.
The air distribution is displayed on the
indicator D.
õThe air flow is directed to the
windscreen and the front side
window demisting vents.
÷The air flow is distributed be-
tween all the air vents, the
front side window demisting vents, the
windscreen demisting vents and the
footwells.
óThe air flow is directed mainly
towards the footwells.
GThe air flow is directed towards
the dashboard air vents, the
front footwells and, depending on the
vehicle, the second row footwells.
JAll the air flow is directed to the
dashboard vents.
B
682
D
Page 184 of 298

3.6
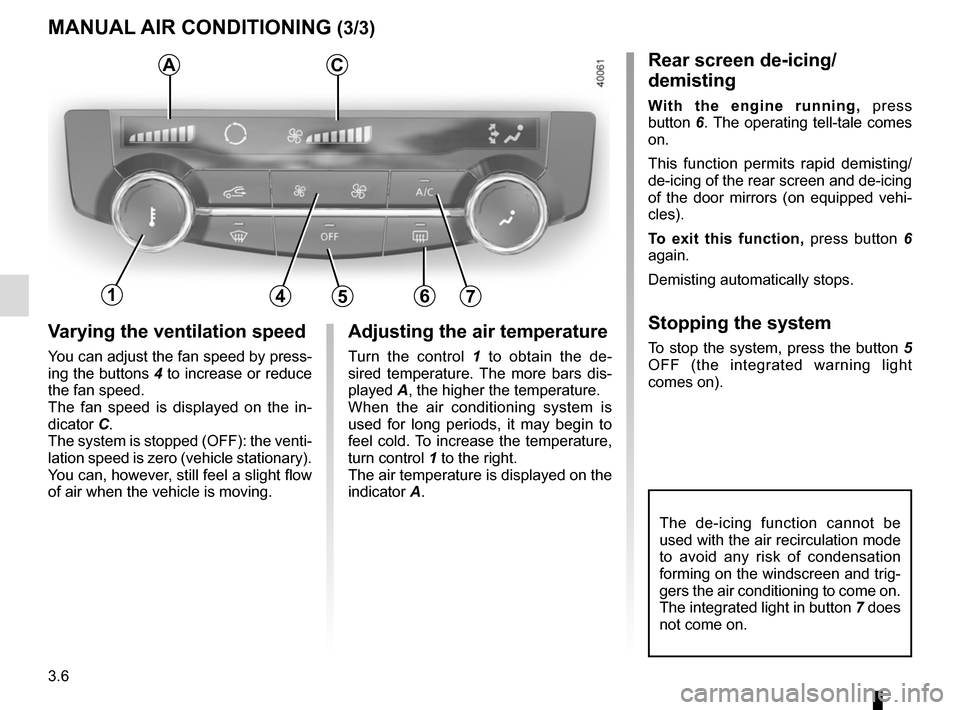
Varying the ventilation speed
You can adjust the fan speed by press-
ing the buttons 4 to increase or reduce
the fan speed.
The fan speed is displayed on the in-
dicator C.
The system is stopped (OFF): the venti-
lation speed is zero (vehicle stationary).
You can, however, still feel a slight flow
of air when the vehicle is moving.
MANUAL AIR CONDITIONING (3/3)
Adjusting the air temperature
Turn the control 1 to obtain the de-
sired temperature. The more bars dis-
played A, the higher the temperature.
When the air conditioning system is
used for long periods, it may begin to
feel cold. To increase the temperature,
turn control 1 to the right.
The air temperature is displayed on the
indicator A.
The de-icing function cannot be
used with the air recirculation mode
to avoid any risk of condensation
forming on the windscreen and trig-
gers the air conditioning to come on.
The integrated light in button 7 does
not come on.
Rear screen de-icing/
demisting
With the engine running, press
button 6. The operating tell-tale comes
on.
This function permits rapid demisting/
de-icing of the rear screen and de-icing
of the door mirrors (on equipped vehi-
cles).
To exit this function, press button 6
again.
Demisting automatically stops.
Stopping the system
To stop the system, press the button 5
OFF (the integrated warning light
comes on).
AC
14567
Page 185 of 298

3.7
AUTOMATIC CLIMATE CONTROL (1/6)Automatic mode
The automatic climate control system
guarantees comfort in the passen-
ger compartment and good visibility
(except in the event of extreme condi-
tions), while optimising consumption.
The system controls the ventilation
speed, air distribution, air recirculation,
and starting and stopping the air condi-
tioning and air temperature.
AUTO: allows the selected com-
fort level to be best attained, depend-
ing on the exterior conditions. Press
button 7. The integrated indicator light
on button 7 comes on.
Varying the ventilation speedIn automatic mode, the system uses
the most suitable amount of air to reach
and maintain the desired comfort level.
You can still adjust the fan speed by
pressing the buttons 6 to increase or
reduce the fan speed.
In this case, the integrated indicator
light on button 7 goes out and the ven-
tilation speed selected is displayed on
the indicator C.
Indicators
A Left-hand side air temperature.
B Distribution of air.
C Fan speed.
D Automatic air recirculation warning
light.
E Right-hand side air temperature.
The controls
1 Stopping the system or, depending on the vehicle, de-icing/demisting
the windscreen.
2 and 10 air temperature.
3 “Clear View” function.
4 and 5 Passenger compartment air
distribution.
6 Fan speed and, depending on the ventilation, stopping the system.
7 Automatic programme.
8 Air conditioning.
9 Air recirculation.
11 De-icing/demisting of the rear screen
and, depending on the vehicle, the
door mirrors.
12 DUAL function
124567891012
ABCDE
311
Page 186 of 298

3.8
AUTOMATIC CLIMATE CONTROL (2/6)
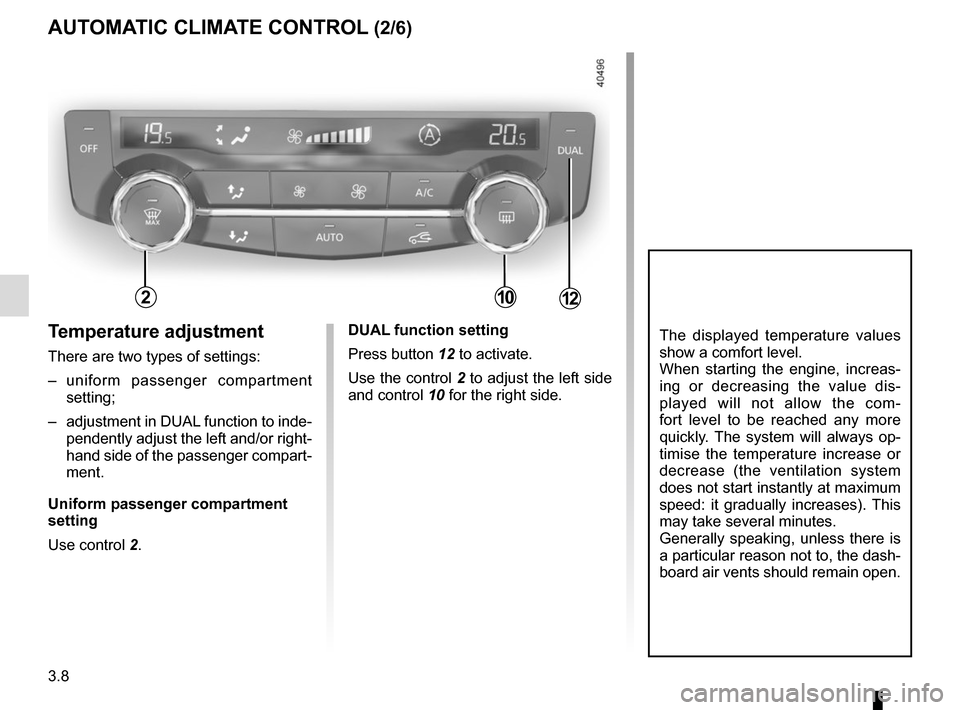
Temperature adjustment
There are two types of settings:
– uniform passenger compartment setting;
– adjustment in DUAL function to inde- pendently adjust the left and/or right-
hand side of the passenger compart-
ment.
Uniform passenger compartment
setting
Use control 2.
The displayed temperature values
show a comfort level.
When starting the engine, increas-
ing or decreasing the value dis-
played will not allow the com-
fort level to be reached any more
quickly. The system will always op-
timise the temperature increase or
decrease (the ventilation system
does not start instantly at maximum
speed: it gradually increases). This
may take several minutes.
Generally speaking, unless there is
a particular reason not to, the dash-
board air vents should remain open.DUAL function setting
Press button 12 to activate.
Use the control 2 to adjust the left side
and control 10 for the right side.
21012
Page 193 of 298

3.15
ELECTRIC WINDOWS (1/2)
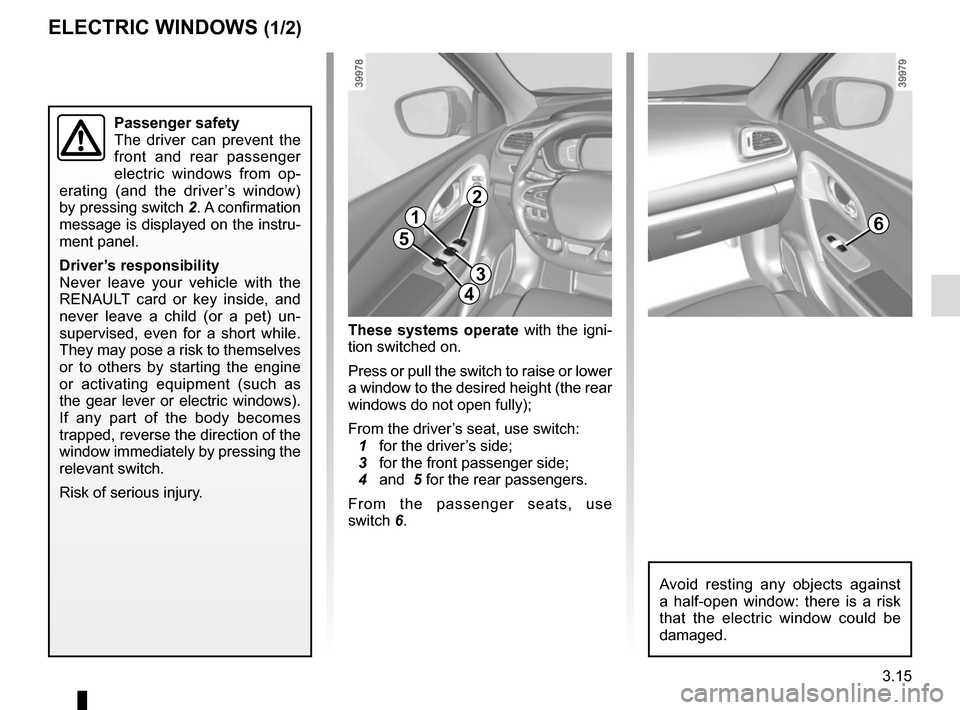
These systems operate with the igni-
tion switched on.
Press or pull the switch to raise or lower
a window to the desired height (the rear
windows do not open fully);
From the driver’s seat, use switch:
1 for the driver’s side;
3 for the front passenger side;
4 and 5 for the rear passengers.
From the passenger seats, use
switch 6.
1
3
4
56
Avoid resting any objects against
a half-open window: there is a risk
that the electric window could be
damaged.
Passenger safety
The driver can prevent the
front and rear passenger
electric windows from op-
erating (and the driver’s window)
by pressing switch 2. A confirmation
message is displayed on the instru-
ment panel.
Driver’s responsibility
Never leave your vehicle with the
RENAULT card or key inside, and
never leave a child (or a pet) un-
supervised, even for a short while.
They may pose a risk to themselves
or to others by starting the engine
or activating equipment (such as
the gear lever or electric windows).
If any part of the body becomes
trapped, reverse the direction of the
window immediately by pressing the
relevant switch.
Risk of serious injury.
2
Page 218 of 298

4.4
– Remove the dipstick and wipe with a clean, lint-free cloth;
– push the dipstick in as far as it will go (for vehicles equipped with a cap-
type dipstick C, screw the cap in as
far as it will go);
– take out the dipstick again;
– read the level: it should never fall below minimum mark A or exceed
maximum mark B.
Once the operation has been com-
pleted, ensure that the dipstick is
pushed in as far as it will go or that
the “cap-type dipstick” is completely
screwed in.
Reading the oil levelThe oil level should be read with the ve-
hicle on level ground, after the engine
has been switched off for some time.
The dipstick must be used to read
the exact oil level and make sure
that the maximum level has not been
exceeded (risk of engine damage).
Refer to the following pages.
The instrument panel display only
alerts the driver when the oil level is at
its minimum.
It is normal for an engine to use oil for
lubrication and cooling of moving parts
and it is normal to top up the level be-
tween oil changes.
However, contact your approved
Dealer if more than 0.5 litres is being
consumed every 600 miles (1,000 km)
after the running in period.
Oil change frequency: check the oil
level from time to time and certainly
before any long journey to avoid the
risk of damaging your engine.
ENGINE OIL LEVEL: general information
A
B
A
B
C
Exceeding the maximum
engine oil level
Under no circumstances
must the maximum fill
level B be exceeded: risk of damage
to the engine and catalytic con-
verter.
If the level exceeds the maximum
level, do not start your vehicle and
contact an authorised dealer.
In order to prevent splashback, it is
recommended that a funnel be used
when topping up/filling with oil.
Before performing any
action in the engine com-
partment, the ignition must
be switched off by pressing
the engine stop button (please see
the information on “Starting, stop-
ping the engine” in Section 2).
Page 226 of 298

4.12
BATTERY (1/2)
1
The battery 1 does not require any
maintenance.
Handle the battery with care
as it contains sulphuric acid
which must not come into
contact with the eyes or
skin. If it does, wash the affected
area with plenty of cold water. If
necessary, consult a doctor.
Ensure that naked flames, red hot
objects and sparks do not come into
contact with the battery as there is a
risk of explosion.
Depending on the vehicle, a system
continuously checks the battery charge
status. If this decreases, the message
“Battery low start engine” is displayed
on the instrument panel. In this case,
start the engine. The message will go
off.
The charge status of your battery can
decrease especially if you use your ve-
hicle:
– for short journeys;
– for driving in town;
– when the temperature drops;
– after extended use of energy-con- suming devices (radio, etc.) with the
engine switched off.
The engine may be hot
during operations in close
proximity. In addition, the
engine cooling fan may
start at any moment.
Risk of injury.
Before performing any
action in the engine com-
partment, the ignition must
be switched off by pressing
the engine stop button (please see
the information on “Starting, stop-
ping the engine” in Section 2).