2015 RENAULT KADJAR tow
[x] Cancel search: towPage 177 of 298
2.73
AUTOMATIC TRANSMISSION (3/3)
Parking the vehicle
When the vehicle is stopped, move the
lever to position P while keeping your
foot on the brake pedal: the gearbox is
in neutral and the drive wheels are me-
chanically locked by the driveshaft.
Apply the handbrake.
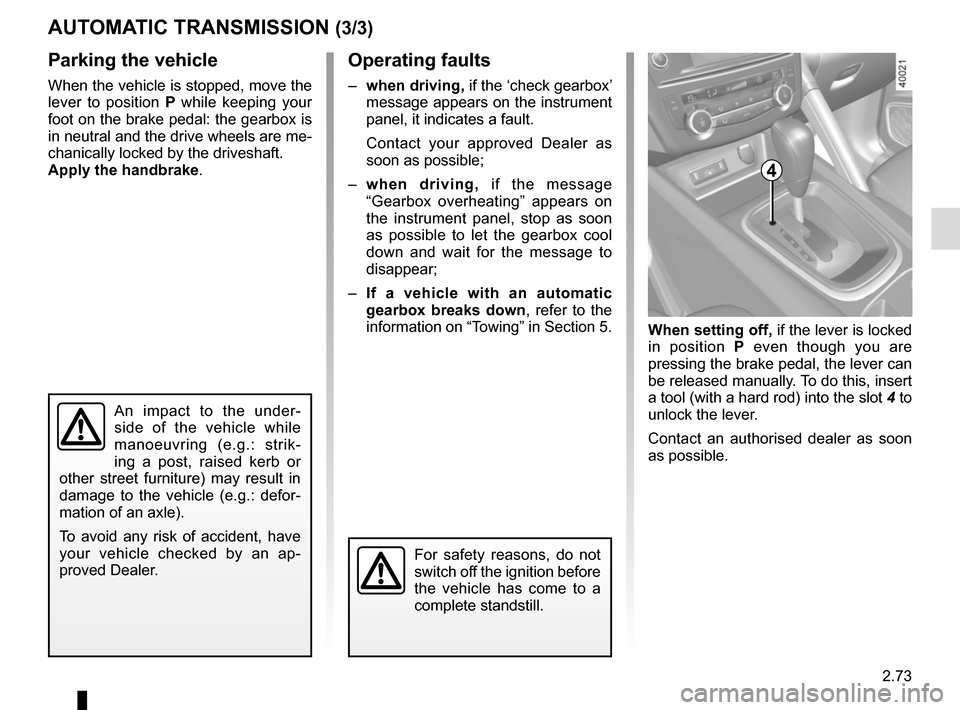
When setting off, if the lever is locked
in position P even though you are
pressing the brake pedal, the lever can
be released manually. To do this, insert
a tool (with a hard rod) into the slot 4 to
unlock the lever.
Contact an authorised dealer as soon
as possible.
Operating faults
– when driving, if the ‘check gearbox’
message appears on the instrument
panel, it indicates a fault.
Contact your approved Dealer as
soon as possible;
– when driving, if the message
“Gearbox overheating” appears on
the instrument panel, stop as soon
as possible to let the gearbox cool
down and wait for the message to
disappear;
– If a vehicle with an automatic
gearbox breaks down, refer to the
information on “Towing” in Section 5.
4
For safety reasons, do not
switch off the ignition before
the vehicle has come to a
complete standstill.
An impact to the under-
side of the vehicle while
manoeuvring (e.g.: strik-
ing a post, raised kerb or
other street furniture) may result in
damage to the vehicle (e.g.: defor-
mation of an axle).
To avoid any risk of accident, have
your vehicle checked by an ap-
proved Dealer.
Page 179 of 298
3.1
Section 3: Your comfort
Air vents. . . . . . . . . . . . . . . . . . . . . . . . . . . . . . . .\
. . . . . . . . . . . . . . . . . . . . . . . . . . . . . . . . . . . . . . . 3.2
Manual air conditioning and heating system . . . . . . . . . . . . . . . . . . . . . . . . . . . . . . . . . . . . \
. . . . . . . 3.4
Automatic climate control . . . . . . . . . . . . . . . . . . . . . . . . . . . . . . . . . . . .\
. . . . . . . . . . . . . . . . . . . . . 3.7
Air conditioning: information and advice on use . . . . . . . . . . . . . . . . . . . . . . . . . . . . . . . . . . . .\
. . . . 3.13
Outside air quality and deodorisation functions . . . . . . . . . . . . . . . . . . . . . . . . . . . . . . . . . . . . \
. . . . . 3.14
Electric windows . . . . . . . . . . . . . . . . . . . . . . . . . . . . . . . . . . . .\
. . . . . . . . . . . . . . . . . . . . . . . . . . . . 3.15
Fixed glass roof . . . . . . . . . . . . . . . . . . . . . . . . . . . . . . . . . . . . \
. . . . . . . . . . . . . . . . . . . . . . . . . . . . . 3.16
Interior lighting . . . . . . . . . . . . . . . . . . . . . . . . . . . . . . . . . . . . \
. . . . . . . . . . . . . . . . . . . . . . . . . . . . . . 3.17
Passenger compartment storage space and fittings . . . . . . . . . . . . . . . . . . . . . . . . . . . . . . . . . . . . \
. 3.18
Ashtray, cigarette lighter . . . . . . . . . . . . . . . . . . . . . . . . . . . . . . . . . . . .\
. . . . . . . . . . . . . . . . . . . . . . 3.23
Sliding rear bench seat . . . . . . . . . . . . . . . . . . . . . . . . . . . . . . . . . . . .\
. . . . . . . . . . . . . . . . . . . . . . . 3.25
Boot . . . . . . . . . . . . . . . . . . . . . . . . . . . . . . . . . . . . \
. . . . . . . . . . . . . . . . . . . . . . . . . . . . . . . . . . . . . . 3.27
Luggage compartment cover . . . . . . . . . . . . . . . . . . . . . . . . . . . . . . . . . . . . \
. . . . . . . . . . . . . . . . . . . 3.28
Boot storage . . . . . . . . . . . . . . . . . . . . . . . . . . . . . . . . . . . .\
. . . . . . . . . . . . . . . . . . . . . . . . . . . . . . . 3.29
Transporting objects in the boot . . . . . . . . . . . . . . . . . . . . . . . . . . . . . . . . . . . .\
. . . . . . . . . . . . . . . . 3.31
Transporting objects: . . . . . . . . . . . . . . . . . . . . . . . . . . . . . . . . . . . . \
. . . . . . . . . . . . . . . . . . . . . . . . . 3.32 towbar . . . . . . . . . . . . . . . . . . . . . . . . . . . . . . . . . . . .\
. . . . . . . . . . . . . . . . . . . . . . . . . . . . . . 3.32
Roof bars . . . . . . . . . . . . . . . . . . . . . . . . . . . . . . . . . . . . \
. . . . . . . . . . . . . . . . . . . . . . . . . . . . . . . . . . 3.33
Spoiler . . . . . . . . . . . . . . . . . . . . . . . . . . . . . . . . . . . . \
. . . . . . . . . . . . . . . . . . . . . . . . . . . . . . . . . . . . 3.34
Multimedia equipment . . . . . . . . . . . . . . . . . . . . . . . . . . . . . . . . . . . . \
. . . . . . . . . . . . . . . . . . . . . . . . 3.35
Page 183 of 298
3.5
Air recirculation is for:
– isolating the vehicle from the exter-nal atmosphere (driving in polluted
areas, etc.);
– lowering the passenger compart- ment temperature as quickly as pos-
sible.Switching the air
recirculation on
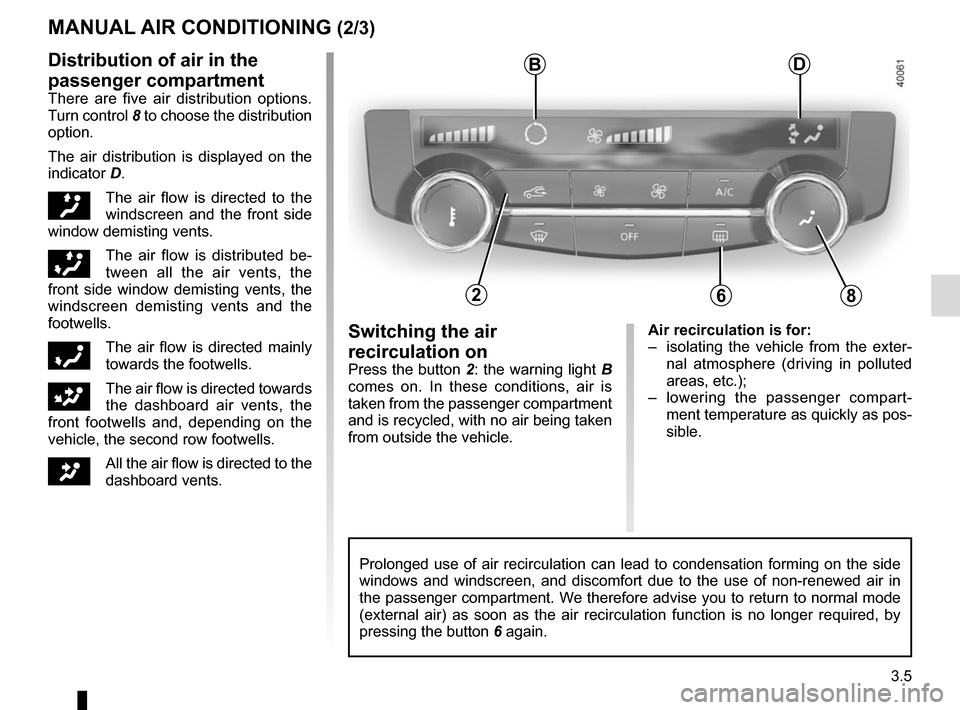
Press the button 2: the warning light B
comes on. In these conditions, air is
taken from the passenger compartment
and is recycled, with no air being taken
from outside the vehicle.
MANUAL AIR CONDITIONING (2/3)
Prolonged use of air recirculation can lead to condensation forming on t\
he side
windows and windscreen, and discomfort due to the use of non-renewed air\
in
the passenger compartment. We therefore advise you to return to normal mode
(external air) as soon as the air recirculation function is no longer \
required, by
pressing the button 6 again.
Distribution of air in the
passenger compartment
There are five air distribution options.
Turn control 8 to choose the distribution
option.
The air distribution is displayed on the
indicator D.
õThe air flow is directed to the
windscreen and the front side
window demisting vents.
÷The air flow is distributed be-
tween all the air vents, the
front side window demisting vents, the
windscreen demisting vents and the
footwells.
óThe air flow is directed mainly
towards the footwells.
GThe air flow is directed towards
the dashboard air vents, the
front footwells and, depending on the
vehicle, the second row footwells.
JAll the air flow is directed to the
dashboard vents.
B
682
D
Page 188 of 298
3.10
45
B
AUTOMATIC CLIMATE CONTROL (4/6)
6311
Clear View function
This function quickly demists and de-
ices the windscreen, the rear screen,
the front side windows, and the door
mirrors (depending on the vehicle). The
air conditioning and rear screen de-ic-
ing functions must be activated.
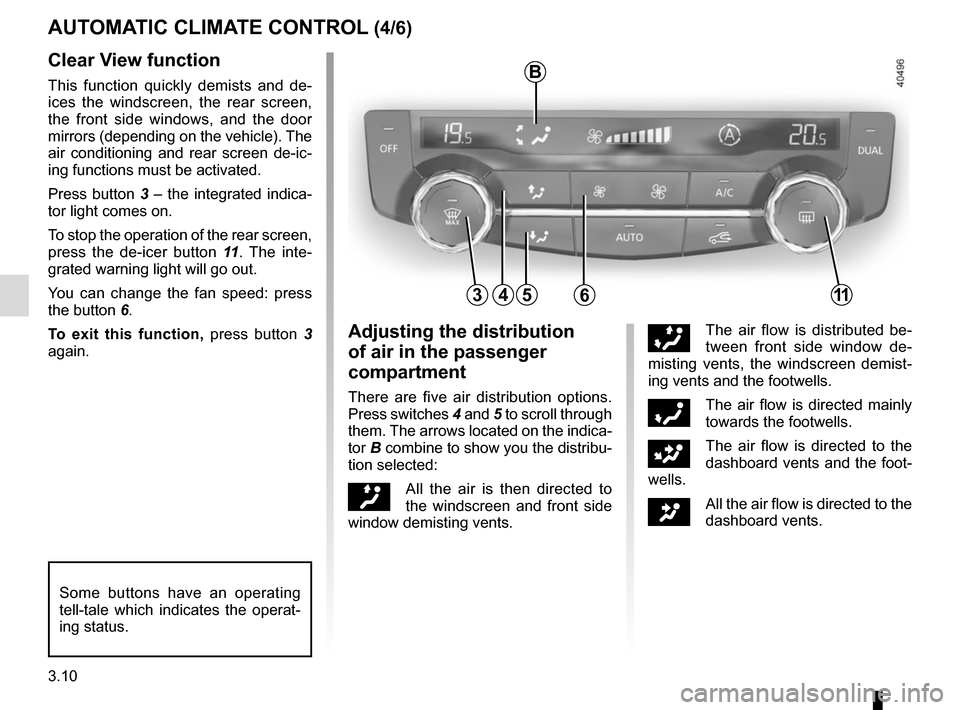
Press button 3 – the integrated indica-
tor light comes on.
To stop the operation of the rear screen,
press the de-icer button 11. The inte-
grated warning light will go out.
You can change the fan speed: press
the button 6.
To exit this function, press button 3
again.
Some buttons have an operating
tell-tale which indicates the operat-
ing status.
Adjusting the distribution
of air in the passenger
compartment
There are five air distribution options.
Press switches 4 and 5 to scroll through
them. The arrows located on the indica-
tor B combine to show you the distribu-
tion selected:
õAll the air is then directed to
the windscreen and front side
window demisting vents.
÷The air flow is distributed be-
tween front side window de-
misting vents, the windscreen demist-
ing vents and the footwells.
óThe air flow is directed mainly
towards the footwells.
GThe air flow is directed to the
dashboard vents and the foot-
wells.
JAll the air flow is directed to the
dashboard vents.
Page 191 of 298

3.13
Operating faults
As a general rule, contact your ap-
proved dealer in the event of an oper-
ating fault.
– Reduction in de-icing, demisting or air conditioning performance.
This may be caused by the passen-
ger compartment filter cartridge be-
coming clogged.
– No cold air is being produced .
Check that the controls are set cor-
rectly and that the fuses are sound.
Otherwise, switch off the system.
Presence of water under the
vehicle
After prolonged use of the air condi-
tioning system, it is normal for water
to be present under the vehicle. This is
caused by condensation.
AIR CONDITIONING: information and advice on use
Do not open the refriger-
ant fluid circuit. The fluid
may damage eyes or skin.
Fuel consumption
You will normally notice an increase in
fuel consumption (especially in town)
when the air conditioning is operating.
For vehicles fitted with air conditioning
with no automatic mode, switch off the
system when it is not required.
Advice for reducing consumption
and helping to preserve the environ-
ment
Drive with the air vents open and the
windows closed.
If the vehicle has been parked in the
sun, open the doors for a few moments
to let the hot air escape before starting
the engine.
Advice on use
In some situations, (air conditioning
off, air recirculation activated, ventila-
tion speed at zero or low, etc.) you may
notice that condensation starts to form
on the windows and windscreen.
If there is condensation, use the “Clear
View” function to remove it, then use
the air conditioning in automatic mode
to stop it forming again.
Maintenance
Refer to the Maintenance Document
for your vehicle for the inspection fre-
quency.
Do not add anything to the
vehicle’s ventilation circuit
(for example, to remove
bad odours).
There is a risk of damage or of
fire.
Page 201 of 298
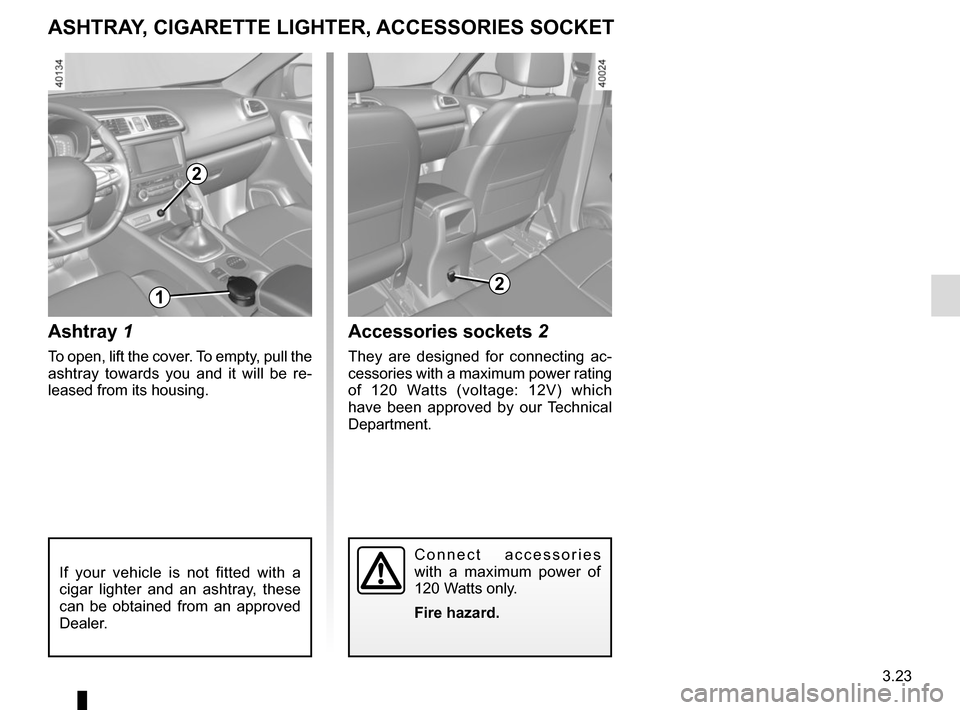
3.23
Ashtray 1
To open, lift the cover. To empty, pull the
ashtray towards you and it will be re-
leased from its housing.
Accessories sockets 2
They are designed for connecting ac-
cessories with a maximum power rating
of 120 Watts (voltage: 12V) which
have been approved by our Technical
Department.
ASHTRAY, CIGARETTE LIGHTER, ACCESSORIES SOCKET
If your vehicle is not fitted with a
cigar lighter and an ashtray, these
can be obtained from an approved
Dealer.
2
12
Connect accessories
with a maximum power of
120 Watts only.
Fire hazard.
Page 210 of 298
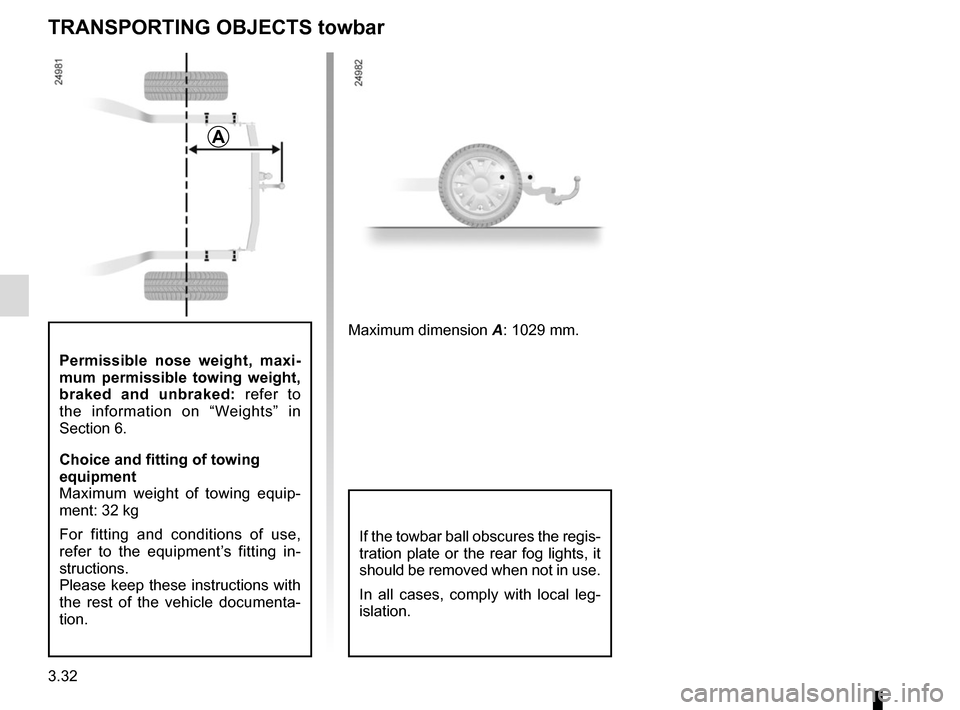
3.32
Permissible nose weight, maxi-
mum permissible towing weight,
braked and unbraked: refer to
the information on “Weights” in
Section 6.
Choice and fitting of towing
equipment
Maximum weight of towing equip-
ment: 32 kg
For fitting and conditions of use,
refer to the equipment’s fitting in-
structions.
Please keep these instructions with
the rest of the vehicle documenta-
tion.
TRANSPORTING OBJECTS towbar
A
Maximum dimension A: 1029 mm.
If the towbar ball obscures the regis-
tration plate or the rear fog lights, it
should be removed when not in use.
In all cases, comply with local leg-
islation.
Page 225 of 298

4.11
TYRE PRESSURES (2/2)
Special note concerning fully laden
vehicles (Maximum Permissible All-Up
Weight) and towing a trailer: the maxi-
mum speed must be limited to 60 mph
(100 kph) and the tyre pressure in-
creased by 0.2 bar.
Please refer to the information on
“Weights” in Section 6.
Tyre safety and use of snow chains:
Refer to the information on “Tyres” in
Section 5 for the servicing conditions
and, depending on the version, the use
of chains. For your safety, please re-
spect the speed limit.
When they need to be re-
placed, only tyres of the
same make, size, type and profile
should be used on a single axle.
They must: either have a load ca-
pacity and speed rating at least
equal to those of the original
tyres, or conform to those recom-
mended by an authorised dealer.
Failure to heed these instructions
could endanger your safety and
affect your vehicle’s roadworthi-
ness.
Risk of loss of control of the ve-
hicle.