Page 60 of 316
1.54
CHILD SEATS: attachment using the ISOFIX system (2/6)
Five-seater version
Type of child seat Weight of
the child Seat size ISOFIX Front passenger
seat Rear side seats Rear centre seat
Carrycot fitted across
the vehicle
Group 0 < 10 kg
F, GXX X
Rear-facing shell
seat
Groups 0 or 0 + < 10 kg and
< 13 kg
E
XIL (1) IL (1)
Shell seat/rear-facing
seat
Groups 0+ and 1 < 13 kg and 9 to
18 kg
C, D
XIL (1) IL (1)
Forward-facing seat
Group 1 9 to 18 kg
A, B, B1XIUF - IL (1) (2) IUF - IL (1) (2)
Booster seat
Groups 2 and 3 15 to 25 kg and
22 to 36 kg
X
IUF - IL (1) (2) IUF - IL (1) (2)
Seat i-Size Xi-U i-U
The table below summarises the information already shown on the diagram \
on the previous page, to ensure the regula-
tions in force are respected.
Page 62 of 316
1.56
Seven-seat version
Type of child seat Weight of
the child Seat size
ISOFIX Front
passenger seat Row 2 rear
side seats Row 2 rear
centre seat Row 3 rear
centre
seat (3)
Carrycot fitted across
the vehicle
Group 0 < 10 kg F, G X X X X
Rear-facing shell
seat
Groups 0 or 0 + < 10 kg and
< 13 kg
E X IL (1) IL (1) X
Shell seat/rear-facing
seat
Groups 0+ and 1 < 13 kg and 9 to
18 kg
C, D X IL (1) IL (1) X
Forward-facing seat
Group 1 9 to 18 kg A, B, B1 X IUF - IL (1) (2) IUF - IL (1) (2) X
Booster seat
Groups 2 and 3 15 to 25 kg and
22 to 36 kg
X IUF - IL (1) (2) IUF - IL (1) (2) X
Seat i-Size X i-U i-U X
CHILD SEATS: attachment using the isofix system (4/6)
The table below summarises the information already shown in the diagram \
on the following pages, to ensure the appli-
cable regulations are respected.
Page 73 of 316

1.67
WARNING LIGHTS (4/6)
ÉPreheating warning light
(diesel version)
This should come on when the igni-
tion is switched on. It indicates that the
heater plugs are in operation.
It goes out when preheating is com-
plete. The engine can be started.
2 Door(s) open warning light
A
The display of information shown below DEPENDS ON THE VEHICLE EQUIPMENT \
AND COUNTRY.
åAir bag warning light
This warning light will be dis-
played on the instrument panel when
the ignition is switched on or the engine
is started, and will then go out after a
few seconds.
If it does not come on when the igni-
tion is switched on, or comes on when
the engine is running, there is a fault in
the system.
Contact your approved Dealer as soon
as possible.
ÓBrake pedal warning light
This lights up when the brake
pedal should be depressed. Refer to
the information on the “Automatic gear-
box” in Section 2.
Please refer to the information on
“Driving advice, Eco-driving” in
Section 2.
}Handbrake or electronic
parking brake warning light
Refer to the information on the “Assisted
parking brake” in Section 2.
Rear seat belt reminder
(depending
on vehicle)
Warning light
ß comes on, accom-
panied (depending on the vehicle) by
a message indicating the number of
fastened seat belts on the instrument
panel for approximately 30 seconds,
each time the vehicle is started, a door
is opened or a rear seat belt is fas-
tened/unfastened. Check that the rear
passengers are wearing seat belts and
that the number of seat belts shown as
fastened corresponds to the number of
rear seat places occupied.
Š ‰Gear change indicator
This lights up to advise you to
change to a higher gear (up arrow) or
lower gear (down arrow).
Please refer to the information on
“Driving advice, Eco-driving” in
Section 2.
Page 98 of 316

1.92
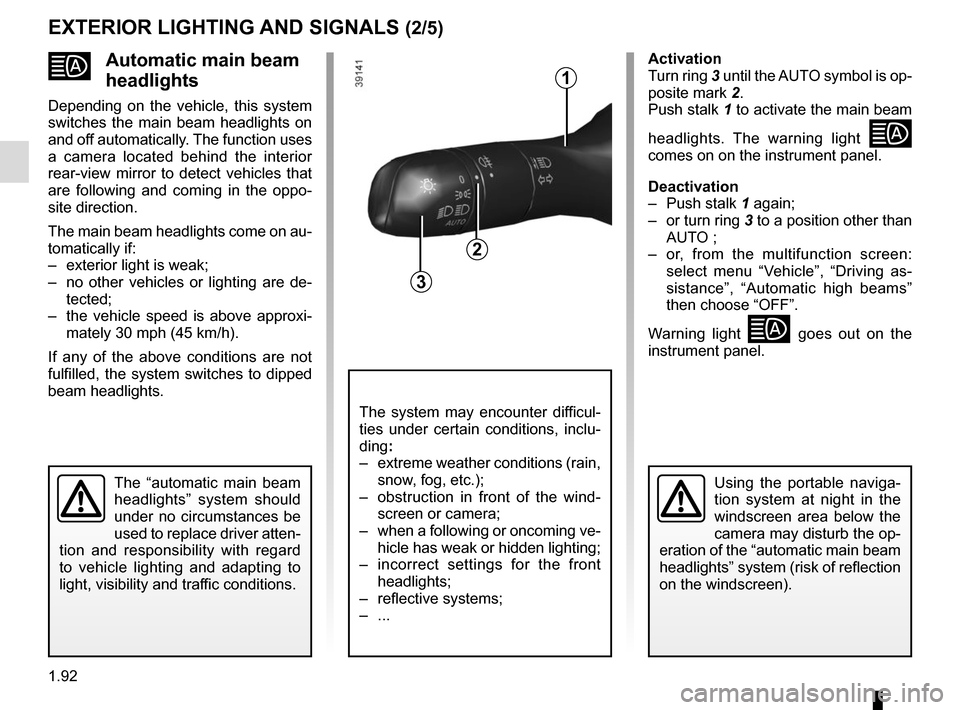
�Automatic main beam
headlights
Depending on the vehicle, this system
switches the main beam headlights on
and off automatically. The function uses
a camera located behind the interior
rear-view mirror to detect vehicles that
are following and coming in the oppo-
site direction.
The main beam headlights come on au-
tomatically if:
– exterior light is weak;
– no other vehicles or lighting are de-tected;
– the vehicle speed is above approxi- mately 30 mph (45 km/h).
If any of the above conditions are not
fulfilled, the system switches to dipped
beam headlights.
The “automatic main beam
headlights” system should
under no circumstances be
used to replace driver atten-
tion and responsibility with regard
to vehicle lighting and adapting to
light, visibility and traffic conditions.Using the portable naviga-
tion system at night in the
windscreen area below the
camera may disturb the op-
eration of the “automatic main beam
headlights” system (risk of reflection
on the windscreen).
EXTERIOR LIGHTING AND SIGNALS (2/5)
3
1
The system may encounter difficul-
ties under certain conditions, inclu-
ding :
– extreme weather conditions (rain, snow, fog, etc.);
– obstruction in front of the wind- screen or camera;
– when a following or oncoming ve- hicle has weak or hidden lighting;
– incorrect settings for the front headlights;
– reflective systems;
– ...
Activation
Turn ring 3 until the AUTO symbol is op-
posite mark 2.
Push stalk 1 to activate the main beam
headlights. The warning light
�
comes on on the instrument panel.
Deactivation
– Push stalk 1 again;
– or turn ring 3 to a position other than AUTO ;
– or, from the multifunction screen: select menu “Vehicle”, “Driving as-
sistance”, “Automatic high beams”
then choose “OFF”.
Warning light
� goes out on the
instrument panel.
2
Page 101 of 316

1.95
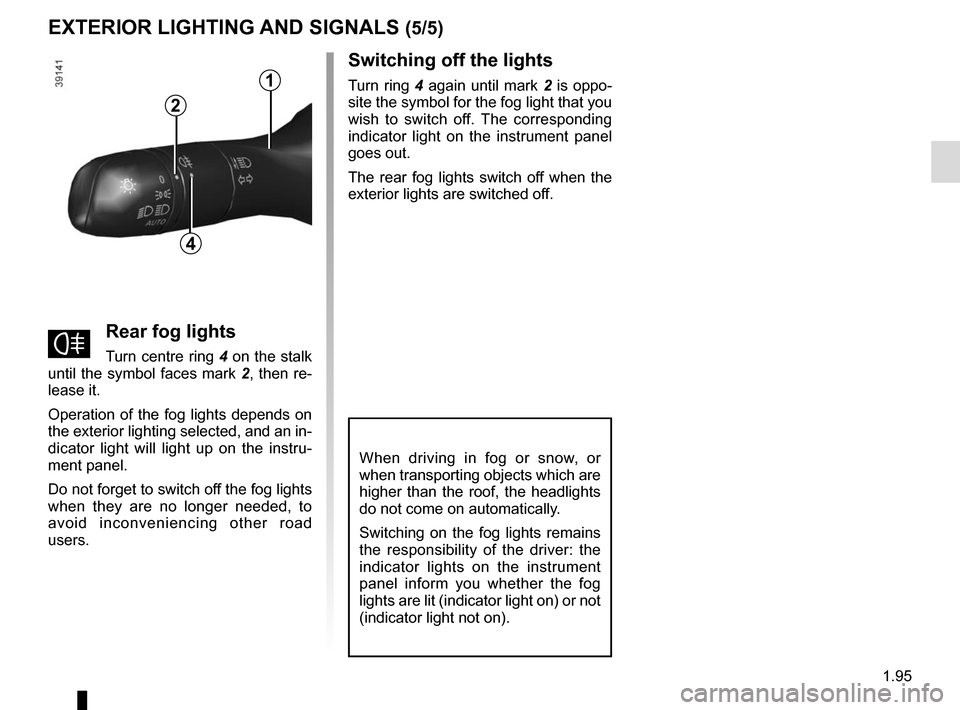
EXTERIOR LIGHTING AND SIGNALS (5/5)
fRear fog lights
Turn centre ring 4 on the stalk
until the symbol faces mark 2, then re-
lease it.
Operation of the fog lights depends on
the exterior lighting selected, and an in-
dicator light will light up on the instru-
ment panel.
Do not forget to switch off the fog lights
when they are no longer needed, to
avoid inconveniencing other road
users.
Switching off the lights
Turn ring 4 again until mark 2 is oppo-
site the symbol for the fog light that you
wish to switch off. The corresponding
indicator light on the instrument panel
goes out.
The rear fog lights switch off when the
exterior lights are switched off.
When driving in fog or snow, or
when transporting objects which are
higher than the roof, the headlights
do not come on automatically.
Switching on the fog lights remains
the responsibility of the driver: the
indicator lights on the instrument
panel inform you whether the fog
lights are lit (indicator light on) or not
(indicator light not on).
4
2
1
Page 102 of 316

1.96
Special note
When driving the vehicle, the wiping
speed slows down whenever the vehi-
cle stops. For example, fast wiping
speed will slow to normal wiping speed.
As soon as the vehicle moves off,
wiping will return to the speed originally
selected.
If stalk 1 is operated, it overrides and
cancels the automatic function.Vehicle fitted with intermittent
windscreen wipers
A single sweep
A short push will trigger one sweep
of the wipers.
B stop
C intermittent wiping
The wipers will pause for seve-
ral seconds between sweeps. It
is possible to change the time
between sweeps by turning ring 2.
D slow continuous wiping
E fast continuous wiping
Positions A, C and D are accessible
with the ignition on. Position E is
accessible only when the engine is
running.
1
A
B
C
D
WINDSCREEN WASH/WIPE (1/6)
E
Check the condition of the wiper
blades. You are responsible for their
service life:
– they must remain clean: clean the blades, windscreen and
rear screen regularly with soapy
water;
– do not use them when the winds- creen or rear screen are dry;
– free them from the windscreen or rear screen when they have not
been used for a long time.
In all cases, replace them as soon
as they begin to lose efficiency: ap-
proximately once a year.
Before using the rear wiper, check
that no object obstructs the travel of
the blade.
Do not use the wiper arm to open or
close the tailgate.
1
2
Page 104 of 316

1.98
D slow continuous wiping
E fast continuous wiping
Positions A and D are accessible
with the ignition on. Positions B
and E are accessible only with the
engine running.
Operating fault
In the event of a malfunction of the
automatic wiping, the wiper is set to
intermittent wiping. Contact an au-
thorised dealer.
The operation of the rain sensor can
be disturbed in the event of:
– damaged wiper blades; a screen
of water or traces left by a blade in
the sensor’s detection zone may
increase the response time of the
automatic wiper, or increase the
wiping frequency;
– a windscreen with any chip or
crack level with the sensor, or a
windscreen covered in dust, dirt,
insects, ice, the use of washing
wax and water-repellent chemi-
cals; the automatic wiping will
be less sensitive, or even unres-
ponsive.
1
A
B
C
DE
WINDSCREEN WASH/WIPE (3/6)
Special note
When driving the vehicle, the wiping
speed slows down whenever the vehi-
cle stops. For example, fast wiping
speed will slow to normal wiping speed.
As soon as the vehicle moves off,
wiping will return to the speed originally
selected.
If stalk 1 is operated, it overrides and
cancels the automatic function.
Precautions
– In the event of ice, check whether the
blades are stuck to the windscreen
before operating the wiping mecha-
nism. If you activate the wipers while
the blades are stuck down with ice,
you may risk damaging both the
blade and the wiper motor.
– Do not activate the wipers on a dry
screen. This will lead to the prema-
ture wear or damage to the blades.
Page 108 of 316

1.102
REAR SCREEN WASH/WIPE (1/2)
1
3
Check the condition of the wiper
blades. You are responsible for their
service life:
– they must remain clean: clean the blades, windscreen and
rear screen regularly with soapy
water;
– do not use them when the winds- creen or rear screen are dry;
– free them from the windscreen or rear screen when they have not
been used for a long time.
In all cases, replace them as soon
as they begin to lose efficiency: ap-
proximately once a year.
Before using the rear wiper, check
that no object obstructs the travel of
the blade.
Do not use the wiper arm to open or
close the tailgate.
YRear screen wiper
With the ignition on, turn ring 3
on stalk 1 to align the symbol with
mark 2.
– stop;
– intermittent wiping. The wipers will pause for several
seconds between sweeps. Wiping
frequency varies with vehicle
speed;
– slow continuous wiping. To stop the operation, pivot ring
3 again.
Note:
When washing using a roller type car
wash, return the ring 3 on the stalk 1
to the stop position to deactivate auto-
matic wiping.
Follow usage recommendations.
Before any action involving
the rear screen (washing
the vehicle, de-icing, clean-
ing, etc.) return stalk 1 to
the stop position.
Risk of injury and/or damage.
2