Page 173 of 252
4.11
TYRE PRESSURE (2/2)
Special note concerning fully laden
vehicles (Maximum Permissible All-Up
Weight) and towing a trailer: the maxi-
mum speed must be limited to 60 mph
(100 kph) and the tyre pressure in-
creased by 0.2 bar.
Please refer to the information on
“Weights” in Section 6. Tyre safety and use of snow chains:
Refer to the information on “Tyres” in
Section 5 for the servicing conditions
and, depending on the version, the use
of chains.
For your safety, please re-
spect the speed limit.
When they need to be re-
placed, only tyres of the
same make, size, type and profile
should be used on a single axle.
They must: either have a load ca-
pacity and speed rating at least
equal to those of the original
tyres, or conform to those recom-
mended by an authorised dealer.
Failure to heed these instructions
could endanger your safety and
affect your vehicle’s roadworthi-
ness.
Risk of loss of control of the ve-
hicle.
Page 179 of 252

5.1
Section 5: Practical advice
Puncture, emergency spare wheel . . . . . . . . . . . . . . . . . . . . . . . . . . . . . . . . . . . .\
. . . . . . . . . . . . . . 5.2
Tyre inflation kit . . . . . . . . . . . . . . . . . . . . . . . . . . . \
. . . . . . . . . . . . . . . . . . . . . . . . . . . . . . . . . . . . . . 5.6
Tools . . . . . . . . . . . . . . . . . . . . . . . . . . . . . . . . . . . .\
. . . . . . . . . . . . . . . . . . . . . . . . . . . . . . . . . . . . . 5.9
Wheel trims - wheel . . . . . . . . . . . . . . . . . . . . . . . . . . . . . . . . . . . . \
. . . . . . . . . . . . . . . . . . . . . . . . . . 5.10
Changing a wheel . . . . . . . . . . . . . . . . . . . . . . . . . . . . . . . . . . . .\
. . . . . . . . . . . . . . . . . . . . . . . . . . . 5.11
Tyres (tyre and wheel safety, use in winter) . . . . . . . . . . . . . . . . . . . . . . . . . . . . . . . . . . . .\
. . . . . . . 5.13
Headlights (changing bulbs) . . . . . . . . . . . . . . . . . . . . . . . . . . . . . . . . . . . .\
. . . . . . . . . . . . . . . . . . . 5.16
Rear lights and side lights (changing bulbs) . . . . . . . . . . . . . . . . . . . . . . . . . . . . . . . . . . . .\
. . . . . . . 5.20
Indicator lights (changing bulbs) . . . . . . . . . . . . . . . . . . . . . . . . . . . . . . . . . . . .\
. . . . . . . . . . . . . . . . 5.23
Interior lighting (changing bulbs) . . . . . . . . . . . . . . . . . . . . . . . . . . . . . . . . . . . . \
. . . . . . . . . . . . . . . . 5.24
RENAULT card: battery . . . . . . . . . . . . . . . . . . . . . . . . . . . . . . . . . . . . \
. . . . . . . . . . . . . . . . . . . . . . . 5.26
Fuses . . . . . . . . . . . . . . . . . . . . . . . . . . . . . . . . . . . . \
. . . . . . . . . . . . . . . . . . . . . . . . . . . . . . . . . . . . . 5.27
Battery . . . . . . . . . . . . . . . . . . . . . . . . . . . . . . . . . . . . \
. . . . . . . . . . . . . . . . . . . . . . . . . . . . . . . . . . . . 5.32
Fitting a radio . . . . . . . . . . . . . . . . . . . . . . . . . . . . . . . . . . . . \
. . . . . . . . . . . . . . . . . . . . . . . . . . . . . . . 5.34
Accessories . . . . . . . . . . . . . . . . . . . . . . . . . . . . . . . . . . . . \
. . . . . . . . . . . . . . . . . . . . . . . . . . . . . . . . 5.35
Wipers (replacing blades) . . . . . . . . . . . . . . . . . . . . . . . . . . . . . . . . . . . .\
. . . . . . . . . . . . . . . . . . . . . 5.36
Towing . . . . . . . . . . . . . . . . . . . . . . . . . . . . . . . . . . . . \
. . . . . . . . . . . . . . . . . . . . . . . . . . . . . . . . . . . . 5.38
Operating faults . . . . . . . . . . . . . . . . . . . . . . . . . . . . . . . . . . . . \
. . . . . . . . . . . . . . . . . . . . . . . . . . . . . 5.40
Page 181 of 252
5.3
1
2
Emergency spare wheel
– Open the tailgate;
– lift the carpet;
– lift the cover 1 and remove it;– remove the tool kit by lifting it by its handles;
The label 2 reminds you of how to
operate the emergency spare wheel
winch.
34
A
– unscrew nut 3 in an anti-clockwise
direction until it comes off com-
pletely, then place the palm of your
hand on section A of handle 4 and
push towards the front of the vehicle.
The wheel will be lowered;
When you push handle 4,
the wheel will drop under
the vehicle; risk of injury.
Ensure that everybody is
kept away from the underside of the
vehicle.
5
6
– pull the wheel towards you;
– lay the wheel down flat and unfasten cable 5 from its housing 6.
You may remove the wheel from its
support.
Do not touch the exhaust as
it could burn.
PUNCTURE, EMERGENCY SPARE WHEEL (2/4)
Page 182 of 252
5.4
After changing a wheel, position the
replaced wheel on support 7, with the
valve facing the ground. Clip cable 5
in its housing 6, then push the wheel
under the boot.
Ensure that tab 8 is positioned towards
the rear of the vehicle.
Position yourself behind the vehicle and
pull handle 4 to raise the wheel until it is
anchored under the vehicle.
To carry out this operation, the cable
must be unwound.
If the cable has been wound back up on
its own, unwind it again as follows:
– pull the handle to unwind the cable;
– press the button located under
handle 4 to hold the unwound cable,
then guide it down;
– recover the cable from underneath the vehicle.
You may refit the wheel.To refit a wheel
PUNCTURE, EMERGENCY SPARE WHEEL (3/4)
456
7
8
A wheel size larger than 15” cannot
be installed under the vehicle.
Make sure that no-one has their fingers close to the cable when you
move the handle: risk of injury.
Page 183 of 252
5.5
NB: if the tool kit does not lock in place,
check the tightness of nut 3 and the
correct positioning of handle 4.
Special features
The emergency spare wheel holder
should always be present when you are
driving even when the wheel itself is not
present: risk of water entering the ve-
hicle.
If you have to release it when it is not
holding a wheel, push the centre of the
wheel holder towards the ground while
pressing handle 4.
To lock the system
– Press nut 3, screwing it on fully until
it locks in place. Several turns will
be necessary. This operation is es-
sential to ensure that the wheel is
secure;
– return handle 4 to its original posi-
tion;
– clip the tool kit;
– replace the cover, then lower it and replace the luggage compartment
carpet.
PUNCTURE, EMERGENCY SPARE WHEEL (4/4)
The system should only be
used with the original ve-
hicle wheels or identical
wheels.
It is essential to lock the nut
so that the wheel is held se-
curely.
4
3
Page 187 of 252

5.9
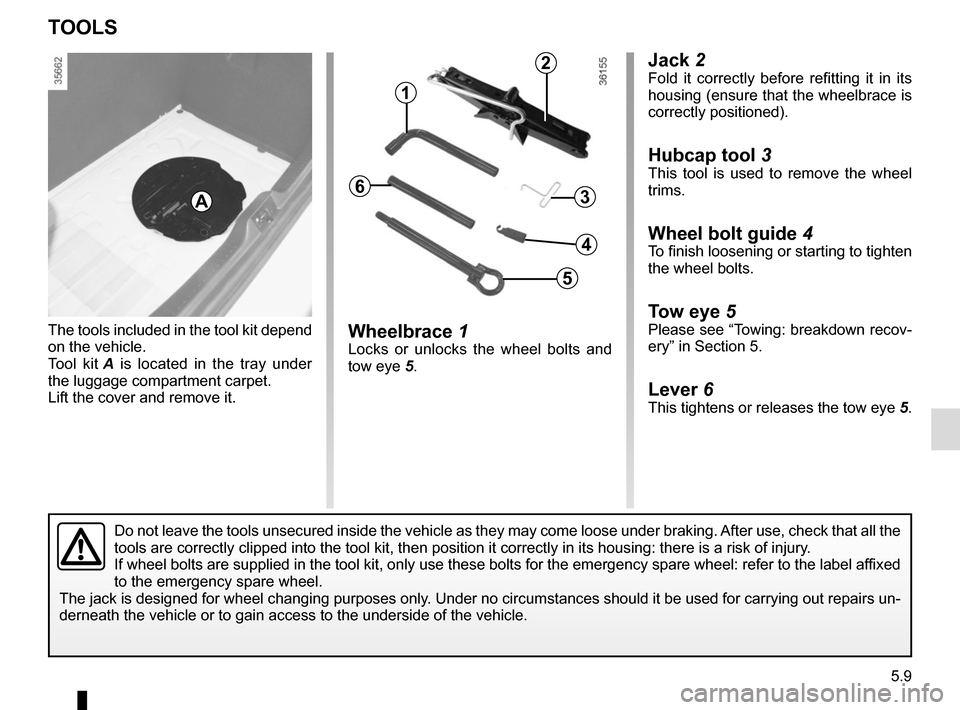
Jack 2Fold it correctly before refitting it in its
housing (ensure that the wheelbrace is
correctly positioned).
Hubcap tool 3
This tool is used to remove the wheel
trims.
Wheel bolt guide 4To finish loosening or starting to tighten
the wheel bolts.
Tow eye 5Please see “Towing: breakdown recov-
ery” in Section 5.
Lever 6This tightens or releases the tow eye 5.
Wheelbrace 1Locks or unlocks the wheel bolts and
tow eye 5.
The tools included in the tool kit depend
on the vehicle.
Tool kit
A is located in the tray under
the luggage compartment carpet.
Lift the cover and remove it.
TOOLS
A
Do not leave the tools unsecured inside the vehicle as they may come loo\
se under braking. After use, check that all the
tools are correctly clipped into the tool kit, then position it correctl\
y in its housing: there is a risk of injury.
If wheel bolts are supplied in the tool kit, only use these bolts for th\
e emergency spare wheel: refer to the label affixed
to the emergency spare wheel.
The jack is designed for wheel changing purposes only. Under no circumstances should it be used for carrying out repairs un-
derneath the vehicle or to gain access to the underside of the vehicle.
2
1
3
5
4
6
Page 216 of 252

5.38
TOWING: breakdown recovery (1/2)
Before towing, unlock the steering
column: with the clutch depressed,
engage first gear (lever in position N
or R for vehicles with automatic gear-
boxes), insert the RENAULT card in the
card reader, then press the engine start
button for two seconds.
Reposition the lever to neutral (posi-
tion N for vehicles fitted with an auto-
matic gearbox).
The column is unlocked, the acces-
sory functions are supplied: the vehi-
cle lights can be used (indicators, brake
lights etc.). At night the vehicle must
have its lights on.
Once you have finished towing, press
the engine start button twice (risk of
running down the battery). The speed specified by current legis-
lation for towing must always be ob-
served. If your vehicle is the towing
vehicle, do not exceed the maximum
towing weight for your vehicle (refer
to the information on “Weights” in
Section 6).
Towing a vehicle with an
automatic gearbox
With the engine switched off, the trans-
mission is no longer lubricated. It is
preferable to tow this type of vehicle on
a trailer or tow it with the front wheels
off the ground.
Under
exceptional circumstances, you
may tow the vehicle with all four wheels
on the ground, only going forward, with
the gear lever in the neutral N position,
and for a distance not exceeding
30 miles (50 km).
Do not remove the
RENAULT card from the
reader when the vehicle is
being towed.
If the lever is stuck in P ,
even though you are de-
pressing the brake pedal,
the lever can be released
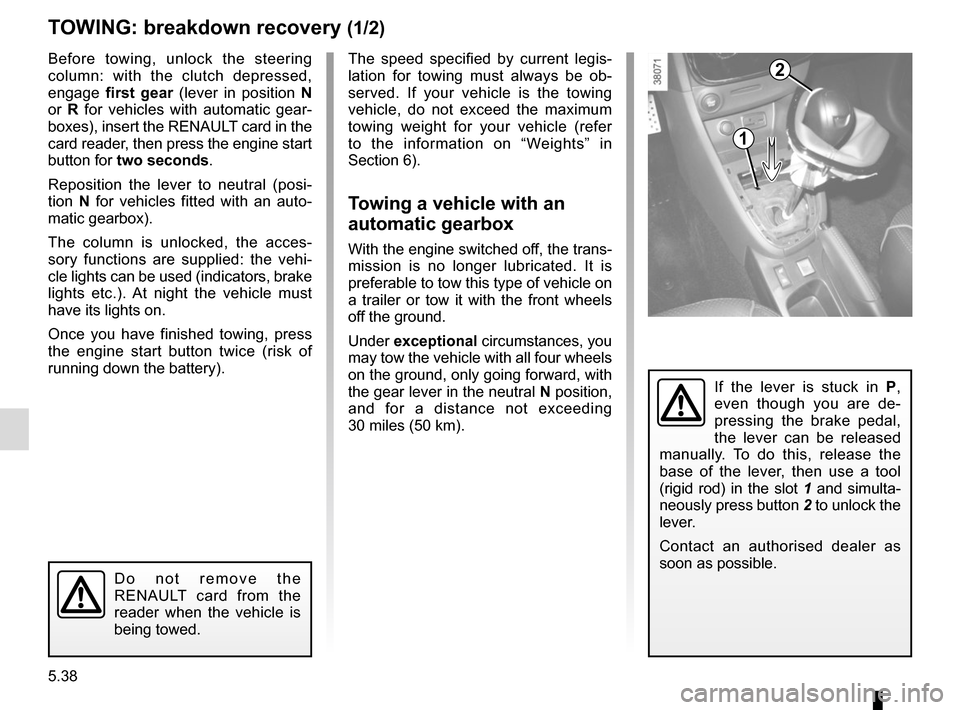
manually. To do this, release the
base of the lever, then use a tool
(rigid rod) in the slot 1 and simulta-
neously press button 2 to unlock the
lever.
Contact an authorised dealer as
soon as possible.
1
2
Page 217 of 252

5.39
TOWING: breakdown recovery (2/2)
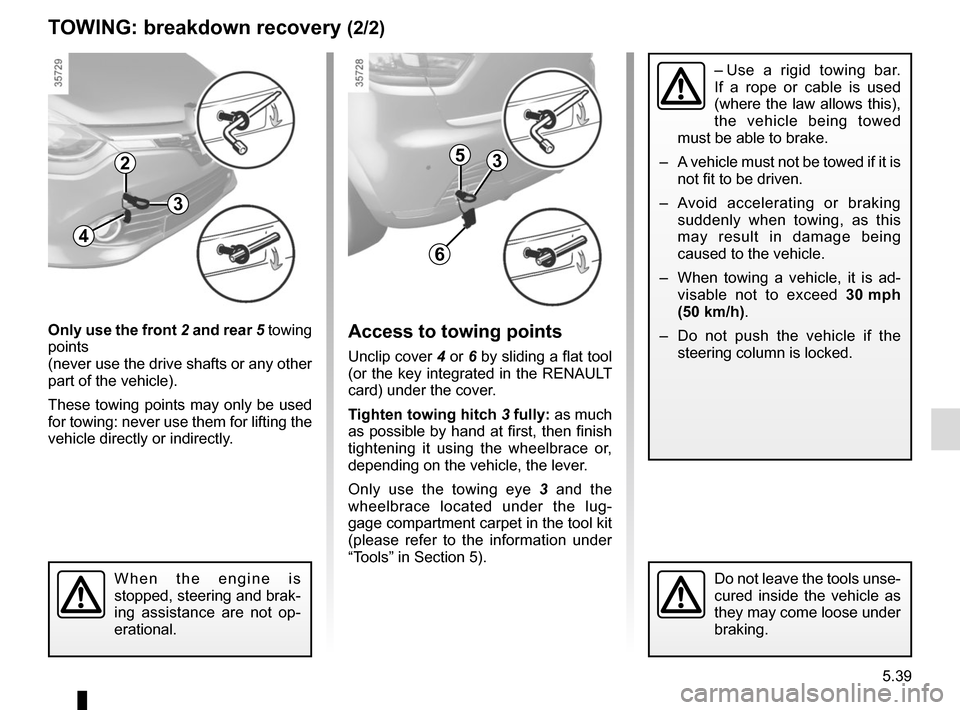
Only use the front 2 and rear 5 towing
points
(never use the drive shafts or any other
part of the vehicle).
These towing points may only be used
for towing: never use them for lifting the
vehicle directly or indirectly.Access to towing points
Unclip cover 4 or 6 by sliding a flat tool
(or the key integrated in the RENAULT
card) under the cover.
Tighten towing hitch 3 fully: as much
as possible by hand at first, then finish
tightening it using the wheelbrace or,
depending on the vehicle, the lever.
Only use the towing eye 3 and the
wheelbrace located under the lug-
gage compartment carpet in the tool kit
(please refer to the information under
“Tools” in Section 5).
When the engine is
stopped, steering and brak-
ing assistance are not op-
erational.Do not leave the tools unse-
cured inside the vehicle as
they may come loose under
braking.
5
6
3
– Use a rigid towing bar.
If a rope or cable is used
(where the law allows this),
the vehicle being towed
must be able to brake.
– A vehicle must not be towed if it is not fit to be driven.
– Avoid accelerating or braking suddenly when towing, as this
may result in damage being
caused to the vehicle.
– When towing a vehicle, it is ad- visable not to exceed 30 mph
(50 km/h).
– Do not push the vehicle if the steering column is locked.
4
3
2