Page 113 of 425
WARNING!
•Drivers must be careful when backing up even
when using ParkSense®. Always check carefully
behind your vehicle, look behind you, and be sure
to check for pedestrians, animals, other vehicles,
obstructions, and blind spots before backing up.
You are responsible for safety and must continue to
pay attention to your surroundings. Failure to do so
can result in serious injury or death.
• Before using ParkSense®, it is strongly recom-
mended that the ball mount and hitch ball assem-
bly is disconnected from the vehicle when the
vehicle is not used for towing. Failure to do so can
result in injury or damage to vehicles or obstacles
because the hitch ball will be much closer to the
obstacle than the rear fascia when the loudspeaker
sounds the continuous tone. Also, the sensors
(Continued)
WARNING! (Continued)
could detect the ball mount and hitch ball assem-
bly, depending on its size and shape, giving a false
indication that an obstacle is behind the vehicle.
If it’s necessary to keep the ball mount and hitch ball
assembly mounted for a long period, it is possible to filter
out the ball mount and hitch ball assembly presence in
sensor field of view. The filtering operation must be
performed only by an authorized dealer.
PARKVIEW REAR BACK UP CAMERA — IF
EQUIPPED
Your vehicle may be equipped with the ParkView Rear
Back Up Camera that allows you to see an on-screen
image of the rear surroundings of your vehicle whenever
the shift lever is put into REVERSE and/or when the rear
doors are opened. The image will be displayed on the
touchscreen display along with a caution note to “check
3
UNDERSTANDING THE FEATURES OF YOUR VEHICLE 111
Page 115 of 425
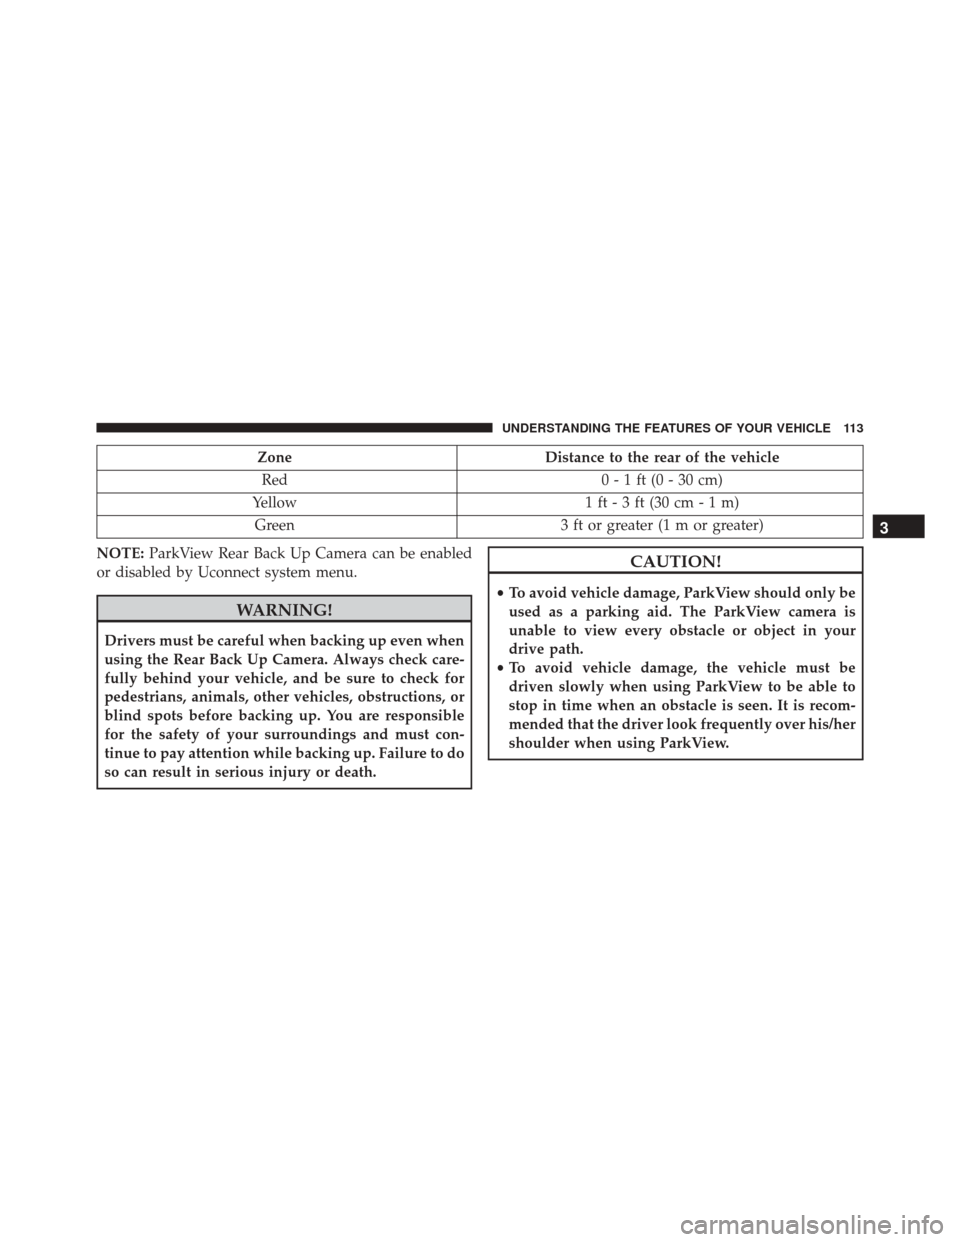
ZoneDistance to the rear of the vehicle
Red 0 - 1 ft (0 - 30 cm)
Yellow 1 ft - 3 ft (30 cm - 1 m)
Green 3 ft or greater (1 m or greater)
NOTE: ParkView Rear Back Up Camera can be enabled
or disabled by Uconnect system menu.
WARNING!
Drivers must be careful when backing up even when
using the Rear Back Up Camera. Always check care-
fully behind your vehicle, and be sure to check for
pedestrians, animals, other vehicles, obstructions, or
blind spots before backing up. You are responsible
for the safety of your surroundings and must con-
tinue to pay attention while backing up. Failure to do
so can result in serious injury or death.
CAUTION!
• To avoid vehicle damage, ParkView should only be
used as a parking aid. The ParkView camera is
unable to view every obstacle or object in your
drive path.
• To avoid vehicle damage, the vehicle must be
driven slowly when using ParkView to be able to
stop in time when an obstacle is seen. It is recom-
mended that the driver look frequently over his/her
shoulder when using ParkView.
3
UNDERSTANDING THE FEATURES OF YOUR VEHICLE 113
Page 116 of 425
NOTE:If snow, ice, mud, or any foreign substance
builds up on the camera lens, clean the lens, rinse with
water, and dry with a soft cloth. Do not cover the lens.
OVERHEAD CONSOLE — IF EQUIPPED
The overhead console is located on the headliner above
the review mirror. The overhead console contains the
following features:
• Automatic Dome Lights
• Dome Lights
• Map Lights
Map/Dome/Lights
These lights are mounted between the sun visors on the
overhead console. Each light is turned on by pushing the
corresponding switch. Left Switch
•
Push the left switch to the left to turn OFF the auto
dome lights. The dome lights will not automatically
turn on when a door is opened.
• Push the left switch to the right to turn ON the dome
lights.
Right Switch
• Push the right switch to the left to turn ON the left
map light.
• Push the right switch to the right to turn ON the right
map light.
114 UNDERSTANDING THE FEATURES OF YOUR VEHICLE
Page 139 of 425
24. Air Bag Warning LightThis light will turn on for four to eight seconds
as a bulb check when the ignition switch is first
turned to ON/RUN. If the light is either not on
during starting, stays on, or turns on while
driving, have the system inspected at an authorized
dealer as soon as possible. Refer to “Occupant Restraints”
in “Things To Know Before Starting Your Vehicle” for
further information.
25. Tire Pressure Monitoring Telltale Light
Each tire, including the spare (if provided),
should be checked monthly when cold and
inflated to the inflation pressure recommended
by the vehicle manufacturer on the vehicle
placard or tire inflation pressure label. (If your vehicle
has tires of a different size than the size indicated on the vehicle placard or tire inflation pressure label, you should
determine the proper tire inflation pressure for those
tires).
As an added safety feature, your vehicle has been
equipped with a Tire Pressure Monitoring System
(TPMS) that illuminates a low tire pressure telltale when
one or more of your tires is significantly under-inflated.
Accordingly, when the low tire pressure telltale illumi-
nates, you should stop and check your tires as soon as
possible, and inflate them to the proper pressure. Driving
on a significantly under-inflated tire causes the tire to
overheat and can lead to tire failure. Under-inflation also
reduces fuel efficiency and tire tread life, and may affect
the vehicle’s handling and stopping ability.
Please note that the TPMS is not a substitute for proper
tire maintenance, and it is the driver ’s responsibility to
maintain correct tire pressure, even if under-inflation has
not reached the level to trigger illumination of the TPMS
low tire pressure telltale.
4
UNDERSTANDING YOUR INSTRUMENT PANEL 137
Page 152 of 425
Recommendations
Road Safety
We recommend that you learn how to use the various
radio features (for example, Station Preset) before you
begin your journey.
WARNING!
Turning the volume up too high may be dangerous
for the driver and other people on the road. You
should adjust the volume so that you are always able
to hear sounds around you (e.g. horns, ambulances,
police cars, etc.).
Radio Reception
Reception varies constantly while driving.Reception may be affected by mountains, buildings or
bridges, especially when further away from the transmit-
ter of the tuned radio station.
CAUTION!
When listening to traffic news, you may notice
louder volume compared to normal playback.
Care And Maintenance
The radio structure is built to guarantee many years of
operation without needing maintenance. In case of a
fault, contact your local authorized dealer.
Use only a soft, anti-static cloth to clean the front of the
radio.
Detergents and waxes can damage the surface.
150 UNDERSTANDING YOUR INSTRUMENT PANEL
Page 170 of 425
Whenever the radio skips from one folder to another, the
display will show the name of the folder to which you are
going for a few milliseconds (the rotary movements are
ignored during this period) and a maximum of three
seconds. When you reach the last folder and push Button
1 again, the radio will advance to the next folder on the
USB device. When you reach the first folder and push
Button 2 again, the radio will advance to the next folder
on the USB device.
Shuffle (Random Playback)
Pushing the RND button enables or disables the�shuffle�
feature. When enabled, the RND indicator is switched on
and the display will show �RND ON�for two seconds.
The display will then revert to the previous view.
When you push this button again, the function is dis-
abled, the RND indicator is turned off and the display
will show �RND OFF� for two seconds. The display then
reverts to the previous view. If the RND function is enabled, the music forward/
reverse will be random, both in normal mode and Fast
Track mode. In this case, Buttons 1 and 2 (forward/
reverse folder) have the exact same function as
or
(music forward/reverse), respectively.
Switching Between Display Modes
When you push the DISP button for less than two
seconds, information about the track being played will
alternate in the following sequence: Track
Time
TitleAlbumArtistFileFolder
Track. At the first touch of the button, the display
now shows the information type related to the track
being played, for example, if the current information is
track, the display will show �TIME�. If you push any
other buttons or if the DISP button is not pushed for
two seconds, the information type that is on the
display will be selected. When the file that is being
played does not contain the selected information, the
radio will display �NO NAME.�
168 UNDERSTANDING YOUR INSTRUMENT PANEL
Page 175 of 425
•Units — If Equipped
Press the Units button to select the correct unit for
Temperature (°F or °C), Distance (mi or km) and Fuel
Consumption. If the distance is in mi (miles), miles per
gallon (mpg) are set automatically. If the distance
is km, km/1 or 1/100km can be selected.
• Voice Response Length
This feature allows you to change the Voice Response
Length settings. To change the Voice Response Length,
press the Brief or Detailed button on the touchscreen The
button will highlight showing that setting has been
selected. Press the back arrow/Done button on the
touchscreen to return to the previous menu.
Clock & Date
After pressing the Clock button on the touchscreen the
following settings will be available: •
Sync Time With GPS
This feature allows you to automatically have the radio
set the time. To change the Sync Time setting, press the
“Sync with GPS Time” button on the touchscreen. The
button will highlight showing that setting has been
selected. Press the back arrow/Done button on the
touchscreen to return to the previous menu, or push the
back button on the faceplate.
• Set Time Hours
This feature allows you to adjust the hours. The “Sync
with GPS Time” button on the touchscreen must be
unchecked. To make your selection, press the �Up�or
�Down� arrow buttons on the touchscreen to adjust the
hours up or down. Press the back arrow/Done button on
the touchscreen to return to the previous menu or press
the ”X” button on the touchscreen to close out of the
settings screen.
4
UNDERSTANDING YOUR INSTRUMENT PANEL 173
Page 185 of 425
harmful to the radio. If your radio performance does not
satisfactorily “clear” by the repositioning of the phone, it
is recommended that the radio volume be turned down
or off during mobile phone operation when not using
Uconnect® (if equipped).
General Information
This device complies with Part 15 of the FCC rules and
RSS 210 of Industry Canada. Operation is subject to the
following conditions:
•Changes or modifications not expressly approved by
the party responsible for compliance could void the
user’s authority to operate the equipment.
• This device may not cause harmful interference.
• This device must accept any interference received,
including interference that may cause undesired op-
eration.
CLIMATE CONTROLS
Manual Heating And Air Conditioning
Manual Temperature Controls
4
UNDERSTANDING YOUR INSTRUMENT PANEL 183