2015 Ram 2500 change time
[x] Cancel search: change timePage 357 of 865
Voice
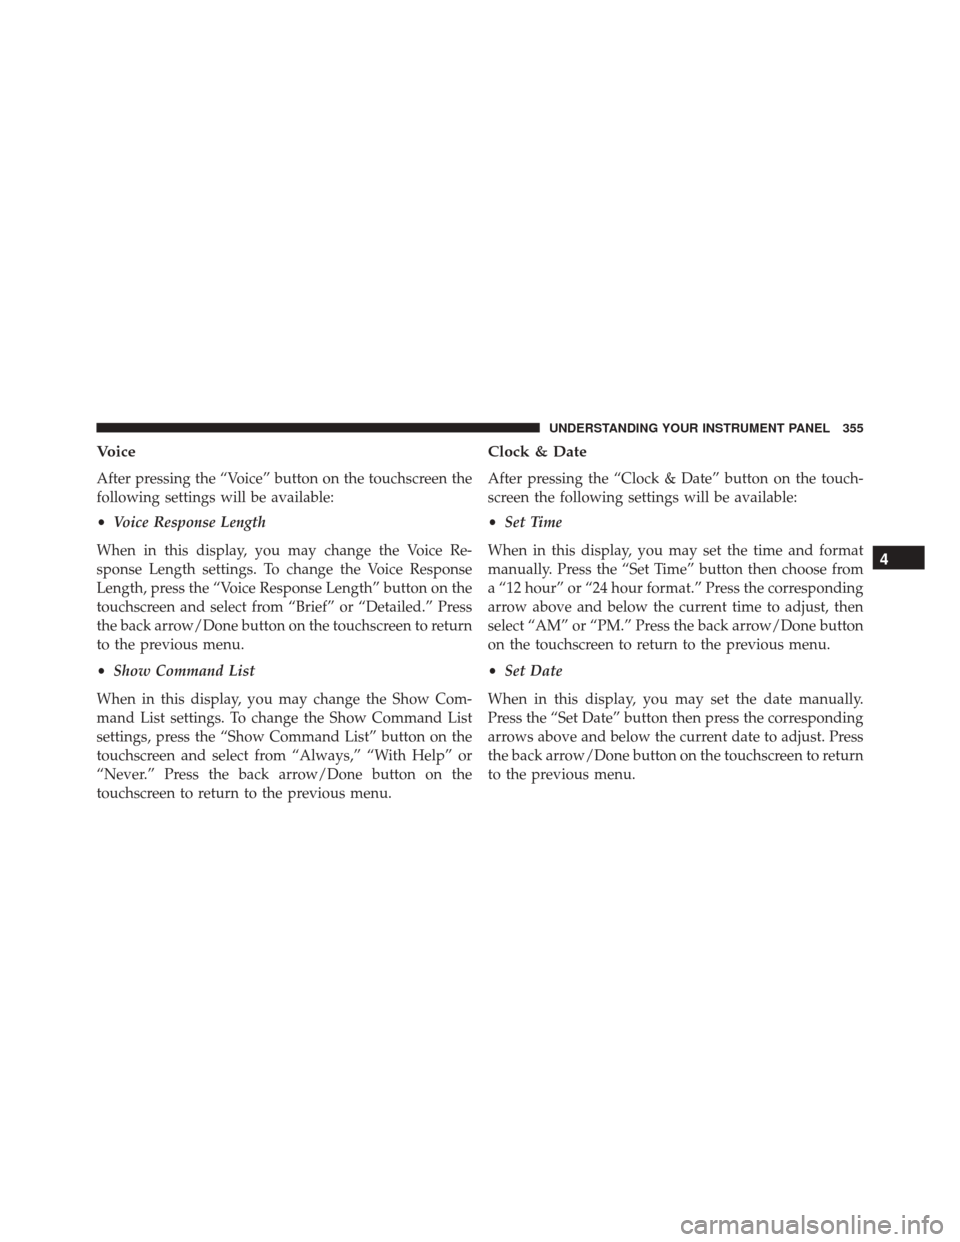
After pressing the “Voice” button on the touchscreen the
following settings will be available:
•Voice Response Length
When in this display, you may change the Voice Re-
sponse Length settings. To change the Voice Response
Length, press the “Voice Response Length” button on the
touchscreen and select from “Brief” or “Detailed.” Press
the back arrow/Done button on the touchscreen to return
to the previous menu.
• Show Command List
When in this display, you may change the Show Com-
mand List settings. To change the Show Command List
settings, press the “Show Command List” button on the
touchscreen and select from “Always,” “With Help” or
“Never.” Press the back arrow/Done button on the
touchscreen to return to the previous menu.
Clock & Date
After pressing the “Clock & Date” button on the touch-
screen the following settings will be available:
• Set Time
When in this display, you may set the time and format
manually. Press the “Set Time” button then choose from
a “12 hour” or “24 hour format.” Press the corresponding
arrow above and below the current time to adjust, then
select “AM” or “PM.” Press the back arrow/Done button
on the touchscreen to return to the previous menu.
• Set Date
When in this display, you may set the date manually.
Press the “Set Date” button then press the corresponding
arrows above and below the current date to adjust. Press
the back arrow/Done button on the touchscreen to return
to the previous menu.
4
UNDERSTANDING YOUR INSTRUMENT PANEL 355
Page 360 of 865
Lights
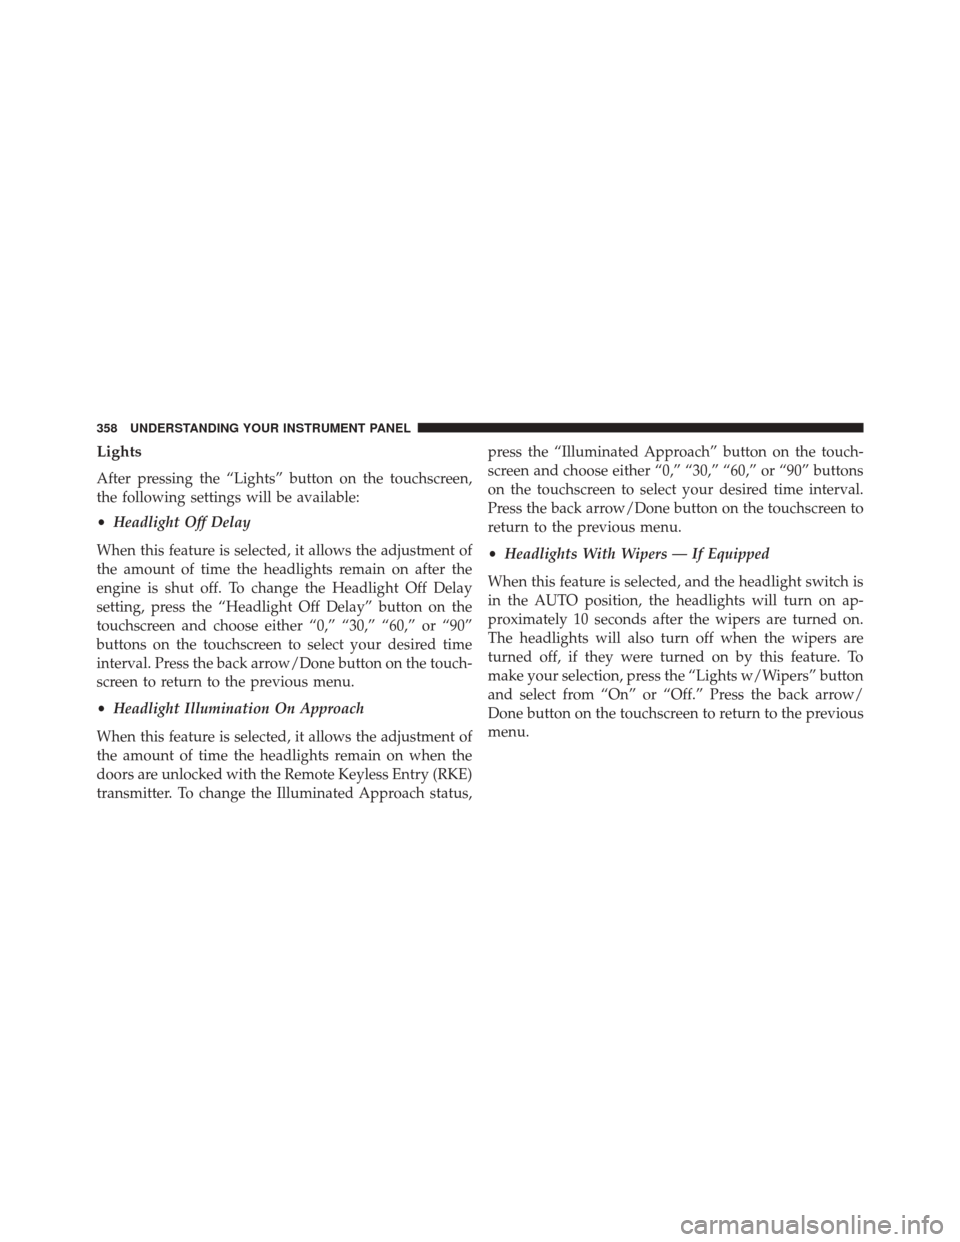
After pressing the “Lights” button on the touchscreen,
the following settings will be available:
•Headlight Off Delay
When this feature is selected, it allows the adjustment of
the amount of time the headlights remain on after the
engine is shut off. To change the Headlight Off Delay
setting, press the “Headlight Off Delay” button on the
touchscreen and choose either “0,” “30,” “60,” or “90”
buttons on the touchscreen to select your desired time
interval. Press the back arrow/Done button on the touch-
screen to return to the previous menu.
• Headlight Illumination On Approach
When this feature is selected, it allows the adjustment of
the amount of time the headlights remain on when the
doors are unlocked with the Remote Keyless Entry (RKE)
transmitter. To change the Illuminated Approach status, press the “Illuminated Approach” button on the touch-
screen and choose either “0,” “30,” “60,” or “90” buttons
on the touchscreen to select your desired time interval.
Press the back arrow/Done button on the touchscreen to
return to the previous menu.
•
Headlights With Wipers — If Equipped
When this feature is selected, and the headlight switch is
in the AUTO position, the headlights will turn on ap-
proximately 10 seconds after the wipers are turned on.
The headlights will also turn off when the wipers are
turned off, if they were turned on by this feature. To
make your selection, press the “Lights w/Wipers” button
and select from “On” or “Off.” Press the back arrow/
Done button on the touchscreen to return to the previous
menu.
358 UNDERSTANDING YOUR INSTRUMENT PANEL
Page 372 of 865

System Information
After pressing the “System Information” button on the
touchscreen the following information will be available:
•System Information
When System Information is selected, a System Information
screen will appear displaying the system software version.
Customer Programmable Features — Uconnect®
8.4A/8.4AN Personal Settings
Press the “Settings” button on the touchscreen (if
equipped) or press the “Apps” button on the touchscreen
then press the “Settings” button on the touchscreen to
display the settings menu screen. In this mode the
Uconnect® system allows you to access programmable
features that may be equipped such as Display, Voice,
Clock, Safety & Driving Assistance, Lights, Doors &
Locks, Auto-On Comfort (if equipped), Engine Off Op-
tions, Suspension, Trailer Brake, Audio, Phone/ Bluetooth®, SiriusXM Setup (if equipped), Restore Set-
tings, Clear Personal Data and System Information.
NOTE:
Only one category may be selected at a time.
When making a selection, press the button on the touch-
screen to enter the desired mode. Once in the desired
mode, press and release the preferred setting until a
check-mark appears next to the setting, showing that
setting has been selected. Once the setting is complete,
either press the back arrow button on the touchscreen or
the Back button on the faceplate to return to the previous
menu or press the “X” button on the touchscreen to close
out of the settings screen. Pressing the Up or Down
Arrow buttons on the touchscreen on the right side of the
screen will allow you to toggle up or down through the
list of available settings.
NOTE: All settings should be changed with the ignition
in the “Run” position.
370 UNDERSTANDING YOUR INSTRUMENT PANEL
Page 376 of 865
Voice
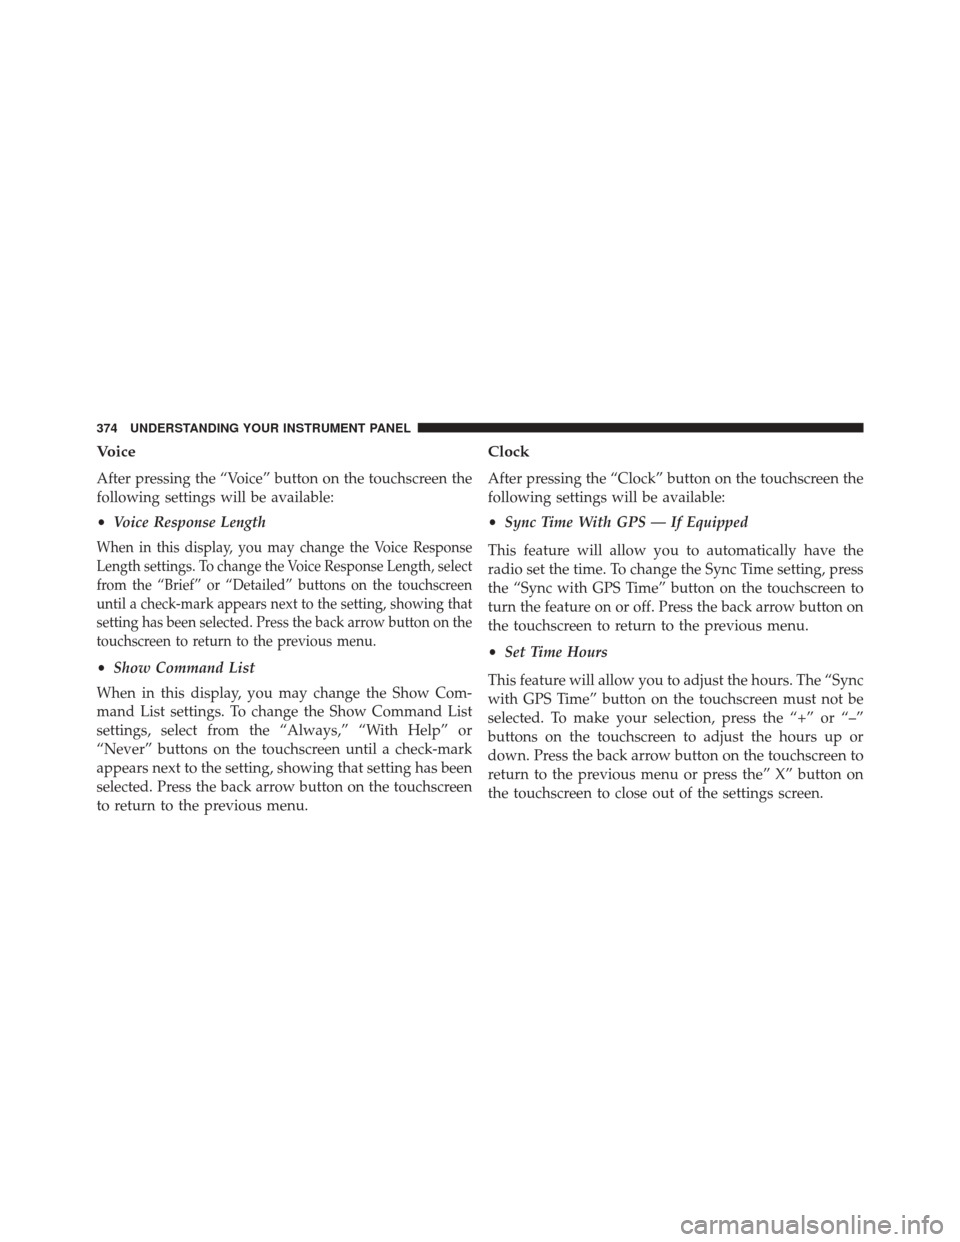
After pressing the “Voice” button on the touchscreen the
following settings will be available:
•Voice Response Length
When in this display, you may change the Voice Response
Length settings. To change the Voice Response Length, select
from the “Brief” or “Detailed” buttons on the touchscreen
until a check-mark appears next to the setting, showing that
setting has been selected. Press the back arrow button on the
touchscreen to return to the previous menu.
•Show Command List
When in this display, you may change the Show Com-
mand List settings. To change the Show Command List
settings, select from the “Always,” “With Help” or
“Never” buttons on the touchscreen until a check-mark
appears next to the setting, showing that setting has been
selected. Press the back arrow button on the touchscreen
to return to the previous menu.
Clock
After pressing the “Clock” button on the touchscreen the
following settings will be available:
• Sync Time With GPS — If Equipped
This feature will allow you to automatically have the
radio set the time. To change the Sync Time setting, press
the “Sync with GPS Time” button on the touchscreen to
turn the feature on or off. Press the back arrow button on
the touchscreen to return to the previous menu.
• Set Time Hours
This feature will allow you to adjust the hours. The “Sync
with GPS Time” button on the touchscreen must not be
selected. To make your selection, press the “+” or “–”
buttons on the touchscreen to adjust the hours up or
down. Press the back arrow button on the touchscreen to
return to the previous menu or press the” X” button on
the touchscreen to close out of the settings screen.
374 UNDERSTANDING YOUR INSTRUMENT PANEL
Page 377 of 865
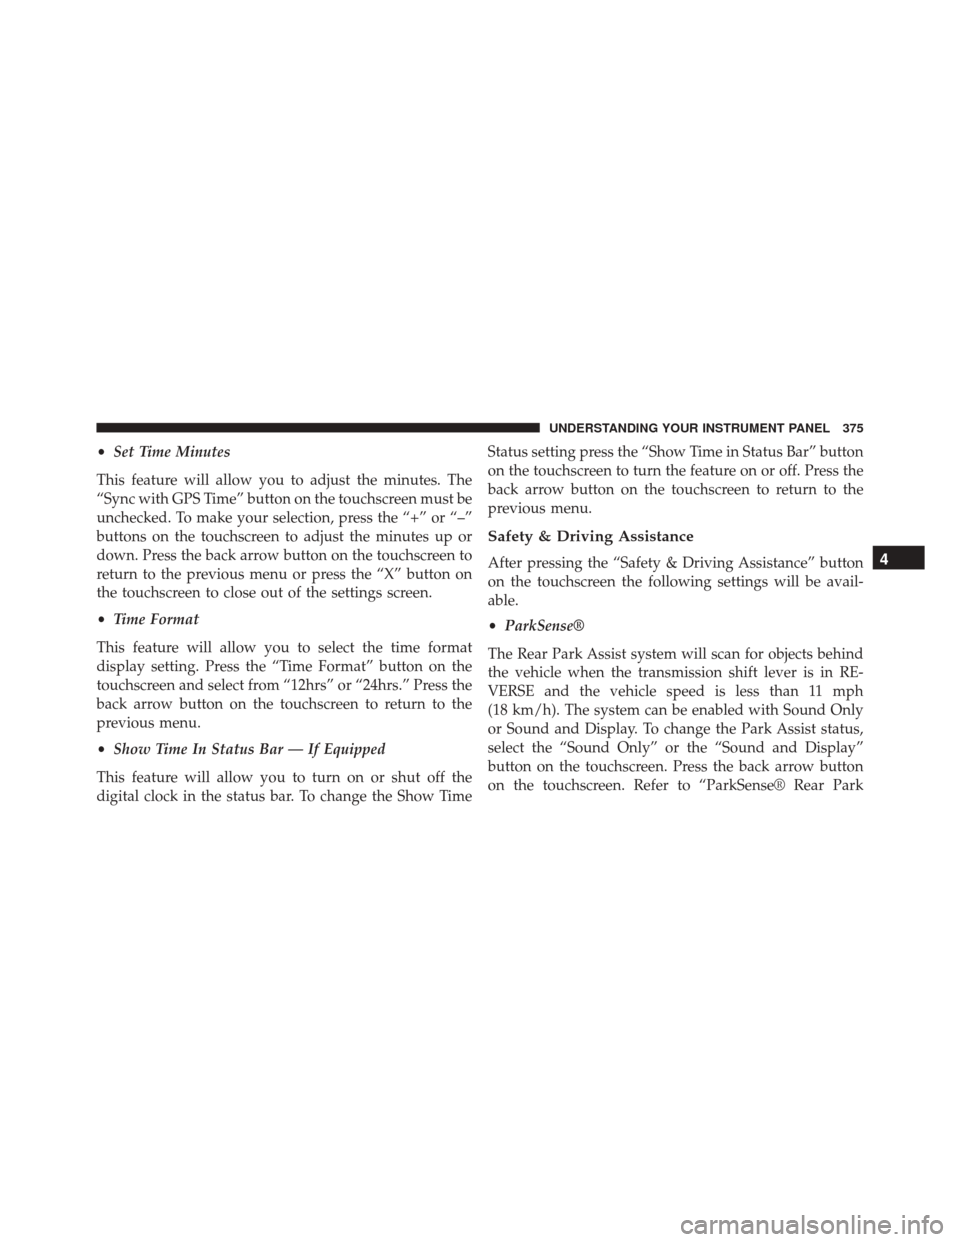
•Set Time Minutes
This feature will allow you to adjust the minutes. The
“Sync with GPS Time” button on the touchscreen must be
unchecked. To make your selection, press the “+” or “–”
buttons on the touchscreen to adjust the minutes up or
down. Press the back arrow button on the touchscreen to
return to the previous menu or press the “X” button on
the touchscreen to close out of the settings screen.
• Time Format
This feature will allow you to select the time format
display setting. Press the “Time Format” button on the
touchscreen and select from “12hrs” or “24hrs.” Press the
back arrow button on the touchscreen to return to the
previous menu.
• Show Time In Status Bar — If Equipped
This feature will allow you to turn on or shut off the
digital clock in the status bar. To change the Show Time Status setting press the “Show Time in Status Bar” button
on the touchscreen to turn the feature on or off. Press the
back arrow button on the touchscreen to return to the
previous menu.
Safety & Driving Assistance
After pressing the “Safety & Driving Assistance” button
on the touchscreen the following settings will be avail-
able.
•
ParkSense®
The Rear Park Assist system will scan for objects behind
the vehicle when the transmission shift lever is in RE-
VERSE and the vehicle speed is less than 11 mph
(18 km/h). The system can be enabled with Sound Only
or Sound and Display. To change the Park Assist status,
select the “Sound Only” or the “Sound and Display”
button on the touchscreen. Press the back arrow button
on the touchscreen. Refer to “ParkSense® Rear Park4
UNDERSTANDING YOUR INSTRUMENT PANEL 375
Page 386 of 865
•Engine Off Power Delay
When this feature is selected, the power window
switches, radio, Uconnect® phone system (if equipped),
DVD video system (if equipped), power sunroof (if
equipped), and power outlets will remain active for up to
10 minutes after the ignition is cycled to OFF. Opening
either front door will cancel this feature. To change the
Engine Off Power Delay status press the “+” or “–”
buttons on the touchscreen to adjust the time delay up or
down. Press the back arrow button on the touchscreen to
return to the previous menu.
• Headlight Off Delay
When this feature is selected, the driver can choose to
have the headlights remain on for 0, 30, 60, or 90 seconds
when exiting the vehicle. To make your selection press
the “+” or “–” buttons on the touchscreen to adjust the
seconds up or down. Press the back arrow button on the
touchscreen to return to the previous menuAir Suspension — If Equipped
After pressing the “Suspension” button on the touch-
screen the following settings will be available.
• Sound Horn With Lower
When this feature is selected, a short horn sound will
occur when the RKE transmitter REMOTE LOWER but-
ton is pressed. Press the box next to your selection and a
check-mark appears next to the feature showing the
system has been activated or the check-mark is removed
showing the system has been deactivated.
• Flash Lights With Lower
When this feature is selected, the front and rear turn
signals will flash when the RKE transmitter REMOTE
LOWER button is pressed twice. This feature may be
selected with or without the Sound Horn on Lower
feature selected. Press the box next to your selection and
a check-mark appears next to the feature showing the
384 UNDERSTANDING YOUR INSTRUMENT PANEL
Page 447 of 865

ENGINE START/STOP Button Functions — With
Driver ’s Foot OFF The Brake Pedal (In PARK Or
NEUTRAL Position)
The ENGINE START/STOP button operates similar to an
ignition switch. It has three positions, OFF, ACC, RUN.
To change the ignition switch positions without starting
the vehicle and use the accessories follow these steps:
1. Starting with the ignition in the OFF position:
2. Push the ENGINE START/STOP button once tochange the ignition to the ACC position.
3. Push the ENGINE START/STOP button a second time to change the ignition to the RUN position.
4. Push the ENGINE START/STOP button a third time to return the ignition to the OFF position.
Extreme Cold Weather (Below –20°F Or �29°C)
To ensure reliable starting at these temperatures, use of
an externally powered electric engine block heater (avail-
able from your authorized dealer) is recommended.
If Engine Fails To Start
If the engine fails to start after you have followed the
“Normal Starting” procedure, it may be flooded. Push
the accelerator pedal all the way to the floor and hold it
there while the engine is cranking. This should clear any
excess fuel in case the engine is flooded.
The starter motor will engage automatically, run for 10
seconds, and then disengage. Once this occurs, release
the accelerator pedal and the brake pedal, wait 10 to 15
seconds, then repeat the “Normal Starting” procedure.
5
STARTING AND OPERATING 445
Page 474 of 865

You can switch between DRIVE and ERS mode at any
vehicle speed. When the shift lever is in the DRIVE
position, the transmission will operate automatically,
shifting between all available gears. Tapping the ERS (-)
switch (column shift) or tapping the shift lever to the left
(-) (console shift) will activate ERS mode, display the
current gear in the instrument cluster, and set that gear as
the top available gear. For example, if you are in DRIVE
and are in third (direct) gear, when you tap the shift
lever/switch one time in the (-) direction, the display will
show 4 (ERS 4 is direct gear). Another tap down (-) will
shift the transmission down to ERS 3 (the added under-
drive gear). Once in ERS mode, tapping (-) or (+) will
change the top available gear.
Column Shift Lever
472 STARTING AND OPERATING