2015 Peugeot Bipper turn signal
[x] Cancel search: turn signalPage 33 of 192

31
Bipper_en_Chap03_pret-a-partir_ed02-2014
Warning lampisindicates Solution - action
Sidelamps on.a manual selection.
turn the ring on the lighting control stalk to the
first position.
Dipped beam
headlamps on.a manual selection.
turn the ring on the lighting control stalk to the
first position.
Main beam headlamps a pull on the control stalk.Pull the lighting control stalk to return to dipped
beam.
Direction indicators flashing with an
audible signal.a change of direction
using the lighting control
stalk.
to the Right: press the stalk upwards.to the
l eft: press the stalk downwards.
Hazard warning lamps flashing with an
audible signal.
the hazard warning lamp switch,
located in the middle of the
dashboard, has been pressed.the left and right direction indicators, and the
associated warning lamps, flash simultaneously .
Front foglamps on.that the button on the
dashboard has been
pressed. Manual selection.
t
he foglamps only operate if the sidelamps or
dipped beam headlamps are on.
Rear foglamps on.that the button on the
dashboard has been
pressed. Manual selection.
the foglamps only operate if the dipped beam headlamps are
on. When visibility is normal, switch the foglamps of f.
3
READY TO SET OFF
Instruments and controls
Page 42 of 192

40
Bipper_en_Chap03_pret-a-partir_ed02-2014
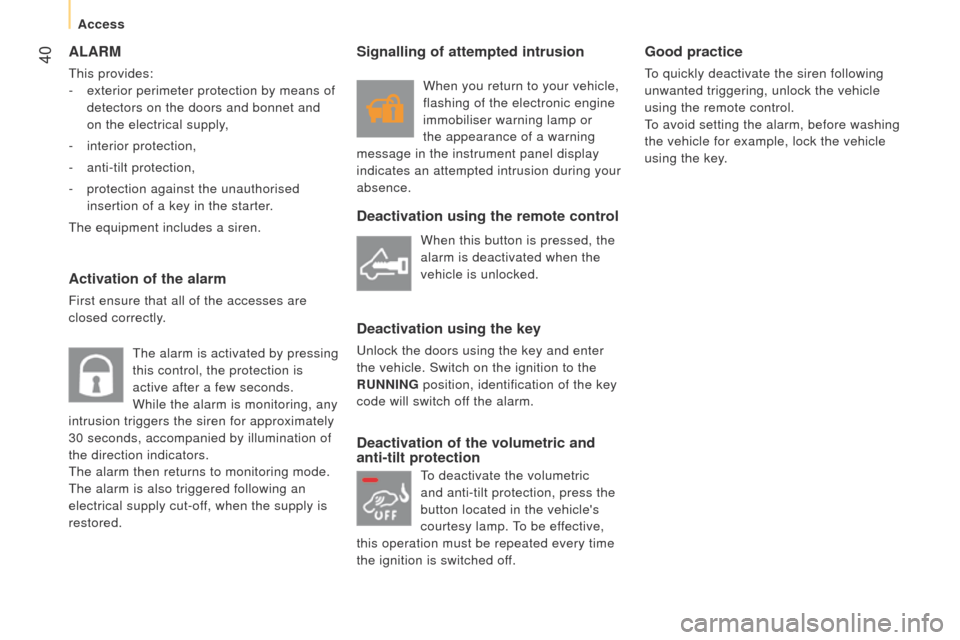
ALARM
this provides:
-
exterior perimeter protection by means of
detectors on the doors and bonnet and
on the electrical supply,
-
interior protection,
-
anti-tilt protection,
-
protection against the unauthorised
insertion of a key in the starter.
t
he equipment includes a siren.
Activation of the alarm
First ensure that all of the accesses are
closed correctly.
t
he alarm is activated by pressing
this control, the protection is
active after a few seconds.
While the alarm is monitoring, any
intrusion triggers the siren for approximately
30 seconds, accompanied by illumination of
the direction indicators.
t
he alarm then returns to monitoring mode.
t
he alarm is also triggered following an
electrical supply cut-off, when the supply is
restored.
Deactivation using the remote control
Deactivation using the key
unlock the doors using the key and enter
the vehicle. Switch on the ignition to the
RUNNING position, identification of the key
code will switch off the alarm.
Deactivation of the volumetric and
anti-tilt protection Good practice
to quickly deactivate the siren following
unwanted triggering, unlock the vehicle
using the remote control.
to avoid setting the alarm, before washing
the vehicle for example, lock the vehicle
using the key.
When this button is pressed, the
alarm is deactivated when the
vehicle is unlocked.
Signalling of attempted intrusion
When you return to your vehicle,
flashing of the electronic engine
immobiliser warning lamp or
the appearance of a warning
message in the instrument panel display
indicates an attempted intrusion during your
absence.
to deactivate the volumetric
and anti-tilt protection, press the
button located in the vehicle's
courtesy lamp.
to be ef
fective,
this operation must be repeated every time
the ignition is switched off.
Access
Page 58 of 192

56
Bipper_en_Chap03_pret-a-partir_ed02-2014
Stopping the vehicle
to switch off the engine, with your foot on
the brake pedal, you should:
-
select first gear or reverse.
-
apply the parking brake to immobilise the
vehicle.
-
switch of
f the ignition.
Temporarily changing gear
in AUTO mode
You can also request a gear change using
the gear lever.
t
his action does not deactivate the
automated mode, but allows temporary
use of the sequential mode functions (for
example: for overtaking another vehicle...).
"AUTO" remains displayed in the instrument
panel screen.
"ECO" economy programme
t
his programme works with the automated
mode to reduce fuel consumption.
Press button E to activate the programme.
Sequential mode
After using the automated mode, you can
return to the sequential mode by selecting
position A/M again.
"E" appears in the instrument
panel screen, next to "AUTO"
and the gear selected by the
gearbox.
t
he gearbox then selects the best gear for
the speed of the vehicle, the engine speed
and the accelerator pedal position to reduce
fuel consumption. "AUTO" disappears and the
gears engaged appear in
succession in the instrument
panel screen.
t is not necessary to take your foot off the
accelerator pedal to change the gear.
t
he gear change requests are only carried
out if the engine speed permits it.
t
he
system gives an audible signal if a gear
change is not possible.
At low speeds, when approaching a stop
or traffic lights for example, the gearbox
changes down to first gear automatically.
Release the brake pedal after the display
of the gear engaged has disappeared
from the instrument panel screen.
Never leave the vehicle with the
gearbox in neutral (position N ). In this
case, there is an audible signal on switching
off the ignition (ignition key in
the STOP
position).
Gearbox and steering wheel
Page 59 of 192

57
Bipper_en_Chap03_pret-a-partir_ed02-2014
Reinitialisation
turn the ignition key to the MAR position.
Within ten seconds, the gear engaged should
appear in the instrument panel screen.
Otherwise, turn the ignition key to the
STOP
position and wait until the instrument
panel screen goes off.
turn the ignition key to the
MAR position
again. t he illumination of this warning
lamp, accompanied by a message
in the instrument panel screen,
indicates incorrect use of the
gearbox by the driver.
With the ignition on, the flashing this warning
lamp, accompanied by an audible signal and
a message in the instrument panel screen,
indicates a fault with the gearbox.
Have it checked by a P
euge O t
dealer or a
qualified workshop.
If the problem persist, have the system
checked by a P
euge O t
dealer or a
qualified workshop.
Never select neutral N while the vehicle
is moving.
Only engage reverse gear R with the vehicle
immobilised and the brake pedal pressed.
You risk damaging the gearbox if you
press the accelerator and brake pedals
simultaneously.
Back-up mode - Slow move off
this procedure should be applied if pressing
the brake pedal is not recognised by the
system, or if the gearbox has fault on
starting the engine.
Press the brake pedal firmly.
turn the ignition key to the
AV V position for
at least seven seconds.
t
he engine starts.
t
he system is in back-up mode; the gearbox
will not go beyond the 3rd gear engaged and
automated mode is not available.
If the engine does not start, have the
system checked by a P
euge O t
dealer
or a qualified workshop.
Operating faultIn the event of a prolonged stop with
the engine running, it is recommended
that the gearbox be put into neutral
(position N).
With the vehicle stationary, the engine
running and first, second or reverse
gear engaged, the gearbox changes to
neutral automatically, accompanied
by
an audible signal, in the following
circumstances:
-
no action on the accelerator or brake
pedals for at least 3
minutes,
-
brake pedal applied for more than
10
minutes,
-
driver's door opened and no action on the
accelerator or brake pedals for at least
1.5
seconds,
-
a gearbox fault. When towing your vehicle, ensure that
the gearbox is in neutral (position N ).
When traversing a flooded road or a
ford, drive at walking pace.
3
READY TO SET OFF
Gearbox and steering wheel
Page 87 of 192

85
Bipper_en_Chap05_technologie_ed02-2014
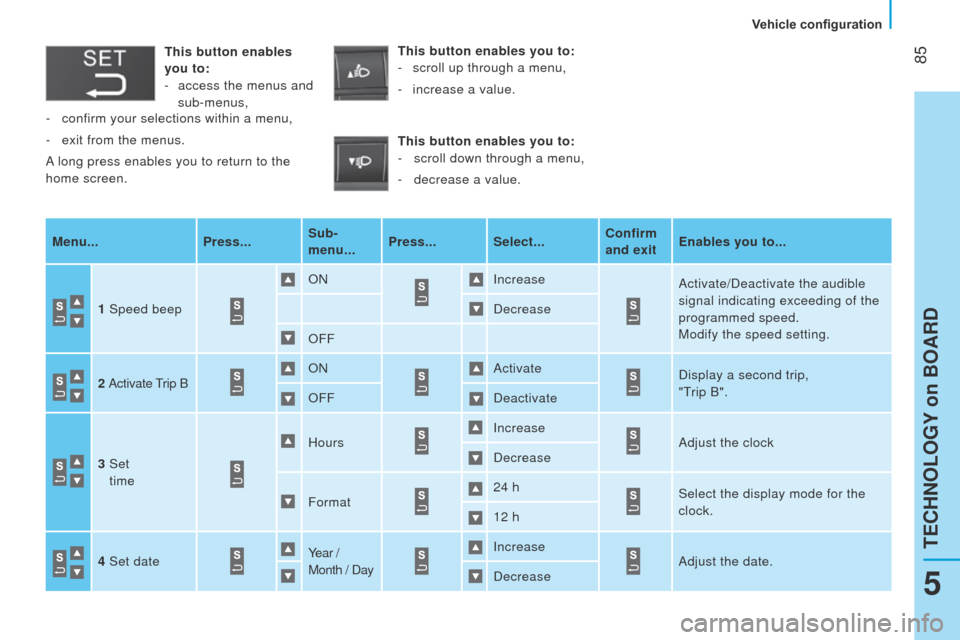
Menu...Press...Sub-
menu...Press... Select... Confirm
and exitEnables you to...
1 Speed beep ON
Increase
Activate/Deactivate the audible
signal indicating exceeding of the
programmed speed.
Modify the speed setting.
Decrease
OFF
2
Activate
trip
B ON
Activate
Display a second trip,
"
t
rip B".
OFF Deactivate
3
Set
time Hours
Increase
Adjust the clock
Decrease
Format 24 h
Select the display mode for the
clock.
12 h
4 Set date Year /
Month / DayIncrease
Adjust the date.
Decrease
This button enables
you to:
-
access the menus and
sub-menus, This button enables you to:
-
scroll up through a menu,
-
increase a value.
This button enables you to: -
scroll down through a menu,
-
decrease a value.
-
confirm your selections within a menu,
-
exit from the menus.
A
long press enables you to return to the
home screen.
5
TECHNOLOGY on BOARD
Vehicle configuration