Page 125 of 192

123
Bipper_en_Chap06_securite_ed02-2014
For the airbags to be fully effective,
observe the following safety rules:
Sit in a normal upright position.
Wear a correctly adjusted seat belt.
Do not leave anything between the
occupants and the airbags (a child, pet,
object...).
t
his could hamper the operation
of the airbags or injure the occupants.
After an accident or if the vehicle has been
stolen or broken into, have the airbag
systems checked.
All work on the airbag systems must be
carried out by a P
euge O t
dealer or a
qualified workshop.
e
ven if all of the precautions mentioned are
observed, a risk of injury or of slight burns
to the head, chest or arms when an airbag
is deployed cannot be ruled out. In fact,
the bag inflates almost instantly (within a
few milliseconds) then deflates within the
same time, discharging the hot gas through
openings provided for this purpose. Front airbags
Do not drive holding the steering wheel
by its spokes or resting your hands on the
centre part of the wheel.
Passengers must not place their feet on the
dashboard.
Smoke as little as possible as deployment
of the airbags can cause burns or the risk of
injury from a cigarette or pipe.
Never remove or pierce the steering wheel
or hit it violently.
Lateral airbags
Only put approved covers on the seats,
compatible with the deployment of lateral
airbags. For information on the range of seat
covers suitable for your vehicle, you can
contact a P
euge O t
dealer
. Refer to the
"Accessories" section.
Do not fix or attach anything to the seat
backs.
t
his could cause injury to the chest
or arms when the lateral airbag inflates.
Do not sit with the upper part of the body
any nearer to the door than necessary.
6
SAFETY
Airbags
Page 133 of 192

131
Bipper_en_Chap06_securite_ed02-2014
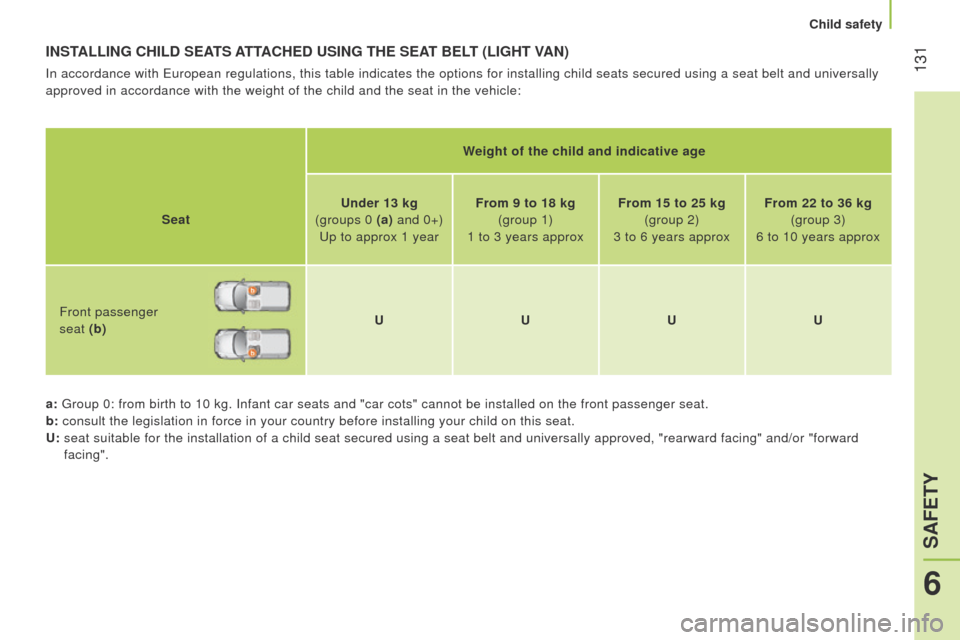
INSTALLING CHILD SEATS ATTACHED USING THE SEAT BELT (LIGHT VAN)
In accordance with european regulations, this table indicates the options for installing chi\
ld seats secured using a seat belt and universally
approved in accordance with the weight of the child and the seat in the \
vehicle:
W
eight of the child and indicative age
Seat Under 13 kg
(groups 0 (a) and 0+)
u
p to approx 1 yearFrom 9 to 18 kg
(group 1)
1 to 3 years approx From 15 to 25 kg
(group 2)
3 to 6 years approx From 22 to 36 kg
(group 3)
6 to 10 years approx
Front passenger
seat (b) U
UUU
a :
g roup 0: from birth to 10 kg. Infant car seats and "car cots" cannot be i\
nstalled on the front passenger seat.
b : consult the legislation in force in your country before installing your\
child on this seat.
U:
seat suitable for the installation of a child seat secured using a seat \
belt and universally approved, "rearward facing" and/or
"forward
facing".
6
SAFETY
Child safety
Page 146 of 192
144
Bipper_en_Chap08_verifications_ed02-2014
OPENING THE BONNET
On the inside
Pull the release lever below the dashboard
towards you.
On the outside
Raise the bonnet slightly, placing your hand
flat under the bonnet to make the operation
easier.
Push the safety catch lever to the left, then
open the bonnet fully.
While holding the bonnet open, check
that the locking control A is engaged by
pressing it.
To close
lift the bonnet slightly and pull the release
control A to release it.
l
ower the bonnet and release it at the end
of its travel. Check that the bonnet is fully
latched.
Avoid opening the bonnet in strong winds.
Before doing anything under the
bonnet, switch off the ignition with the
key to avoid any risk of injury resulting from
an automatic change to S
t
ARt mode. Because of the presence of electrical
equipment under the bonnet, it is
recommended that exposure to water (rain,
washing, ...) be limited.
Opening the bonnet
Page 152 of 192

150
Bipper_en_Chap08_verifications_ed02-2014
Manual gearbox
the gearbox does not require any
maintenance (no oil change).
Refer to the warranty and maintenance
record for the checking interval for this
component.
Good practice
to check the main levels and certain
components, in accordance with the
manufacturer's servicing schedule, refer to
the pages of the warranty and maintenance
record which correspond to your vehicle's
engine.
Electronic gearbox
the gearbox does not require any
maintenance (no oil change).
Refer to the warranty and maintenance
record for details of the checking interval
for this component.
Only use products recommended by
P
euge O t
or products of equivalent
quality and specification.
In order to optimise the operation of units as
important as the braking system, P
euge O t
selects and of
fers specific products.
In order to avoid damaging the electrical
units, high pressure washing to clean the
engine compartment is strictly prohibited.
After washing the vehicle dampness, or in
winter, ice may form on the brake discs and
pads: braking efficiency may be reduced.
Make some light brake applications to dry
and de-ice the brakes.
Checks
Page 164 of 192

162
Bipper_en_Chap09_aide-rapide_ed02-2014
1 - Dipped beam headlamps
T
ype D, H4 - 55 W
-
Remove the cover by turning it
anticlockwise.
-
Disconnect the electrical connector
.
-
Release the retaining spring by pressing
on the two clips.
-
Change the bulb taking care to align the
metal part with the grooves on the lamp.
2 - Sidelamps
T
ype A, W 5 W - 5 W
-
Remove the cover by turning it
anticlockwise.
-
Pull the bulb holder to gain access to the
bulb.
-
Change the bulb. 3 - Main beam headlamps
T
ype D, H4 - 55 W
-
Remove the cover by turning it
anticlockwise.
-
Disconnect the electrical connector
.
-
Release the retaining spring by pressing
on the two clips.
-
Remove the bulb holder
.
-
Change the bulb taking care to align the
metal part with the groove on the lamp. 4 - Direction indicators
T
ype B, PY 21 W - 21 W amber
- t
urn the bulb holder a quarter turn
anticlockwise.
-
Remove the bulb by pressing it lightly
while turning it anticlockwise.
-
Change the bulb.
If you encounter any dif
ficulty, consult a
P euge O t
dealer or a qualified workshop.
When each operation has been
completed, check the operation of the
lamps.
5 - Foglamps
T
ype E, H1 - 55 W
Contact a P
euge O t
dealer or a qualified
workshop.
Changing a bulb
Page 170 of 192
168
Bipper_en_Chap09_aide-rapide_ed02-2014
Table of dashboard fuses, driver’s
sideMarking RatingFunctions
F12 7.5 ARight-hand dipped beam headlamp supply
F13 7.5 A
l
eft-hand dipped beam headlamp supply - headlamp height
adjuster
F31 5 A
e
ngine control unit supply switch
F32 7.5 AFront lamp - front courtesy lamp - rear courtesy light lamp
F36 10 AAudio system - mobile telephone pre-equipment -
air conditioning control panel -
e ODB diagnostic socket
F37 5 ABrake lamp - instrument panel
F38 20 ADoor locking
F43 15 AScreenwash pump
F47 20 ADriver’s electric window motor supply
F48 20 APassenger’s electric window motor supply
F49 5 AParking sensors control unit - rear lighting switch -
electric door mirrors - volumetric alarm
control unit
F50 7.5 AAirbags control unit
F51 7.5 ASwitch on brake pedal - switch on clutch pedal -
door mirror controls - central Bluetooth
system
F53 5 AInstrument panel - rear foglamps
Changing a fuse
Page 171 of 192
169
Bipper_en_Chap09_aide-rapide_ed02-2014
Marking RatingFunctions
F41 7.5 ADoor mirror demisting.
F94 15 ACigar lighter.
F96 15 A12 V accessory socket.
F97 10 AHeated seat, driver’s side.
F98 10 AHeated seat, passenger’s side.
9
QUICK HELP
Changing a fuse
Page 173 of 192

171
Bipper_en_Chap09_aide-rapide_ed02-2014
Marking RatingFunctions
F16 7.5 A
e
ngine management control unit - electronic gearbox control unit and gear\
lever -
t
20 relay coil
F17 15 ASupply for ignition coil - injectors - engine management control unit (\
1.3 HDi)
F18 7.5 AEngine management control unit (1.3 HDi) - T09 relay coil
F19 7.5 AAir conditioning compressor
F20 30 ASupply for heated rear screen, electric door mirrors heater elements
F21 15 AFuel pump (1.4 petrol and 1.3 HDi)
F22 20 A
e
ngine management control unit (1.3 HDi)
F23 20 AABS hydraulic block electrovalves supply
F24 7.5 AABS
F30 15 AFoglamps
F81 60 APre-heat unit (1.3 HDi)
F82 30 A
e
lectronic gearbox pump - electronic gearbox supply
F84 10 A
e
lectronic gearbox control unit and electrovalves
F85 30 ACigar lighter - 12 V accessory socket
F87 7.5 A
Reversing lamps - water in Diesel sensor - airflow sensor - T02, T05, T14, T17 and T19 relay coils
(except 1.3 HDi)
5 A Reversing lamps - water in Diesel sensor - airflow sensor - T02, T05, T14, T17 and T19 relay coils -
battery state of charge sensor (except 1.3 HDi)
9
QUICK HELP
Changing a fuse