Page 112 of 364

110
Roller load space cover
To install the load space cover:
F p osition one of the ends of the roller in its
support,
F
i
nsert the second end in its support,
F
p
ivot the ends of the roller downwards to
secure it,
F
r
eel out the load space cover to the boot
pillars,
F
i
nsert the load space screen guides in the
rails on the boot pillars.
To remove the load space cover:
F
r
emove the load space cover guides from
the rails on the boot pillars,
F
r
eel in the load space cover in its roller, To store the load space cover, roller uppermost
and flap facing towards the inside of the
vehicle:
F
p
lace the right-hand end in its housing,
F
s
lide the left-hand end into the guide then
into its housing,
F
p
ivot the ends of the roller upwards to
release it,
F
r
emove the roller from its support. F
se
cure the assembly by pivoting the ends
downwards. The roller has two rings for fixing the
luggage retaining net depending on its
location. If you use the 3
rd row seats (7 seat
version), it is essential to store the roller
in its housing.
Fittings
Page 113 of 364

111
High load retaining
net*
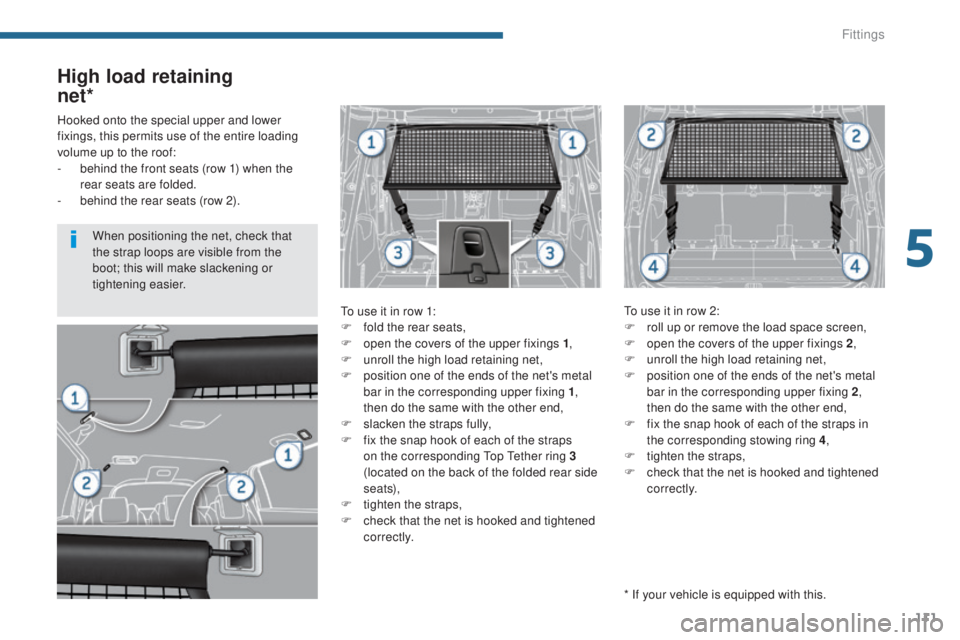
To use it in row 1:
F
f old the rear seats,
F
o
pen the covers of the upper fixings 1 ,
F
u
nroll the high load retaining net,
F
p
osition one of the ends of the net's metal
bar in the corresponding upper fixing 1 ,
then do the same with the other end,
F
s
lacken the straps fully,
F
f
ix the snap hook of each of the straps
on the corresponding Top Tether ring 3
(located on the back of the folded rear side
seats),
F
t
ighten the straps,
F
c
heck that the net is hooked and tightened
c o r r e c t l y. To use it in row 2:
F
r oll up or remove the load space screen,
F
o
pen the covers of the upper fixings 2,
F
u
nroll the high load retaining net,
F
p
osition one of the ends of the net's metal
bar in the corresponding upper fixing 2 ,
then do the same with the other end,
F
f
ix the snap hook of each of the straps in
the corresponding stowing ring 4 ,
F
t
ighten the straps,
F
c
heck that the net is hooked and tightened
c o r r e c t l y.
Hooked onto the special upper and lower
fixings, this permits use of the entire loading
volume up to the roof:
-
b
ehind the front seats (row 1) when the
rear seats are folded.
-
b
ehind the rear seats (row 2).
* If your vehicle is equipped with this.
When positioning the net, check that
the strap loops are visible from the
boot; this will make slackening or
tightening easier.
5
Fittings
Page 114 of 364
112
Luggage retaining net
Hooked onto the stowing rings on the floor and/
or on the load space cover roller, the luggage
retaining net available as an accessory enables
you to secure your luggage.There are 4 possible positions:
-
f
lat at the bottom of the boot,
-
h
orizontal, level with the load space cover,-
v
ertical at the back of the rear seats,
-
f
lat at the bottom of the boot and vertical at
the back of the rear seats.
Fittings
Page 143 of 364

141
Seat belt unfastened warning
lamps display
When the ignition is switched on, with the engine
running or when the vehicle is moving at less than
12 mph (20 km/h), the corresponding warning
lamps 4 to 8 come on in red for approximately
30
seconds, if the seat belt is not fastened.
When the vehicle is moving at more than 12 mph
(20 km/h), the corresponding warning lamp 4 , 5 ,
6 , 7 or 8 comes on in red, accompanied by an
audible signal and a message in the multifunction
screen, if a rear passenger has unfastened their
seat belt.
2nd row rear centre seat belt
Installation
F Pull the strap and insert the tongue A in the right-hand buckle.
F
I
nsert the tongue B in the left-hand buckle.
F
C
heck the fastening of each buckle by
pulling the strap.
Removal and storing
F Press the red button on the buckle B, then on the buckle A .
F
G
uide the strap as it reels in and bring the
tongue B , then A
onto the magnet of the
attachment point on the roof.
3rd row rear seat belts
(7
seat version)
Installation
F Pull the strap and insert the tongue C in the
buckle, on the boot side trim side.
F
I
nsert the tongue D in the opposite buckle.
F
C
heck the fastening of each buckle by
pulling the strap.
The seat belts for the rear seats of the
3
rd row are incorporated at the corner of the
c
orresponding boot pillar and of the roof.
Removal and storing
F Press the red button on the buckle D , then
on the buckle C .
F
G
uide the strap as it reels in and the
tongues D and C .
The seat belt for the rear centre seat of the
2
nd row is incorporated at the rear right of
t
he roof.
To prevent movement of the rear side
seat belts in the 2
nd row, slide the
straps into the guides provided for this
purpose.
7
Safety
Page 206 of 364

204
AdBlue® additive and SCR system
for BlueHDi Diesel engines
To assure respect for the environment and
conformity with the new Euro 6 emissions
standard, without adversely affecting the
per formance or fuel consumption of Diesel
engines, PEUGEOT has taken the decision to
equip its vehicles with an effective system that
associates SCR (Selective Catalytic Reduction)
with a particle filter (FAP) for the treatment of
exhaust gases.
Presentation of the SCR system
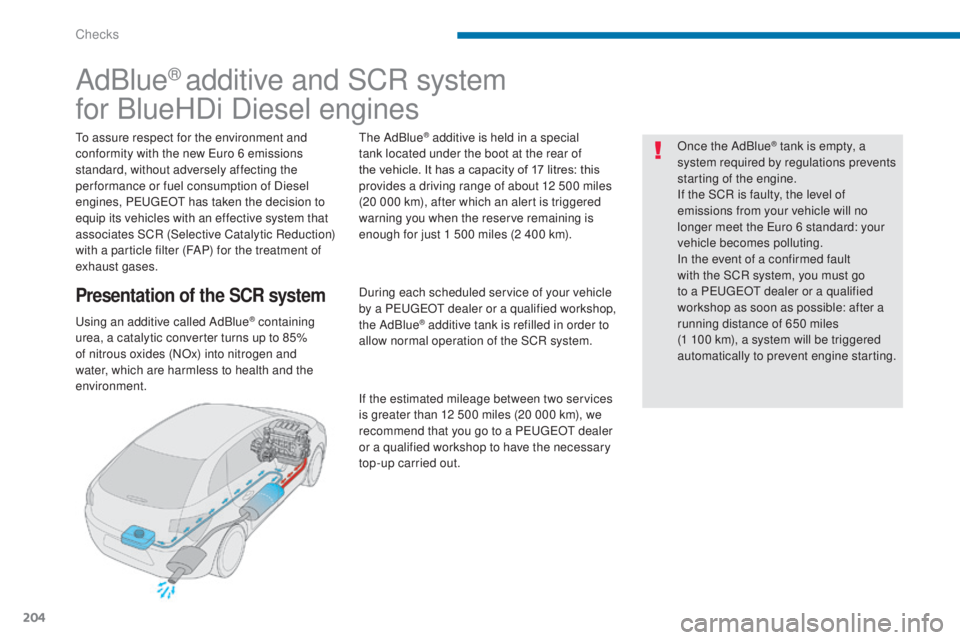
Using an additive called AdBlue® containing
urea, a catalytic converter turns up to 85%
of nitrous oxides (NOx) into nitrogen and
water, which are harmless to health and the
environment. The AdBlue
® additive is held in a special
tank located under the boot at the rear of
the vehicle. It has a capacity of 17 litres: this
provides a driving range of about 12 500 miles
(20 000 km), after which an alert is triggered
warning you when the reserve remaining is
enough for just 1 500 miles (2 400 km).
During each scheduled service of your vehicle
by a PEUGEOT dealer or a qualified workshop,
the AdBlue
® additive tank is refilled in order to
allow normal operation of the SCR system.
If the estimated mileage between two services
is greater than 12 500 miles (20 000 km), we
recommend that you go to a PEUGEOT dealer
or a qualified workshop to have the necessary
top-up carried out. Once the AdBlue
® tank is empty, a
s
ystem required by regulations prevents
starting of the engine.
If the SCR is faulty, the level of
emissions from your vehicle will no
longer meet the Euro 6 standard: your
vehicle becomes polluting.
In the event of a confirmed fault
with the SCR system, you must go
to a PEUGEOT dealer or a qualified
workshop as soon as possible: after a
running distance of 650 miles
(1 100 km), a system will be triggered
automatically to prevent engine starting.
Checks
Page 212 of 364

210
Never store bottles of AdBlue® in your
vehicle.
Recommendations on storage
AdBlue® freezes at about -11°C and
deteriorates above 25°C. It is recommended
that bottles be stored in a cool area and
protected from direct sunlight.
Under these conditions, the additive can be
kept for at least a year.
If the additive has frozen, it can be used once it
has completely thawed out.
Procedure
Before topping-up, ensure that the vehicle is
parked on a flat and level sur face.
In wintry conditions, ensure that the
temperature of the vehicle is above -11°C.
Otherwise the AdBlue
® may be frozen and
so cannot be poured into its tank. Park your
vehicle in a warmer area for a few hours to
allow the top-up to be carried out.
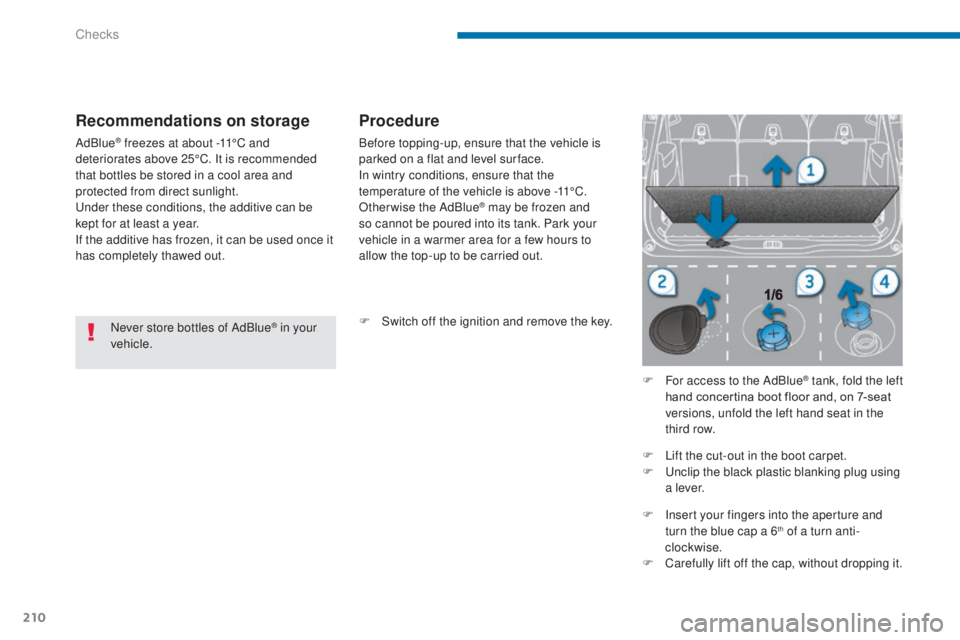
F
S
witch off the ignition and remove the key. F
F
or access to the AdBlue
® tank, fold the left
hand concertina boot floor and, on 7-seat
versions, unfold the left hand seat in the
third row.
F
L
ift the cut-out in the boot carpet.
F
U
nclip the black plastic blanking plug using
a l eve r.
F
I
nsert your fingers into the aperture and
turn the blue cap a 6
th of a turn anti-
clockwise.
F
C
arefully lift off the cap, without dropping it.
Checks
Page 213 of 364

211
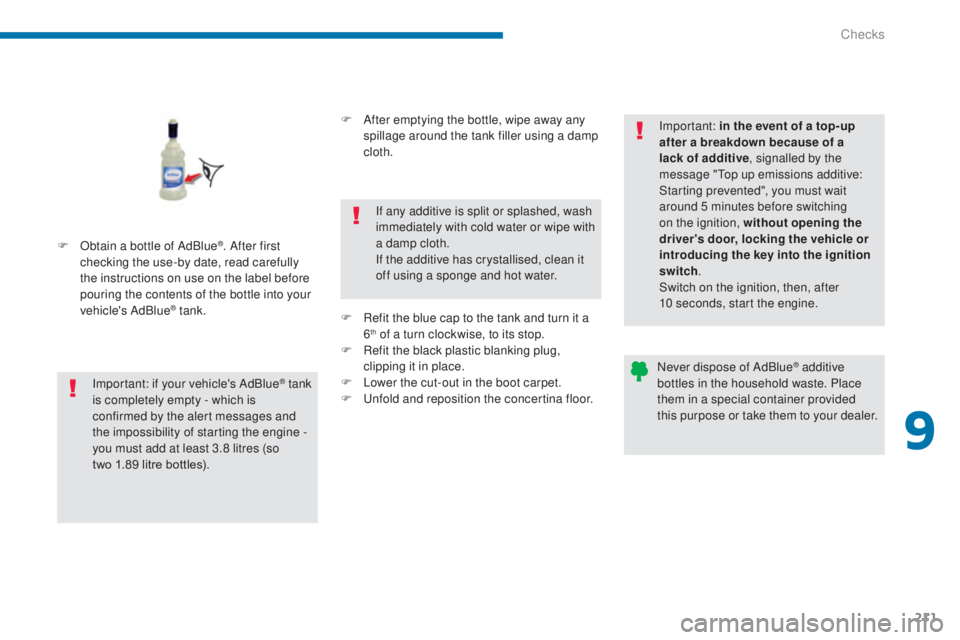
F Obtain a bottle of AdBlue®. After first
checking the use-by date, read carefully
the instructions on use on the label before
pouring the contents of the bottle into your
vehicle's AdBlue
® tank.
Important: if your vehicle's AdBlue
® tank
i
s completely empty - which is
confirmed by the alert messages and
the impossibility of starting the engine
-
you must add at least 3.8 litres (so
two
1.89 litre bottles). F
A
fter emptying the bottle, wipe away any
spillage around the tank filler using a damp
cloth.
If any additive is split or splashed, wash
immediately with cold water or wipe with
a damp cloth.
If the additive has crystallised, clean it
off using a sponge and hot water.
F
R
efit the blue cap to the tank and turn it a
6
th of a turn clockwise, to its stop.
F
R
efit the black plastic blanking plug,
clipping it in place.
F
L
ower the cut-out in the boot carpet.
F
U
nfold and reposition the concertina floor. Important: in the event of a top-up
after a breakdown because of a
lack of additive
, signalled by the
message "Top up emissions additive:
Starting prevented", you must wait
around 5 minutes before switching
on the ignition, without opening the
driver's door, locking the vehicle or
introducing the key into the ignition
switch .
Switch on the ignition, then, after
10 seconds, start the engine.
Never dispose of AdBlue
® additive
bottles in the household waste. Place
them in a special container provided
this purpose or take them to your dealer.
9
Checks
Page 215 of 364
213
To o l s 1, 2, 6 and 7 are stowed in the interior
boot trim.
To gain access to them:
F
o
pen the boot,
F
r
aise the concertina boards. The tools 4 and 8 are stowed in a box, in the
middle of the spare wheel secured underneath
the vehicle. Remove the spare wheel for
access to it.
See the "Changing a wheel" section.
Access to the tools
The temporary puncture repair kit 5a
is stowed
in the boot, under the right hand concertina
boards; the kit 5b is stowed in the boot, under
the left hand seat in the third row. F
P
ress the tab, slide the lid of the box half
way and remove it.
10
Practical information