Page 6 of 344

4
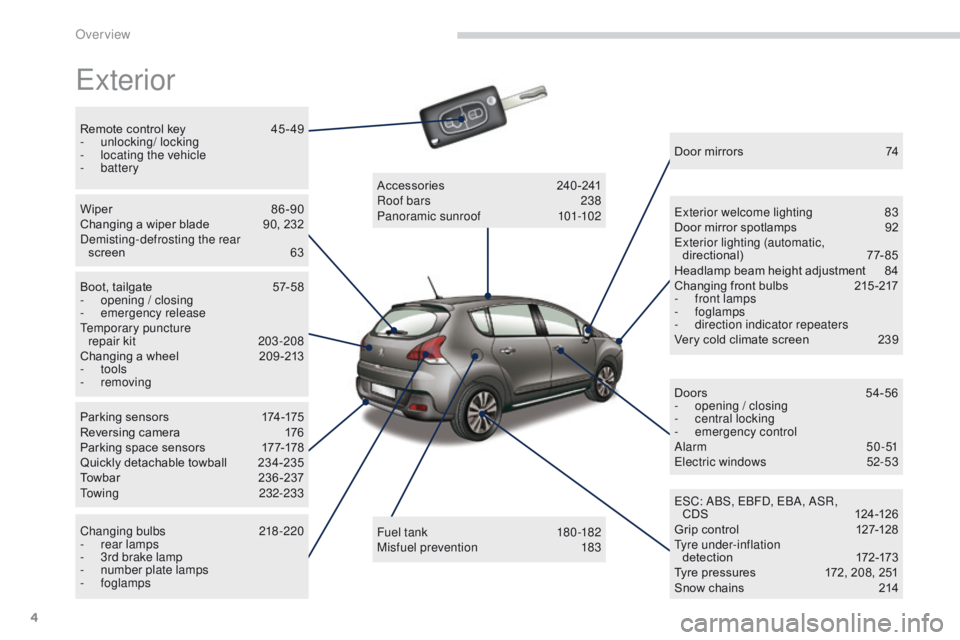
Exterior
Remote control key 45 - 49
- u nlocking/ locking
-
l
ocating the vehicle
-
battery
Wiper
8
6 -90
Changing a wiper blade
9
0, 232
Demisting-defrosting the rear screen
6
3
Boot, tailgate
5
7-58
-
ope
ning / closing
-
em
ergency release
Temporary puncture repair kit
2
03-208
Changing a wheel
2
09 -213
-
tools
-
removing
Parking sensors
1
74-175
Reversing camera
1
76
Parking space sensors
1
77-178
Quickly detachable towball
2
34-235
Towbar
23
6-237
Towing
232-233
Changing bulbs
2
18-220
-
r
ear lamps
-
3
rd brake lamp
-
n
umber plate lamps
-
foglamps Fuel tank
18
0 -182
Misfuel prevention
1
83
Accessories
2
40-241
Roof bars
2
38
Panoramic sunroof
1
01-102Door mirrors
7
4
Exterior welcome lighting
8
3
Door mirror spotlamps
9
2
Exterior lighting (automatic, directional)
7
7-85
Headlamp beam height adjustment
8
4
Changing front bulbs
2
15 -217
-
f
ront lamps
-
foglamps
-
d
irection indicator repeaters
Very cold climate screen
2
39
Doors
5
4-56
-
ope
ning / closing
-
c
entral locking
-
em
ergency control
Alarm
50-51
Electric windows
5
2-53
ESC: ABS, EBFD, EBA, ASR, CDS
12
4 -126
Grip control
1
27-128
Tyre under-inflation d ete c t i o n
17
2-173
Tyre pressures
1
72, 208, 251
Snow chains
2
14
Over view
Page 9 of 344
7
Instruments and controls (cont.)
Head-up display 147-148
Distance alert 1 49 -151
Lighting controls
7
7- 82
Direction indicators
1
23
Speed limiter
1
52-154
Cruise control
1
55 -157 Door mirrors
7
4
Electric windows, deactivating
5
2-53
Side switch panel
8
S
top & Start
1
69 -171
Headlamp beam height adjustment
8
4
Multifunction screens
3
1-39
-
S
creen A
-
S
creen C
-
1
6/9 colour screen
Retractable screen
4
0
Screen A (setting the date/time)
3
1-34
Wiper controls
8
6 -90
Trip computer
4
1- 44
Centre switch panel
8
H
azard warning lamps
1
23
Head-up display
1
47-148
Distance alert
1
49 -151 Ignition switch, starting-switching off
1
37-139
Panoramic sunroof
1
01-102
Grip control
1
27-128 Steering wheel adjustment
7
6
H or n
123
Instrument panels, screens
1
4-15
Warning lamps
1
6-26
Indicators
2
6-30
Gear shift indicator
1
68
Buttons
2
8, 30
-
s
ervice indicator / trip
distance recorder
- d
ashboard lighting dimmer
.
Over view
Page 69 of 344
67
Front seats with manual adjustments
Height
F Pull the control upwards to raise or push it downwards to lower, as many times as
required, to obtain the position required.
Backrest angle
F Push the control rearwards.
Forwards-backwards
F Raise the control and slide the seat forwards or backwards.
Seat consisting of a seat cushion, a seat back and a head restraint which can all be adjusted to adapt your position for ease of driving and comfort.
Before moving the seat backwards, ensure that there is nothing that might prevent the full travel of the seat, so as to avoid the risk of of
jamming the seat caused by the presence of objects on the floor behind the seat or rear passengers. If the seat jams, stop the movement
immediately.
3
Comfort
Page 71 of 344

69
The electric functions of the driver's
seat are active for approximately
one minute after opening the front door.
They are deactivated approximately
one
minute after the ignition is switched
off and in economy mode.
To reactivate them, switch on the ignition.
Before moving the seat backwards,
ensure that there is nothing that might
prevent the full travel of the seat, so
as to avoid the risk of of jamming the
seat caused by the presence of objects
on the floor behind the seat or rear
passengers. If the seat jams, stop the
movement immediately.
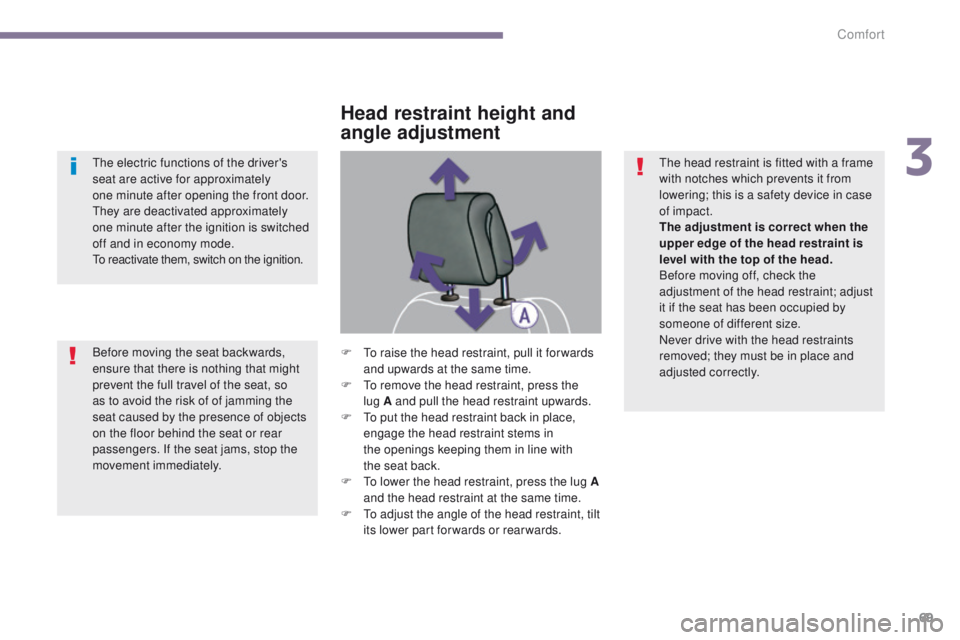
Head restraint height and
angle adjustment
F To raise the head restraint, pull it for wards and upwards at the same time.
F
T
o remove the head restraint, press the
lug
A and pull the head restraint upwards.
F
T
o put the head restraint back in place,
engage the head restraint stems in
the
openings keeping them in line with
the
seat back.
F
T
o lower the head restraint, press the lug A
and the head restraint at the same time.
F
T
o adjust the angle of the head restraint, tilt
its lower part forwards or rearwards. The head restraint is fitted with a frame
with notches which prevents it from
lowering; this is a safety device in case
of impact.
The adjustment is correct when the
upper edge of the head restraint is
level with the top of the head.
Before moving off, check the
adjustment of the head restraint; adjust
it if the seat has been occupied by
someone of different size.
Never drive with the head restraints
removed; they must be in place and
adjusted correctly.
3
Comfort
Page 78 of 344
76
Steering wheel adjustment
F When stationary, pull the control lever to
release the adjustment mechanism.
F
A
djust the height and reach to suit your
driving position.
F
P
ush the control lever to lock the
adjustment mechanism.
As a safety measure, these operations
should only be carried out with the
vehicle stationary.
Comfort
Page 86 of 344
84
Manual beam
adjustment of
halogen headlamps
To avoid causing a nuisance to other road
users, the beam height of the halogen
headlamps should be adjusted according to the
load in the vehicle.
0.
1 o
r 2 people in the front seats.
-.
3
people.
1.
5
people.
-.
I
ntermediate setting.
2.
5 p
eople + maximum authorised load.
-.
I
ntermediate setting.
3.
D
river + maximum authorised load.
Automatic beam
adjustment with
xenon headlamps
In order to avoid causing a nuisance to other
road users, this system corrects the height of the
xenon headlamps beam automatically and when
stationary, according to the load in the vehicle. If a fault occurs, this warning lamp is
displayed on the instrument panel,
accompanied by an audible signal
and a message in the multifunction screen.
The system then places your headlamps in the
lowest position.
The initial setting is position "0" .If a fault occurs, do not touch the xenon
bulbs. Contact a PEUGEOT dealer or a
qualified workshop.
Visibility
Page 131 of 344

129
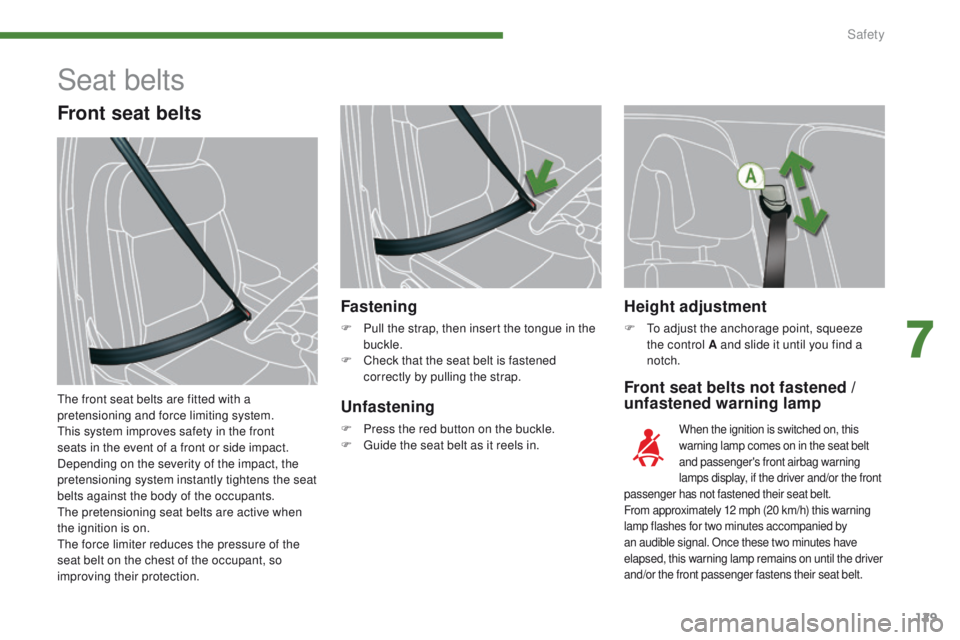
Height adjustment
F To adjust the anchorage point, squeeze the control A and slide it until you find a
notch.
Front seat belts not fastened /
unfastened warning lamp
Fastening
F Pull the strap, then insert the tongue in the
buckle.
F
C
heck that the seat belt is fastened
correctly by pulling the strap.
When the ignition is switched on, this
warning lamp comes on in the seat belt
and passenger's front airbag warning
lamps display, if the driver and/or the front
passenger has not fastened their seat belt.
From approximately 12 mph (20 km/h) this warning
lamp flashes for two minutes accompanied by
an audible signal. Once these two minutes have
elapsed, this warning lamp remains on until the driver
and/or the front passenger fastens their seat belt.
Unfastening
F Press the red button on the buckle.
F G uide the seat belt as it reels in.
Seat belts
Front seat belts
The front seat belts are fitted with a
pretensioning and force limiting system.
This system improves safety in the front
seats in the event of a front or side impact.
Depending on the severity of the impact, the
pretensioning system instantly tightens the seat
belts against the body of the occupants.
The pretensioning seat belts are active when
the ignition is on.
The force limiter reduces the pressure of the
seat belt on the chest of the occupant, so
improving their protection.
7
Safety
Page 149 of 344
147
System which projects various information onto
a transparent blade in the driver's field of vision
so that they do not have to take their eyes off
the road.
This system operates when the engine is
running and the settings are stored when the
ignition is switched off.
Head-up display
1. Head-up display on / off.
2. Br ightness adjustment.
3.
D
isplay height adjustment. Once the system has been activated, the
following information is grouped together in the
head-up display:
A.
T
he speed of your vehicle.
B.
C
ruise control/speed limiter information.
ButtonsDisplays during operation
C. "Distance alert" information (depending on
ve r s i o n).
The blade is activated by pressing one
of the buttons. D.
N
avigation information (depending on
ve r s i o n).
F
or more information on the navigation
system, refer to the "Audio equipment and
telematics" section.
8
Driving