2015 Peugeot 308 ad blue
[x] Cancel search: ad bluePage 29 of 344
27
Service indicator
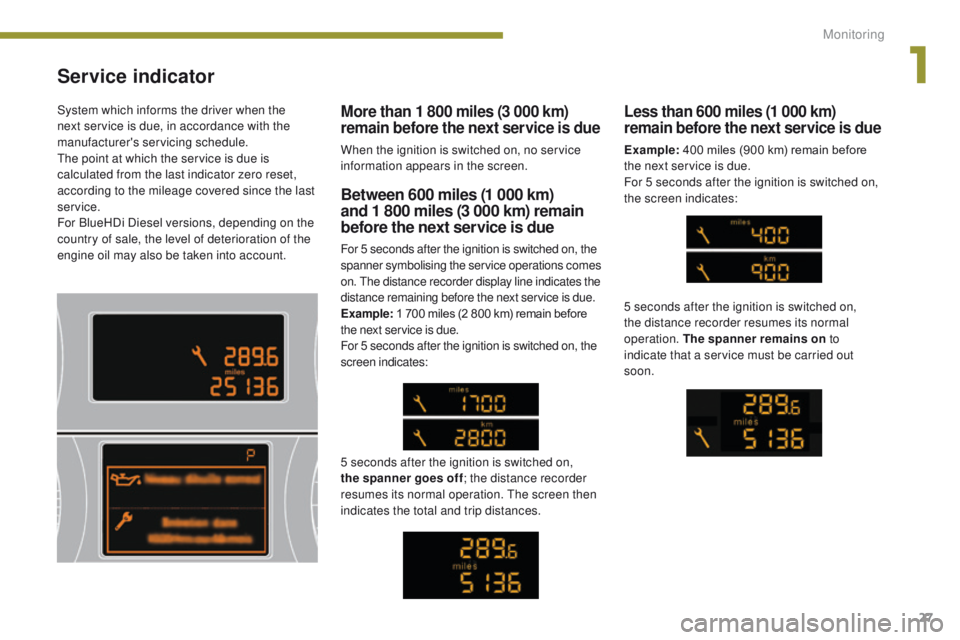
Between 600 miles (1 000 km)
and 1 800 miles (3 000 km) remain
before the next service is due
For 5 seconds after the ignition is switched on, the
spanner symbolising the service operations comes
on. The distance recorder display line indicates the
distance remaining before the next service is due.
Example: 1 700 miles (2 800 km) remain before
the next service is due.
For 5 seconds after the ignition is switched on, the
screen indicates:
5 seconds after the ignition is switched on,
the spanner goes off ; the distance recorder
resumes its normal operation. The screen then
indicates the total and trip distances.
Less than 600 miles (1 000 km)
remain before the next service is due
Example: 400 miles (900 km) remain before
the next service is due.
For 5 seconds after the ignition is switched on,
the screen indicates:
5 seconds after the ignition is switched on,
the distance recorder resumes its normal
operation. The spanner remains on to
indicate that a service must be carried out
soon.
More than 1 800 miles (3 000 km)
remain before the next service is due
When the ignition is switched on, no service
information appears in the screen.
System which informs the driver when the
next service is due, in accordance with the
manufacturer's servicing schedule.
The point at which the service is due is
calculated from the last indicator zero reset,
according to the mileage covered since the last
service.
For BlueHDi Diesel versions, depending on the
country of sale, the level of deterioration of the
engine oil may also be taken into account.
1
Monitoring
Page 30 of 344
28
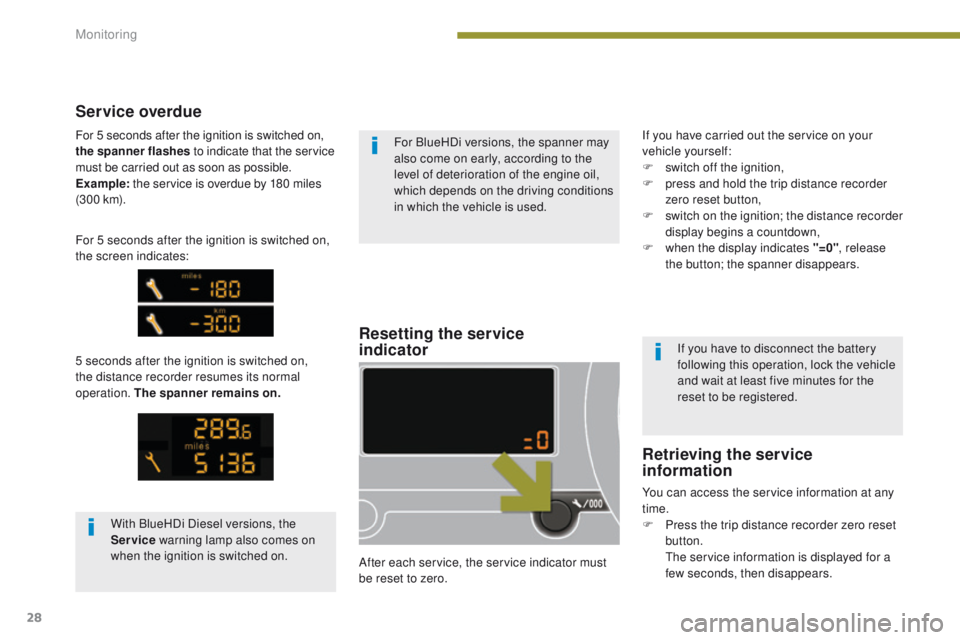
Resetting the service
indicator
After each service, the service indicator must
be reset to zero.
Service overdue
5 seconds after the ignition is switched on,
the distance recorder resumes its normal
operation. The spanner remains on.
Retrieving the service
information
You can access the service information at any
time.
F
P
ress the trip distance recorder zero reset
button.
T
he service information is displayed for a
few seconds, then disappears. If you have to disconnect the battery
following this operation, lock the vehicle
and wait at least five minutes for the
reset to be registered.
If you have carried out the service on your
vehicle yourself:
F
s
witch off the ignition,
F
p
ress and hold the trip distance recorder
zero reset button,
F
s
witch on the ignition; the distance recorder
display begins a countdown,
F
w
hen the display indicates "=0"
, release
the button; the spanner disappears.
For BlueHDi versions, the spanner may
also come on early, according to the
level of deterioration of the engine oil,
which depends on the driving conditions
in which the vehicle is used.
With BlueHDi Diesel versions, the
Service warning lamp also comes on
when the ignition is switched on.
For 5 seconds after the ignition is switched on,
the screen indicates: For 5 seconds after the ignition is switched on,
the spanner flashes
to indicate that the service
must be carried out as soon as possible.
Example: the service is overdue by 180 miles
(3 0 0 k m).
Monitoring
Page 37 of 344
35
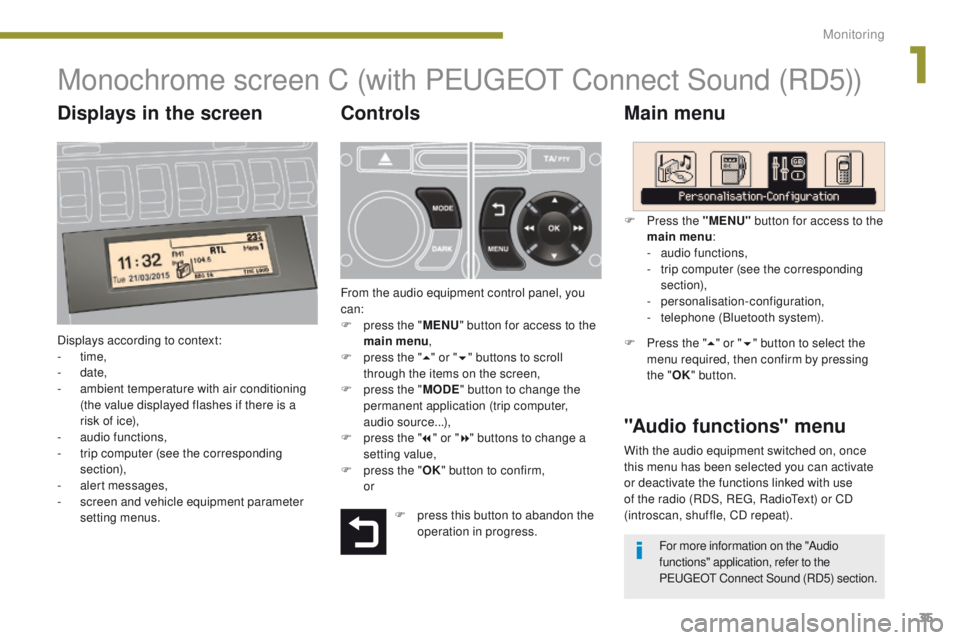
Monochrome screen C (with PEUGEOT Connect Sound (RD5))
Main menu
Displays according to context:
- time,
-
date,
-
a
mbient temperature with air conditioning
(the value displayed flashes if there is a
risk of ice),
-
a
udio functions,
-
t
rip computer (see the corresponding
section),
-
a
lert messages,
-
s
creen and vehicle equipment parameter
setting menus.
"Audio functions" menu
Controls
From the audio equipment control panel, you
can:
F
p
ress the " MENU" button for access to the
main menu ,
F
p
ress the " 5" or " 6" buttons to scroll
through the items on the screen,
F
p
ress the " MODE" button to change the
permanent application (trip computer,
audio source...),
F
p
ress the " 7" or " 8" buttons to change a
setting value,
F
p
ress the " OK" button to confirm,
or F
P
ress the "MENU"
button for access to the
main menu :
-
a
udio functions,
-
t
rip computer (see the corresponding
section),
- personalisation-configuration,
-
t
elephone (Bluetooth system).
F Press the "5" or " 6" button to select the
menu required, then confirm by pressing
the " OK" button.
With the audio equipment switched on, once
this menu has been selected you can activate
or deactivate the functions linked with use
of the radio (RDS, REG, RadioText) or CD
(introscan, shuffle, CD repeat).
F
p
ress this button to abandon the
operation in progress. For more information on the "Audio
functions" application, refer to the
PEUGEOT Connect Sound (RD5) section.
Displays in the screen
1
Monitoring
Page 39 of 344
37
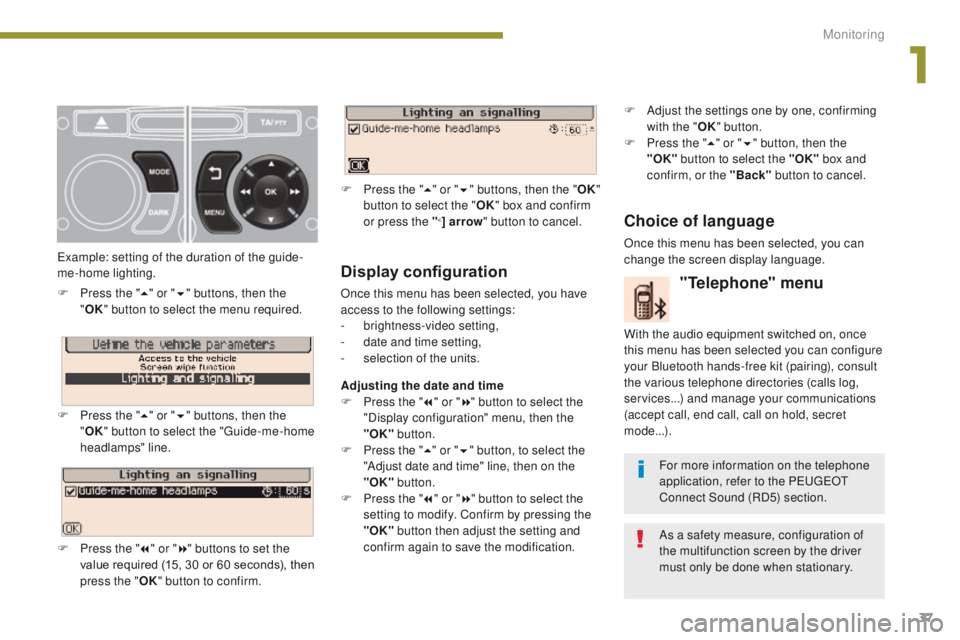
Display configuration
Once this menu has been selected, you have
access to the following settings:
-
b
rightness-video setting,
-
d
ate and time setting,
-
s
election of the units.
Adjusting the date and time
F
P
ress the " 7" or " 8" button to select the
"Display configuration" menu, then the
"OK" button.
F
P
ress the " 5" or " 6" button, to select the
"Adjust date and time" line, then on the
"OK" button.
F
P
ress the " 7" or " 8" button to select the
setting to modify. Confirm by pressing the
"OK"
button then adjust the setting and
confirm again to save the modification.
Example: setting of the duration of the guide-
me-home lighting.
F
P
ress the "
5" or " 6" buttons, then the
" OK "
button to select the menu required.
F
P
ress the " 5" or " 6" buttons, then the
" OK " button to select the "Guide-me-home
headlamps" line.
F
P
ress the " 7" or " 8" buttons to set the
value required (15, 30 or 60 seconds), then
press the " OK" button to confirm. F
P
ress the "
5" or " 6" buttons, then the " OK"
button to select the " OK" box and confirm
or press the "
<] arrow " button to cancel.
"Telephone" menu
With the audio equipment switched on, once
this menu has been selected you can configure
your Bluetooth hands-free kit (pairing), consult
the various telephone directories (calls log,
services...) and manage your communications
(accept call, end call, call on hold, secret
mode...).
For more information on the telephone
application, refer to the PEUGEOT
Connect Sound (RD5) section.
As a safety measure, configuration of
the multifunction screen by the driver
must only be done when stationary.
Choice of language
Once this menu has been selected, you can
change the screen display language. F
A
djust the settings one by one, confirming
with the " OK" button.
F
P
ress the "
5" or " 6" button, then the
"OK"
button to select the "OK"
box and
confirm, or the "Back" button to cancel.
1
Monitoring
Page 63 of 344
61
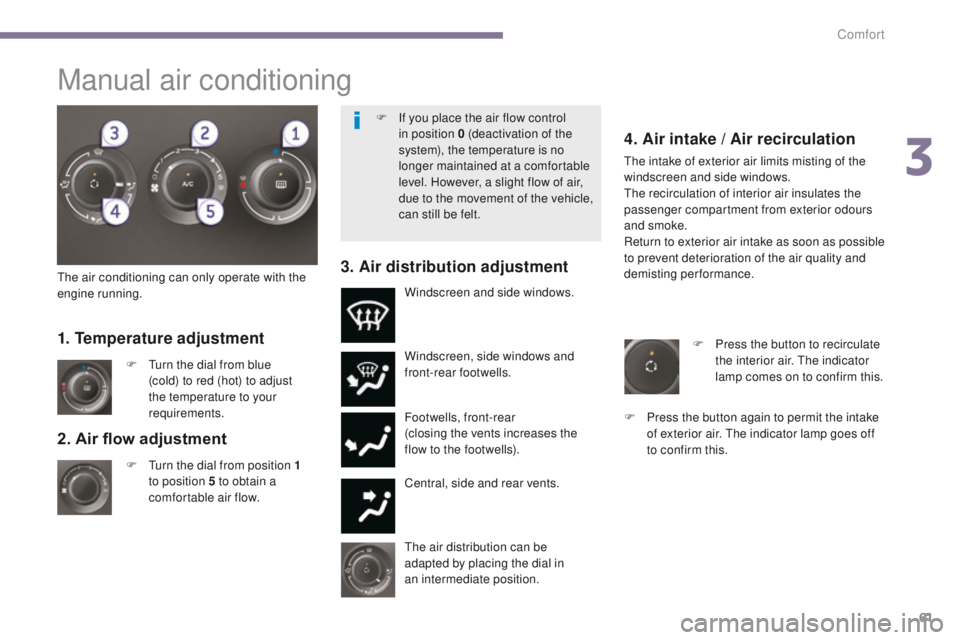
2. Air flow adjustment
F Turn the dial from position 1
to position 5 to obtain a
comfortable air flow. Windscreen, side windows and
front-rear footwells.
Footwells, front-rear
(closing the vents increases the
flow to the footwells).
Central, side and rear vents.
F
T
urn the dial from blue
(cold) to red (hot) to adjust
the temperature to your
requirements. Windscreen and side windows.
1. Temperature adjustment
The air distribution can be
adapted by placing the dial in
an
intermediate position.
The air conditioning can only operate with the
engine running.
4. Air intake / Air recirculation
The intake of exterior air limits misting of the
windscreen and side windows.
The recirculation of interior air insulates the
passenger compartment from exterior odours
and smoke.
Return to exterior air intake as soon as possible
to prevent deterioration of the air quality and
demisting performance.
3. Air distribution adjustment
F Press the button to recirculate
the interior air. The indicator
lamp comes on to confirm this.
F
P
ress the button again to permit the intake
of exterior air. The indicator lamp goes off
to confirm this.
Manual air conditioning
F If you place the air flow control in position 0 (deactivation of the
system), the temperature is no
longer maintained at a comfortable
level. However, a slight flow of air,
due to the movement of the vehicle,
can still be felt.
3
Comfort
Page 100 of 344
98
Rear multimedia
This multimedia system allows rear passengers
to connect one or two external portable
systems (audio or video player, games
consoles, DVD player...). The sound is played
through two Bluetooth
® wireless headphone
sets, while the video content is displayed in
two
7-inch screens built into the backs of the
front seat head restraints.
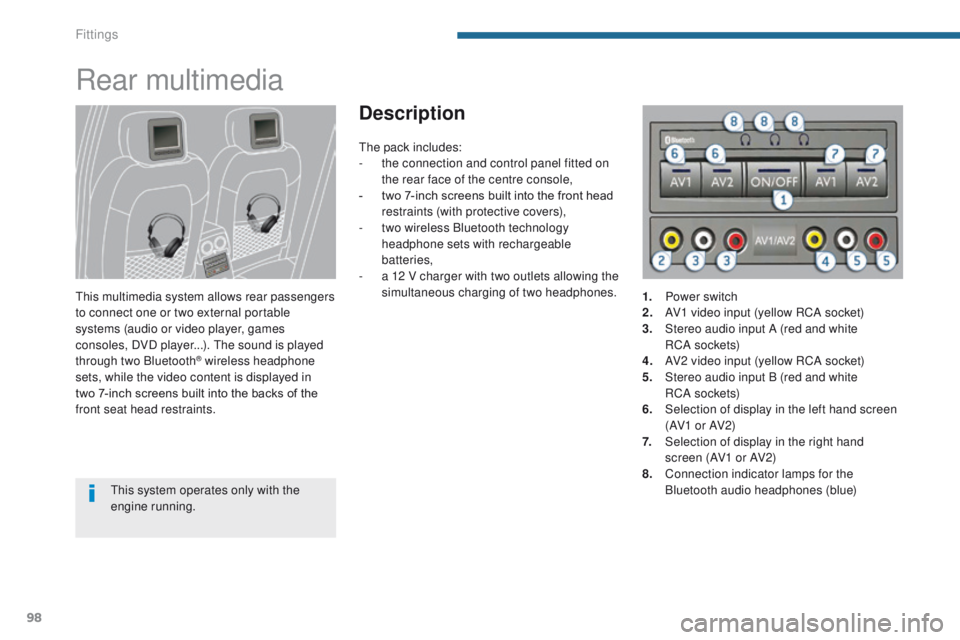
Description
This system operates only with the
engine running. The pack includes:
-
t
he connection and control panel fitted on
the rear face of the centre console,
-
t
wo 7-inch screens built into the front head
restraints (with protective covers),
-
t
wo wireless Bluetooth technology
headphone sets with rechargeable
batteries,
-
a 1
2 V charger with two outlets allowing the
simultaneous charging of two
headphones.
1.
P
ower switch
2.
A
V1 video input (yellow RCA socket)
3.
S
tereo audio input A (red and white
RC A s o c ket s)
4.
A
V2 video input (yellow RCA socket)
5.
S
tereo audio input B (red and white
RC A s o c ket s)
6.
S
election of display in the left hand screen
(AV1 o r AV2)
7.
S
election of display in the right hand
screen (AV1 or AV2)
8.
C
onnection indicator lamps for the
Bluetooth audio headphones (blue)
Fittings
Page 101 of 344
99
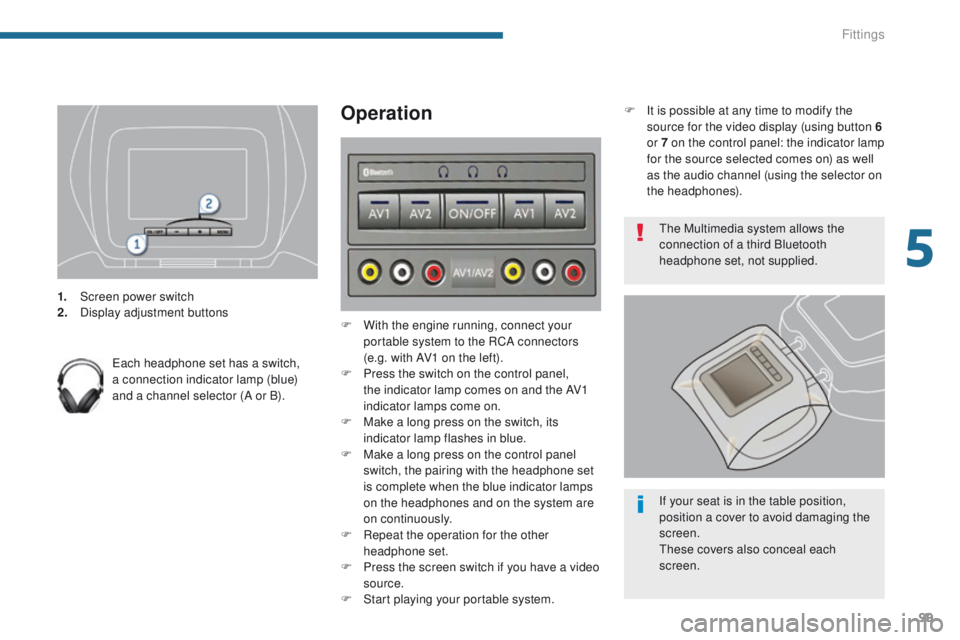
1. Screen power switch
2. Display adjustment buttons
Each headphone set has a switch,
a connection indicator lamp (blue)
and a channel selector (A or B).
Operation
F With the engine running, connect your portable system to the RCA connectors
(e.g. with AV1 on the left).
F
P
ress the switch on the control panel,
the indicator lamp comes on and the AV1
indicator lamps come on.
F
M
ake a long press on the switch, its
indicator lamp flashes in blue.
F
M
ake a long press on the control panel
switch, the pairing with the headphone set
is complete when the blue indicator lamps
on the headphones and on the system are
on continuously.
F
R
epeat the operation for the other
headphone set.
F
P
ress the screen switch if you have a video
source.
F
S
tart playing your portable system. The Multimedia system allows the
connection of a third Bluetooth
headphone set, not supplied.
If your seat is in the table position,
position a cover to avoid damaging the
screen.
These covers also conceal each
screen.
F
I
t is possible at any time to modify the
source for the video display (using button 6
or 7 on the control panel: the indicator lamp
for the source selected comes on) as well
as the audio channel (using the selector on
the headphones).
5
Fittings
Page 170 of 344
168
Gear shift indicator*
* Depending on engine.
The system adapts its gear change
recommendation according to the
driving conditions (slope, load, ...) and
the demands of the driver (power,
acceleration, braking, ...).
The system never suggests:
-
e
ngaging first gear,
-
enga
ging reverse gear.
System which reduces fuel consumption by
recommending the most appropriate gear.
Operation
Depending on the driving situation and your
vehicle's equipment, the system may advise
you to skip one (or more) gear(s). You can
follow this instruction without engaging the
intermediate gears.
The gear engagement recommendations must
not be considered compulsory. In fact, the
configuration of the road, the amount of traffic
and safety remain determining factors when
choosing the best gear. Therefore, the driver
remains responsible for deciding whether or not
to follow the advice given by the system.
This function cannot be deactivated.
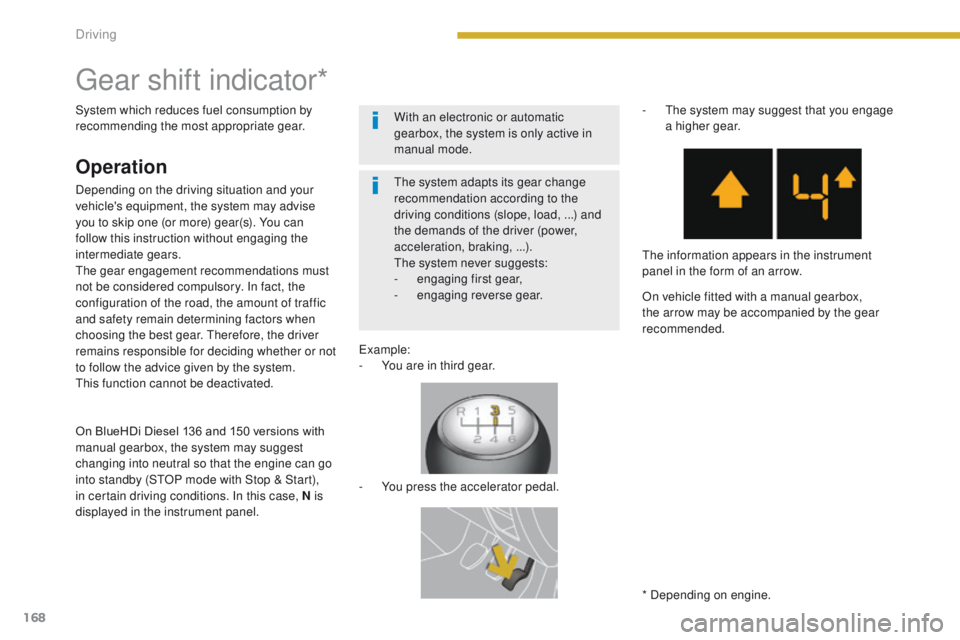
Example:
-
Y
ou are in third gear.
-
Y
ou press the accelerator pedal.-
T
he system may suggest that you engage
a higher gear.
The information appears in the instrument
panel in the form of an arrow.
On vehicle fitted with a manual gearbox,
the arrow may be accompanied by the gear
recommended.
With an electronic or automatic
gearbox, the system is only active in
manual mode.
On BlueHDi Diesel 136 and 150 versions with
manual gearbox, the system may suggest
changing into neutral so that the engine can go
into standby (STOP mode with Stop & Start),
in certain driving conditions. In this case, N is
displayed in the instrument panel.
Driving