Page 318 of 416

04
316
RADIO
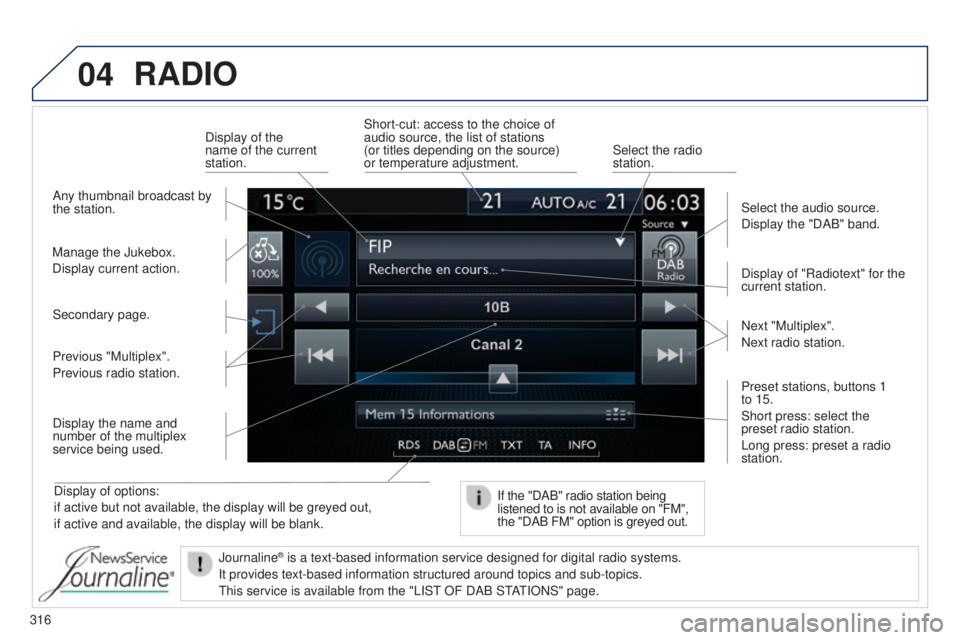
Display of options:
if active but not available, the display will be greyed out,
if active and available, the display will be blank.Display of "Radiotext" for the
current station.
Manage the Jukebox.
Display current action. Select the audio source.
Display the "DAB" band.
Display of the
name of the current
station.
Short-cut: access to the choice of
audio source, the list of stations
(or titles depending on the source)
or temperature adjustment.
Select the radio
station.
If the "DAB" radio station being
listened to is not available on "FM",
the "DAB FM" option is greyed out.
Any thumbnail broadcast by
the station.
Preset stations, buttons 1
to 15.
Short press: select the
preset radio station.
Long press: preset a radio
station. Next "Multiplex".
Next radio station.
Secondary page.
Display the name and
number of the multiplex
service being used. Previous "Multiplex".
Previous radio station.
Journaline
® is a text-based information service designed for digital radio systems.
It provides text-based information structured around topics and sub-topi\
cs.
t
his service is available from the "LIS t
OF DAB S
t
At
IONS" page.
Page 319 of 416

04
317
RADIO
If "DAB / FM auto tracking" is activated, there is a difference of a
few seconds when the system switches to "FM" analogue radio with
sometimes a variation in volume.
When the digital signal is restored, the system automatically
changes back to "DAB".
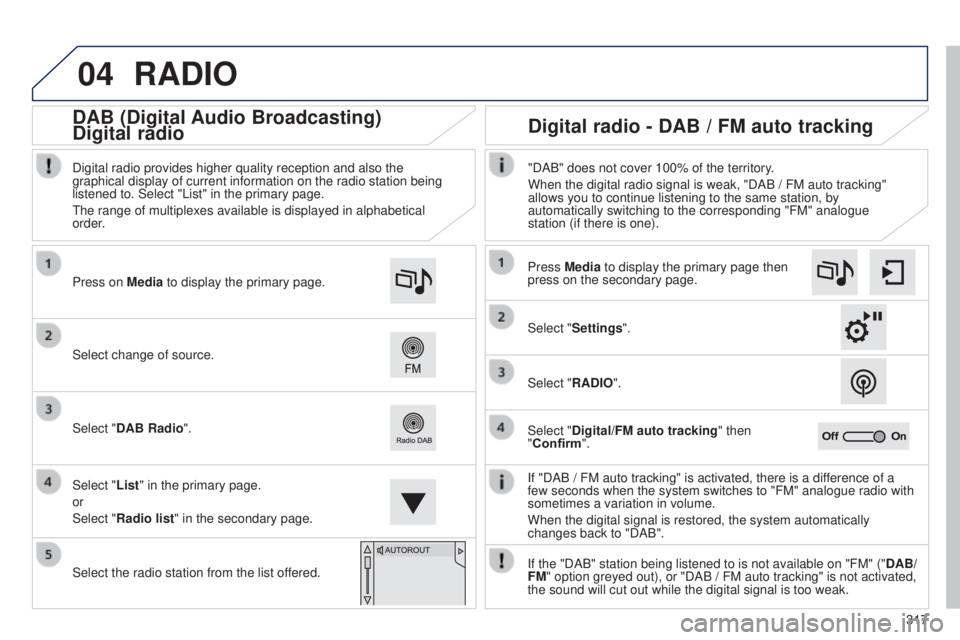
Select change of source. Press on
Media to display the primary page.
Select "DAB Radio".
Select "List" in the primary page.
or
Select "Radio list" in the secondary page.
Select the radio station from the list offered. Digital radio provides higher quality reception and also the
graphical display of current information on the radio station being
listened to. Select "List" in the primary page.
t
he range of multiplexes available is displayed in alphabetical
order.
Press Media to display the primary page then
press on the secondary page.
Select "Settings".
Select "RADIO".
Select "Digital/FM auto tracking" then
"Confirm". "DAB" does not cover 100% of the territory.
When the digital radio signal is weak, "DAB / FM auto tracking"
allows you to continue listening to the same station, by
automatically switching to the corresponding "FM" analogue
station (if there is one).
If the "DAB" station being listened to is not available on "FM" (" DAB/
FM" option greyed out), or "DAB / FM auto tracking" is not activated,
the sound will cut out while the digital signal is too weak.
Digital radio - DAB / FM auto tracking
DAB (Digital Audio Broadcasting)
Digital radio
Page 320 of 416

04
318
CD, MP3 CD, USB player, auxiliary input
Insert the CD in the player, insert the uSB
memory stick in the u SB player or connect the
u
SB peripheral to the u SB port using a suitable
cable (not supplied).
t
he system builds playlists (in temporary
memory), an operation which can take from
a few seconds to several minutes at the first
connection.
Reduce the number of non-music files and the
number of folders to reduce the waiting time.
t
he playlists are updated every time the ignition
is switched off or connection of a
u SB memory
stick. However, the system memorises these
lists and if they are not modified, the loading
time will be shorter. Selection of source
t
he steering mounted SRC (source) button can be used to go to the
next media source, available if the source is active.
Press OK to confirm the selection.
"CD / CD MP3"
"USB, iPod"
"Bluetooth (streaming)"
"Auxiliary"
"Radio" Select change of source then choose the
source. Press on Media to display the primary page.
MUSIC
Page 324 of 416
04
Using the auxiliary input (AUX)
(cable not supplied)
Connect the portable device (MP3 player…) to the auxiliary JACK
socket using an audio cable.
First adjust the volume of your portable device (to a high level).
t
hen adjust the volume of your audio system.
Display and management of the controls are via the portable device. Select change the source. Select Media to display the primary page.
Select the AUXILIARY source.
MUSIC
322
Page 325 of 416
04
323
Select "New folder" to create a folder structure
in the Jukebox or select "
Keep structure" to
retain the structure from the device. Select the magnifying glass to enter the folder
or album and select audio file by audio file.
Managing the Jukebox
Select "Media list". Connect the device (MP3 player...) to the u SB port or auxiliary JACK
socket using a suitable audio cable.
Select copy "Copy Jukebox".
MUSIC
When no audio file is copied to the system with a capacity of 8 GB,
all of the Jukebox function symbols are greyed and are not available.
Select "
Sort by folder" or "Sort by album ". Select "Confirm" then "Copy".
While copying the system returns to the primary
page; you can go back to the copy view at any
time by selecting this button.
Page 326 of 416
05NAVIGATION
Level 1Level 2 Level 3
"Navigation"
Primary page Route settings
Navigation
324
Page 328 of 416
05
326
to use the telephone functions,
refer to the "Communications"
section. For managing contacts and
their addresses, refer to the
"Communications" section.
NAVIGATION
Search for a point of interestNavigation Address
Enter destination
Contacts
Point of interest displayed on the map
Level 1Level 2 Level 3
"Navigation"
Secondary page
Search for a POI by name
Page 329 of 416
327
308_en_Chap10c_SMegplus_ed01-2015
Level 1Level 2 Level 3 Comments
Navigation
Secondary page
Enter destination Address
Curr. location
Address settingsPoints of Interest
town centre
Save
Save the current address.
Add waypointAdd a waypoint to the route.
Navigate toPress to calculate the route.
Contacts AddressesSelect a contact then calculate the route.
Add contact
Add waypoint
Search for contact
Navigate to
From map
Display the map and zoom to view the roads.
ItineraryCreate, add or delete a waypoint or view the itinerary.
StopDelete navigation information.
Navigate toPress to calculate the route.
Navigation
Secondary page Search for POI All POIsList of categories available.
After choosing the category, select the points of interest.Garage
Dining/hotels
Personal
By name
Search
Save the settings.
Navigation
Secondary page Show POIs Select all
Choose the display settings for POIs.Delete
Import POIs
Confirm
Save the options.